React生命周期, 兄弟组件之间通信
1、一个demo(https://www.reactjscn.com/docs/state-and-lifecycle.html)
class Clock extends React.Component {

    constructor(props) {

      super(props);

      this.state = {date: new Date()};

    }

    componentDidMount() {

      this.timerID = setInterval(

        () => this.tick(),

        1000

      );

    }

    componentWillUnmount() {

      clearInterval(this.timerID);

    }

    tick() {

      this.setState({

        date: new Date()

      });

    }

    render() {

      return (

        <div>

          <h1>Hello, world!</h1>

          <h2>It is {this.state.date.toLocaleTimeString()}.</h2>

        </div>

      );

    }

  }

  ReactDOM.render(

    <Clock />,

    document.getElementById('root')

  );
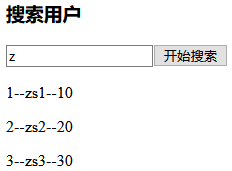
2、demo: 兄弟组件之间通信,使用到生命周期钩子componentWillReceiveProps
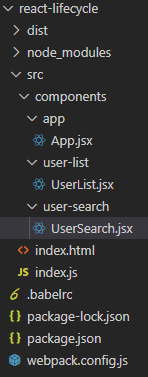
项目结构:
demo效果:“搜索组件”传递keyword参数给父组件,然后父组件将keyword参数传递给“显示子组件”
App.jsx
import React from 'react'

import UserSearch from '../user-search/UserSearch.jsx'

import UserList from '../user-list/UserList.jsx'

export default class App extends React.Component {

    constructor(props) {

        super(props)

        this.state = {

            keyword: ''

        }

        this.setKeyword = this.setKeyword.bind(this)

    }

    setKeyword(keyword) {

        console.log(`App组件setKeyword被调用, keyword=${keyword}`)

        this.setState({ keyword })

    }

    render() {

        return (

            <div>

                <UserSearch setKeyword={this.setKeyword} />

                <UserList keyword={this.state.keyword} />

            </div>

        )

    }

}
UserSearch.jsx
import React from 'react'

import PropTypes from 'prop-types'

export default class UserSearch extends React.Component {

    state = {

        keyword: ''

    }

    static propTypes = {

        setKeyword: PropTypes.func.isRequired

    }

    render() {

        const { keyword} = this.state

        return (

            <div>

                <h3>搜索用户</h3>

                <input type="text" placeholder="请输入搜索关键字" name="keyword" value={keyword} onChange={(e) => this.keywordInputOnChangeHandler(e)} />

                <input type="button" value="开始搜索" onClick={() => this.searchClickHandler()} />

            </div>

        )

    }

    keywordInputOnChangeHandler = (e) => {

        const keyword = e.target.value

        this.setState({ keyword })

    }

    searchClickHandler = () => {

        const { keyword } = this.state

        console.log(`keyword.trim()=${keyword.trim()}`)

        if (!keyword.trim()) return

        this.props.setKeyword(keyword)

    }

}
UserList.jsx
import React from 'react'

import PropTypes from 'prop-types'

import Axios from 'axios'

export default class UserList extends React.Component {

    state = {

        userList: []

    }

    componentWillReceiveProps(newProps) {

        const { keyword } = newProps

        Axios.get(`http://localhost:4000/react-db-crud/user/search?keyword=${keyword}`)

            .then(res => {

                if (res.data.code == 0) {

                    const userList = res.data.data

                    console.log(`userList=${JSON.stringify(userList)}`)

                    this.setState({ userList })

                }

            })

    }

    render() {

        return (

            <div>

                {

                    this.state.userList.map(user => <p>{user.id + "--" + user.name + "--" + user.age}</p>)

                }

            </div>

        )

    }

}

UserList.propTypes = {

    keyword: PropTypes.string.isRequired

}
React生命周期, 兄弟组件之间通信的更多相关文章
- react复习总结(2)--react生命周期和组件通信
这是react项目复习总结第二讲, 第一讲:https://www.cnblogs.com/wuhairui/p/10367620.html 首先我们来学习下react的生命周期(钩子)函数. 什么是 ...
- 在npm Vue单页面的环境下,兄弟组件之间通信Bus
参考1:https://www.cnblogs.com/wangruifang/p/7772631.html 参考2:https://www.jianshu.com/p/b3d09c6c87bf 在m ...
- react生命周期和组件生命周期
React的组件在第一次挂在的时候首先获取父组件传递的props,接着获取初始的state值,接着经历挂载阶段的三个生命周期函数,也就是ComponentWillMount,render,Compon ...
- vue工程利用pubsub-js实现兄弟组件之间的通信
前言 项目是基于vue-cli创建的,不会搭建vue开发环境的同学可以百度,这里不再赘述. 步骤流程 vue项目搭建完成之后的文件图如下: 我的上一篇博客已经详细叙述vue工程中各个文件的作用,不清楚 ...
- React 组件之间通信 All in One
React 组件之间通信 All in One 组件间通信 1. 父子组件之间通信 props 2. 兄弟组件之间通信 3. 跨多层级的组件之间通信 Context API https://react ...
- Vue 组件之间通信 All in One
Vue 组件之间通信 All in One 组件间通信 1. 父子组件之间通信 https://stackblitz.com/edit/vue-parent-child-commutation?fil ...
- React中组件之间通信的方式
一.是什么 我们将组件间通信可以拆分为两个词: 组件 通信 回顾Vue系列的文章,组件是vue中最强大的功能之一,同样组件化是React的核心思想 相比vue,React的组件更加灵活和多样,按照不同 ...
- 使用EventBus实现兄弟组件之间的通信
使用EventBus实现兄弟组件之间的通信 需求:为了实现菜单折叠的效果,例如http://blog.gdfengshuo.com/example/work/#/dashboard header组件和 ...
- Vue2.0父子组件之间和兄弟组件之间的数据交互
熟悉了Vue.js的同级组件之间通信,写此文章,以便记录. Vue是一个轻量级的渐进式框架,对于它的一些特性和优点,请在官网上进行查看,不再赘述. 使用NPM及相关命令行工具初始化的Vue工程,目录结 ...
随机推荐
- dede添加自定义变量不显示
dedecms前端无法调用自定义变量要怎么解决,登录他的网站后台看了一下,自定义变量已经添加了,也写入了数据库表中,但是就是前台没办法调用出来,后面想想可能是文件权限不够,具体是哪个文件呢?查了相关文 ...
- 用python打开文件夹的三种方式
一.利用explorer.exe import os # 利用explorer.exe执行 start_directory = r'C:\代码\软件包' os.system("explore ...
- 第十章 ZYNQ-MIZ701 DDR3 PS读写操作方案
本编文章的目的主要用简明的方法在纯PS里对DDR3进行读写. 本文所使用的开发板是Miz701 PC 开发环境版本:Vivado 2015.4 Xilinx SDK 2015.4 10.0本章难度 ...
- Django(一)安装启动
Django下载/启动 1.下载安装 pip install django 或者 压缩文件下载地址:https://github.com/django/django/releases python s ...
- 复习最短路 spfa+dijstra堆优化
题目很简单,, 但是wa了三次,, 用<vector>之前一定要记得clear()...简单说下 spfa的问题 和bell_forman有点类似 每次取出一个点 然后更新 并把更新了的节 ...
- ubuntu中安装字体雅黑和consolas
Ubuntu的群体里偏向使用雅黑,我目前用的YaHei.Consolas 1.11 版本 (雅黑-Consolas的混合体) http://www.netmako.com/RobertLee/YaHe ...
- 9. Java分支语句之if...else
if...else条件语句 一个if语句包含一个布尔表达式和一条或者多条语句. 语法运用有三种 //第一种 if(布尔表达式){ //如果布尔表达式为true将执行的语句 } //第二种 if(布尔表 ...
- QT开发小技巧-窗口处理(一)
this->setWindowFlags(Qt::WindowCloseButtonHint); // 仅保留关闭按钮 this->setAttribute(Qt::WA_DeleteOn ...
- 【小知识点】input输入框在安卓以及IOS手机中光标及字体不居中解决方法
问题根本:不要使用line-height垂直居中. 解决方法:可直接定义height,然后高度由上下padding值撑开. input { height: 1rem; padding: 1rem 0; ...
- ubuntu安装交叉编译器
# sudo apt-get install gcc-arm-linux-gnueabi # sudo apt-get install g++-arm-linux-gnueabi 官方下载 https ...