iOS CGContextRef/UIBezierPath(绘图)
绘图的底层实现方法
注意:在drawRect方法中系统会默认创建一个上下文(C语言类型)在其他方法中不会有这样一个上下文(可以自己测试)
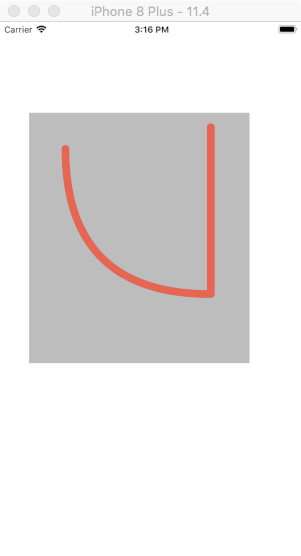
@implementation DrawView

//注意,在drawRect方法中系统会默认创建一个上下文(C语言类型)

//在其他方法中不会有这样一个上下文(可以自己测试)

//下面这个方法中的rect参数会传入当前view的frame

- (void)drawRect:(CGRect)rect{

    //获取上下文

    CGContextRef ctx = UIGraphicsGetCurrentContext();

    //或者绘图路径对象(可以了理解为画笔)

    UIBezierPath *bezierPath = [UIBezierPath bezierPath];

    //绘图

    [bezierPath moveToPoint:CGPointMake(50, 50)];

    //通过控制点(ControlPoint来改变直线的弧度)

    [bezierPath addQuadCurveToPoint:CGPointMake(250, 250) controlPoint:CGPointMake(50, 250)];

    [bezierPath addLineToPoint:CGPointMake(250, 20)];

/**********设置上下文的状态***********/

    CGContextSetLineWidth(ctx, 10);

    CGContextSetLineJoin(ctx, kCGLineJoinRound);

    CGContextSetLineCap(ctx, kCGLineCapRound);

    //改变路径颜色

    [[UIColor redColor] setStroke];

/***********************************/

    //把路径添加到上下文

    CGContextAddPath(ctx, bezierPath.CGPath);

    //渲染上下文(layer)

    CGContextStrokePath(ctx);

}

@end
效果图:
绘制图片(简易)
- (void)drawRect:(CGRect)rect{

    UIBezierPath *path = [UIBezierPath bezierPathWithRect:CGRectMake(50, 50, 150, 150)];

    [[UIColor redColor] setStroke];

    [path setLineWidth:10];

    [[UIColor yellowColor] setFill];

    //fill和stroke必须在绘图的最后一步进行

    [path stroke];

    [path fill];

}
效果图:

绘图三
- (void)drawRect:(CGRect)rect{

    //绘制扇形

    CGPoint center = CGPointMake(rect.size.width*0.5, rect.size.height*0.5);

    /*arcCenter:扇形圆心

     *radius:半径

     *clockWise:YES(逆时针),NO(顺时针)

     */

    //注意不能位self.center作为扇形的圆形:self.center是以screen的左上角位坐标原点进行绘图

    UIBezierPath *path = [UIBezierPath bezierPathWithArcCenter:center radius:100 startAngle:0 endAngle:M_PI_2 clockwise:YES];

    [path addLineToPoint:center];

    [path closePath];

    [path setLineWidth:10];

    [[UIColor redColor] setStroke];

    [[UIColor yellowColor] setFill];

    [path stroke];

    [path fill];

    //fill方法中,有进行路径的自动关闭,使用了fill有时候可以不使用closePath

}
效果图:

绘图三
注意
[self setNeedsDisplay];可以重制绘图内容,刷新UI
//ViewController Slider方法

- (IBAction)progressValue:(UISlider *)sender {

    NSString *progress = [NSString stringWithFormat:@"%.2f%%",sender.value *100];

    self.progressLabel.text = progress;

    self.drawView.progressValue = sender.value;

    [self.drawView drawRect:self.drawView.frame];

}

//drawView中的方法

- (void)setProgressValue:(CGFloat)progressValue{

    _progressValue = progressValue;

    [self setNeedsDisplay];

}

- (void)drawRect:(CGRect)rect{

    CGPoint center = CGPointMake(rect.size.width*0.5, rect.size.height*0.5);

    CGFloat angle = self.progressValue*M_PI*2;

    CGFloat endAngle = angle - M_PI_2;

    UIBezierPath *path = [UIBezierPath bezierPathWithArcCenter:center radius:rect.size.width*0.5 startAngle:-M_PI_2 endAngle:endAngle clockwise:YES];

    [path setLineWidth:10];

    [[UIColor redColor] setStroke];

    [path stroke];

}
效果图:

绘图四 饼图
@implementation DrawView

- (void)drawRect:(CGRect)rect {

    //模拟获取数据

    NSArray *numberArr = @[@20,@30,@50,@70];

    CGFloat total = 0;

    CGPoint center = CGPointMake(rect.size.width*0.5, rect.size.width*0.5);

    CGFloat radius = rect.size.width*0.5-10;

    for(NSNumber *number in numberArr){

        total += number.doubleValue;

    }

    CGFloat startAngel = 0;

    for(NSNumber *number in numberArr){

        CGFloat numberValue = number.doubleValue / total *M_PI *2;

        [self drawRadiusWith:center WithRadius:radius withStartAngle:startAngel wihtNumber:(CGFloat)numberValue];

        startAngel += numberValue;

    }

}

- (void)drawRadiusWith:(CGPoint)center WithRadius:(CGFloat)radius withStartAngle:(CGFloat)startAngle wihtNumber:(CGFloat)number{

    CGFloat endAngle = startAngle + number;

    UIBezierPath *path = [UIBezierPath bezierPathWithArcCenter:center radius:radius startAngle:startAngle endAngle:endAngle clockwise:YES];

    [path setLineWidth:5];

     [path addLineToPoint:center];

    [[self randomColor] setFill];

    [path fill];

}

//设置随机颜色

- (UIColor *)randomColor{

    CGFloat red = arc4random_uniform(256) / 255.0;

    CGFloat blue = arc4random_uniform(256) / 255.0;

    CGFloat yellow = arc4random_uniform(256) / 255.0;

    return [UIColor colorWithRed:red green:blue blue:yellow alpha:1.0];

}

- (void)touchesBegan:(NSSet<UITouch *> *)touches withEvent:(UIEvent *)event{

    [self setNeedsDisplay];

}

@end
效果图:
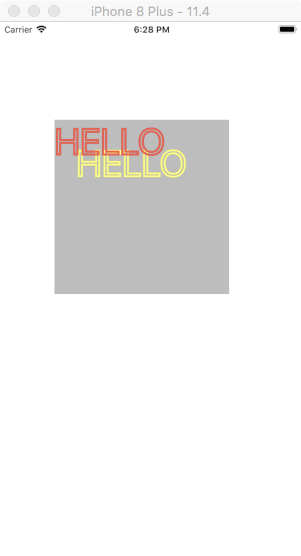
绘文字
- (void)drawRect:(CGRect)rect {

    NSString *str = @"HELLO";

    NSMutableDictionary *mutableDict = [NSMutableDictionary dictionary];

    mutableDict[NSFontAttributeName] = [UIFont systemFontOfSize:50];

    mutableDict[NSForegroundColorAttributeName]  = [UIColor blueColor];

    mutableDict[NSStrokeColorAttributeName] = [UIColor redColor];

    mutableDict[NSStrokeWidthAttributeName]  = @5;

    NSShadow *shadow = [[NSShadow alloc] init];

    shadow.shadowOffset = CGSizeMake(30, 30);

    shadow.shadowColor = [UIColor yellowColor];

    mutableDict[NSShadowAttributeName] = shadow;

    //drawInRect 会匹配内容,绘图适配

    [str drawInRect:rect withAttributes:mutableDict];

}
效果图:
绘图/UIImage/裁剪
- (void)drawRect:(CGRect)rect {

    UIImage *image = [UIImage imageNamed:@"folder"];

    //这是裁剪区域一定要在绘图前进行设置

    UIRectClip(CGRectMake(50, 50, 50, 50));

    [image drawAsPatternInRect:rect];

}
效果图:

不再DrawRect中开启位图上下文
注意关闭上下文
- (void)viewDidLoad {

    [super viewDidLoad];

    UIImage *image = [UIImage imageNamed:@"folder"];

    //1.开启一个跟图片原始大小的上下文

    //第二个参数opaque:不透明度

    UIGraphicsBeginImageContextWithOptions(image.size, NO, 0);

    //2.把图片绘制到上下文中

    [image drawAtPoint:CGPointZero];

    //3.把文字绘制到上下文当中

    NSString *str = @"HELLO";

    [str drawAtPoint:CGPointMake(10, 20) withAttributes:nil];

    //4.把上下文中的所有内容绘制成一张图片

    UIImage *newImage = UIGraphicsGetImageFromCurrentImageContext();

    //5.手动关闭上下文

    UIGraphicsEndImageContext();

    self.imageView.image = newImage;

}

@end
效果图类似于微博中的水印
iOS CGContextRef/UIBezierPath(绘图)的更多相关文章
- iOS 之UIBezierPath
代码地址如下:http://www.demodashi.com/demo/11602.html 在之前的文章中,由于用到过UIBezierPath这个类,所以这里就对这个类进行简单的记录一下,方便自己 ...
- (转)IOS开发之——绘图(CGContext)
周刊 更多 登录 IOS开发之——绘图(CGContext) 时间 2014-04-21 09:17:43 CSDN博客 原文 http://blog.csdn.net/zhenyu521131 ...
- iOS:quartz2D绘图
Quartz-2D:绘图 一.介绍: •Quartz 2D是一个二维图形绘制引擎,支持iOS环境和Mac OS X环境 •Quartz 2D API可以实现许多功能,如基于路径的绘图.透明度.阴影 ...
- iOS - 用 UIBezierPath 实现果冻效果
最近在网上看到一个很酷的下拉刷新效果(http://iostuts.io/2015/10/17/elastic-bounce-using-uibezierpath-and-pan-gesture/). ...
- iOS 使用UIBezierPath类实现随手画画板
在上一篇文章中我介绍了 UIBezierPath类 介绍 ,下面这篇文章介绍一下如何通过这个类实现一个简单的随手画画板的简单程序demo,功能包括:划线(可以调整线条粗细,颜色),撤销笔画,回撤笔画, ...
- [iOS Animation]-CALayer 绘图效率
绘图 不必要的效率考虑往往是性能问题的万恶之源. ——William Allan Wulf 在第12章『速度的曲率』我们学习如何用Instruments来诊断Core Animation性能问题.在构 ...
- IOS中的绘图Quartz2D
drawRect 方法的使用 常见图形的绘制:线条.多边形.圆 绘图状态的设置:文字颜色.线宽等 图形上下文状态的保存与恢复 图形上下文栈 Quartz 2D是一个二维绘图引擎,同时支持IOS和MAC ...
- IOS开发之——绘图(CGContext)
0 CGContextRef context = UIGraphicsGetCurrentContext(); 设置上下文 1 CGContextMoveToPoint 开始画线 2 CGContex ...
- iOS CGContextRef画图时的常用方法
UIView的drawRect方法 CoreGraphics绘图 综述:描述系统会调用UIView的drawRect方法,所以coreGraphics的所有实现代码放在该函数内,setNeedsDis ...
随机推荐
- nginx调优(二)
nginx调优(一) (1).Fastcgi调优 FastCGI全称快速通用网关接口(FastCommonGatewayInterface),可以认为FastCGI是静态服务和动态服务的一个接口.Fa ...
- clientHeight,offsetHeight,scrollHeight迷一样的三个值
https://blog.csdn.net/qq_39083004/article/details/78498178 https://www.imooc.com/article/17571 推荐 o ...
- jquery获取复选框checkbox的值
jQuery API : each(callback) :以每一个匹配的元素作为上下文来执行一个函数. :checked :匹配所有选中的被选中元素(复选框.单选框等,不包括select中的optio ...
- git 操作说明
第一步:代码提交到本地仓库 第二步:更新远程服务器代码到本地,如果有冲突需要优先解决,解决冲突后执行第一步操作 第三步:推送本地代码到远程服务器,可以使用source Tree 或者工具自带的配置gi ...
- web端自动化——Python读取txt文件、csv文件、xml文件
1.读取txt文件 txt文件是我们经常操作的文件类型,Python提供了以下几种读取txt文件的方式. 1)read(): 读取整个文件. 2)readline(): 读取一行数据. 3)readl ...
- face_code业务信息不匹配
face_code业务信息不匹配 检查获取 face code时的 appid, mch_id,out_trade_no以及可选的sub_mch_id , 与 face pay 时是否一致.
- consul(一)什么是consul
1. consul的基本介绍 在分布式架构中,服务治理是一个重要的问题.在没有服务治理的分布式集群中,各个服务之间通过手工或者配置的方式进行服务关系管理,遇到服务关系变化或者增加服务的时候,人肉配置极 ...
- springboot的mapper.xml在src下问题
在pom.xml里面的build标签加上resources说明 <resources> <!-- mapper.xml文件在java目录下 --> <resource&g ...
- Linux下go环境搭建
一:先从https://golang.google.cn/dl/下载,我这边下载的是go1.13.3.linux-amd64.tar.gz: 二:将压缩包解压后得到go目录,将go目录移动到/usr/ ...
- Spring @Transactional 事务机制
几个概念要清楚:事务的传播机制,事务的边界 工作原理 运行配置@Transactional注解的测试类的时候,具体会发生如下步骤 1)事务开始时,通过AOP机制,生成一个代理connection对象, ...