
opencv 检测人脸、人眼
This tutorial code’s is shown lines below. You can also download it from here . The second version (using LBP for face detection) can be found here
 #include "opencv2/objdetect/objdetect.hpp"

 #include "opencv2/highgui/highgui.hpp"

 #include "opencv2/imgproc/imgproc.hpp"

 #include <iostream>

 #include <stdio.h>

 using namespace std;

 using namespace cv;

 /** Function Headers */

 void detectAndDisplay( Mat frame );

 /** Global variables */

 String face_cascade_name = "haarcascade_frontalface_alt.xml";

 String eyes_cascade_name = "haarcascade_eye_tree_eyeglasses.xml";

 CascadeClassifier face_cascade;

 CascadeClassifier eyes_cascade;

 string window_name = "Capture - Face detection";

 RNG rng();

 /** @function main */

 int main( int argc, const char** argv )

 {

   CvCapture* capture;

   Mat frame;

   //-- 1. Load the cascades

   if( !face_cascade.load( face_cascade_name ) ){ printf("--(!)Error loading\n"); return -; };

   if( !eyes_cascade.load( eyes_cascade_name ) ){ printf("--(!)Error loading\n"); return -; };

   //-- 2. Read the video stream

   capture = cvCaptureFromCAM( - );

   if( capture )

   {

     while( true )

     {

   frame = cvQueryFrame( capture );

   //-- 3. Apply the classifier to the frame

       if( !frame.empty() )

       { detectAndDisplay( frame ); }

       else

       { printf(" --(!) No captured frame -- Break!"); break; }

       int c = waitKey();

       if( (char)c == 'c' ) { break; }

      }

   }

   return ;

 }

/** @function detectAndDisplay */

void detectAndDisplay( Mat frame )

{

  std::vector<Rect> faces;

  Mat frame_gray;

  cvtColor( frame, frame_gray, CV_BGR2GRAY );

  equalizeHist( frame_gray, frame_gray );

  //-- Detect faces

  face_cascade.detectMultiScale( frame_gray, faces, 1.1, , |CV_HAAR_SCALE_IMAGE, Size(, ) );

  for( size_t i = ; i < faces.size(); i++ )

  {

    Point center( faces[i].x + faces[i].width*0.5, faces[i].y + faces[i].height*0.5 );

    ellipse( frame, center, Size( faces[i].width*0.5, faces[i].height*0.5), , , , Scalar( , ,  ), , ,  );

    Mat faceROI = frame_gray( faces[i] );

    std::vector<Rect> eyes;

    //-- In each face, detect eyes

    eyes_cascade.detectMultiScale( faceROI, eyes, 1.1, ,  |CV_HAAR_SCALE_IMAGE, Size(, ) );

    for( size_t j = ; j < eyes.size(); j++ )

     {

       Point center( faces[i].x + eyes[j].x + eyes[j].width*0.5, faces[i].y + eyes[j].y + eyes[j].height*0.5 );

       int radius = cvRound( (eyes[j].width + eyes[j].height)*0.25 );

       circle( frame, center, radius, Scalar( , ,  ), , ,  );

     }

  }

  //-- Show what you got

  imshow( window_name, frame );

 }
Explanation
Result
Here is the result of running the code above and using as input the video stream of a build-in webcam:
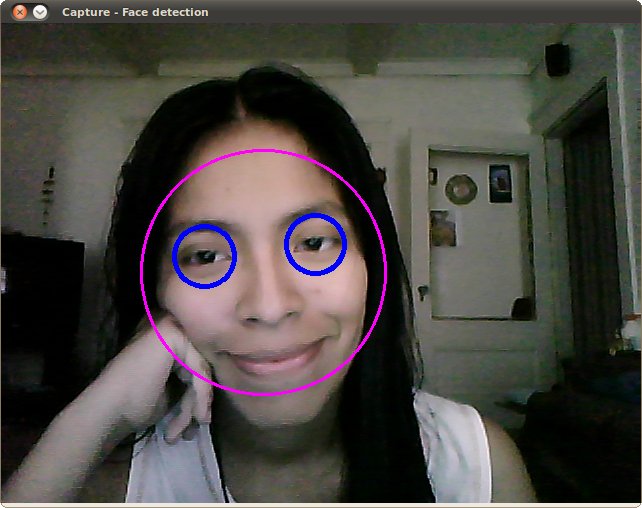
Remember to copy the files haarcascade_frontalface_alt.xml and haarcascade_eye_tree_eyeglasses.xml in your current directory. They are located in opencv/data/haarcascades
This is the result of using the file lbpcascade_frontalface.xml (LBP trained) for the face detection. For the eyes we keep using the file used in the tutorial.
opencv 检测人脸、人眼的更多相关文章
- SmileyFace——基于OpenCV的人脸人眼检测、面部识别程序
项目地址 https://github.com/guoyaohua/SmileyFace 开发环境 Visual Studio 2010 MFC + OpenCV 功能描述 静态图像人脸检测 视频人脸 ...
- OpenCV检测人脸实例代码
下面是使用OpenCV通过在硬盘中读入图像来对其进行Haar人脸检测的代码. //包含头文件 #include <opencv2/core/core.hpp> #include " ...
- 用opencv检测人眼并定位瞳孔位置
最近的研究要用到定位瞳孔的位置,所以上网搜了下相关的代码.总结如下: 1) 定位瞳孔可以直接使用opencv中的自带的分类器(haarcascade_eye_tree_eyeglasses.xml)来 ...
- OpenCV&Qt学习之四——OpenCV 实现人脸检测与相关知识整理
开发配置 OpenCV的例程中已经带有了人脸检测的例程,位置在:OpenCV\samples\facedetect.cpp文件,OpenCV的安装与这个例子的测试可以参考我之前的博文Linux 下编译 ...
- Python学习--使用dlib、opencv进行人脸检测标注
参考自https://www.pyimagesearch.com/2017/04/03/facial-landmarks-dlib-opencv-python/ 在原有基础上有一部分的修改(image ...
- OpenCV + Python 人脸检测
必备知识 Haar-like opencv api 读取图片 灰度转换 画图 显示图像 获取人脸识别训练数据 探测人脸 处理人脸探测的结果 实例 图片素材 人脸检测代码 人脸检测结果 总结 下午的时候 ...
- 【转载】opencv实现人脸检测
全文转载自CSDN的博客(不知道怎么将CSDN的博客转到博客园,应该没这功能吧,所以直接复制全文了),转载地址如下 http://blog.csdn.net/lsq2902101015/article ...
- Java+opencv实现人脸检测
版本 Java1.8 opencv3.4 代码: import java.awt.Graphics; import java.awt.image.BufferedImage; import javax ...
- OpenCV学习系列(一) Mac下OpenCV + xcode人脸检测实现
# OpenCV学习系列(一) Mac下OpenCV + xcode人脸检测实现 [-= 博客目录 =-] 1-学习目标 1.1-本章介绍 1.2-实践内容 1.3-相关说明 2-学习过程 2.1-环 ...
随机推荐
- jenkins的理解及安装
目录 一.理论概述 二.安装 一.理论概述 Jenkins的介绍 Jenkins是一个基于MIT License协议的开源软件项目,是基于Java开发的一种持续集成(CI)工具,用于监控持续重复的 ...
- CaaSP4 - 命令记录
worker01:~ # tree /var/lib/containers/storage/ -L 1 /var/lib/containers/storage/ ├── mounts ├── over ...
- 了解这些后,再去决定要不要买Mac苹果电脑!
我清晰的记得,刚买的macbook pro回到家,开机后第一件事情,就是上了淘宝网,花了500元钱,找了一个上门维修电脑的师傅,上门给我装了一个windows系统......表砍我...当时买mac的 ...
- artDialog提示框
API网址 http://aui.github.io/artDialog/doc/index.html 相关资料下载 https://code.google.com/archive/p/artdial ...
- Winform工程反编译后的工作
Winform工程,反编译后,虽然能用,但不太好用. 因为form并没有像原生的那样. 所以,需要几个步聚: 1. 用ResGen工具,把二进制资源文件还原为xml格式: ResGen fromXX. ...
- 10 loader - 配置处理less文件的loader
第一步:装包 cnpm i less-loader -D 安装完提示警告 peerDependencies WARNING less-loader@* requires a peer of less@ ...
- ajax跨域请求webservice webconfig配置
<configuration> <system.web> <compilation debug="true" targetFramework=&quo ...
- PL/SQL存储过程
一.概述 过程和函数统称为PL/SQL子程序,他们是被命名的PL/SQL块,均存储于数据库中. 并通过输入.输出和输入输出参数与其调用者交换信息.唯一区别是函数总向调用者返回数据. 二.存储过程详解 ...
- jquery关于多个显示隐藏
今天做了一个关于多个栏目的隐藏与显示,内容为初始化显示6个栏目,点击按钮显示所有的栏目,在次点击隐藏出现的栏目 <div class="ftlt_z_navigation acer&q ...
- 题解 [51nod1753] 相似子串
题解 [51nod1753] 相似子串 题面 解析 先考虑相等的时候怎么办, 我们考虑求出每个字母的贡献,这样字母相等的问题就可以用并查集来解决. 具体来说,我们先对于每个字母,把S中等于它的标为1, ...