odoo 11 之signup_with_phone模块分析
signup_with_phone模块的主要功能是允许用户用自己的手机号作为注册登录账号,这里会进行手机号码格式的严格检查,该模块依赖odoo自带的auth_signup注册模块。
该项目地址在https://github.com/odooaktiv/SignupWithPhone,不过目前是10.0版本的,稍微修改下也可以在11.0版本下使用。下面分析其具体原理。
第一部分是使用到的XML布局文件
1.auth_signup模块的auth_signup_login_templates.xml文件
这个文件包含4个模板,对应的是auth_signup.login,auth_signup.fields,auth_signup.signup,auth_signup.reset_password。
我们来一一分析每一个模板的内容,首先是auth_signup.login模板
        <template id="auth_signup.login" inherit_id="web.login" name="Sign up - Reset Password">

            <xpath expr="//button[@type='submit']" position="before">

                <a t-if="signup_enabled" t-attf-href="/web/signup?{{ keep_query() }}" class="btn btn-link pull-right">Don't have an account?</a>

                <a t-if="reset_password_enabled" t-attf-href="/web/reset_password?{{ keep_query() }}" class="btn btn-link pull-right">Reset Password</a>

            </xpath>

        </template>
这个模板继承了我们的登录模板web.login,主要功能是找到其中的submit按钮,在这个按钮之前放2个链接,一个显示Don't have an account,一个显示Reset Password.
但是这里的每个链接都在class属性上使用了bootstrap中的pull-right样式,最终的结果不是显示在submit按钮左侧,而是右侧,如下图所示

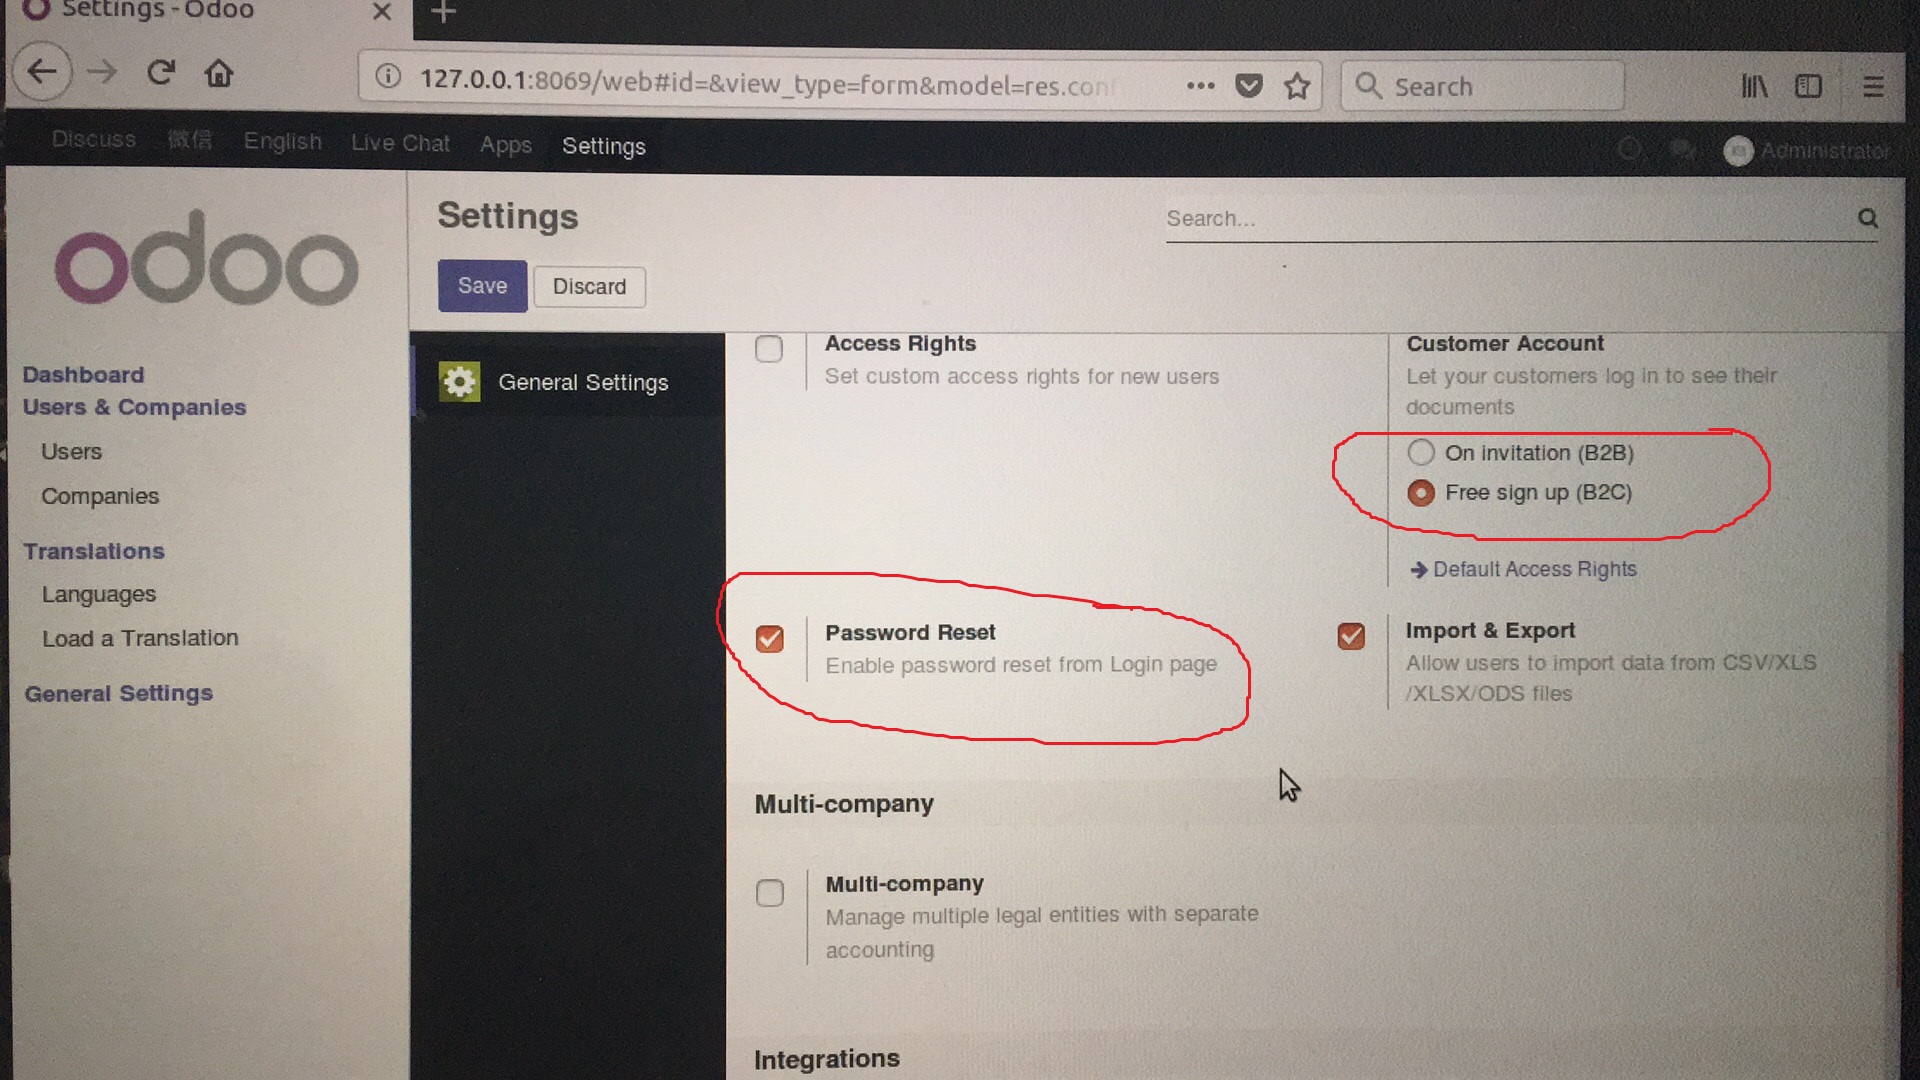
默认情况下这两个链接是不现实的,因为每个链接都有个t-if判断值,odoo系统默认是不设置的,如果需要只能手动设置,设置的位置如下:
第2个模板是auth_signup.fields,此模板会被第三个模板调用
        <template id="auth_signup.fields" name="Auth Signup/ResetPassword form fields">

            <div class="form-group field-login">

                <label for="login" class="control-label">Your Email</label>

                <input type="text" name="login" t-att-value="login" id="login" class="form-control" autofocus="autofocus"

                    autocapitalize="off" required="required" t-att-readonly="'readonly' if only_passwords else None"/>

            </div>

            <div class="form-group field-name">

                <label for="name" class="control-label">Your Name</label>

                <input type="text" name="name" t-att-value="name" id="name" class="form-control" placeholder="e.g. John Doe"

                    required="required" t-att-readonly="'readonly' if only_passwords else None"

                    t-att-autofocus="'autofocus' if login and not only_passwords else None" />

            </div>

            <div class="form-group field-password">

                <label for="password" class="control-label">Password</label>

                <input type="password" name="password" id="password" class="form-control"

                    required="required" t-att-autofocus="'autofocus' if only_passwords else None"/>

            </div>

            <div class="form-group field-confirm_password">

                <label for="confirm_password" class="control-label">Confirm Password</label>

                <input type="password" name="confirm_password" id="confirm_password" class="form-control" required="required"/>

            </div>

        </template>
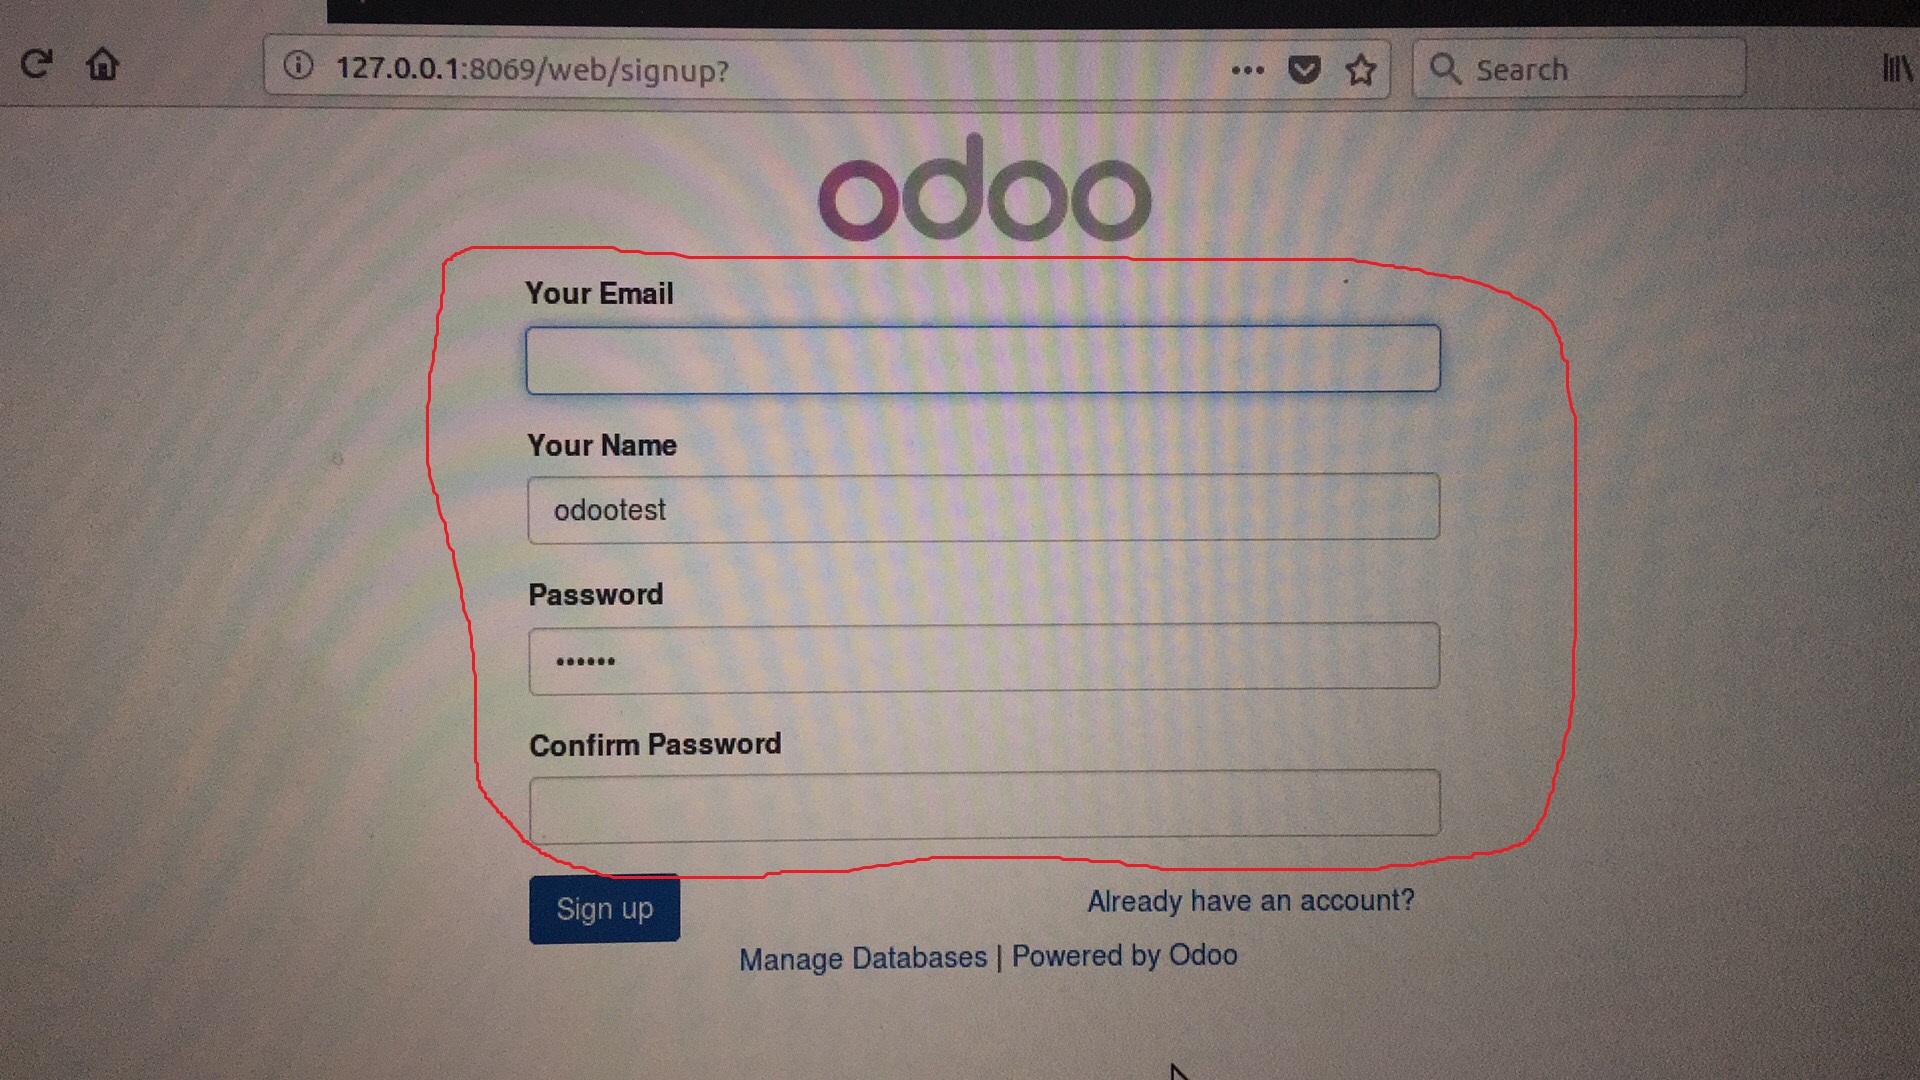
这里主要设置了注册时需要填写的字段,包含Email, Name, Password, Confirm Password 4个input文本。
第3个模板是auth_signup.signup,主要负责将注册界面组合成一个整体
        <template id="auth_signup.signup" name="Sign up login">

            <t t-call="web.login_layout">

                <form class="oe_signup_form" role="form" method="post" t-if="not message">

                  <input type="hidden" name="csrf_token" t-att-value="request.csrf_token()"/>

                    <t t-call="auth_signup.fields">

                        <t t-set="only_passwords" t-value="bool(token and not invalid_token)"/>

                    </t>

                    <p class="alert alert-danger" t-if="error">

                        <t t-esc="error"/>

                    </p>

                    <input type="hidden" name="redirect" t-att-value="redirect"/>

                    <input type="hidden" name="token" t-att-value="token"/>

                    <div class="clearfix oe_login_buttons">

                        <a t-attf-href="/web/login?{{ keep_query() }}" class="btn btn-link pull-right">Already have an account?</a>

                        <button type="submit" class="btn btn-primary pull-left o_signup_btn"> Sign up</button>

                    </div>

                </form>

            </t>

        </template>
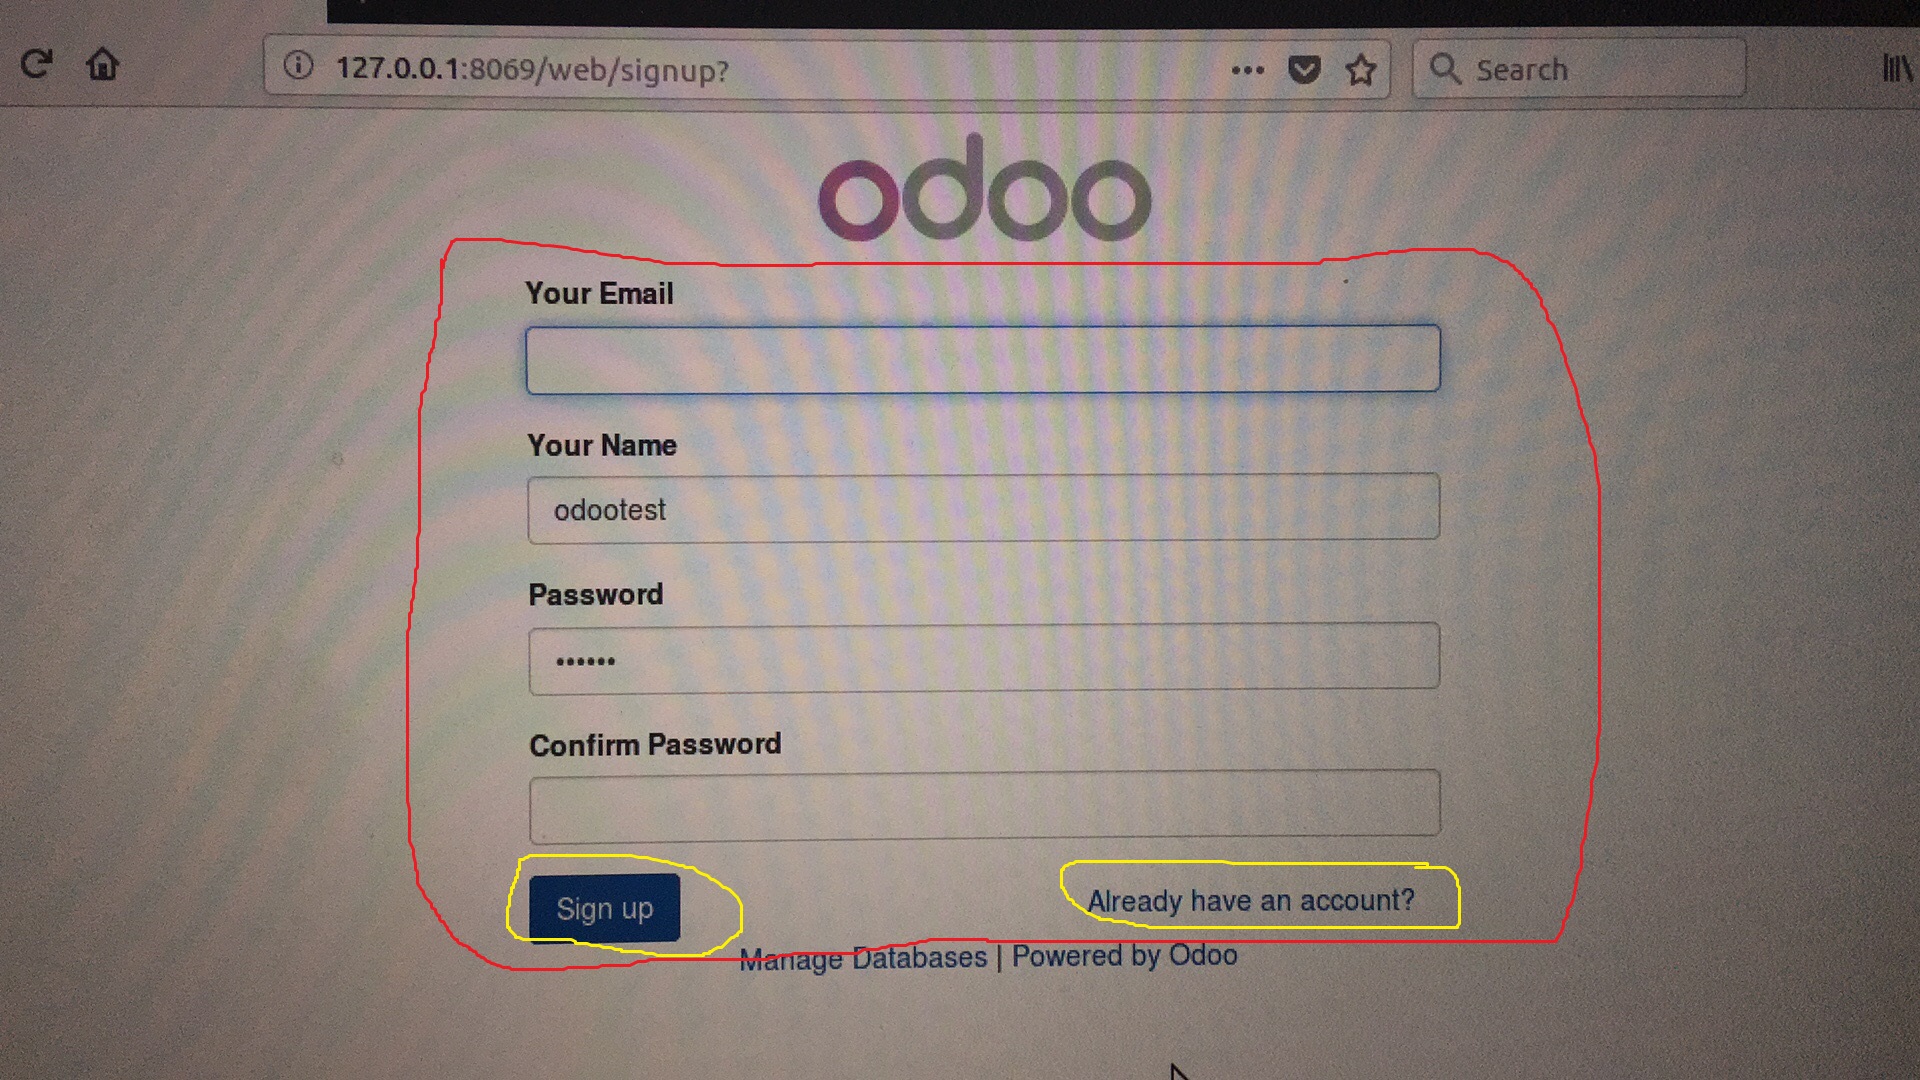
这里还调用了web.login_layout模板,主要实现头部的odoo图标和底部的数据库连接效果,此处不做详细分析。其余代码有3大作用,一是调用模板2 auth_signup.fields,用于显示
注册的填写字段,二是如果填写不合规范的时候,有错误提醒,三是左侧显示''Sign Up按钮”,右侧显示“Already have an account?”链接。
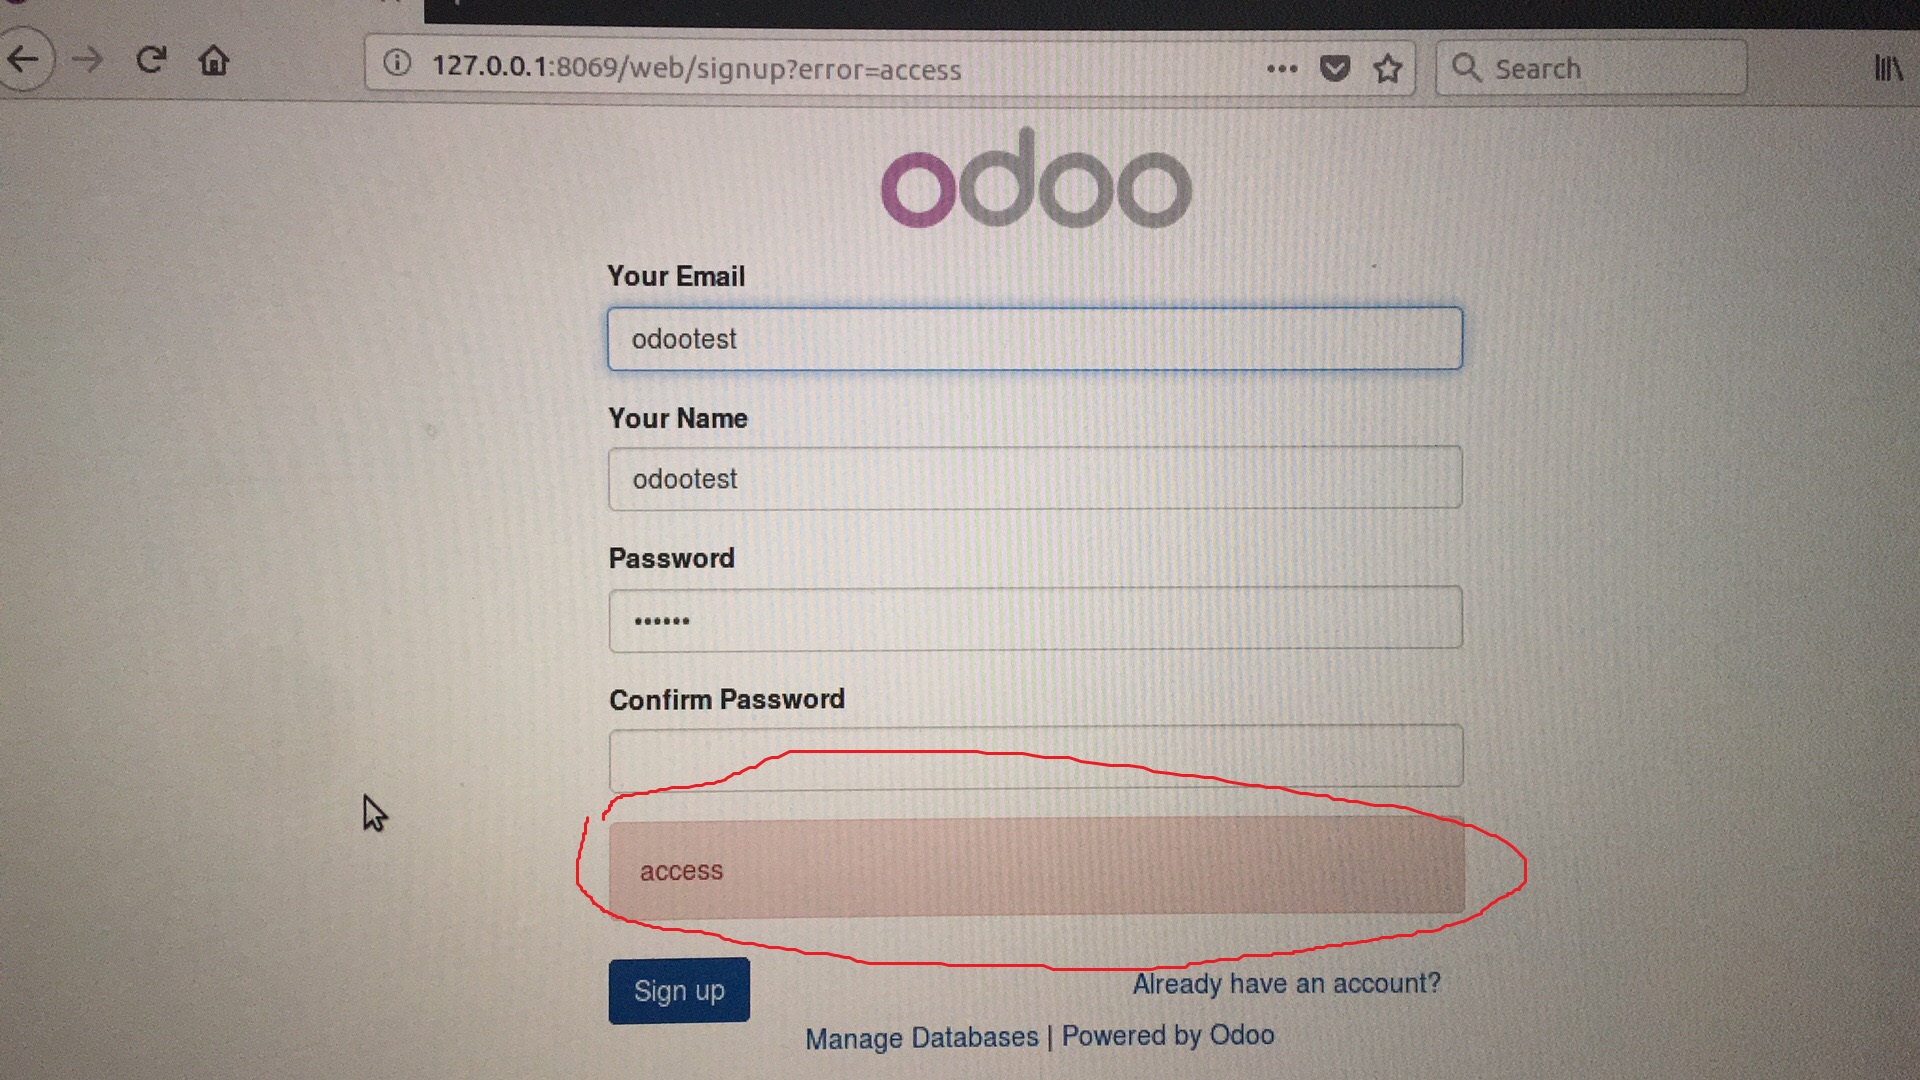
填写内容不合规范的时候,提示错误的信息截图
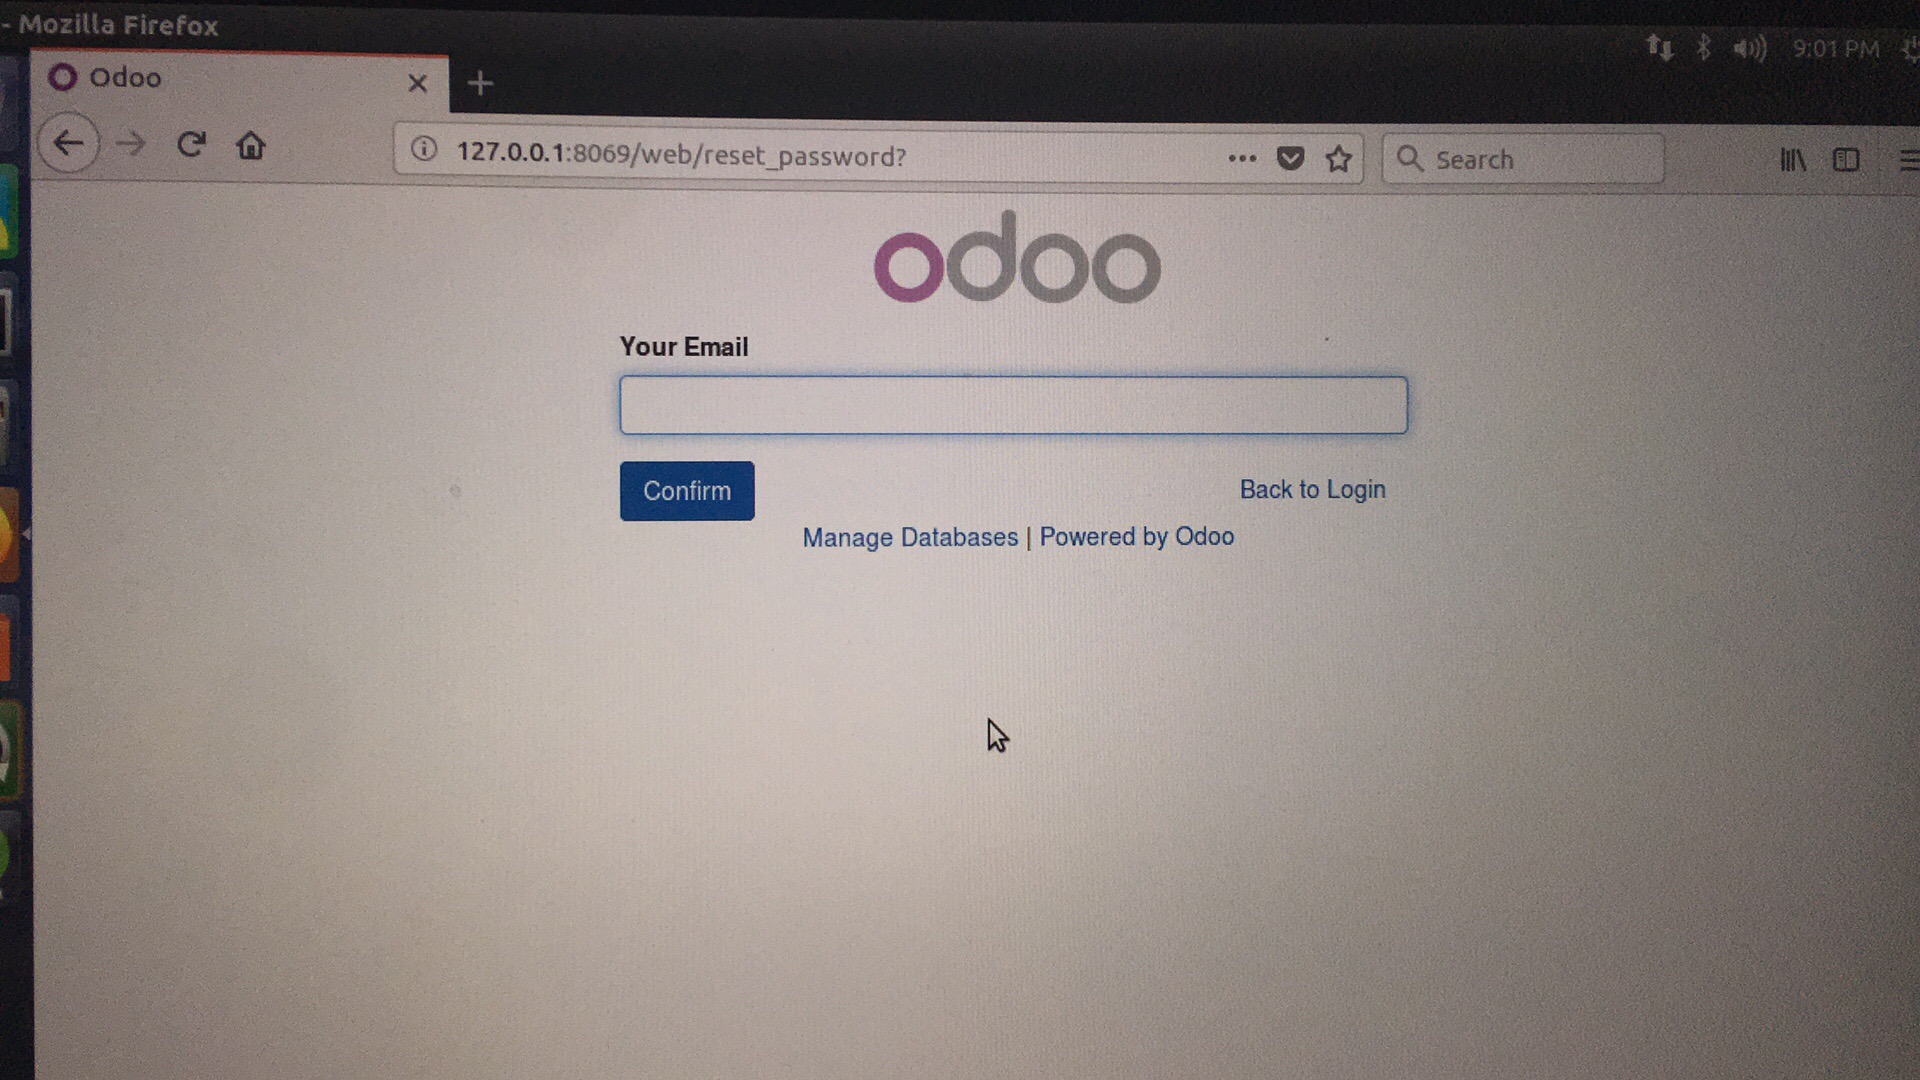
第4个模板是auth_signup.reset_password,主要用于给用户发邮件,进行密码的重设
        <template id="auth_signup.reset_password" name="Reset password">

            <t t-call="web.login_layout">

                <div t-if="message">

                    <p class="alert alert-success" t-if="message">

                        <t t-esc="message"/>

                    </p>

                    <a href="/web/login" class="btn btn-link pull-right">Back to Login</a>

                </div>

                <form class="oe_reset_password_form" role="form" method="post" t-if="not message">

                  <input type="hidden" name="csrf_token" t-att-value="request.csrf_token()"/>

                    <t t-if="token and not invalid_token">

                        <t t-call="auth_signup.fields">

                            <t t-set="only_passwords" t-value=""/>

                        </t>

                    </t>

                    <t t-if="not token">

                        <div class="form-group field-login">

                            <label for="login" class="control-label">Your Email</label>

                            <input type="text" name="login" t-att-value="login" id="login" class="form-control"

                                autofocus="autofocus" required="required" autocapitalize="off"/>

                        </div>

                    </t>

                    <p class="alert alert-danger" t-if="error">

                        <t t-esc="error"/>

                    </p>

                    <input type="hidden" name="redirect" t-att-value="redirect"/>

                    <input type="hidden" name="token" t-att-value="token"/>

                    <div class="clearfix oe_login_buttons">

                        <a t-if="not token" t-attf-href="/web/login?{{ keep_query() }}" class="btn btn-link pull-right">Back to Login</a>

                        <a t-if="invalid_token" href="/web/login" class="btn btn-link pull-right">Back to Login</a>

                        <button type="submit" class="btn btn-primary pull-left">Confirm</button>

                    </div>

                </form>

            </t>

        </template>
这里像前面的模板3一样,调用了web.login_layout模板,还有根据一些属性值来判断是不是显示html控件,目前我们不关系这些。这里的主要代码在与显示"Your Email"输入框,“Confirm”按钮和“Back to Login”链接。
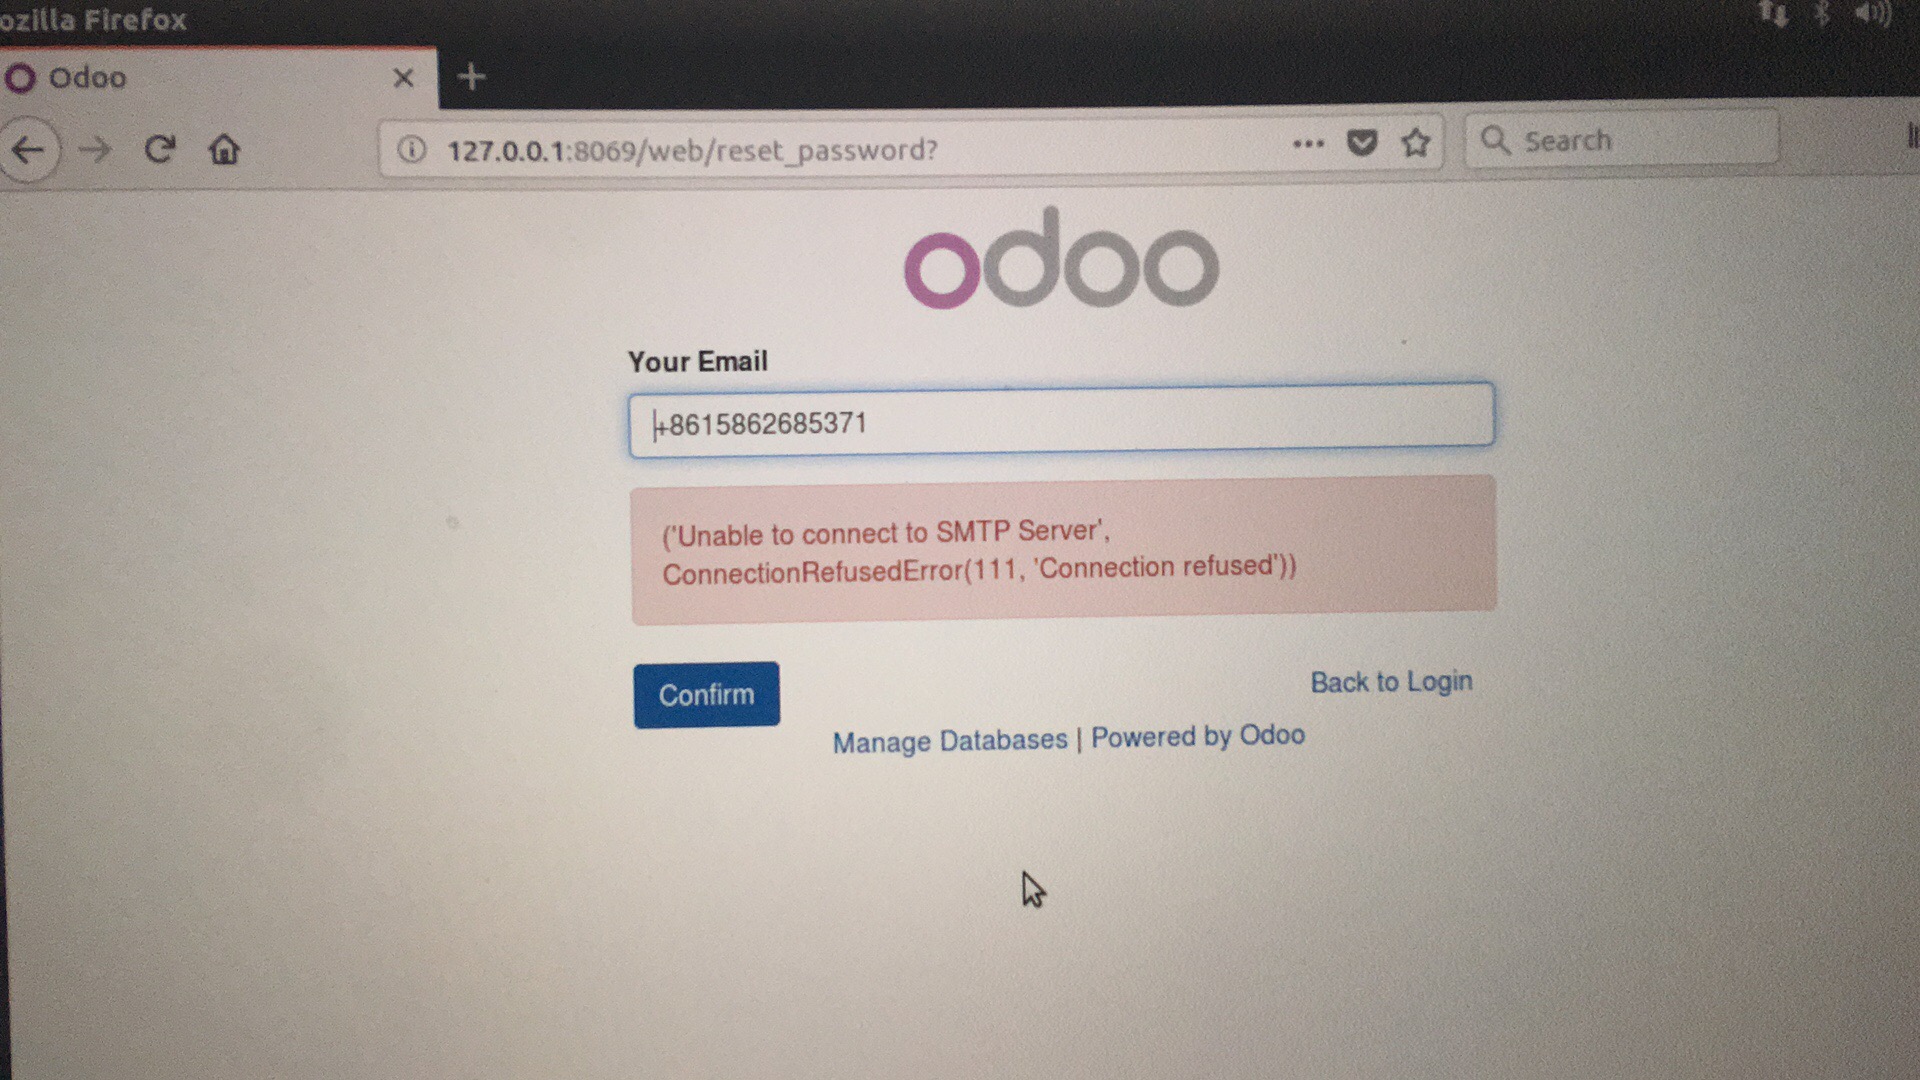
如果有错误,显示提示内容:
到此,auth_signup模块的xml主要模板全部理完,下面开始signupWithPhone模块的XML分析。
2.signupWithPhone模块的auth_signup_inherit.xml分析
这里主要包含2个模板,change_email_label和auth_signup.fields。
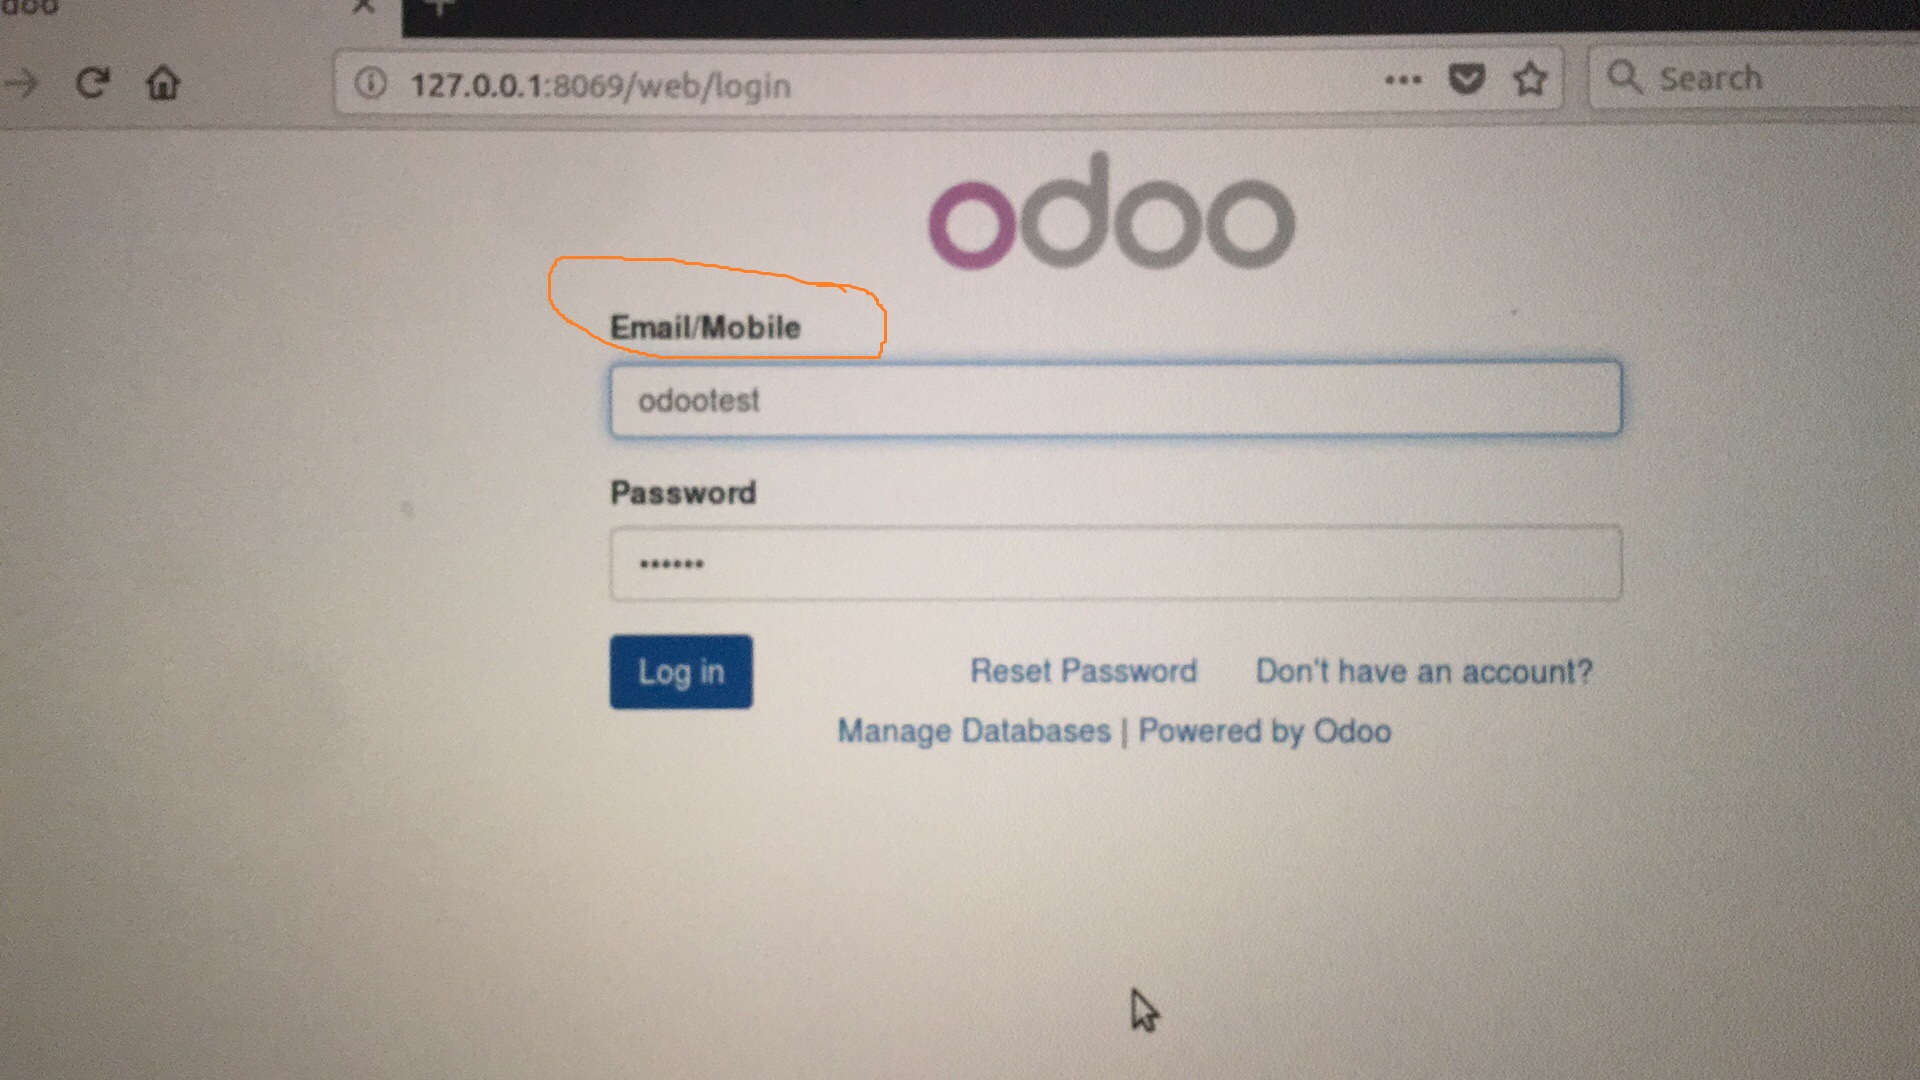
change_email_label模板主要改变登录界面的Email为Email/Mobile,提示用户既可以使用邮件也可以是电话
<!-- Change Email label to Email/Mobile in Signin Form. -->

  <template id="change_email_label" inherit_id="web.login">

        <xpath expr="//form/div/label[@for = 'login']" position="replace">

            <label for="login" class="control-label">Email/Mobile</label>

        </xpath>

    </template>
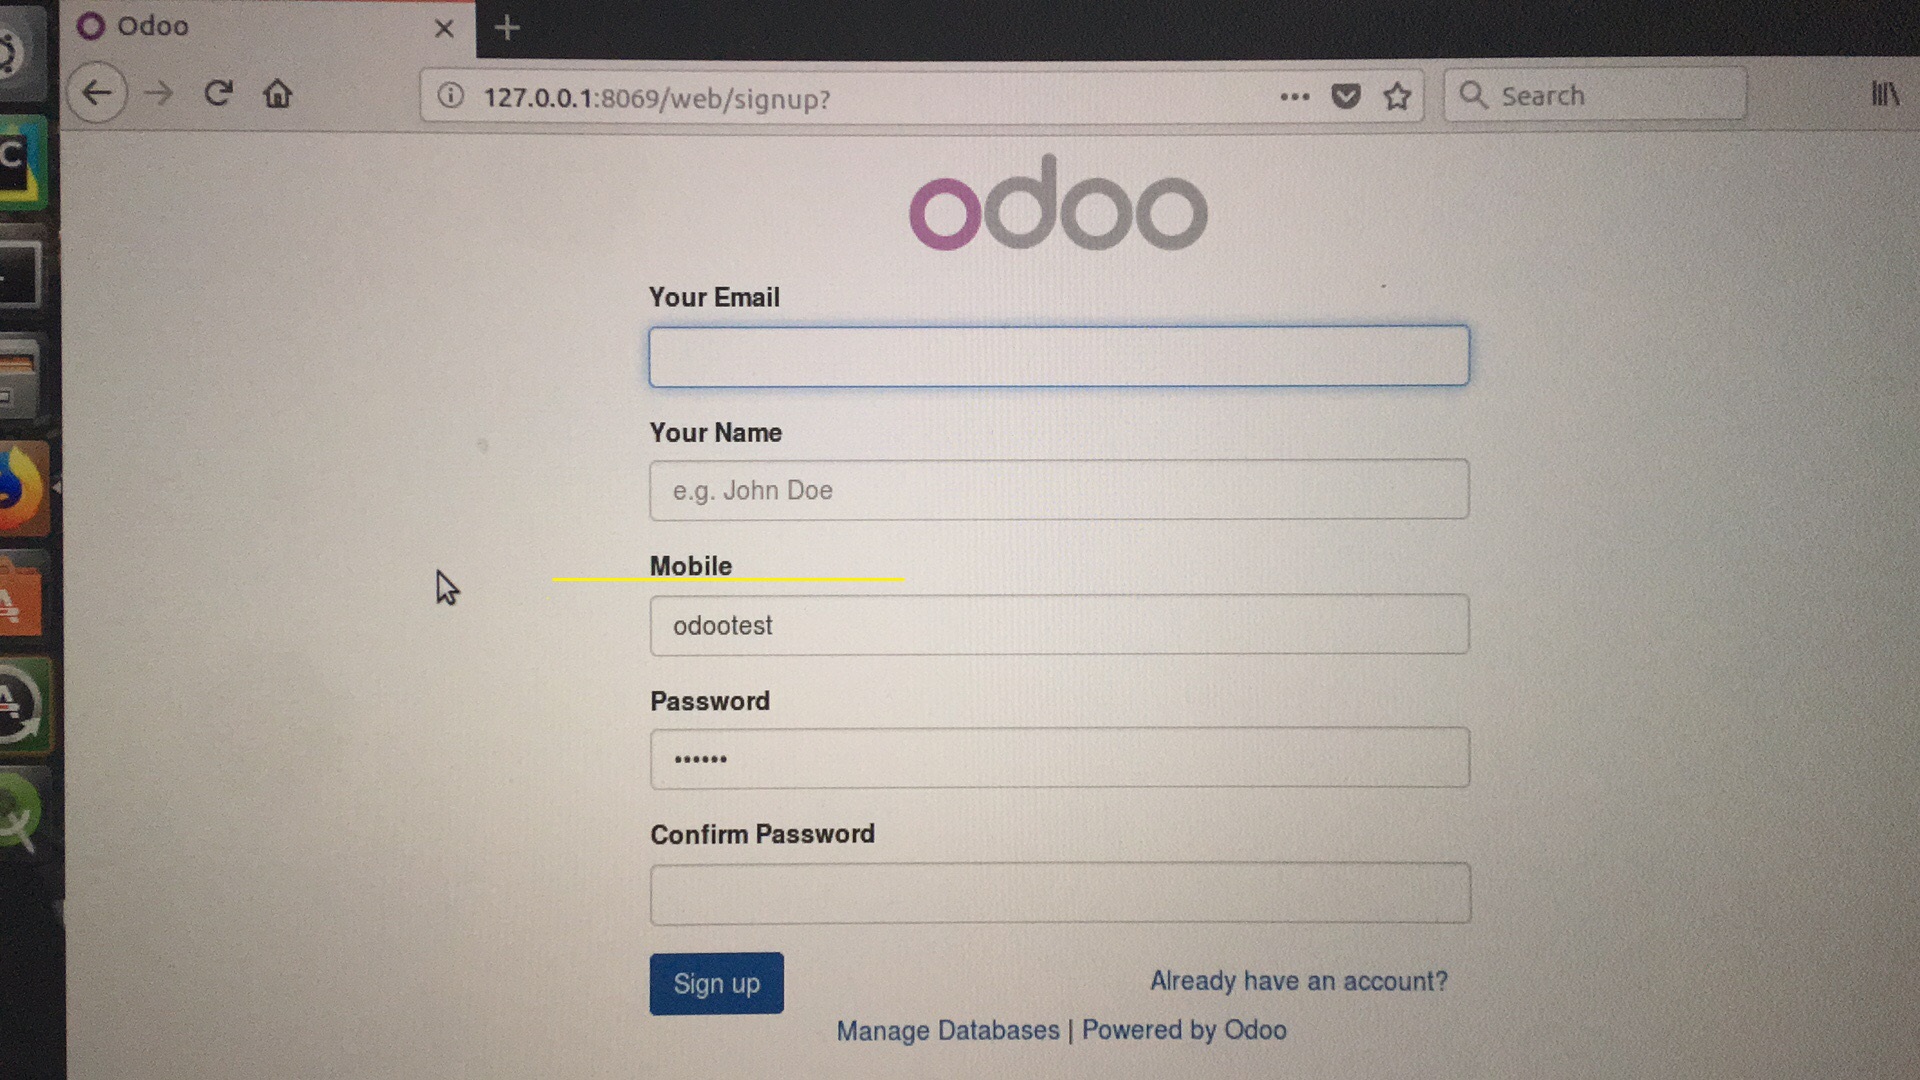
auth_signup.fields模板主要是对auth_signup中的auth_signup.fields的重写,多了个Mobile字段,也是我们今天的主要字段。
<!--  override sign up form And add mobile field-->

	<template id="auth_signup.fields">

		<div class="form-group field-login">

			<label for="login" class="control-label">Your Email</label>

			<input type="text" name="login" t-att-value="login" id="login"

				class="form-control" autofocus="autofocus" autocapitalize="off"

				t-att-readonly="'readonly' if only_passwords else None" />

		</div>

		<div class="form-group field-name">

			<label for="name" class="control-label">Your Name</label>

			<input type="text" name="name" t-att-value="name" id="name"

				class="form-control" placeholder="e.g. John Doe" required="required"

				t-att-readonly="'readonly' if only_passwords else None"

				t-att-autofocus="'autofocus' if login and not only_passwords else None" />

		</div>

		<div class="form-group field-mobile">

			<label for="mobile" class="control-label">Mobile</label>

			<input type="text" name="mobile" id="mobile" class="form-control" placeholder="e.g. +919876543210"/>

		</div>

		<div class="form-group field-password">

			<label for="password" class="control-label">Password</label>

			<input type="password" name="password" id="password" class="form-control"

				required="required" t-att-autofocus="'autofocus' if only_passwords else None" />

		</div>

		<div class="form-group field-confirm_password">

			<label for="confirm_password" class="control-label">Confirm Password</label>

			<input type="password" name="confirm_password" id="confirm_password"

				class="form-control" required="required" />

		</div>

	</template>
效果图如下
这样涉及到的XML视图文件都已分析完毕。
第二部分 原理分析
这里要解决的一个问题,就是signupWithPhone是怎么做到可以使用电话号码作为登录账号的呢?
首先在signupWithPhone模块里面没有modles文件夹,也就意味着没有对原来类或表做任何字段的增加,只能说是Mobile手机字段是存储到了已有表的某个字段中了,带着这个疑问我们来看看后台的注册代码。
这里只有一个AuthSignupController类,继承于web/controllers/main.py文件中的Home类,虽然是继承Home这个Controller类,但此处的AuthSignupController和auth_signup模块中的类名一样,这里的类自然是对auth_signup模块里类的方法的重写和扩展。这里有3个方法,
这里我们重点关心get_auth_signup_qcontext方法
    def get_auth_signup_qcontext(self):

        """ Shared helper returning the rendering context for signup and reset password.

            Check Condition If Email not Exists, then Signup with Mobile.

        """

        if request.params.items() and request.params['mobile']:

            try:

                carrier._is_mobile(number_type(phonenumbers.parse(request.params['mobile'])))

            except NumberParseException:

                request.params['error'] = _("Please Enter Valid Mobile Number")

        if request.params.items() and request.params['login']:

            if not tools.single_email_re.match(request.params['login']):

                request.params['error'] = _("Please Enter Valid Email")

        if request.params.items() and request.params['mobile'] and request.params['login'] == '':

            request.params['login'] = request.params['mobile']

        qcontext = request.params.copy()

        qcontext.update(self.get_auth_signup_config())

        if qcontext.get('token'):

            try:

                # retrieve the user info (name, login or email) corresponding to a signup token

                token_infos = request.env['res.partner'].sudo().signup_retrieve_info(qcontext.get('token'))

                for k, v in token_infos.items():

                    qcontext.setdefault(k, v)

            except:

                qcontext['error'] = _("Invalid signup token")

                qcontext['invalid_token'] = True

        return qcontext
以上红色代码表示,如果注册了电话号码,没有填写邮件,那么将会把mobile字段对应的值,赋值给login参数
    def do_signup(self, qcontext):

        """ Override do_signup for Create User & Partner with Extra field Mobile.

        """

        values = { key: qcontext.get(key) for key in ('login', 'name', 'password','mobile') }

        assert values.get('password') == qcontext.get('confirm_password'), "Passwords do not match; please retype them."

        supported_langs = [lang['code'] for lang in request.env['res.lang'].sudo().search_read([], ['code'])]

        if request.lang in supported_langs:

            values['lang'] = request.lang

        self._signup_with_values(qcontext.get('token'), values)

        request.env.cr.commit()
以上的红色代码,抽取了对应的login,name,password,mobile 4个参数的值,当然,此时的login和mobile值是一样的,如果用户没有填写邮件的话。
这样signupWithPhone模块,就完成了使用电话号码的注册过程,而不仅仅是只允许用户使用邮件注册。
注册的过程中,auth_signup模块,而作为管理员在后台新增用户的时候,或者使用Oauth2进行登录的时候,用户名都没有进行验证是否属于邮件格式,其他都可以作为登录账号。
那么这里就有一个问题,就是在找回密码的时候,问题就变得复杂了,分3种情况,第一种是邮件的,第二种是电话号码的,第三种是非邮件亦不是电话号码的。对于前2种情况,在重设密码的时候,可以分别使用发送邮件和发送手机验证码的方式实现对密码的修改,第三种就暂时无法处理。
貌似对于重设密码的问题,需要单独开一篇文章来讨论了,待续.....
odoo 11 之signup_with_phone模块分析的更多相关文章
- OpenRisc-41-or1200的cache模块分析
引言 为CPU提供足够的,稳定的指令流和数据流是计算机体系结构设计中两个永恒的话题.为了给CPU提供指令流,需要设计分支预测机构,为了给CPU提供数据流,就需要设计cache了.其实,无论是insn还 ...
- OpenRisc-45-or1200的ID模块分析
引言 之前,我们分析了or1200流水线的整体结构,也分析了流水线中IF级,EX级,本小节我们来分析ID(insn decode)级的一些细节. 1,基础 or1200的pipeline的ID阶段包含 ...
- odoo 11导入外部数据过程记录
在开发过程中,遇见需要将SQL Server中的数据转移到Pg数据库的情况,那么如何做才能解决这一问题呢? 1.自己写代码,将数据从SQL Server到PG. 2.利用odoo自带的导入功能导入. ...
- 第四章 Odoo 12 开发之模块继承
Odoo 的一个强大功能是无需直接修改底层对象就可以添加功能.这是通过其继承机制来实现的,采取在已有对象之上修改层来完成.这种修改可以在不同层上进行-模型层.视图层和业务逻辑层.我们创建新的模块来做出 ...
- nginx事件模块分析(一)
nginx ngx_events_module模块分析 ngx_events_module模块是核心模块之一,它是其它所有事件模块的代理模块.nginx在启动时只与events模块打交道,而由even ...
- 游戏模块分析总结(2)之UI、操作篇
转自:http://www.gameres.com/309812.html 游戏模块分析总结(2)之UI.操作篇 发布者: wuye | 发布时间: 2014-12-12 15:03| 评论数: 0 ...
- css扁平化博客学习总结(一)模块分析
一.模块分析 1.每开发一个项目之前,首先要对项目进行一个大致规划,它到底要做什么功能,它有什么具体需求. 2.所以需要进行模块化分析,把这些东西具象化,把一个问题模块化,对需求有一个宏观的了解. 3 ...
- OpenRisc-43-or1200的IF模块分析
引言 “喂饱饥饿的CPU”,是计算机体系结构设计者时刻要考虑的问题.要解决这个问题,方法大体可分为两部分,第一就是利用principle of locality而引进的cache技术,缩短取指时间,第 ...
- [转载] 关于“淘宝应对"双11"的技术架构分析”
微博上一篇最新的关于“淘宝应对"双11"的技术架构分析”.数据产品的一个最大特点是数据的非实时写入.
随机推荐
- Glide图片加载框架小bug
如上一段加载图片的代码,本身是没问题的,后来测试发现有情况不显示url对应的图片,而一直显示加载超时的图片 修改如下: 将with()方法的上下文context改为图片的imageView.getCo ...
- pyHook和pythoncom的安装
pyHook包为Windows中的全局鼠标和键盘事件提供回调.Python应用程序为用户输入事件注册事件处理程序,例如鼠标左键,鼠标左键,按键等,并设置键盘和/或鼠标挂钩.底层C库报告的信息包括事件的 ...
- ERP口碑后付关于如何设置后厨小票打印时间的问题解决方法
1. 2.
- Using IntelliJ IDEA as the Vim Editor
转载自https://www.jetbrains.com/help/idea/using-intellij-idea-as-the-vim-editor.html This feature is on ...
- CSS杂谈(1)图
- SQL Server基础之表级触发器
触发器分为两种,一种与数据表绑定,响应数据表指定动作(insert.delete或update),此处称为表级:一种与数据库本身绑定,响应数据定义语句(主要是CREATE.ALTER 和 DROP 开 ...
- AngularJS学习之旅—AngularJS 简介(一)
一.AngularJS 简介 1.AngularJS 是一个 JavaScript 框架. AngularJS 是一个 JavaScript 框架.它是一个以 JavaScript 编写的库.Angu ...
- Win10 使用笔记
前言 记录我在使用过程的一些笔记,本文所写内容,基于笔者所使用的两款win10操作系统: win10 x64 企业版 (1607) win10 x64 专业版 (1703) Win10 五笔输入法 使 ...
- Windows10家庭版连接远程桌面出现credssp加密oracle修正问题
我发现我的win10不能连接别人的远程桌面,问题如下: 1.windows10家庭版需要修改注册表,家庭版没有组织策略: 2.win+R打开快速启动命令行输入"regedit": ...
- npm方法
1. 使用npm 下载全局包 npm install 包名字 -g 安装 npm uninstall 包名字 -g 卸载 2. 安装卸载本地的包 (在哪里执行命令就把包安装在哪个目录的node_mod ...