Spring日记_02之搭建一个新项目
程序
表现层 业务层 持久层
从持久层开始写
总结如何搭建一个项目
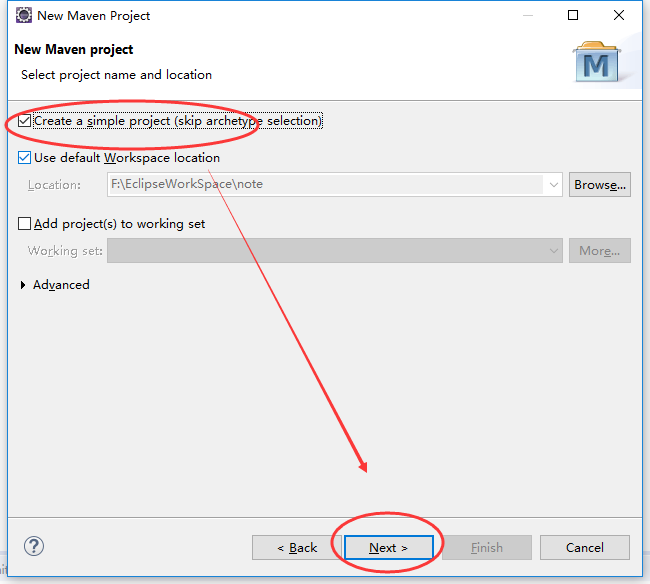
1、新建一个Maven项目


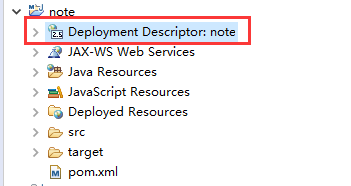
2、可能新建之后会有错,右键Deployment
Descriptor: note, 选择Generate
Deployment Descriptor Stub
3、使用maven仓库导包

<dependencies>

      <dependency>

          <groupId>org.springframework</groupId>

          <artifactId>spring-webmvc-portlet</artifactId>

          <version>3.2.8.RELEASE</version>

      </dependency>

      <dependency>

          <groupId>com.fasterxml.jackson.core</groupId>

          <artifactId>jackson-databind</artifactId>

          <version>2.8.5</version>

      </dependency>

     <dependency>

      <groupId>com.fasterxml.jackson.core</groupId>

      <artifactId>jackson-core</artifactId>

      <version>2.8.5</version>

    </dependency>

    <dependency>

      <groupId>com.fasterxml.jackson.core</groupId>

      <artifactId>jackson-annotations</artifactId>

      <version>2.8.5</version>

    </dependency>

    <dependency>

      <groupId>org.springframework</groupId>

      <artifactId>spring-jdbc</artifactId>

      <version>3.2.8.RELEASE</version>

    </dependency>

    <dependency>

      <groupId>org.mybatis</groupId>

      <artifactId>mybatis</artifactId>

      <version>3.4.0</version>

    </dependency>

    <dependency>

      <groupId>org.mybatis</groupId>

      <artifactId>mybatis-spring</artifactId>

      <version>1.3.1</version>

    </dependency>

    <dependency>

      <groupId>mysql</groupId>

      <artifactId>mysql-connector-java</artifactId>

      <version>5.1.38</version>

    </dependency>

    <dependency>

      <groupId>commons-dbcp</groupId>

      <artifactId>commons-dbcp</artifactId>

      <version>1.4</version>

    </dependency>

  </dependencies>
dependencies
3.1、查看一下下载的包

如果maven的包迟迟不下载,就右键项目,选择maven – UpdateProject

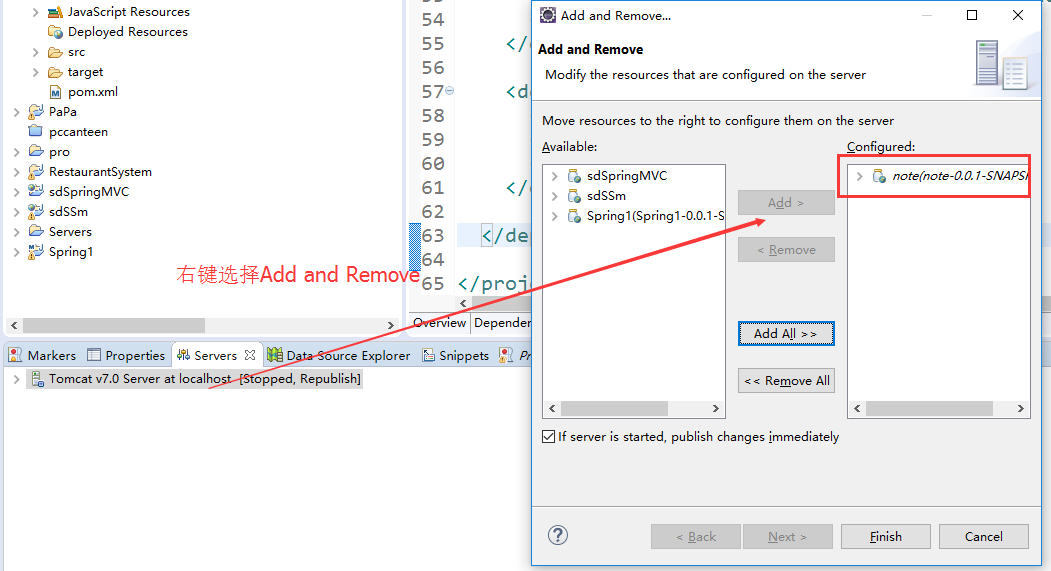
4、 为项目指定tomcat运行环境
右键项目 – Properties – Targeted Runtimes

5.在下面server的tomcat服务器中添加项目
6 、在src/main/resources下添加两个文件夹

7 、 Spring配置文件
先将原项目的两个配置文件 spring-service.xml和 spring-mybatis.xml 复制过来
将spring-service.xml 改名为spring-web.xml,因为这样更合适一点
spring-mybatis.xml注意改一下文件里的包名,其他的关于mybatis的不用改


spring-web.xml如下:
<?xml version="1.0" encoding="UTF-8"?>

<beans xmlns="http://www.springframework.org/schema/beans"

    xmlns:xsi="http://www.w3.org/2001/XMLSchema-instance"

    xmlns:context="http://www.springframework.org/schema/context"

    xmlns:jdbc="http://www.springframework.org/schema/jdbc"

    xmlns:jee="http://www.springframework.org/schema/jee"

    xmlns:tx="http://www.springframework.org/schema/tx"

    xmlns:aop="http://www.springframework.org/schema/aop"

    xmlns:mvc="http://www.springframework.org/schema/mvc"

    xmlns:util="http://www.springframework.org/schema/util"

    xmlns:jpa="http://www.springframework.org/schema/data/jpa"

    xsi:schemaLocation="

        http://www.springframework.org/schema/beans http://www.springframework.org/schema/beans/spring-beans-3.2.xsd

        http://www.springframework.org/schema/context http://www.springframework.org/schema/context/spring-context-3.2.xsd

        http://www.springframework.org/schema/jdbc http://www.springframework.org/schema/jdbc/spring-jdbc-3.2.xsd

        http://www.springframework.org/schema/jee http://www.springframework.org/schema/jee/spring-jee-3.2.xsd

        http://www.springframework.org/schema/tx http://www.springframework.org/schema/tx/spring-tx-3.2.xsd

        http://www.springframework.org/schema/data/jpa http://www.springframework.org/schema/data/jpa/spring-jpa-1.3.xsd

        http://www.springframework.org/schema/aop http://www.springframework.org/schema/aop/spring-aop-3.2.xsd

        http://www.springframework.org/schema/mvc http://www.springframework.org/schema/mvc/spring-mvc-3.2.xsd

        http://www.springframework.org/schema/util http://www.springframework.org/schema/util/spring-util-3.2.xsd">

    <!-- 启动注解版本的Spring MVC -->

    <mvc:annotation-driven></mvc:annotation-driven>

    <context:component-scan base-package="cn.edu.sdu.wh.controller"> </context:component-scan>

</beans>
spring-web.xml
spring-mybatis.xml如下:
<?xml version="1.0" encoding="UTF-8"?>

<beans xmlns="http://www.springframework.org/schema/beans"

    xmlns:xsi="http://www.w3.org/2001/XMLSchema-instance"

    xmlns:context="http://www.springframework.org/schema/context"

    xmlns:jdbc="http://www.springframework.org/schema/jdbc"

    xmlns:jee="http://www.springframework.org/schema/jee"

    xmlns:tx="http://www.springframework.org/schema/tx"

    xmlns:aop="http://www.springframework.org/schema/aop"

    xmlns:mvc="http://www.springframework.org/schema/mvc"

    xmlns:util="http://www.springframework.org/schema/util"

    xmlns:jpa="http://www.springframework.org/schema/data/jpa"

    xsi:schemaLocation="

        http://www.springframework.org/schema/beans http://www.springframework.org/schema/beans/spring-beans-3.2.xsd

        http://www.springframework.org/schema/context http://www.springframework.org/schema/context/spring-context-3.2.xsd

        http://www.springframework.org/schema/jdbc http://www.springframework.org/schema/jdbc/spring-jdbc-3.2.xsd

        http://www.springframework.org/schema/jee http://www.springframework.org/schema/jee/spring-jee-3.2.xsd

        http://www.springframework.org/schema/tx http://www.springframework.org/schema/tx/spring-tx-3.2.xsd

        http://www.springframework.org/schema/data/jpa http://www.springframework.org/schema/data/jpa/spring-jpa-1.3.xsd

        http://www.springframework.org/schema/aop http://www.springframework.org/schema/aop/spring-aop-3.2.xsd

        http://www.springframework.org/schema/mvc http://www.springframework.org/schema/mvc/spring-mvc-3.2.xsd

        http://www.springframework.org/schema/util http://www.springframework.org/schema/util/spring-util-3.2.xsd">

    <!-- 配置dbcp连接池:连接到数据库 -->

    <bean id="dataSource" class="org.apache.commons.dbcp.BasicDataSource">

        <!-- 连接池的基本连接参数 -->

        <property name="driverClassName" value="com.mysql.jdbc.Driver"></property>

        <property name="url" value="jdbc:mysql://localhost:3306/cloud_note"></property>

        <property name="username" value="root"></property>

        <property name="password" value="123"></property>

        <!-- 连接池可选参数 -->

        <property name="maxActive" value="50"></property>

        <property name="initialSize" value="5"></property>

        <property name="maxIdle" value="5"></property>

    </bean>

    <!-- 配置MyBatis的 Session 工厂 -->

    <bean id="sqlSessionFactory" class="org.mybatis.spring.SqlSessionFactoryBean">

        <property name="dataSource" ref="dataSource"></property>

        <!-- 声明MyBatis SQL 声明文件保存的地方 -->

        <property name="mapperLocations" value="classpath:mapper/*.xml"></property>

    </bean>

    <!-- 配置MyBatis的自动接口扫描 -->

    <bean class="org.mybatis.spring.mapper.MapperScannerConfigurer">

        <!-- 数据访问接口的存储位置 -->

        <property name="basePackage" value="cn.edu.sdu.wh.dao"></property>

    </bean>

</beans>
spring-mybatis.xml
8 、 相应的在src/main/java下添加两个包

9 、 新建一个Servlet

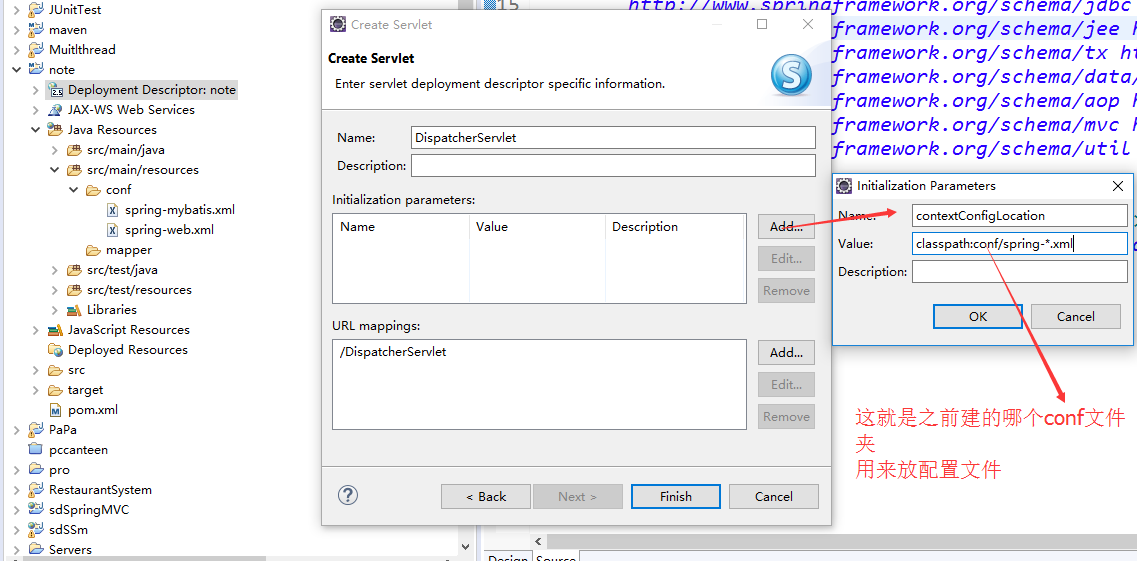

可以查看src/main/webapp/WEB-INF下的web.xml,验证一下

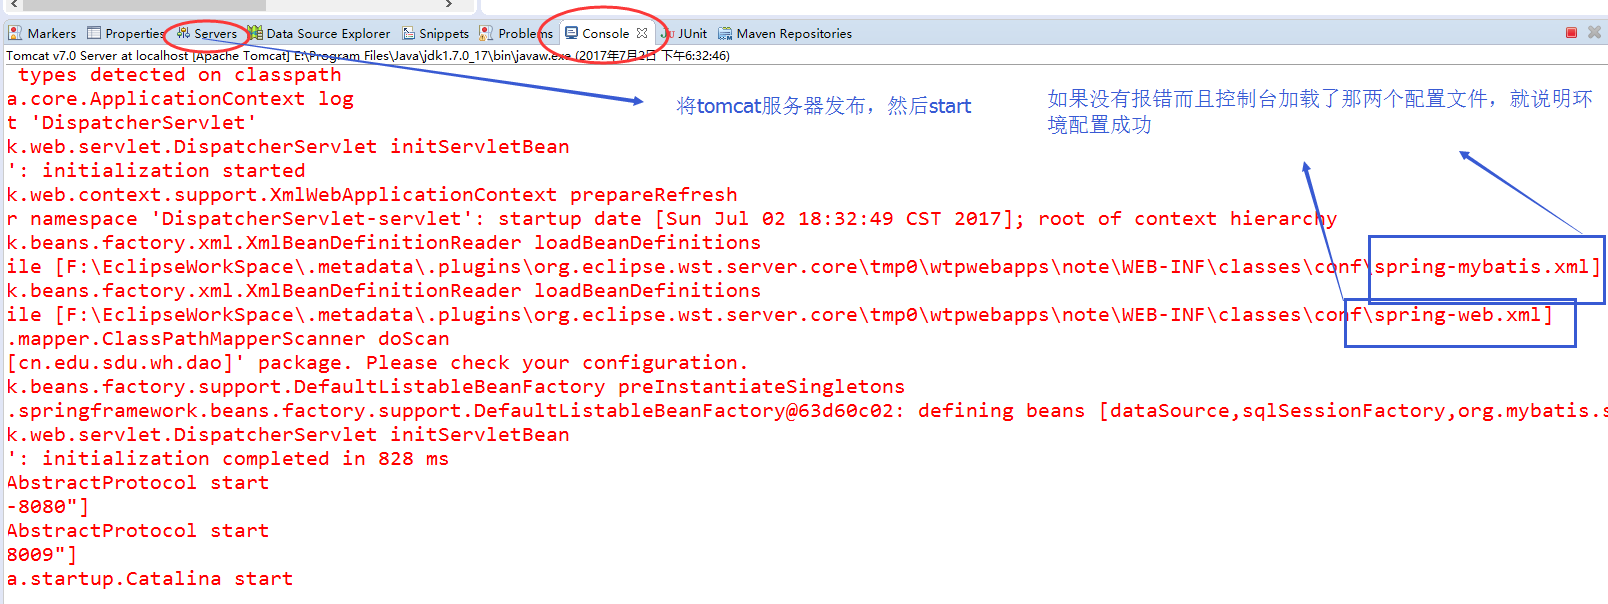
10 、 将Tomcat 发布 然后 运行!
Spring日记_02之搭建一个新项目的更多相关文章
- IDEA搭建一个SpringBoot项目——十分详细(web+mysql)
前排提示: IDEA版本:IntelliJ IDEA 2021.1.1 专业版(是否为专业版影响不大) 搭建目的:前端web页面能够获取到MySQL数据库中的数据 详细步骤: 1. 创建一个新项目 ...
- 从零开始搭建一个react项目
Nav logo 120 发现 关注 消息 4 搜索 从零开始搭建一个react项目 96 瘦人假噜噜 2017.04.23 23:29* 字数 6330 阅读 32892评论 31喜欢 36 项目地 ...
- 从零搭建一个SpringCloud项目之Feign搭建
从零搭建一个SpringCloud项目之Feign搭建 工程简述 目的:实现trade服务通过feign调用user服务的功能.因为trade服务会用到user里的一些类和接口,所以抽出了其他服务需要 ...
- 如何向Openstack社区提交一个新项目
前几天有个朋友问我:自己有一个idea不错的项目,也把基本的框架写好了,想贡献到Openstack社区,却不知道应该怎么做.正好之前我有过类似的经历,那么来分享一下我是如何向Openstack社区提交 ...
- vue-用Vue-cli从零开始搭建一个Vue项目
Vue是近两年来比较火的一个前端框架(渐进式框架吧). Vue两大核心思想:组件化和数据驱动.组件化就是将一个整体合理拆分为一个一个小块(组件),组件可重复使用:数据驱动是前端的未来发展方向,释放了对 ...
- Vue Create 创建一个新项目 命令行创建和视图创建
Vue Create 创建一个新项目 命令行创建和视图创建 开始之前 你可以先 >>:cd desktop[将安装目录切换到桌面] >>:vue -V :Vue CLI 3.0 ...
- 基于 Express 搭建一个node项目 - 起步
一,如何基于 Express 搭建一个node项目 什么是Express 借用官方的介绍,Express是一个基于Node.js平台的极简.灵活的web应用开发框架,它提供了一系列强大的特性,帮助你创 ...
- 将本地的一个新项目上传到GitHub上新建的仓库中去
转载: 如何将本地的一个新项目上传到GitHub上新建的仓库中去 踩过的坑: 1.在git push时报错 error: RPC failed; curl 56 SSL read: error:000 ...
- Google C++测试框架系列入门篇:第二章 开始一个新项目
上一篇:Google C++测试框架系列入门篇:第一章 介绍:为什么使用GTest? 原始链接:Setting up a New Test Project 词汇表 版本号:v_0.1 开始一个新项目 ...
随机推荐
- Day7--------------IP地址与子网划分
1.ip地址:32位 172.16.45.10/16 网络位:前十六位是网络位 主机位:后16位是主机位 网络地址:172.16.0.0 主机地址:172.16.45.10 A类: 0NNNNN ...
- iOS weak 内存释放问题
我们都知道weak 关键字可以解决内存不释放问题,但是使用上有些讲究. 看代码: import UIKit var str = "Hello, playground" class ...
- Hive学习01-基础常见问题
理论: 什么是hive: 1. Hive旨在实现轻松的数据汇总,即时查询和分析大量数据. 2. 它提供了SQL,使用户可以轻松地进行临时查询,汇总和数据分析. 3. Hive可以使用用户定义函数( ...
- mysql 定期删除表中无用数据
MySQL5.1.x版本中引入了一项新特性EVENT,定期执行某些事物,这可以帮助我们实现定期执行某个小功能,不在依赖代码去实现. 我现在有一张表,这张表中的数据有个特点,每天都会有大量数据插入,但是 ...
- RianbowDesign
换了很多个名字,最后换成这个. 主要考虑把自己所学的.所经历的都结合到一起,用这种方式来保持热情. 算是一个设计网站,管理咨询,游戏设计,平面logo之类,想最多地攘括到里边.就像自己不确定的主业一样 ...
- Confluence 6 基本性能问题诊断步骤
基本性能问题诊断步骤 开始下面的程序: 进入 Troubleshooting Confluence hanging or crashing页面找到已知的主要性能问题. 进行页面 Performance ...
- html固定表头,表单内容垂直循环滚动
<!DOCTYPE html><html lang="zh-cn"><head> <meta charset="utf-8 ...
- 【深度学习】吴恩达网易公开课练习(class1 week3)
知识点梳理 python工具使用: sklearn: 数据挖掘,数据分析工具,内置logistic回归 matplotlib: 做图工具,可绘制等高线等 绘制散点图: plt.scatter(X[0, ...
- 状态压缩dp小结
最近一段时间算是学了一些状态压缩的题目,在这里做个小结吧 首先是炮兵布阵类题目,这类题目一开始给定一个矩形,要求在上面放置炮兵,如果在一格放了炮兵那么周围的某些格子就不能放炮兵,求最大能放置炮兵的数量 ...
- MySQL数据库权限分类
一.权限表 mysql数据库中的3个权限表:user .db. host 权限表的存取过程是: 1)先从user表中的host. user. password这3个字段中判断连接的IP.用户名.密码是 ...