
Build CRUD Application with jQuery EasyUI
http://www.jeasyui.com/tutorial/app/crud.php
It has become a common necessily for web application to collect data and manage it properly. CRUD allows us to generate pages to list and edit database records. This tutorial will show you how to implement a CRUD DataGrid using jQuery EasyUI framework.
We will use following plugins:
- datagrid: show the user list data.
- dialog: create or edit a single user information.
- form: used to submit form data.
- messager: to show some operation messages.
Step 1: Prepare database
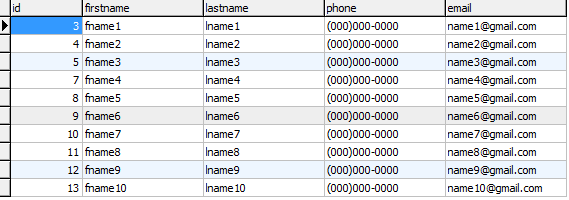
We will use MySql database to store user information. Create database and 'users' table.
Step 2: Create DataGrid to display user information
Create the DataGrid with no javascript code.
- <table id="dg" title="My Users" class="easyui-datagrid" style="width:550px;height:250px"
- url="get_users.php"
- toolbar="#toolbar"
- rownumbers="true" fitColumns="true" singleSelect="true">
- <thead>
- <tr>
- <th field="firstname" width="50">First Name</th>
- <th field="lastname" width="50">Last Name</th>
- <th field="phone" width="50">Phone</th>
- <th field="email" width="50">Email</th>
- </tr>
- </thead>
- </table>
- <div id="toolbar">
- <a href="#" class="easyui-linkbutton" iconCls="icon-add" plain="true" onclick="newUser()">New User</a>
- <a href="#" class="easyui-linkbutton" iconCls="icon-edit" plain="true" onclick="editUser()">Edit User</a>
- <a href="#" class="easyui-linkbutton" iconCls="icon-remove" plain="true" onclick="destroyUser()">Remove User</a>
- </div>
We don't need to write any javascript code and we can show the user list as following image:
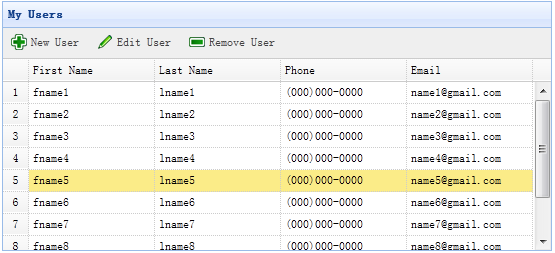
The DataGrid use the 'url' property that is assigned to 'get_users.php' to retrieve data from server.
Code of get_users.php file
- $rs = mysql_query('select * from users');
- $result = array();
- while($row = mysql_fetch_object($rs)){
- array_push($result, $row);
- }
- echo json_encode($result);
Step 3: Create form dialog
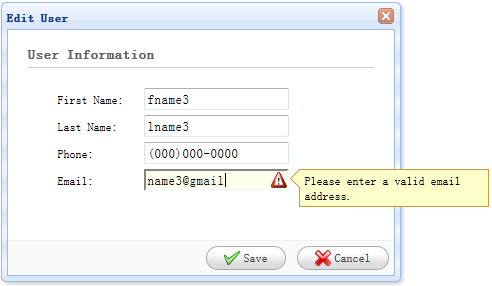
To create or edit a user, we use the same dialog.
- <div id="dlg" class="easyui-dialog" style="width:400px;height:280px;padding:10px 20px"
- closed="true" buttons="#dlg-buttons">
- <div class="ftitle">User Information</div>
- <form id="fm" method="post" novalidate>
- <div class="fitem">
- <label>First Name:</label>
- <input name="firstname" class="easyui-textbox" required="true">
- </div>
- <div class="fitem">
- <label>Last Name:</label>
- <input name="lastname" class="easyui-textbox" required="true">
- </div>
- <div class="fitem">
- <label>Phone:</label>
- <input name="phone" class="easyui-textbox">
- </div>
- <div class="fitem">
- <label>Email:</label>
- <input name="email" class="easyui-textbox" validType="email">
- </div>
- </form>
- </div>
- <div id="dlg-buttons">
- <a href="javascript:void(0)" class="easyui-linkbutton c6" iconCls="icon-ok" onclick="saveUser()" style="width:90px">Save</a>
- <a href="javascript:void(0)" class="easyui-linkbutton" iconCls="icon-cancel" onclick="javascript:$('#dlg').dialog('close')" style="width:90px">Cancel</a>
- </div>
The dialog is created with no javascript code also.
Step 4: Implement creating and editing a user
When create a user, we open the dialog and clear form data.
- function newUser(){
- $('#dlg').dialog('open').dialog('setTitle','New User');
- $('#fm').form('clear');
- url = 'save_user.php';
- }
When edit a user, we open the dialog and load form data from the selected datagrid row.
- var row = $('#dg').datagrid('getSelected');
- if (row){
- $('#dlg').dialog('open').dialog('setTitle','Edit User');
- $('#fm').form('load',row);
- url = 'update_user.php?id='+row.id;
- }
The 'url' stores the URL address where the form will post to when save the user data.
Step 5: Save the user data
To save the user data we use the following code:
- function saveUser(){
- $('#fm').form('submit',{
- url: url,
- onSubmit: function(){
- return $(this).form('validate');
- },
- success: function(result){
- var result = eval('('+result+')');
- if (result.errorMsg){
- $.messager.show({
- title: 'Error',
- msg: result.errorMsg
- });
- } else {
- $('#dlg').dialog('close'); // close the dialog
- $('#dg').datagrid('reload'); // reload the user data
- }
- }
- });
- }
Before submit the form, the 'onSubmit' function will be called, in which we can validate the form field value. When the form field values are submited successfully, close the dialog and reload the datagrid data.
Step 6: Remove a user
To remove a user, we use the following code:
- function destroyUser(){
- var row = $('#dg').datagrid('getSelected');
- if (row){
- $.messager.confirm('Confirm','Are you sure you want to destroy this user?',function(r){
- if (r){
- $.post('destroy_user.php',{id:row.id},function(result){
- if (result.success){
- $('#dg').datagrid('reload'); // reload the user data
- } else {
- $.messager.show({ // show error message
- title: 'Error',
- msg: result.errorMsg
- });
- }
- },'json');
- }
- });
- }
- }
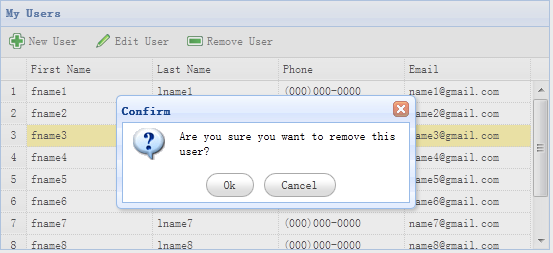
Before remove a row, we will display a confirm dialog to let user to determine whether to really remove the row data. When remove data successfully, call 'reload' method to refresh the datagrid data.
Step 7: Run the Code
Run the code in your browser with MySQL started.
So, you now know the basics of CRUD in jQuery EasyUI framework. Press below link to start the demo application.
Download the EasyUI example:
Build CRUD Application with jQuery EasyUI的更多相关文章
- 使用Struts2和jQuery EasyUI实现简单CRUD系统(转载汇总)
使用Struts2和jQuery EasyUI实现简单CRUD系统(一)——从零开始,ajax与Servlet的交互 使用Struts2和jQuery EasyUI实现简单CRUD系统(二)——aja ...
- jQuery EasyUI 应用 – 创建 CRUD 应用(表格)
jQuery EasyUI 应用 - 创建 CRUD 应用 本节介绍如何创建CRUD应用. CRUD分别是指在做计算处理时的增加(Create).读取查询(Retrieve).更新(Update)和删 ...
- 使用Struts2和jQuery EasyUI实现简单CRUD系统(五)——jsp,json,EasyUI的结合
这部分比較复杂,之前看过自己的同学开发一个选课系统的时候用到了JSON,可是一直不知道有什么用.写东西也没用到.所以没去学他.然后如今以这样的怀着好奇心,这是做什么用的,这是怎么用的.这是怎么结合的心 ...
- jQuery EasyUI学习二
1. 课程介绍 1. Datagrid组件(掌握) 2. Dialog.form组件(掌握) 3. Layout.Tabs;(掌握) Datagrid组件 2.1. 部署运行pss启动无错 ...
- 使用Jquery+EasyUI 进行框架项目开发案例讲解之五 模块(菜单)管理源码分享
http://www.cnblogs.com/huyong/p/3454012.html 使用Jquery+EasyUI 进行框架项目开发案例讲解之五 模块(菜单)管理源码分享 在上四篇文章 ...
- [jQuery EasyUI系列] 创建增删改查应用
一.数据收集并妥善管理数据是网络应用共同的必要.CRUD允许我们生产页面列表并编辑数据库记录. 本文主要演示如何使用jQuery EasyUI实现CRUD DataGrid. 将使用到的插件有: da ...
- jQuery EasyUI教程之datagrid应用(一)
最近一段时间都在做人事系统的项目,主要用到了EasyUI,数据库操作,然后抽点时间整理一下EasyUI的内容. 这里我们就以一个简洁的电话簿软件为基础,具体地说一下datagrid应用吧 datagr ...
- Jquery EasyUI DataGrid .net实例
前台界面:<!DOCTYPE html PUBLIC "-//W3C//DTD XHTML 1.0 Transitional//EN" "http://www.w3 ...
- jquery easyui常见问题:
1.jquery easyui1.4.2 demo在ie10 上加载json的时候没有效果 从官网上下载了jquery easyui1.4.2 里面有个demo文件夹,但是发现底下的demo在IE.3 ...
随机推荐
- mfc 纯虚函数和抽象类
纯虚函数 抽像类 一.纯虚函数 虚函数为了重载和多态的需要,有时需要在基类中定义一个纯虚函数,代码部分在子类中加以实现.定义格式如下的函数我们称为纯虚函数: ; 纯虚函数与空虚函数是有区别的; 二.抽 ...
- LoRa---数据包结构、跳频
数据包结构 跳频扩频技术FHSS 人太懒,直接贴图,自己看!
- SQL SERVER 2008R2 安装问题
背景 今天帮可以安装数据库.操作系统是windows server 2012 标准版, 安装SQL SERVER 2008R2 . 运行安装程序,提示如下 这是因为两者之间存在兼容性问题. ...
- Asp.Net_Get跟Post
1. Get(即使用QueryString显式传递) 方式:在url后面跟参数. 特点:简单.方便. 缺点:字符串长度最长为255个字符:数据泄漏在url中. 适用数据 ...
- centos7 RabbitMQ部署
一.RabbitMQ简单介绍在日常工作环境中,你是否遇到过两个(多个)系统间需要通过定时任务来同步某些数据?你是否在为异构系统的不同进程间相互调用.通讯的问题而苦恼.挣扎?如果是,那么恭喜你,消息服务 ...
- kubernetes(k8s) 的常用命令
1.查询副本[root@master ~]# kubectl get pods2.删除一个副本[root@master ~]# kubectl get pods 3.启动一个容器副本[root@mas ...
- 20181204-4 互评Final版本
此次作业要求参见https://edu.cnblogs.com/campus/nenu/2018fall/homework/2478 互评 一.互评Final版本——杨老师粉丝群<PinBall ...
- Daily Scrumming* 2015.12.8(Day 1)
一.团队scrum meeting照片 二.今日总结 姓名 WorkItem ID 工作内容 签入链接以及备注说明 江昊 任务942 学习使用github,在github上建立组织并将所有队员纳入, ...
- 20135337朱荟潼 Linux第六周学习总结——进程的描述和进程的创建
朱荟潼 + 原创作品转载请注明出处 + <Linux内核分析>MOOC课http://mooc.study.163.com/course/USTC 1000029000 第六周 进程的描述 ...
- Java中的基本数据据类型
1.整数类型 类型 字节数 表示范围 byte 1 -128~127 short 2 -32768 ~ 32767 int 4 -2147483648~2147483647 long 8 -92233 ...