.NET Core中使用AutoMapper
何为AutoMapper
AutoMapper是对象到对象的映射工具。在完成映射规则之后,AutoMapper可以将源对象转换为目标对象。
安装AutoMapper
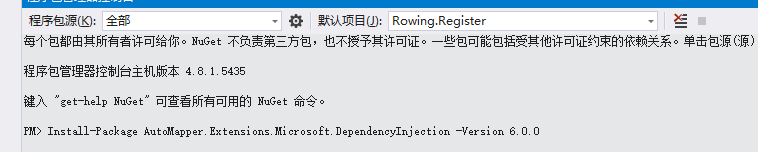
这里我们在NuGet中下载安装AutoMapper。如下图

在项目中执行此命令
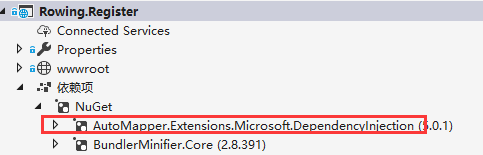
安装完成后 即可查看到依赖项中的 NuGet
配置AutoMapper映射规则
AutoMapper是基于约定的,因此在实用映射之前,我们需要先进行映射规则的配置。
public class ClubDetail

{

        public int Id { get; set; }

        public string Name { get; set; }

        public string Creator { get; set; }

        public int Year { get; set; }

        public string Contact { get; set; }

        public string Phone { get; set; }

        public string Address { get; set; }

        public string Description { get; set; }

        public byte[] ImageData { get; set; }

        public string CreateNumber { get; set; }

}

public class ClubDetailModel

{

        public int Id { get; set; }

        public string Name { get; set; }

        public string Creator { get; set; }

        public int Year { get; set; }

        public string Contact { get; set; }

        public string Phone { get; set; }

        public string Address { get; set; }

        public string Description { get; set; }

        public string ImageDataBase64 { get; set; }

        public byte[] ImageData { get; set; }

        public IList<IFormFile> ImageUpload { get; set; }

        public string CreateNumber { get; set; }

}
在上面的代码中,我们定义了两个类,我们需要将ClubDetil类的对象映射到ClubDetailModel类的对象上面。要完成这个操作,我们需要对AutoMapper进行如下配置:
CreateMap<ClubDetail, ClubDetailModel>();
用法:

这样,返回得到的就是映射后的ClubDetailModel了。
Profile的用法
Profile提供了一个命名的映射类,所有继承自Profile类的子类都是一个映射集合。
我们来看一下Profile的用法,这个例子中仍然使用上面的ClubDetil类和ClubDetailModel类。
public class ServiceProfiles : Profile

{

        public ServiceProfiles()

        {

            CreateMap<ClubDetail, ClubDetailModel>().ReverseMap();//加ReverseMap是让两个实体可以相互映射
} }
然后 我们在Startup中ConfigureServices配置和初始化
Mapper.Initialize(cfg =>

            {

                cfg.AddProfile<ServiceProfiles>();

            });

            services.AddAutoMapper();
在一个Profile中,我们可以完成多个、更复杂的规则的约定:
public class Destination2

{

    public int Id{ get; set; }

    public string Name{ get; set; }

}
public class ServiceProfiles : Profile

{

    public ServiceProfiles()

    {

       CreateMap<ClubDetail, ClubDetailModel>().ReverseMap();

    CreateMap<ClubDetail, Destination2>().ForMember(d => d.AnotherValue2, opt =>

       {

         opt.MapFrom(s => s.AnotherValue);

       });

   }

}
AutoMapper最佳实践
这段内容将讨论AutoMapper的规则写在什么地方的问题。
在上一段中,我们已经知道了如何使用AutoMapper进行简单的对象映射,但是,在实际的项目中,我们会有很多类进行映射(从Entity转换为Dto,或者从Entity转换为ViewModel等),这么多的映射如何组织将成为一个问题。
首先我们需要定义一个Configuration.cs的类,该类提供AutoMapper规则配置的入口,它只提供一个静态的方法,在程序第一次运行的时候调用该方法完成配置。
当有多个Profile的时候,我们可以这样添加:
public class Configuration

{

    public static void Configure()

    {

        Mapper.Initialize(cfg =>

        {

            cfg.AddProfile<Profiles.SourceProfile>();

            cfg.AddProfile<Profiles.OrderProfile>();

            cfg.AddProfile<Profiles.CalendarEventProfile>();

        });

    }

}
在程序运行的时候,只需要调用Configure方法即可。
了解了这些实现以后,我们可以再项目中添加AutoMapper文件夹,文件夹结构如下:
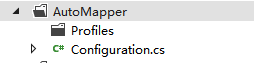
Configuration为我们的静态配置入口类;Profiles文件夹为我们所有Profile类的文件夹。
AutoMapper.Configuration.Configure();
扁平化映射(Flattening)
默认情况下,我们的ClubDetil类和ClubDetailModel类是根据属性名称进行匹配映射的。除此之外,默认的映射规则还有下面两种情况,我们称之为扁平化映射,即当Source类中不包含Destination类中的属性的时候,AutoMapper会将Destination类中的属性进行分割,或匹配“Get”开头的方法,例如:
Order类:
public class Order

{

    public Customer Customer { get; set; }

    public decimal GetTotal()

    {

        return 100M;

    }

}
Order类中包含了一个customer对象和一个GetTotal方法,为了方便演示,我直接将GetTotal方法返回100;
Customer类的定义如下:
public class Customer

{

    public string Name { get; set; }

}
OrderDto类的定义如下:
public class OrderDto

{

    public string CustomerName { get; set; }

    public string Total { get; set; }

}
我们在进行映射的时候,不需要进行特殊的配置,既可以完成从Order到OrderDto的映射。
public class OrderProfile : Profile

{

    protected override void Configure()

    {

        CreateMap<Entity.Order, Dto.OrderDto>();

    }

}
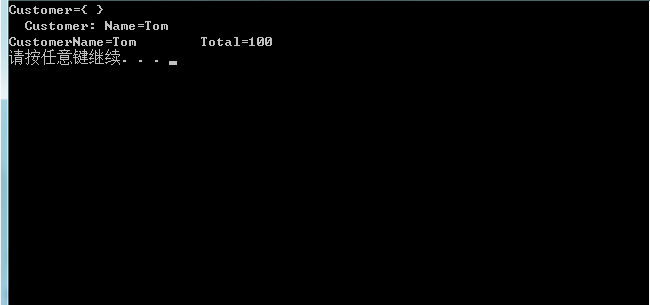
测试代码:
Entity.Customer customer = new Entity.Customer() { Name = "Tom" };

Entity.Order order = new Entity.Order() { Customer = customer };

Dto.OrderDto orderDto = Mapper.Map<Dto.OrderDto>(order);

ObjectDumper.Write(order, );

ObjectDumper.Write(orderDto);
测试结果:
指定映射字段(Projection)
在实际的业务环境中,我们的ClubDetil类和ClubDetailModel类的字段不可能一对一的匹配,这个时候我们就需要来指定他们的实际映射关系,例如:
public class CalendarEvent

{

    public DateTime Date { get; set; }

    public string Title { get; set; }

}

public class CalendarEventForm

{

    public DateTime EventDate { get; set; }

    public int EventHour { get; set; }

    public int EventMinute { get; set; }

    public string DisplayTitle { get; set; }

}
在这两个类中,CalendarEvent的Date将被拆分为CalendarEventForm的日期、时、分三个字段,Title也将对应DisplayTitle字段,那么相应的Profile定义如下:
public class CalendarEventProfile : Profile

{

    protected override void Configure()

    {

        CreateMap<Entity.CalendarEvent, Entity.CalendarEventForm>()

            .ForMember(dest => dest.EventDate, opt => opt.MapFrom(src => src.Date.Date))

            .ForMember(dest => dest.EventHour, opt => opt.MapFrom(src => src.Date.Hour))

            .ForMember(dest => dest.EventMinute, opt => opt.MapFrom(src => src.Date.Minute))

            .ForMember(dest => dest.DisplayTitle, opt => opt.MapFrom(src => src.Title));

    }

}
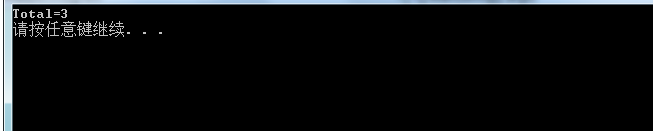
测试代码:
Entity.CalendarEvent calendarEvent = new Entity.CalendarEvent()

{

    Date = DateTime.Now,

    Title = "Demo Event"

};

Entity.CalendarEventForm calendarEventForm = Mapper.Map<Entity.CalendarEventForm>(calendarEvent);

ObjectDumper.Write(calendarEventForm);
测试结果:

验证配置项(Configuration Validation)
AutoMapper提供了一种验证机制,用来判断Destination类中的所有属性是否都被映射,如果存在未被映射的属性,则抛出异常。
验证的用法:
Mapper.AssertConfigurationIsValid();
例如:
public class Source

{

    public int SomeValue { get; set; }

    public string AnotherValue { get; set; }

}
Destination代码:
public class Destination

{

    public int SomeValuefff { get; set; }

}
测试:
Mapper.CreateMap<Entity.Source, Entity.Destination>();

Mapper.AssertConfigurationIsValid();
运行程序将会出现AutoMapperConfigurationException异常:
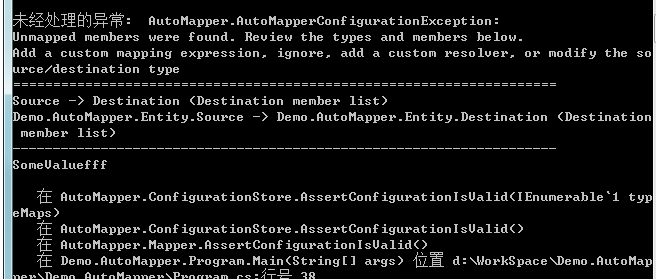
这是因为SomeValuefff在Source类中没有对应的字段造成的。
解决这种异常的方法有:
指定映射字段,例如:
Mapper.CreateMap<Entity.Source, Entity.Destination>()

    .ForMember(dest => dest.SomeValuefff, opt =>

    {

        opt.MapFrom(src => src.SomeValue);

    });
或者使用Ignore方法:
Mapper.CreateMap<Entity.Source, Entity.Destination>()

    .ForMember(dest => dest.SomeValuefff, opt =>

    {

        opt.Ignore();

    });
或者使用自定义解析器,自定义解析器在下面讲到。
自定义解析器(Custom value resolvers)
AutoMapper允许我们自定义解析器来完成Source到Destination的值的转换。例如:
public class Source

{

    public int Value1 { get; set; }

    public int Value2 { get; set; }

}

public class Destination

{

    public int Total { get; set; }

}
Total属性在Source中不存在,如果现在创建映射规则,在映射的时候必然会抛出异常。这个时候我们就需要使用自定义解析器来完成映射。
自定义解析器需要实现 IValueResolver 接口,接口的定义如下:
public interface IValueResolver

{

    ResolutionResult Resolve(ResolutionResult source);

}
我们来自定义一个Resolver:
public class CustomResolver : ValueResolver<Source, int>

{

    protected override int ResolveCore(Source source)

    {

        return source.Value1 + source.Value2;

    }

}
然后在映射规则中使用这个解析器:
public class SourceProfile : Profile

{

    protected override void Configure()

    {

        //Source->Destination

        CreateMap<Source, Destination>()

            .ForMember(dest => dest.Total, opt =>

            {

                opt.ResolveUsing<CustomResolver>();

            });

    }

}
测试代码:
Source src = new Source()

{

    Value1 = ,

    Value2 =

};

Destination dest = Mapper.Map<Destination>(src);

ObjectDumper.Write(dest);
测试结果:
在使用自定义Resolver中,我们还可以指定Resolver的构造函数,例如:
//Source->Destination

CreateMap<Source, Destination>()

    .ForMember(dest => dest.Total, opt =>

    {

        opt.ResolveUsing<CustomResolver>()

            .ConstructedBy(() => new CustomResolver());

    });
自定义类型转换器(Custom type converters)
AutoMapper通过ConvertUsing来使用自定义类型转换器。ConvertUsing有三种用法:
void ConvertUsing(Func<TSource, TDestination> mappingFunction);

void ConvertUsing(ITypeConverter<TSource, TDestination> converter);

void ConvertUsing<TTypeConverter>() where TTypeConverter : ITypeConverter<TSource, TDestination>;
当我们有如下的Source类和Destination类:
public class Source

{

    public string Value1 { get; set; }

}

public class Destination

{

    public int Value1 { get; set; }

}
我们可以使用如下配置:
public class SourceProfile : Profile

{

    protected override void Configure()

    {

        //string->int

        CreateMap<string, int>()

            .ConvertUsing(Convert.ToInt32);

        //Source->Destination

        CreateMap<Source, Destination>();

    }

}
在上面的配置中,我们首先创建了从string到int的类型转换,这里使用了系统自带的Convert.ToInt32转换方法。
除了这种方法之外,我们还可以自定义类型转换器
public class CustomConverter : ITypeConverter<Source, Destination>

{

    public Destination Convert(ResolutionContext context)

    {

        Source src = context.SourceValue as Source;

        Destination dest = new Destination();

        dest.Value1 = System.Convert.ToInt32(src.Value1);

        return dest;

    }

}
通过这个转换器,我们可以绕过string到int的转换,直接将Source类的对象转换为Destination类的对象。
对应的配置如下:
public class SourceProfile : Profile

{

    protected override void Configure()

    {

        //Source->Destination

        CreateMap<Source, Destination>()

            .ConvertUsing<CustomConverter>();

    }

}
或者,我们也可以使用下面的配置:
public class SourceProfile : Profile

{

    protected override void Configure()

    {

        //Source->Destination

        CustomConverter converter = new CustomConverter();

        CreateMap<Source, Destination>()

            .ConvertUsing(converter);

    }

}
空值替换(Null substitution)
空值替换允许我们将Source对象中的空值在转换为Destination的值的时候,使用指定的值来替换空值。
public class Source

{

    public string Value { get; set; }

}

public class Destination

{

    public string Value { get; set; }

}
配置代码:
public class SourceProfile : Profile

{

    protected override void Configure()

    {

        //Source->Destination

        CreateMap<Source, Destination>()

            .ForMember(dest => dest.Value, opt =>

            {

                opt.NullSubstitute("原始值为NULL");

            });

    }

}
测试代码:
Source src = new Source();

Destination dest = Mapper.Map<Destination>(src);

ObjectDumper.Write(dest);
测试结果:

条件映射(Conditional mapping)
条件映射只当Source类中的属性值满足一定条件的时候才进行映射。例如:
public class Foo

{

    public int baz;

}

public class Bar

{

    public uint baz;

}
对应的配置代码如下:
Mapper.CreateMap<Foo, Bar>()

    .ForMember(dest => dest.baz, opt =>

    {

        opt.Condition(src => (src.baz >= ));

    });
总结
关于AutoMapper更多信息 还可移步官网 http://automapper.org/
.NET Core中使用AutoMapper的更多相关文章
- Dotnet Core中使用AutoMapper
官网:http://automapper.org/ 文档:https://automapper.readthedocs.io/en/latest/index.html GitHub:https://g ...
- ASP.NET CORE 中使用AutoMapper进行对象映射
ASP.NET CORE 中使用AutoMapper进行对象映射 1.什么是AutoMapper? AutoMapper是基于对象到对象约定的映射工具,常用于(但并不仅限制于)把复杂的对象模型转为DT ...
- ASP.NET.Core中使用AutoMapper
首先需要在NuGet中引用AutoMapper的类库 install-package AutoMapper install-package AutoMapper.Extensions.Micros ...
- ASP.NET Core Web 应用程序系列(五)- 在ASP.NET Core中使用AutoMapper进行实体映射
本章主要简单介绍下在ASP.NET Core中如何使用AutoMapper进行实体映射.在正式进入主题之前我们来看下几个概念: 1.数据库持久化对象PO(Persistent Object):顾名思义 ...
- .NET CORE 中使用AutoMapper进行对象映射
简介 AutoMapper uses a fluent configuration API to define an object-object mapping strategy. AutoMappe ...
- 在 ASP.NET Core 中使用 AutoMapper 使 Entity 和 Resource 之间进行映射
目录 从 NuGet 安装 AutoMapper 添加 Entity类 和 Resource类 添加一个 Profile文件,配置映射关系 在Startup中对AutoMapper进行注册 在项目中使 ...
- .Net Core 中使用AutoMapper
1.新建一个类 using AutoMapper; using YourModels; using YourViewModels; namespace YourNamespace { public c ...
- TransactionScope事务处理方法介绍及.NET Core中的注意事项 SQL Server数据库漏洞评估了解一下 预热ASP.NET MVC 的VIEW [AUTOMAPPER]反射自动注册AUTOMAPPER PROFILE
TransactionScope事务处理方法介绍及.NET Core中的注意事项 作者:依乐祝 原文链接:https://www.cnblogs.com/yilezhu/p/10170712.ht ...
- 在 ASP.NET Core 项目中使用 AutoMapper 进行实体映射
一.前言 在实际项目开发过程中,我们使用到的各种 ORM 组件都可以很便捷的将我们获取到的数据绑定到对应的 List<T> 集合中,因为我们最终想要在页面上展示的数据与数据库实体类之间可能 ...
随机推荐
- 用post请求方式实现对地图服务的基本操作
ArcGIS Server REST API 中的很多操作都可以用以下方式实现,具体参数的设置请查看其中的详细说明 public List<string> getGeometry(stri ...
- node传统读取文件和promise,async await,
先上传统文件加载方式代码,传统方式在处理多层嵌套时代码比较混乱 const fs = require('fs') //引入文件系统 function readFile (cb) { fs.readFi ...
- css 实现文字自动换行切同行元素高度自适应
1.实现div行内布局所有行跟随最大高度自适应 html代码样例: <div class="row-single"> <div class="colsp ...
- Rocketmq 集群
写在前面 Rocketmq采用apache rockemq 4.2.0release版本. 源码路径(http://mirrors.shu.edu.cn/apache/rocketmq/4.2.0/r ...
- 【Quartz】常用方法的使用方式(三)
前言 总结了一下quartz组件的一些常用方法,以备将来不时之需.哈哈,看着挺简单有些好是值得笔记一下的.好记性不如烂笔头吗? 代码部分: 方法类内容: public class Example ...
- C# 使用 SmtpClient.SendAsync 方法发送邮件失败,总是返回 Cancelled
问题: 调用 SmtpClient.SendAsync,在 SendCompleted 的回调函数里面总是获取到 e.Cancelled 为 true. 后来测试了一下,相同的代码,只是把 SmtpC ...
- PAT1100:Mars Numbers
1100. Mars Numbers (20) 时间限制 400 ms 内存限制 65536 kB 代码长度限制 16000 B 判题程序 Standard 作者 CHEN, Yue People o ...
- OVMF基础
什么是OVMF The Open Virtual Machine Firmware (OVMF) project aims to support firmware for Virtual Machin ...
- POI处理Excel中各种日期格式问题
前不久写过一篇随笔<EXCEL解析之终极方法WorkbookFactory>,提到使用WorkbookFactory来处理Excel文件数据,最近发现一个问题就是这个办法不能很好的处理各种 ...
- javascript 正则(将数字转化为三位分隔的样式)
'12345678912345678'.replace(/\B(?=(?:\d{3})+\b)/g, ',') 解释: \b : 匹配单词边界,就是位于字符\w([a-zA-Z0-9_])和\W[^a ...