201709011工作日记--Volley源码详解(二)
1.Cache接口和DiskBasedCache实现类
首先,DiskBasedCache类是Cache接口的实现类,因此我们需要先把Cache接口中的方法搞明白。
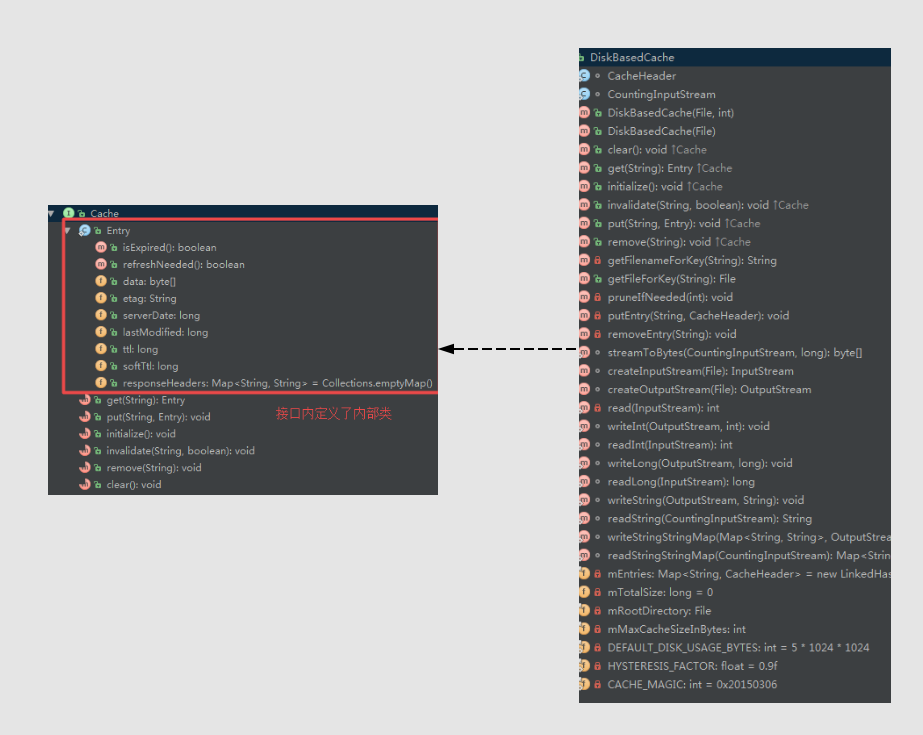
首先分析下Cache接口中的东西,首先是接口的内部类 class entry{},用途是返回缓存的数据,下面是内部类的具体实现:
 class Entry {

         /**

          * 从缓存中返回的数据

          * The data returned from cache.

          * */

         public byte[] data;

         /**

          * 缓存一致性

          * ETag for cache coherency. */

         public String etag;

         /**

          * 从服务端返回的响应数据

          * Date of this response as reported by the server. */

         public long serverDate;

         /**

          * 请求的最后修改时间

          * The last modified date for the requested object. */

         public long lastModified;

         /**

          * 记录的TTL值。IP包被路由器丢弃之前允许通过的最大网段数量

          * 作用是限制IP数据包在计算机网络中的存在的时间,IP数据包在计算机网络中可以转发的最大跳数

          * TTL for this record. */

         public long ttl;

         /** Soft TTL for this record. */

         public long softTtl;

         /** Immutable response headers as received from server; must be non-null. */

         public Map<String, String> responseHeaders = Collections.emptyMap();

         /**过期,返回true

          * True if the entry is expired. */

         public boolean isExpired() {

             return this.ttl < System.currentTimeMillis();

         }

         /**

          * 如果需要从数据源跟新数据则返回TRUE

          * True if a refresh is needed from the original data source. */

         public boolean refreshNeeded() {

             return this.softTtl < System.currentTimeMillis();

         }

     }
上面的是在接口中定义了一个内部类Entry,这种情况之前没见过,还不知道有什么具体作用,下面是接口内部类举例:
 public class QuestionMain implements ITest{

     public static void main(String[] args) {

         ITest.TestInternal.test(new QuestionMain());

     }

     @Override

     public void print() {

         System.out.println("真正实现方法");

     }

 }

 interface ITest {

     void print();

     public static class TestInternal {

         public static void test(ITest test) {

             test.print();

         }

     }

 }
链接中有一点点相关讨论,但是仍然不知道有啥作:http://www.th7.cn/Program/java/201412/329066.shtmlhttp://bbs.csdn.net/topics/390735550
我的一点理解是:由于接口中的所有方法都需要重写,但是有些方法不想重写的话可以放到接口内部类中去。
接口 Cache 里面封装了一个静态内部类 Entry(登记),这个内部类非常重要,看了 HTTP 协议的同学们会发现,Entry 里面定义的这些成员变量跟 headers(消息报头)里面关于缓存的标签是一样的,这也是前面强调要看协议的原因。其中还维护了一个map 用来保存消息报头中的 key / value,data 来保存 entity 消息实体。除此之外就是一些集合操作了。接口的内部类 Entry,他真的太重要了,我们看连个判断过期和需要刷新的方法分别是,两个成员变量跟当前时间的对比。而 data 是二进制数组,我们都知道在 HTTP 中 start line 和 headers 是明文存储的,而 Entity 是没有规定的,一般我们都用二进制流传输,可以减少传输流量,并且安全,data 这里就是用来保存 Entity 的。
这个接口的作用就是对外提供一个查询、存入、删除缓存条目的作用。
Cache 的默认实现是 DiskBasedCache,实现类的目的是:类的目的是 将文件直接缓存到指定目录中的硬盘上的缓存实现。
参数与初始化函数:
 /**

      * 缓存条目

      * Map of the Key, CacheHeader pairs */

     private final Map<String, CacheHeader> mEntries =

             new LinkedHashMap<String, CacheHeader>(16, .75f, true);

     /**

      * 目前所使用到的缓存字节数组

      * Total amount of space currently used by the cache in bytes. */

     private long mTotalSize = 0;

     /**

      * 缓存的根目录

      * The root directory to use for the cache. */

     private final File mRootDirectory;

     /**

      * 缓存的最大字节数组

      * The maximum size of the cache in bytes. */

     private final int mMaxCacheSizeInBytes;

     /**

      * 默认的最大硬盘缓存

      * Default maximum disk usage in bytes. */

     private static final int DEFAULT_DISK_USAGE_BYTES = 5 * 1024 * 1024;

     /** High water mark percentage for the cache */

     private static final float HYSTERESIS_FACTOR = 0.9f;

     /** Magic number for current version of cache file format. */

     private static final int CACHE_MAGIC = 0x20150306;

     /**缓存根目录,最大缓存字节数

      * Constructs an instance of the DiskBasedCache at the specified directory.

      * @param rootDirectory The root directory of the cache.

      * @param maxCacheSizeInBytes The maximum size of the cache in bytes.

      */

     public DiskBasedCache(File rootDirectory, int maxCacheSizeInBytes) {

         mRootDirectory = rootDirectory;

         mMaxCacheSizeInBytes = maxCacheSizeInBytes;

     }

     /**

      * Constructs an instance of the DiskBasedCache at the specified directory using

      * the default maximum cache size of 5MB.

      * @param rootDirectory The root directory of the cache.

      */

     public DiskBasedCache(File rootDirectory) {

         this(rootDirectory, DEFAULT_DISK_USAGE_BYTES);

     }
针对缓存数据的处理:
  /**

      * 清空缓存,并将缓存目录下面的所有缓存文件删除

      * Clears the cache. Deletes all cached files from disk.

      */

     @Override

     public synchronized void clear() {

         File[] files = mRootDirectory.listFiles();

         if (files != null) {

             for (File file : files) {

                 file.delete();

             }

         }

             mEntries.clear();

         mTotalSize = 0;

         VolleyLog.d("Cache cleared.");

     }

     /**

      * 利用指定----key,去获取缓存条目

      * Returns the cache entry with the specified key if it exists, null otherwise.

      */

     @Override

     public synchronized Entry get(String key) {

         CacheHeader entry = mEntries.get(key);

         // if the entry does not exist, return.

         //缓存为空则直接返回

         if (entry == null) {

             return null;

         }

         File file = getFileForKey(key);

         try {

             CountingInputStream cis = new CountingInputStream(

                     new BufferedInputStream(createInputStream(file)), file.length());

             try {

                 CacheHeader entryOnDisk = CacheHeader.readHeader(cis);

                 if (!TextUtils.equals(key, entryOnDisk.key)) {

                     // File was shared by two keys and now holds data for a different entry!

                     VolleyLog.d("%s: key=%s, found=%s",

                             file.getAbsolutePath(), key, entryOnDisk.key);

                     // Remove key whose contents on disk have been replaced.

                     removeEntry(key);

                     return null;

                 }

                 byte[] data = streamToBytes(cis, cis.bytesRemaining());

                 return entry.toCacheEntry(data);

             } finally {

                 // Any IOException thrown here is handled by the below catch block by design.

                 //noinspection ThrowFromFinallyBlock

                 cis.close();

             }

         } catch (IOException e) {

             VolleyLog.d("%s: %s", file.getAbsolutePath(), e.toString());

             remove(key);

             return null;

         }

     }

     /**

      * Initializes the DiskBasedCache by scanning for all files currently in the

      * specified root directory. Creates the root directory if necessary.

      */

     @Override

     public synchronized void initialize() {

         if (!mRootDirectory.exists()) {

             if (!mRootDirectory.mkdirs()) {

                 VolleyLog.e("Unable to create cache dir %s", mRootDirectory.getAbsolutePath());

             }

             return;

         }

         File[] files = mRootDirectory.listFiles();

         if (files == null) {

             return;

         }

         for (File file : files) {

             try {

                 long entrySize = file.length();

                 CountingInputStream cis = new CountingInputStream(

                         new BufferedInputStream(createInputStream(file)), entrySize);

                 try {

                     CacheHeader entry = CacheHeader.readHeader(cis);

                     // NOTE: When this entry was put, its size was recorded as data.length, but

                     // when the entry is initialized below, its size is recorded as file.length()

                     entry.size = entrySize;

                     putEntry(entry.key, entry);

                 } finally {

                     // Any IOException thrown here is handled by the below catch block by design.

                     //noinspection ThrowFromFinallyBlock

                     cis.close();

                 }

             } catch (IOException e) {

                 //noinspection ResultOfMethodCallIgnored

                 file.delete();

             }

         }

     }

     /**

      * Invalidates an entry in the cache.

      * @param key Cache key

      * @param fullExpire True to fully expire the entry, false to soft expire

      */

     @Override

     public synchronized void invalidate(String key, boolean fullExpire) {

         Entry entry = get(key);

         if (entry != null) {

             entry.softTtl = 0;

             if (fullExpire) {

                 entry.ttl = 0;

             }

             put(key, entry);

         }

     }

     /**

      * Puts the entry with the specified key into the cache.

      */

     @Override

     public synchronized void put(String key, Entry entry) {

         pruneIfNeeded(entry.data.length);

         File file = getFileForKey(key);

         try {

             BufferedOutputStream fos = new BufferedOutputStream(createOutputStream(file));

             CacheHeader e = new CacheHeader(key, entry);

             boolean success = e.writeHeader(fos);

             if (!success) {

                 fos.close();

                 VolleyLog.d("Failed to write header for %s", file.getAbsolutePath());

                 throw new IOException();

             }

             fos.write(entry.data);

             fos.close();

             putEntry(key, e);

             return;

         } catch (IOException e) {

         }

         boolean deleted = file.delete();

         if (!deleted) {

             VolleyLog.d("Could not clean up file %s", file.getAbsolutePath());

         }

     }

     /**

      * Removes the specified key from the cache if it exists.

      */

     @Override

     public synchronized void remove(String key) {

         boolean deleted = getFileForKey(key).delete();

         removeEntry(key);

         if (!deleted) {

             VolleyLog.d("Could not delete cache entry for key=%s, filename=%s",

                     key, getFilenameForKey(key));

         }

     }

     /**为指定的缓存键创建伪唯一文件名。利用key,创建key相关的文件名

      * Creates a pseudo-unique filename for the specified cache key.

      * @param key The key to generate a file name for.

      * @return A pseudo-unique filename.

      */

     private String getFilenameForKey(String key) {

         int firstHalfLength = key.length() / 2;

         String localFilename = String.valueOf(key.substring(0, firstHalfLength).hashCode());

         localFilename += String.valueOf(key.substring(firstHalfLength).hashCode());

         return localFilename;

     }

     /**

      * 根据给定的缓存键,创建该文件,并返回该键对应的文件对象

      * Returns a file object for the given cache key.

      */

     public File getFileForKey(String key) {

         return new File(mRootDirectory, getFilenameForKey(key));

     }

     /**

      * 修剪缓存以适应指定的字节数

      * Prunes the cache to fit the amount of bytes specified.

      * @param neededSpace The amount of bytes we are trying to fit into the cache.

      */

     private void pruneIfNeeded(int neededSpace) {

         //如果已经用的和需要用的大小,小于最大缓存字节数,则直接返回

         if ((mTotalSize + neededSpace) < mMaxCacheSizeInBytes) {

             return;

         }

         if (VolleyLog.DEBUG) {

             VolleyLog.v("Pruning old cache entries.");

         }

         long before = mTotalSize;

         int prunedFiles = 0;

         long startTime = SystemClock.elapsedRealtime();

         Iterator<Map.Entry<String, CacheHeader>> iterator = mEntries.entrySet().iterator();

         while (iterator.hasNext()) {

             Map.Entry<String, CacheHeader> entry = iterator.next();

             CacheHeader e = entry.getValue();

             boolean deleted = getFileForKey(e.key).delete();

             if (deleted) {

                 mTotalSize -= e.size;

             } else {

                VolleyLog.d("Could not delete cache entry for key=%s, filename=%s",

                        e.key, getFilenameForKey(e.key));

             }

             iterator.remove();

             prunedFiles++;

             if ((mTotalSize + neededSpace) < mMaxCacheSizeInBytes * HYSTERESIS_FACTOR) {

                 break;

             }

         }

         if (VolleyLog.DEBUG) {

             VolleyLog.v("pruned %d files, %d bytes, %d ms",

                     prunedFiles, (mTotalSize - before), SystemClock.elapsedRealtime() - startTime);

         }

     }

     /**

      * 利用特定的key去添加缓存条目

      * Puts the entry with the specified key into the cache.

      * @param key The key to identify the entry by.

      * @param entry The entry to cache.

      */

     private void putEntry(String key, CacheHeader entry) {

         //存入条目之前需要需要更改缓存容量的大小

         if (!mEntries.containsKey(key)) {

             mTotalSize += entry.size;

         } else {

             CacheHeader oldEntry = mEntries.get(key);

             mTotalSize += (entry.size - oldEntry.size);

         }

         mEntries.put(key, entry); //存入缓存条目

     }

     /**

      * 删除缓存并且更改缓存大小

      * Removes the entry identified by 'key' from the cache.

      */

     private void removeEntry(String key) {

         CacheHeader removed = mEntries.remove(key);

         if (removed != null) {

             mTotalSize -= removed.size;

         }

     }
实现类里面还有一个静态内部类CacheHeader,作用是将缓存一个条目。其中pruneIfNeeded()方法是在 put 方法的第一行执行的,做的就是这件事,Volley 并没有使用 LRU。而是使用的 FIFO。DiskBasedCache 剩下的就是一些文件操作了,就不挨着看了。
这里顺便提一下内部接口,具体例子在Response.java这个类中,存在着两个接口:
  /** Callback interface for delivering parsed responses.  传递相应信息时,回调此接口*/

     public interface Listener<T> {

         /** Called when a response is received. */

         void onResponse(T response);

     }

     /** Callback interface for delivering error responses.    传递错误响应信息时,回调此接口*/

     public interface ErrorListener {

         /**

          * Callback method that an error has been occurred with the

          * provided error code and optional user-readable message.

          */

         void onErrorResponse(VolleyError error);

     }
看下内部接口的使用场景:
 package com.dao.util;

 public class Util {

     public interface Worker {

         void work();

     }

 }

 package com.dao.util;

 import com.dao.util.Util.Worker;

 public class Demo implements Worker {

     public void work() {

         System.out.println("Is working");

     }

 }
在这个util类里面封装了会改变的Worker,也就是说,util类里面有自己的算法:一部分是固定,另外一部分是可变的,而这个可变的部分就变成了一个接口,接口是特殊的抽象类~其实的意思大概的这个worker可能在不同的工作环境有不同的工作方式,所以在类里面放一个接口不是什么新的设计,而是一种思想方式,让代码扩展性更高。
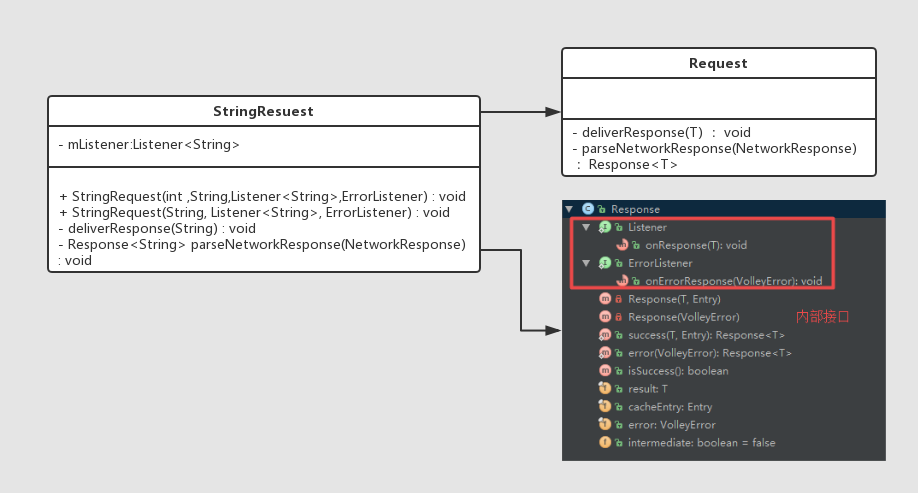
2. 创建一个 StringRequest 请求
这个是我们发起的请求,我们可以注意上边的方法有四个参数的方法,(int method, String url, Listener listener,ErrorListener errorListener) ,我们可以主要关注一个后边的两个回调,一个是成功的回调,一个是失败的回调,而且我们可以看一下他的源码。如下为利用构造函数创建的一个StringRequest请求代码:
 StringRequest stringRequest = new StringRequest("http://www.baidu.com",

                 new Response.Listener<String>() {

                     @Override

                     public void onResponse(String response) {

                     }

                 }, new Response.ErrorListener() {

             @Override

             public void onErrorResponse(VolleyError error) {

             }

         });
先看下StringRequest继承了Request类,需要实现其中的两个抽象方法;在构造函数中需要两个回调函数。他们之间的关系如下:
StringRequest类:
 /**

  * 一个用于在给定URL中以String形式检索响应正文的请求。

  * A canned request for retrieving the response body at a given URL as a String.

  */

 public class StringRequest extends Request<String> {

     private final Listener<String> mListener;

     /**

      * 利用给定的方式创造一个请求消息

      * Creates a new request with the given method.

      *

      * @param method the request {@link Method} to use  请求方式

      * @param url URL to fetch the string at            用于获取字符串的URL

      * @param listener Listener to receive the String response  侦听器接收String响应

      * @param errorListener Error listener, or null to ignore errors        错误侦听器,或null忽略错误

      */

     public StringRequest(int method, String url, Listener<String> listener,

             ErrorListener errorListener) {

         super(method, url, errorListener);

         mListener = listener;

     }

     /**

      * 使用指定的GET方式创建新的请求消息

      * Creates a new GET request.

      *

      * @param url URL to fetch the string at

      * @param listener Listener to receive the String response

      * @param errorListener Error listener, or null to ignore errors

      */

     public StringRequest(String url, Listener<String> listener, ErrorListener errorListener) {

         this(Method.GET, url, listener, errorListener);

     }

     /**

      * 将解析到的响应传送给他们的监听器,给定的响应response保证为非空值;

      * 无法解析的响应不会传递。

      * @param response The parsed response returned by

      */

     @Override

     protected void deliverResponse(String response) {

         if (mListener != null) {

             mListener.onResponse(response);

         }

     }

     /**

      * 工作线程将会调用这个方法

      * 方法的目的是:按照HTTP头消息中的编码字符集,去重新构建这个消息的返回信息

      *

      * new String(byte[],"UTF-8")是新建了一个UTF-8编码的字符串

      *

      * @param response Response from the network

      * @return  返回成功响应的消息

      */

     @Override

     protected Response<String> parseNetworkResponse(NetworkResponse response) {

         String parsed;

         try {

             //解析头部信息的编码格式,然后将返回信息按照编码格式进行转换

             parsed = new String(response.data, HttpHeaderParser.parseCharset(response.headers));

         } catch (UnsupportedEncodingException e) {//如果指定字符集不受支持

             parsed = new String(response.data);

         }

         return Response.success(parsed, HttpHeaderParser.parseCacheHeaders(response));

     }

 }
Response类的内部接口:
 public class Response<T> {

     /** Callback interface for delivering parsed responses.  传递相应信息时,回调此接口*/

     public interface Listener<T> {

         /** Called when a response is received. */

         void onResponse(T response);

     }

     /** Callback interface for delivering error responses.    传递错误响应信息时,回调此接口*/

     public interface ErrorListener {

         /**

          * Callback method that an error has been occurred with the

          * provided error code and optional user-readable message.

          */

         void onErrorResponse(VolleyError error);

     }
201709011工作日记--Volley源码详解(二)的更多相关文章
- 201709011工作日记--Volley源码详解(三)
1. RequestQueue类 我们使用 Volley 的时候创建一个 request 然后把它丢到 RequestQueue 中就可以了.那么来看 RequestQueue 的构造方法,含有四个参 ...
- 20170908工作日记--Volley源码详解
Volley没有jar包,需要从官网上下载源码自己编译出来,或者做成相关moudle引入项目中.我们先从最简单的使用方法入手进行分析: //创建一个网络请求队列 RequestQueue reques ...
- 201709021工作日记--Volley源码详解(五)
学习完了CacheDispatcher这个类,下面我们看下NetworkDispatcher这个类的具体细节,先上代码: /** * 提供一个线程执行网络调度的请求分发 * Provides a th ...
- 201709021工作日记--Volley源码解读(四)
接着volley源码(三)继续,本来是准备写在(三)后面的,但是博客园太垃圾了,写了半天居然没保存上,要不是公司这个博客还没被限制登陆,鬼才用这个...真是垃圾 继续解读RequestQueue的源码 ...
- 20170906工作日记--volley源码的相关方法细节学习
1. 在StringRequest类中的75行--new String();使用方法 /** * 工作线程将会调用这个方法 * @param response Response from the ne ...
- OkHttp3源码详解(二) 整体流程
1.简单使用 同步: @Override public Response execute() throws IOException { synchronized (this) { if (execut ...
- Activiti架构分析及源码详解
目录 Activiti架构分析及源码详解 引言 一.Activiti设计解析-架构&领域模型 1.1 架构 1.2 领域模型 二.Activiti设计解析-PVM执行树 2.1 核心理念 2. ...
- 源码详解系列(六) ------ 全面讲解druid的使用和源码
简介 druid是用于创建和管理连接,利用"池"的方式复用连接减少资源开销,和其他数据源一样,也具有连接数控制.连接可靠性测试.连接泄露控制.缓存语句等功能,另外,druid还扩展 ...
- [转]【视觉 SLAM-2】 视觉SLAM- ORB 源码详解 2
转载地址:https://blog.csdn.net/kyjl888/article/details/72942209 1 ORB-SLAM2源码详解 by 吴博 2 https://github.c ...
随机推荐
- sql查询分析器中显示行号
-- 工具-> -- 选项-> -- 文本编辑器-> -- 所有语言-> -- 常规-> -- 显示-> -- 行号
- 在SQL Server中使用CLR调用.NET方法
介绍 我们一起来做个示例,在.NET中新建一个类,并在这个类里新建一个方法,然后在SQL Server中调用这个方法.按照微软所述,通过宿主 Microsoft .NET Framework 2 ...
- MySQL 语句的规范
- Syncthing搭建
现在貌似只有windows和linux比较号装. 安装 先从官网下载好Windows 32位版(我本本对应的系统版本)的Syncthing,解压后可以看到如下文件结构 Syncthing文件结构 ...
- 奇偶数判断2(if else+switch语句)
public class 奇偶数判断2 { public static void main(String [] agrs){ float s = 17f; //定义浮点型数据s float h = s ...
- django做form表单的数据验证
我们之前写的代码都没有对前端input框输入的数据做验证,我们今天来看下,如果做form表单的数据的验证 在views文件做验证 首先用文字描述一下流程 1.在views文件中导入forms模块 2. ...
- 【转】Hadoop HDFS分布式环境搭建
原文地址 http://blog.sina.com.cn/s/blog_7060fb5a0101cson.html Hadoop HDFS分布式环境搭建 最近选择给大家介绍Hadoop HDFS系统 ...
- .NET发送请求(get/post/http/https),携带json数据,接收json数据
C#发送https请求有一点要注意: ServicePointManager.ServerCertificateValidationCallback = new RemoteCertificateVa ...
- 全屏API
by zhangxinxu from http://www.zhangxinxu.com本文地址:http://www.zhangxinxu.com/wordpress/?p=2679 二.相关文章以 ...
- Golang之定义错误(errors)
基本示例: package main //定义错误 //error 也是个接口 import ( "errors" "fmt" ) var errNotFoun ...