Android(java)学习笔记195:学生信息管理系统案例(SQLite + ListView)
1.首先说明一个知识点,通常我们显示布局文件xml都是如下:
setContentView(R.layout.activity_main);
其实每一个xml布局文件就好像一个气球,我们可以使用View.inflate(Context context,int resource , ViewGroup root),inflate单词的意思就是:打气筒,也就是使用打气筒方法inflate(静态方法,返回View)把xml这个气球打成View,交给系统去显示;也就是说如下:
setContentView(R.layout.activity_main);
等价于:
View view = View.inflate(MainActivity.this,R.layout.activity_main, null);
setContentView(view);
2. 学生信息管理系统案例实现过程:
(1)新建一个Android工程,如下:
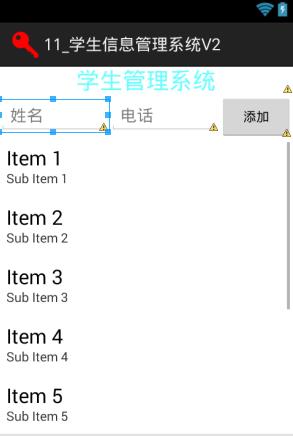
(2)首先我们设置学生信息系统的UI,来到activity_main.xml,如下:
 <LinearLayout xmlns:android="http://schemas.android.com/apk/res/android"

     xmlns:tools="http://schemas.android.com/tools"

     android:layout_width="match_parent"

     android:layout_height="match_parent"

     android:gravity="center_horizontal"

     android:orientation="vertical"

     tools:context="com.himi.studentsys.MainActivity" >

     <TextView

         android:layout_width="fill_parent"

         android:layout_height="wrap_content"

         android:gravity="center_horizontal"

         android:text="学生管理系统"

         android:textColor="#66ffff"

         android:textSize="25dp" />

     <LinearLayout

         android:layout_width="match_parent"

         android:layout_height="wrap_content"

         android:orientation="horizontal" >

         <EditText

             android:inputType="text"

             android:hint="姓名"

             android:id="@+id/et_name"

             android:layout_width="0dp"

             android:layout_height="wrap_content"

             android:layout_weight="3" />

         <EditText

             android:inputType="phone"

             android:hint="电话"

             android:id="@+id/et_phone"

             android:layout_width="0dp"

             android:layout_height="wrap_content"

             android:layout_weight="3" />

         <Button

             android:onClick="add"

             android:id="@+id/button1"

             style="?android:attr/buttonStyleSmall"

             android:layout_width="0dp"

             android:layout_height="wrap_content"

             android:layout_weight="2"

             android:text="添加" />

     </LinearLayout>

     <ListView

         android:layout_width="fill_parent"

         android:layout_height="fill_parent"

         android:id="@+id/lv">

     </ListView>

 </LinearLayout>
布局效果如下:
(3)上面学生信息要存储到数据库,自然这里需要创建数据库(实现数据增删改查),如下:
新建一个包,包名为"com.himi.studentsys.db",在这个包下新建一个类StudentDBOpenHelper(数据库帮助类),让它继承自SQLiteOpenHelper,这里StudentDBOpenHelper实现 数据库 和 表 的创建。
 package com.himi.studentsys.db;

 import android.content.Context;

 import android.database.sqlite.SQLiteDatabase;

 import android.database.sqlite.SQLiteDatabase.CursorFactory;

 import android.database.sqlite.SQLiteOpenHelper;

 public class StudentDBOpenHelper extends SQLiteOpenHelper {

     public StudentDBOpenHelper(Context context) {

         super(context, "student.db", null, 1);

     }

     @Override

     public void onCreate(SQLiteDatabase db) {

         db.execSQL("create table info (_id integer primary key autoincrement,name varchar(20),phone varchar(20))");

     }

     @Override

     public void onUpgrade(SQLiteDatabase db, int oldVersion, int newVersion) {

     }

 }
下面接着实现数据库增删改查的工具类StudentDao,新建一个包"com.himi.studentsys.db.dao",如下:
 package com.himi.studentsys.db.dao;

 import java.util.ArrayList;

 import java.util.List;

 import android.content.ContentValues;

 import android.content.Context;

 import android.database.Cursor;

 import android.database.sqlite.SQLiteDatabase;

 import com.himi.studentsys.db.StudentDBOpenHelper;

 /**

  * 学生信息的dao代码:data access object

  * 提供增删改查

  */

 public class StudentDao {

     private StudentDBOpenHelper helper;

     /**

      * 没有无参的构造方法,只能用下面的构造方法去初始化dao

      * @param context

      */

     public StudentDao(Context context) {

         helper = new StudentDBOpenHelper(context);

     }

     /**

      * 添加一个学生信息

      * @param name 姓名

      * @param phone 电话

      * @return 添加在数据库的第几行

      */

     public long add(String name,String phone){

         // 获取可写的数据库

         SQLiteDatabase db = helper.getWritableDatabase();

         // 获取插入值对象

         ContentValues values = new ContentValues();

         // 设置插入值

         values.put("name", name);

         values.put("phone", phone);

         // 调用数据库插入方法

         long rowid = db.insert("info", null, values);

         // 关闭数据库连接

         db.close();

         return rowid;

     }

     /**

      * 删除一条学生信息

      * @param id 学生id

      * @return 影响了几行,0代表删除失败

      */

     public int delete(String id){

         SQLiteDatabase db = helper.getWritableDatabase();

         int result = db.delete("info", "_id=?", new String[]{id});

         db.close();

         return result;

     }

     /**

      * 获取所有的学生信息

      * @return

      */

     public List<StudentInfo> findAll(){

         SQLiteDatabase db = helper.getReadableDatabase();

         List<StudentInfo> infos = new ArrayList<StudentInfo>();

         Cursor cursor = db.query("info", new String[]{"_id","name","phone"}, null, null, null, null, null);

         while(cursor.moveToNext()){

             StudentInfo info = new StudentInfo();

             String id = cursor.getString(0);

             String name = cursor.getString(1);

             String phone = cursor.getString(2);

             info.setId(id);

             info.setName(name);

             info.setPhone(phone);

             infos.add(info);

         }

         cursor.close();

         db.close();

         return infos;

     }

 }
上面查询数据的时候需要一个业务bean类,新建一个包"com.himi.studentsys.db.bean",创建一个学生信息的bean类StudentInfo,如下:
 package com.himi.studentsys.db.bean;

 /**

  * 学生信息的业务bean

  */

 public class StudentInfo {

     private String id;

     private String name;

     private String phone;

     public String getId() {

         return id;

     }

     public void setId(String id) {

         this.id = id;

     }

     public String getName() {

         return name;

     }

     public void setName(String name) {

         this.name = name;

     }

     public String getPhone() {

         return phone;

     }

     public void setPhone(String phone) {

         this.phone = phone;

     }

     @Override

     public String toString() {

         return "StudentInfo [id=" + id + ", name=" + name + ", phone=" + phone

                 + "]";

     }

 }
(4)实现Button的点击事件,实现添加数据到数据库:
来到MainActivity,如下:
 package com.himi.studentsys;

 import java.util.List;

 import android.app.Activity;

 import android.graphics.Color;

 import android.os.Bundle;

 import android.text.TextUtils;

 import android.view.View;

 import android.view.ViewGroup;

 import android.view.Window;

 import android.widget.BaseAdapter;

 import android.widget.EditText;

 import android.widget.ListView;

 import android.widget.TextView;

 import android.widget.Toast;

 import com.himi.studentsys.db.bean.StudentInfo;

 import com.himi.studentsys.db.dao.StudentDao;

 public class MainActivity extends Activity {

     private EditText et_name;

     private EditText et_phone;

     private ListView lv;

     /**

      * 学生信息的dao

      */

     private StudentDao dao;

     /**

      * 所有的学生信息

      */

     private List<StudentInfo> infos;

     /**

      * 全局的数据适配器

      */

     private StudentAdapter adapter;

     @Override

     protected void onCreate(Bundle savedInstanceState) {

         super.onCreate(savedInstanceState);

         requestWindowFeature(Window.FEATURE_NO_TITLE);

         setContentView(R.layout.activity_main);

         et_name = (EditText) findViewById(R.id.et_name);

         et_phone = (EditText) findViewById(R.id.et_phone);

         lv = (ListView) findViewById(R.id.lv);

         dao = new StudentDao(this);

         infos = dao.findAll();

         adapter = new StudentAdapter();

         lv.setAdapter(adapter);

     }

     /**

      * 添加一个信息到数据库

      * @param view

      */

     public void add(View view){

         String name = et_name.getText().toString().trim();

         String phone = et_phone.getText().toString().trim();

         if(TextUtils.isEmpty(name)||TextUtils.isEmpty(phone)){

             Toast.makeText(this, "数据不能为空", 0).show();

             return ;

         }

         long result = dao.add(name, phone);

         if(result>0){

             Toast.makeText(this, "添加成功", 0).show();

             infos = dao.findAll();

             adapter.notifyDataSetChanged();//-->从新调用getcount 调用getview

         }else{

             Toast.makeText(this, "添加失败", 0).show();

         }

     }

     private class StudentAdapter extends BaseAdapter{

         @Override

         public int getCount() {

             return infos.size();

         }

         @Override

         public View getView(final int position, View convertView,

                 ViewGroup parent) {

             System.out.println("position" + position);

             TextView tv;

             if (convertView == null) {

                 tv = new TextView(MainActivity.this);

             } else {

                 tv = (TextView) convertView;

             }

             tv.setTextSize(20);

             tv.setTextColor(Color.RED);

             tv.setText(infos.get(position).toString());

             return tv;

         }

         @Override

         public Object getItem(int position) {

             return null;

         }

         @Override

         public long getItemId(int position) {

             return 0;

         }

     }

 }
这时候布署程序到模拟器上,如下:

明显这个UI效果不好,要完善一下。
(5)完善优化显示的UI效果:
优化UI显示,主要是修改Adapter 中的getView()方法,来到MainActivity,如下:
 package com.himi.studentsys;

 import java.util.List;

 import android.app.Activity;

 import android.graphics.Color;

 import android.os.Bundle;

 import android.text.TextUtils;

 import android.view.View;

 import android.view.ViewGroup;

 import android.widget.BaseAdapter;

 import android.widget.EditText;

 import android.widget.ListView;

 import android.widget.TextView;

 import android.widget.Toast;

 import com.himi.studentsys.db.bean.StudentInfo;

 import com.himi.studentsys.db.dao.StudentDao;

 public class MainActivity extends Activity {

     private EditText et_name;

     private EditText et_phone;

     private ListView lv;

     /**

      * 学生信息的dao

      */

     private StudentDao dao;

     /**

      * 所有的学生信息

      */

     private List<StudentInfo> infos;

     @Override

     protected void onCreate(Bundle savedInstanceState) {

         super.onCreate(savedInstanceState);

         setContentView(R.layout.activity_main);

         initViews();

     }

     private void initViews() {

         // TODO 自动生成的方法存根

         et_name = (EditText) findViewById(R.id.et_name);

         et_phone = (EditText) findViewById(R.id.et_phone);

         lv = (ListView) findViewById(R.id.lv);

         dao = new StudentDao(this);

         refreshUI();

     }

     /**

      * 刷新显示

      */

     public void refreshUI() {

         //获取数据库数据

         infos = dao.findAll();

         //设置数据

         lv.setAdapter(new StudentAdapter());

     }

     private class StudentAdapter extends BaseAdapter {

         public int getCount() {

             // TODO 自动生成的方法存根

             return infos.size();

         }

         public View getView(int position, View convertView, ViewGroup parent) {

             /*TextView tv;

             if(convertView == null) {

                 tv=  new TextView(MainActivity.this);

             }else {

                 tv = (TextView) convertView;

             }

             tv.setTextSize(20);

             tv.setTextColor(Color.RED);

             tv.setText(infos.get(position).toString());*/

             View view = View.inflate(MainActivity.this, R.layout.item, null);

             TextView tv_id = (TextView) view.findViewById(R.id.tv_id);

             TextView tv_name = (TextView) view.findViewById(R.id.tv_name);

             TextView tv_phone = (TextView) view.findViewById(R.id.tv_phone);

             //设置数据

             tv_id.setText(infos.get(position).getId());

             tv_name.setText(infos.get(position).getName());

             tv_phone.setText(infos.get(position).getPhone());

             return view;

         }

         public Object getItem(int position) {

             // TODO 自动生成的方法存根

             return null;

         }

         public long getItemId(int position) {

             // TODO 自动生成的方法存根

             return 0;

         }

     }

     /**

      * 添加数据到数据库

      * @param v

      */

     public void add(View v) {

         String name = et_name.getText().toString().trim();

         String phone = et_phone.getText().toString().trim();

         if(TextUtils.isEmpty(name) || TextUtils.isEmpty(phone)) {

             Toast.makeText(this, "数据不能为空", 0).show();

             return;

         }

         long result = dao.add(name, phone);

         if(result>0) {

             Toast.makeText(this, "添加成功", 0).show();

             refreshUI();

         }else {

             Toast.makeText(this, "添加失败", 0).show();

             refreshUI();

         }

     }

 }
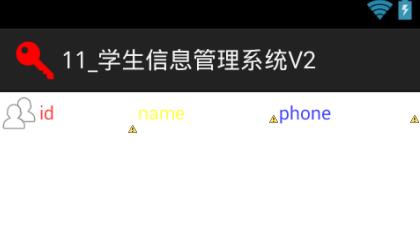
自定义的条目布局item.xml,如下:
 <?xml version="1.0" encoding="utf-8"?>

 <LinearLayout xmlns:android="http://schemas.android.com/apk/res/android"

     android:layout_width="match_parent"

     android:layout_height="wrap_content"

     android:orientation="horizontal" >

     <TextView

         android:id="@+id/tv_id"

         android:drawableLeft="@drawable/ic_menu_cc"

         android:textColor="#bbff0000"

         android:gravity="center_vertical"

         android:layout_width="0dip"

         android:layout_height="wrap_content"

         android:layout_weight="1"

         android:text="id"/>

      <TextView

         android:id="@+id/tv_name"

         android:textColor="#bbffff00"

         android:gravity="center_vertical"

         android:layout_width="0dip"

         android:layout_height="wrap_content"

         android:layout_weight="1"

         android:text="name"/>

       <TextView

         android:id="@+id/tv_phone"

         android:textColor="#bb0000ff"

         android:gravity="center_vertical"

         android:layout_width="0dip"

         android:layout_height="wrap_content"

         android:layout_weight="1"

         android:text="phone"/>

 </LinearLayout>
它的布局效果是:
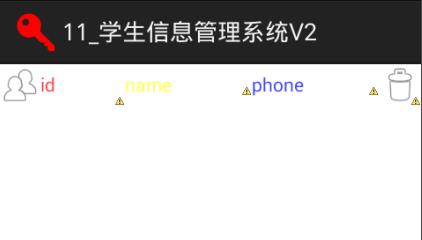
(6)上面只有添加数据到数据库并显示的效果,这里添加删除数据库中数据的效果
修改item.xml如下:
 <?xml version="1.0" encoding="utf-8"?>

 <LinearLayout xmlns:android="http://schemas.android.com/apk/res/android"

     android:layout_width="match_parent"

     android:layout_height="wrap_content"

     android:orientation="horizontal" >

     <TextView

         android:id="@+id/tv_id"

         android:drawableLeft="@drawable/ic_menu_cc"

         android:textColor="#bbff0000"

         android:gravity="center_vertical"

         android:layout_width="0dip"

         android:layout_height="wrap_content"

         android:layout_weight="3"

         android:text="id"/>

      <TextView

         android:id="@+id/tv_name"

         android:textColor="#bbffff00"

         android:gravity="center_vertical"

         android:layout_width="0dip"

         android:layout_height="wrap_content"

         android:layout_weight="3"

         android:text="name"/>

       <TextView

         android:id="@+id/tv_phone"

         android:textColor="#bb0000ff"

         android:gravity="center_vertical"

         android:layout_width="0dip"

         android:layout_height="wrap_content"

         android:layout_weight="3"

         android:text="phone"/>

       <ImageView

         android:id="@+id/iv_delete"

         android:layout_width="0dip"

         android:layout_height="wrap_content"

         android:layout_weight="1"

         android:src="@drawable/ic_menu_delete"/>

 </LinearLayout>
布局效果如下:
再来到MainActivity之中,如下:
 package com.himi.studentsys;

 import java.util.List;

 import android.app.Activity;

 import android.app.AlertDialog;

 import android.app.AlertDialog.Builder;

 import android.content.DialogInterface;

 import android.os.Bundle;

 import android.text.TextUtils;

 import android.view.View;

 import android.view.View.OnClickListener;

 import android.view.ViewGroup;

 import android.view.Window;

 import android.widget.BaseAdapter;

 import android.widget.EditText;

 import android.widget.ImageView;

 import android.widget.ListView;

 import android.widget.TextView;

 import android.widget.Toast;

 import com.himi.studentsys.db.bean.StudentInfo;

 import com.himi.studentsys.db.dao.StudentDao;

 public class MainActivity extends Activity {

     private EditText et_name;

     private EditText et_phone;

     private ListView lv;

     /**

      * 学生信息的dao

      */

     private StudentDao dao;

     /**

      * 所有的学生信息

      */

     private List<StudentInfo> infos;

     /**

      * 全局的数据适配器

      */

     private StudentAdapter adapter;

     @Override

     protected void onCreate(Bundle savedInstanceState) {

         super.onCreate(savedInstanceState);

         requestWindowFeature(Window.FEATURE_NO_TITLE);

         setContentView(R.layout.activity_main);

         et_name = (EditText) findViewById(R.id.et_name);

         et_phone = (EditText) findViewById(R.id.et_phone);

         lv = (ListView) findViewById(R.id.lv);

         dao = new StudentDao(this);

         infos = dao.findAll();

         adapter = new StudentAdapter();

         lv.setAdapter(adapter);

     }

     /**

      * 添加一个信息到数据库

      * @param view

      */

     public void add(View view){

         String name = et_name.getText().toString().trim();

         String phone = et_phone.getText().toString().trim();

         if(TextUtils.isEmpty(name)||TextUtils.isEmpty(phone)){

             Toast.makeText(this, "数据不能为空", 0).show();

             return ;

         }

         long result = dao.add(name, phone);

         if(result>0){

             Toast.makeText(this, "添加成功", 0).show();

             infos = dao.findAll();

             adapter.notifyDataSetChanged();//-->从新调用getcount 调用getview

         }else{

             Toast.makeText(this, "添加失败", 0).show();

         }

     }

     private class StudentAdapter extends BaseAdapter{

         @Override

         public int getCount() {

             return infos.size();

         }

         @Override

         public View getView(final int position, View convertView, ViewGroup parent) {

             System.out.println("position"+position);

             View view = View.inflate(MainActivity.this, R.layout.item, null);

             TextView tv_id = (TextView) view.findViewById(R.id.tv_id);

             TextView tv_name = (TextView) view.findViewById(R.id.tv_name);

             TextView tv_phone = (TextView) view.findViewById(R.id.tv_phone);

             ImageView iv_delete = (ImageView) view.findViewById(R.id.iv_delete);

              iv_delete.setOnClickListener(new OnClickListener() {

                 @Override

                 public void onClick(View v) {

                     AlertDialog.Builder builder = new Builder(MainActivity.this);

                     builder.setTitle("提醒");

                     builder.setMessage("是否确定删除?");

                     builder.setPositiveButton("确定删除", new DialogInterface.OnClickListener() {

                         @Override

                         public void onClick(DialogInterface dialog, int which) {

                             // 获取该位置组件id,并删除

                             int result = dao.delete(infos.get(position).getId());

                             Toast.makeText(MainActivity.this, "删除了"+result+"个记录", 0).show();

                             // 重新查询

                             infos = dao.findAll();

                             adapter.notifyDataSetChanged();

                         }

                     });

                     builder.setNegativeButton("取消", null);

                     builder.create().show();

                 }

             });

             // 修改对应值

             tv_id.setText(infos.get(position).getId());

             tv_name.setText(infos.get(position).getName());

             tv_phone.setText(infos.get(position).getPhone());

             return view;

         }

         @Override

         public Object getItem(int position) {

             return null;

         }

         @Override

         public long getItemId(int position) {

             return 0;

         }

     }

 }
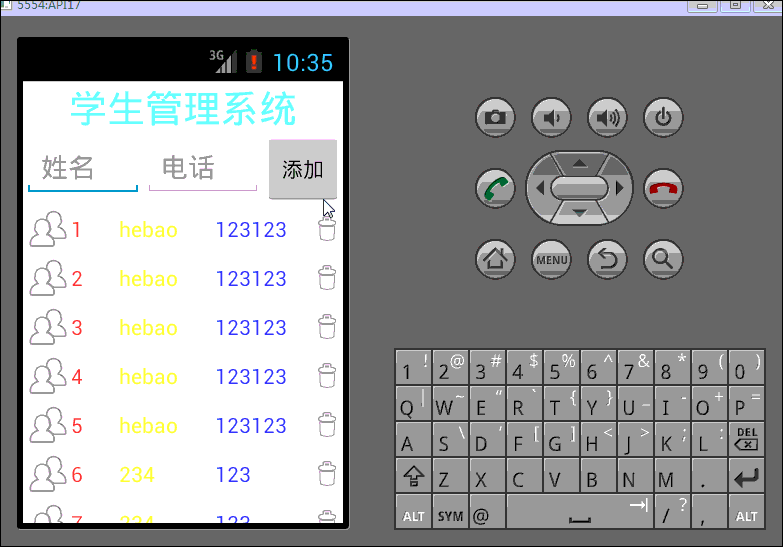
(7)最终代码已经完成,布署程序到模拟器上:
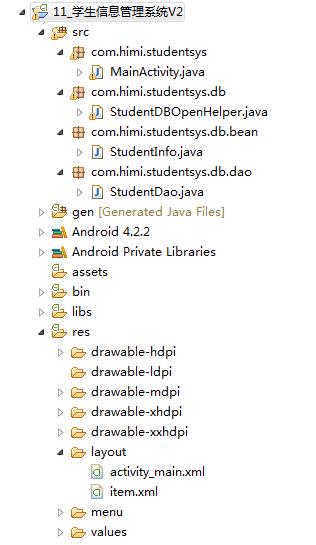
工程项目一览图:
Android(java)学习笔记195:学生信息管理系统案例(SQLite + ListView)的更多相关文章
- Android(java)学习笔记188:学生信息管理系统案例(SQLite + ListView)
1.首先说明一个知识点,通常我们显示布局文件xml都是如下: setContentView(R.layout.activity_main): 其实每一个xml布局文件就好像一个气球,我们可以使用Vie ...
- Java课设(学生信息管理系统)
1.团队课程设计博客链接 http://www.cnblogs.com/Min21/p/7064093.html 2.个人负责模板或任务说明 设计登陆界面和学生信息界面的设计,学生信息的显示.退出等功 ...
- 【JAVA】简陋的学生信息管理系统
因为之前写了一个学生信息管理系统,但还是处于命令行界面,不美观,于是打算做一个完整的界面出来. 在网上查阅资料后发现C++本身是不支持图形化界面的(可以使用第三方的Qt来做) 权衡之下还是选择了JAV ...
- Py学生信息管理系统 案例(优化版)
# 第一题:设计一个全局变量,来保存很多个学生信息:学生(学号, 姓名,年龄):思考要用怎样的结构来保存:# 第二题:在第一题基础上,完成:让用户输入一个新的学生信息(学号,姓名,年龄):你将其保存在 ...
- Java学习笔记-学生管理系统
Java学习笔记 一个Student类 public class Student { private String sid; private String name; private String a ...
- Java 实现学生信息管理系统
编写一个简单的学生管理信息系统. 在oracle中设计一张学生表,以学号作为关键字. 其他学生信息有:姓名.手机号. 在进入系统时,显示如下菜单: ************************** ...
- java开发学生信息管理系统的实现(简洁易懂),适合计算机专业学生参考,课程设计、毕业论文设计参考等
编写一个简单的学生管理信息系统. 在oracle中设计一张学生表,以学号作为关键字. 其他学生信息有:姓名.手机号. 在进入系统时,显示如下菜单: ************************** ...
- Java用户名登录学生信息管理系统并对其进行增删改查操作
package zzzzzzzz; import java.io.*;//作者:凯鲁嘎吉 - 博客园//http://www.cnblogs.com/kailugaji/ public class T ...
- Java课程设计---学生信息管理系统需求分析及总体设计
按照软件工程实践的原则,开发大型程序需要经历需求分析.总体设计.详细设计.编码实现.系统测试.系统维护等几个阶段. 1.需求分析 本阶段是整个软件开发过程中最重要的环节.通过了解实际运行的系统或与用户 ...
随机推荐
- 在Thinkphp3.2 中使用PHPMailer 发送邮件
phpmailer发送邮件是php开发者首选的一个邮件发送插件了,下面我来介绍怎么集成phpmailer到thinkphp框架了,有需要了解的朋友可参考. phpmailer发送邮件功能很强大,今天真 ...
- magento站点还原到本地
问题描述 首先将网站文件夹解压到xampp/htdocs/wenjianjia目录下,然后替换sql文件里的域名为localhost/wenjianjia.然后访问前台,正常.访问后台,出问题了 Ma ...
- Ubuntu软件包管理命令全面集锦
说明:由于图形化界面方法(如Add/Remove... 和Synaptic Package Manageer)比较简单,所以这里主要总结在终端通过命令行方式进行的软件包安装.卸载和删除的方法. 一.U ...
- Python Tutorial 学习(十)-- Brief Tour of the Standard Library
10.1. Operating System Interface os库 import os os.getcwd() # Return the current working directory 'C ...
- S5PV210开发板刷机(SD卡uboot、串口+USB-OTG刷机方法)
一.介绍 九鼎的S5PV210开发板,在出厂前已经默认刷了Android4.0系统.如果需要刷其它的系统或者是由于系统问题无法启动时,就需要对板子刷机. 其实,刷机是对210开发板的一个基础学习,目的 ...
- jquery如何判断div是否隐藏--useful
<!DOCTYPE html PUBLIC "-//W3C//DTD XHTML 1.0 Transitional//EN" "http://www.w3.org/ ...
- 转:如何找出发生SEGV内存错误的程序
原文来自于:http://www.searchtb.com/2014/03/%E5%A6%82%E4%BD%95%E6%89%BE%E5%87%BA%E5%8F%91%E7%94%9Fsegv%E5% ...
- BZOJ 1031 字符加密
Description 喜欢钻研问题的JS 同学,最近又迷上了对加密方法的思考.一天,他突然想出了一种他认为是终极的加密办法:把需要加密的信息排成一圈,显然,它们有很多种不同的读法.例如下图,可以读作 ...
- [BZOJ 2350] [Poi2011] Party 【Special】
题目链接: BZOJ - 2350 题目分析 因为存在一个 2/3 n 大小的团,所以不在这个团中的点最多 1/3 n 个. 牺牲一些团内的点,每次让一个团内的点与一个不在团内的点抵消删除,最多牺牲 ...
- svn图形客户端:smartsvn,svnmanager,rapidsvn,svnworkbench,rabbitsvn,Esvn, trac
svn图形客户端: smartsvn,http://www.oschina.net/p/smartsvn, 不用安装直接运行 qsvn, http://www.oschina.net/p/qsvn r ...