一周一话题之一(EF-CodeFirst、MEF、T4框架搭建学习)
本话题是根据郭明峰博客《MVC实用架构系列》的搭建学习总结。
-->目录导航
一、数据仓储访问的构建
充分采用面向对象思想,针对接口、针对抽象进行设计;
1.UnitOfWork的构建
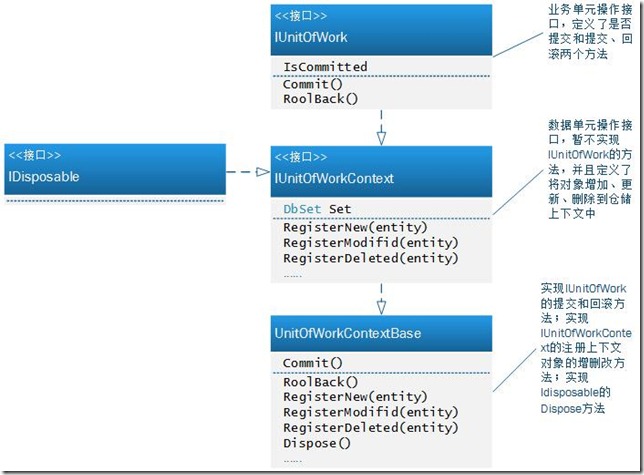
最终使得所有的数据操作最终都提交到一个与IUnitOfWork接口的实现类中进行操作,以保证各个实体的Repository与IUnitOfWork使用的是同一个DbContext上下文
2.Repository的构建

注:EF的操作提交 context.SaveChanged() 默认就是事务性的,只要保证了当前的所有实体的操作都是在一个共同的上下文中进行的,就实现了事务操作了
3.使用MEF应用IOC
(1)优势
.net4.0 自带:MEF的功能在 System.ComponentModel.Composition.dll 程序集中,直接引用即可使用,不用安装第三方组件
0 配置:MEF是不需要使用配置文件或代码对接口与实现进行一一配对的,只需要简单的使用几个Attribute特性,就能自动完成源与目标的配对工作
自动化:系统初始化时自动遍历程序目录或指定文件夹下的dll,根据程序集中接口与类的特定Attribute特性进行自动配对
(2)使用
-->在接口和类上加上特定的Attribute,
例如:使用[Export(typeof(IUnitOfWork))]将EFUnitOfWorkContext进行导出
[Export(typeof(IUnitOfWork))]

    internal class EFUnitOfWorkContext : UnitOfWorkContextBase
使用[Import],在需要EFUnitOfWorkContext时直接将其导入
[Import]

        protected IUnitOfWork UnitOfWork { get; set; }
(3)MVC项目的应用
IOC组件是通过 DependencyResolver类中的 SetResolver(IDependencyResolver resolver) 方法来向MVC提供注册点的,所以我们只需要实现一个 IDependencyResolver 接口的MEF实现类,即可完成MEF在MVC中的注册工作。
/// <summary>

    /// MEF依赖关系解析类

    /// </summary>

    public class MefDependencySolver : IDependencyResolver

    {

        private readonly ComposablePartCatalog _catalog;

        private const string HttpContextKey = "MefContainerKey";

        public MefDependencySolver(ComposablePartCatalog catalog)

        {

            _catalog = catalog;

        }

        public CompositionContainer Container

        {

            get

            {

                if (!HttpContext.Current.Items.Contains(HttpContextKey))

                {

                    HttpContext.Current.Items.Add(HttpContextKey, new CompositionContainer(_catalog));

                }

                CompositionContainer container = (CompositionContainer)HttpContext.Current.Items[HttpContextKey];

                HttpContext.Current.Application["Container"] = container;

                return container;

            }

        }

        #region IDependencyResolver Members

        public object GetService(Type serviceType)

        {

            string contractName = AttributedModelServices.GetContractName(serviceType);

            return Container.GetExportedValueOrDefault<object>(contractName);

        }

        public IEnumerable<object> GetServices(Type serviceType)

        {

            return Container.GetExportedValues<object>(serviceType.FullName);

        }

        #endregion

    }
(4)MEF排错
-->MEF的导出导入是整体关联的,只要树中某一个部件匹配失败,整个树将无法实例化,也就是会出现Import的属性值为Null
使用MEF开发团队提供的调试工具MEFX来进行调试
-->常用命令
1.基本语法
mefx [files and directories] [action] [options]2.列出可用部件
(1)mefx /file:【dll路径】 /parts
ex: F:\study\资源包\Ioc\mefx_0.4>mefx /file:【dll路径】/parts
(2)查看详细信息
mefx /file:【dll路径】 /type:【具体部件名称】 verboseex: F:\study\资源包\Ioc\mefx_0.4>mefx /file:【dll路径】 /type:【具体部件名称】 /verbose
(3)列出导入、导出
mefx /file:【dll路径】 /importers(exporters):【具体部件名称】3.查找拒绝部件
mefx /file:【dll路径】 /rejected /verbose
4.DBContext
(1)实体映射配置
-->映射配置通用接口
/// <summary>

    ///     实体映射接口

    /// </summary>

    [InheritedExport]

    public interface IEntityMapper

    {

        /// <summary>

        ///     将当前实体映射对象注册到当前数据访问上下文实体映射配置注册器中

        /// </summary>

        /// <param name="configurations"></param>

        void RegistTo(ConfigurationRegistrar configurations);

    }
IEntityMapper接口添加了MEF的InheritedExport特性,该特性可以沿着继承链传递所施加的特性。在需要的时候,就可以通过ImportManyAttribute一次性导出所有实现了IEntityMapper接口的实现类对象。
-->实体映射类
internal partial class RoleConfiguration : EntityTypeConfiguration<Role>,IEntityMapper

    {

        /// <summary>

         /// 实体类-数据表映射构造函数——角色信息

         /// </summary>

         public RoleConfiguration()

         {

             RoleConfigurationAppend();

         }

         /// <summary>

         /// 额外的数据映射

         /// </summary>

         partial void RoleConfigurationAppend();

         /// <summary>

         /// 将当前实体映射对象注册到当前数据访问上下文实体映射配置注册器中

         /// </summary>

         /// <param name="configurations">实体映射配置注册器</param>

         public void RegistTo(ConfigurationRegistrar configurations)

         {

             configurations.Add(this);

         }

    }
(2)EFDbContext
namespace Xwb.Component.Data

{

    [Export("EF",typeof(DbContext))]

    public class EFDbContext : DbContext

    {

        #region 构造函数

        /// <summary>

        ///     初始化一个 使用连接名为“default”的数据访问上下文类 的新实例

        /// </summary>

        public EFDbContext()

            : base("default"){}

        public EFDbContext(string nameOrConnectionString)

            : base(nameOrConnectionString){}

        public EFDbContext(DbConnection existingConnection)

            : base(existingConnection, true) { }

        #endregion

        [ImportMany(typeof(IEntityMapper))]

        public IEnumerable<IEntityMapper> EntityMappers { get; set; }

        protected override void OnModelCreating(DbModelBuilder modelBuilder)

        {

            modelBuilder.Conventions.Remove<OneToManyCascadeDeleteConvention>();

            if (EntityMappers == null)

            {

                return;

            }

            foreach (var entityMapper in EntityMappers)

            {

                entityMapper.RegistTo(modelBuilder.Configurations);

            }

        }

    }

}
至此我们有了依托于EF的DBContext上下文对象了。
(3)EFCachingDbContext
接下来我们利用Community Entity Framework Provider Wrappers来完成EF4、5的缓存扩展,构建一个带缓存的EFDbContext
/// <summary>

    ///     启用缓存的自定义EntityFramework数据访问上下文

    /// </summary>

    [Export("EFCaching", typeof(DbContext))]

    public class EFCachingDbContext:EFDbContext

    {

        private static readonly InMemoryCache InMemoryCache= new InMemoryCache();

        public EFCachingDbContext()

            : base(CreateConnectionWrapper("default")){}

        public EFCachingDbContext(string connectionStringName)

            : base(CreateConnectionWrapper(connectionStringName)) { }

        /// <summary>

        /// 由数据库连接字符串创建连接对象

        /// </summary>

        /// <param name="connectionStringName">连接字符串名称</param>

        /// <returns></returns>

        private static DbConnection CreateConnectionWrapper(string connectionStringName)

        {

            PublicHelper.CheckArgument(connectionStringName, "connectionStringName");

            string providerInvariantName = "System.Data.SqlClient";

             string connectionString = null;

             ConnectionStringSettings connectionStringSetting = ConfigurationManager.ConnectionStrings[connectionStringName];

             if (connectionStringSetting != null)

             {

                 providerInvariantName = connectionStringSetting.ProviderName;

                 connectionString = connectionStringSetting.ConnectionString;

             }

             if (connectionString == null)

             {

                 throw PublicHelper.ThrowComponentException("名称为“" + connectionStringName + "”数据库连接串的ConnectionString值为空。");

             }

             string wrappedConnectionString = "wrappedProvider=" + providerInvariantName + ";" + connectionString;

             EFCachingConnection connection = new EFCachingConnection

             {

                 ConnectionString = wrappedConnectionString,

                 //这里缓存策略使用了缓存所有数据(CacheAllPolicy)的策略,在实际项目中,最好自定义缓存策略,而不要使用这个策略,以免服务器内存被撑爆。

                 CachingPolicy = CachingPolicy.CacheAll,

                 Cache = InMemoryCache

             };

             return connection;

        }

    }
(4)根据配置来获得当前数据库访问上下文对象
[Export(typeof(IUnitOfWork))]

    internal class EFUnitOfWorkContext : UnitOfWorkContextBase

    {

        [Import("EF", typeof(DbContext))]

        private Lazy<EFDbContext> EFDbContext { get; set; }

        [Import("EFCaching", typeof(DbContext))]

        private Lazy<EFCachingDbContext> EFCachingDbContext { get; set; }

        /// <summary>

        ///     获得 当前使用的数据库访问上下文对象

        /// </summary>

        protected override DbContext Context

        {

            get

            {

                bool secondCachingEnabled = ConfigurationManager.AppSettings["EntityFrameworkCachingEnabled"].CastTo(false);

                return secondCachingEnabled ? EFCachingDbContext.Value : EFDbContext.Value;

            }

        }

    }
二、T4模板的运用
1.两个VS插件
Devart T4 Editor:为VS提供智能提示功能。
T4 Toolbox:生成多文件
2.T4模型类
/// <summary>

    ///     T4实体模型信息类

    /// </summary>

    public class T4ModelInfo

    {

        /// <summary>

        /// 获取 是否使用模块文件夹

        /// </summary>

        public bool UseModuleDir { get; private set; }

        /// <summary>

        ///     获取 模型所在模块名称

        /// </summary>

        public string ModuleName { get; private set; }

        /// <summary>

        ///     获取 模型名称

        /// </summary>

        public string Name { get; private set; }

        /// <summary>

        ///     获取 模型描述

        /// </summary>

        public string Description { get; private set; }

        /// <summary>

        /// 主键类型

        /// </summary>

        public Type KeyType { get; set; }

        /// <summary>

        /// 主键类型名称

        /// </summary>

        public string KeyTypeName { get; set; }

        /// <summary>

        ///     获取 属性

        /// </summary>

        public IEnumerable<PropertyInfo> Properties { get; private set; }

        /// <summary>

        /// 构造函数

        /// </summary>

        /// <param name="modelType"></param>

        /// <param name="useModuleDir"></param>

        public T4ModelInfo(Type modelType, bool useModuleDir = false)

        {

            var @namespace = modelType.Namespace;

            if (@namespace == null)

            {

                return;

            }

            UseModuleDir = useModuleDir;

            if (UseModuleDir)

            {

                var index = @namespace.LastIndexOf('.') + 1;

                ModuleName = @namespace.Substring(index, @namespace.Length - index);

            }

            Name = modelType.Name;

            PropertyInfo keyProp = modelType.GetProperty("Id");

            KeyType = keyProp.PropertyType;

            KeyTypeName = KeyType.Name;

            var descAttributes = modelType.GetCustomAttributes(typeof(DescriptionAttribute), true);

            Description = descAttributes.Length == 1 ? ((DescriptionAttribute)descAttributes[0]).Description : Name;

            Properties = modelType.GetProperties();

        }

    }
3.同时生成多个文件
(1)通过反射的方式拿到定义的所有实体类型信息
//当前文件所在目录的绝对路径

    string currentPath= Path.GetDirectoryName(Host.TemplateFile);

    //项目的绝对路径

    string projectPath= currentPath.Substring(0,currentPath.IndexOf(@"\T4"));

    //解决方案的绝对路径

    string solutionPath= currentPath.Substring(0,currentPath.IndexOf(@"Xwb.Core.Data"));

    //加载模型实体

    string modelFile= Path.Combine(solutionPath,@"Xwb.Core.Models\bin\Debug\Xwb.Core.Models.dll");

    byte[] fileData= File.ReadAllBytes(modelFile);

    Assembly assembly = Assembly.Load(fileData);

    //调用方通过反射从业务实体程序集中获取所有基类为 EntityBase<int>或EntityBase<Guid> 的并且不是抽象类的实体类型信息

    IEnumerable<Type> modelTypes = assembly.GetTypes().Where(m => (typeof(EntityBase<int>).IsAssignableFrom(m) || typeof(EntityBase<Guid>).IsAssignableFrom(m)) && !m.IsAbstract);
(2)定义每一个T4 ToolBox模板
public class EntityRepositoryTemplate : CSharpTemplate

{

    private T4ModelInfo _model;

    public EntityRepositoryTemplate(T4ModelInfo model)

    {

        _model = model;

    }

    public string FileName

    {

        get

        {

            return string.Format("{0}Repository.generated.cs",_model.Name);

        }

    }

    public override string TransformText()

    {

#>

using System;

using System.ComponentModel.Composition;

using Xwb.Component.Data;

using Xwb.Core.Models<#= _model.UseModuleDir ? "." + _model.ModuleName : null #>;

namespace Xwb.Core.Data.Repositories<#= _model.UseModuleDir ? "." + _model.ModuleName : null #>.Impl

{

    /// <summary>

    /// 仓储操作实现--<#= _model.Description #>

    /// </summary>

    [Export(typeof(I<#= _model.Name #>Repository))]

    public partial class <#= _model.Name #>Repository : EFRepositoryBase<<#= _model.Name #>, <#= _model.KeyTypeName #>>, I<#= _model.Name #>Repository

    { }

}

<#+

        return this.GenerationEnvironment.ToString();

    }

}

#>
(3)循环调用每个模板,一次性在不同目录下生成多个文件
foreach(Type modelType in modelTypes)

    {

        T4ModelInfo model = new T4ModelInfo(modelType, true);

        //实体映射类

        EntityConfigurationTemplate config = new EntityConfigurationTemplate(model);

        string path = model.UseModuleDir

                ? string.Format(@"{0}\Configurations\{1}", projectPath, model.ModuleName)

                : string.Format(@"{0}\Configurations", projectPath);

        config.Output.Encoding = Encoding.UTF8;

        config.RenderToFile(Path.Combine(path, config.FileName));

    }

#>
一周一话题之一(EF-CodeFirst、MEF、T4框架搭建学习)的更多相关文章
- EF CodeFirst 使用T4模板 生成文件
小编是个实用主义者,并没有深入的去理解T4的原理.只是根据自己的需求,在博客园里的前辈哪里找的资料,结合自己的理解,在项目中使用了T4模板. 最近的项目用了他,很方便,节省了不少代码量. 想利用T4做 ...
- EF CodeFirst 使用T4模板
实用等级:★★★★★ 首先,定义一个接口,代表一个领域实体.在定义一个实体集成这个接口,面向接口编程的各种好处就不提了. /// <summary> /// 代表一个领域实体 /// &l ...
- EF CodeFirst 创建数据库
最近悟出来一个道理,在这儿分享给大家:学历代表你的过去,能力代表你的现在,学习代表你的将来. 十年河东十年河西,莫欺少年穷 学无止境,精益求精 话说EF支持三种模式:Code First M ...
- 1.【使用EF Code-First方式和Fluent API来探讨EF中的关系】
原文链接:http://www.c-sharpcorner.com/UploadFile/3d39b4/relationship-in-entity-framework-using-code-firs ...
- [.NET领域驱动设计实战系列]专题一:前期准备之EF CodeFirst
一.前言 从去年已经接触领域驱动设计(Domain-Driven Design)了,当时就想自己搭建一个DDD框架,所以当时看了很多DDD方面的书,例如领域驱动模式与实战,领域驱动设计:软件核心复杂性 ...
- [转]Using Entity Framework (EF) Code-First Migrations in nopCommerce for Fast Customizations
本文转自:https://www.pronopcommerce.com/using-entity-framework-ef-code-first-migrations-in-nopcommerce-f ...
- EF CodeFirst 如何通过配置自动创建数据库<当模型改变时>
最近悟出来一个道理,在这儿分享给大家:学历代表你的过去,能力代表你的现在,学习代表你的将来. 十年河东十年河西,莫欺少年穷 学无止境,精益求精 本篇为进阶篇,也是弥补自己之前没搞明白的地方,惭愧 ...
- EF CodeFirst增删改查之‘CRUD’
最近悟出来一个道理,在这儿分享给大家:学历代表你的过去,能力代表你的现在,学习代表你的将来. 十年河东十年河西,莫欺少年穷 学无止境,精益求精 本篇旨在学习EF增删改查四大操作 上一节讲述了EF ...
- 新年奉献MVC+EF(CodeFirst)+Easyui医药MIS系统
本人闲来无事就把以前用Asp.net做过的一个医药管理信息系统用mvc,ef ,easyui重新做了一下,业务逻辑简化了许多,旨在加深对mvc,ef(codefirst),easyui,AutoMap ...
随机推荐
- HTTP请求类型详解
HTTP(HyperText Transfer Protocol)是一套计算机通过网络进行通信的规则.计算机专家设计出HTTP,使HTTP客户(如Web浏览器)能够从HTTP服务器(Web服务 器)请 ...
- ffmpeg之YUYV转RGB ARM使用流程分析
本例基于3.2.2 ffmpeg 一.应用调用API 二.头文件包含的API接口 对应于libswscale.so.libswscale.so.4.libswscale.so.4.2.100中 sws ...
- java ssh框架入门
源码:http://pan.baidu.com/s/1hspUOKG
- Jquery Ajax调用aspx页面实例
目前,我会的几种asp.net界面与后台代码交互方式有几种: 1.webform+服务器控件交互: 2.webform+jquery+ajax+一般处理程序交互: 3.webform+jquery+a ...
- [python]pep8编码规范
一 代码编排1 缩进.4个空格的缩进(编辑器都可以完成此功能),不使用Tap,更不能混合使用Tap和空格.2 每行最大长度79,换行可以使用反斜杠,最好使用圆括号.换行点要在操作符的后边敲回车.3 类 ...
- iOS app提交审核 11.13条款问题
今年开年到现在.提交app应用一直招拒,这个问题我想不明白,感觉就是一个坑.所以贴出来给大家看看. 发件人 Apple11.13 - Apps that link to external mechan ...
- Get AD user 的三种方法
一. 通过AccountManagement 程序集(System.DirectoryServices.AccountManagement) acountManagement 包含有: 1. User ...
- ServiceStack.Redis 破解
在github上下载了ServiceStack.Redis,做测试发现有限制,居然从v4开始就收费,无聊时,做了个源码分析 废话不多,上测试代码 try { ; i < ; i++) { red ...
- javascript函数 第14节
<html> <head> <title>function</title> </head> <body> 1.函数形式<b ...
- java新手笔记6 示例for
1.计算天数 /*给定一个年月日,计算是一年的第几天 (如输入:2 15 结果:第46天) */ public class Demo1 { public static void main(String ...