nginx unit的初探
安装介绍:
https://www.oschina.net/p/nginx-unit
可以看到,unit还是很强大的,居然特么都支持go 还有python
在/etc/yum.repos.d/unit.repo加入如下语句:
# cat /etc/yum.repos.d/unit.repo
[unit]
name=unit repo
baseurl=https://packages.nginx.org/unit/centos/$releasever/$basearch/
gpgcheck=
enabled=
#
makecache yum源
# yum makecache
执行安装 由于要测试unit-php,故安装unit-php ,如果要测试python,可以安装unit-python,如果要测试go,则安装unit-go
# yum install unit unit-php
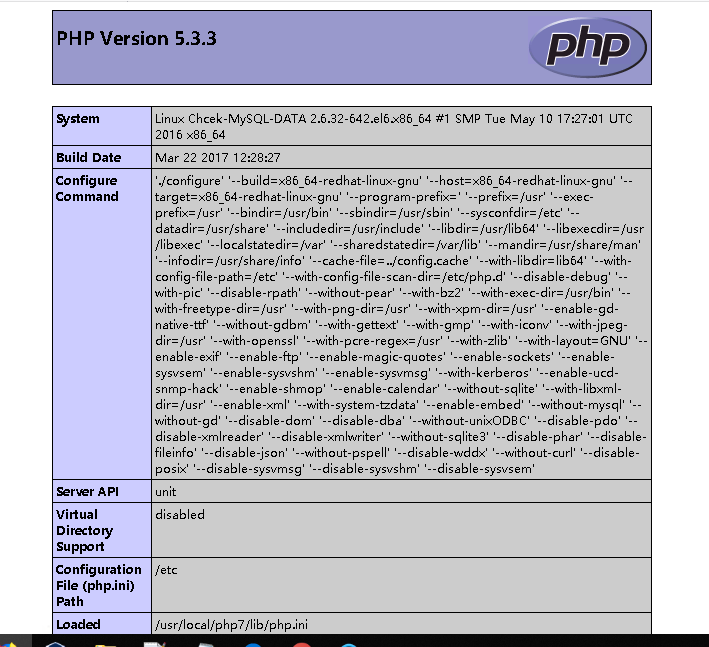
这里有坑,安装unit-php的时候,默认就安装了5.3的

所以,如果你自己安装了php7的,调用phpinfo的时候,会显示php 5.3 ,原因在此,这个得需要源码安装,有点坑,过几天再去踩踩
编辑配置文件
编辑配置文件,内容如下:
# cat /etc/unit/start.json
{
    "listeners": {
        "*:8300": {
            "application": "blogs"
        }
    },

    "applications": {
        "blogs": {
            "type": "php",
            ,
            "root": "/usr/local/nginx/php",
            "index": "index.php"
        }
    }
}
#
启动unit并且加载json文件
# /etc/init.d/unit start

# /usr/local/bin/curl -X PUT -d @/etc/unit/start.json --unix-socket /var/run/control.unit.sock http://localhost
{
"success": "Reconfiguration done."
}

当出现success": "Reconfiguration done.则怎么加载成功,可以用netstat查看端口是否已经开起来
注意,这里有坑,如果要用curl的unix-socket参数,若curl包低于7.4需要进行升级
例如,如下安装方法:
# wget https://curl.haxx.se/download/curl-7.55.0.tar.gz
...解压,进入目录...
# ./configure
# make
# make install
# /usr/local/bin/curl --version
curl  (x86_64-pc-linux-gnu) libcurl/ OpenSSL/
Release-Date: --
Protocols: dict file ftp ftps gopher http https imap imaps pop3 pop3s rtsp smb smbs smtp smtps telnet tftp
Features: IPv6 Largefile NTLM NTLM_WB SSL libz UnixSockets HTTPS-proxy
#
查看加载的配置
# /usr/local/bin/curl --unix-socket /var/run/control.unit.sock http://localhost
{
    "listeners": {
        "*:8300": {
            "application": "blogs"
        }
    },

    "applications": {
        "blogs": {
            "type": "php",
            ,
            "root": "/usr/local/nginx/php",
            "index": "index.php"
        }
    }
}
#
这时候,通过netstat可以看到8300端口已经打开了,
# cat /usr/local/nginx/php/index.php
<?php
    phpinfo();
?>
#
通过8300访问,就可以看看到phpinfo的界面了,但是前提是,root下,必须有index.php哟
重新加载配置文件
重新编写配置文件
# cat /etc/unit/start.json
{
    "listeners": {
        "*:8300": {
            "application": "blogs"
        }
    },

    "applications": {
        "blogs": {
            "type": "php",
            ,
            "root": "/usr/local/nginx/php",
            "index": "index.php",

        "user": "php",
        "group": "php",

        "options": {
            "file": "/usr/local/php7/lib/php.ini"
        }
        }
    }
}
#
重新加载配置文件
# /usr/local/bin/curl -X PUT -d @/etc/unit/start.json --unix-socket /var/run/control.unit.sock http://localhost
{
"success": "Reconfiguration done."
}
再次查看配置文件
# /usr/local/bin/curl --unix-socket /var/run/control.unit.sock http://localhost
{
    "listeners": {
        "*:8300": {
            "application": "blogs"
        }
    },

    "applications": {
        "blogs": {
            "type": "php",
            ,
            "root": "/usr/local/nginx/php",
            "index": "index.php",
            "user": "php",
            "group": "php",
            "options": {
                "file": "/usr/local/php7/lib/php.ini"
            }
        }
    }
}
#
这时候,可以通过页面,访问如下信息:
Nginx proxy_pass设置
只需要在location中添加如下几项即可
proxy_pass http://127.0.0.1:8300;
proxy_set_header Host $host;
proxy_set_header X-Forwarded-For $proxy_add_x_forwarded_for;
检查语法,重启nginx
# /usr/local/nginx/sbin/nginx -t
nginx: the configuration file /usr/local/nginx/conf/nginx.conf syntax is ok
nginx: configuration file /usr/local/nginx/conf/nginx.conf test is successful
# /usr/local/nginx/sbin/nginx -s reload
#
通过Nginx访问界面如下:

可以看到,Server API 是unit
总结:
0.参考网址:http://unit.nginx.org/
1.unit 目前用的还很少,主流依然是php-fpm
2.如果能够采用源码编译unit的话,当然是最好的
3.curl版本问题
4.编写的json文件格式一定要正确,可以用在线工具检测json是否正确(http://www.bejson.com/)
兴趣才是最好的老师,加油吧。。。这玩意快搞了我加起来两天时间了,
nginx unit的初探的更多相关文章
- svn + nginx unit + python3自动化发布web服务方法
本周将python web服务管理更换成nginx unit以后发现接口性能有了明显的提升,访问速度快了不少.不过有个很大的问题就是使用svn自动化发布以后,服务并没有刷新使用新的代码运行,而又不懂得 ...
- 关于nginx unit服务非正常关闭后,无法重新启动问题的处理
昨天在前领导技术大牛吕哥的帮忙下,python服务管理从nginx+supervisor+uwsgi+python3改为了轻便结构nginx + unit + python3,部署和配置起来顿时轻松起 ...
- nginx unit PHP
2018-12-26 14:20:33 星期三 综述: nginx unit php 的关系: nginx -> 转发请求到 8300端口 -> unit 转发 8300 收到的请求 -& ...
- Nginx unit 源码安装初体验
Nginx unit 源码安装初体验 上次介绍了从yum的安装方法(https://www.cnblogs.com/wang-li/p/9684040.html),这次将介绍源码安装,目前最新版为1. ...
- nginx unit nodejs 模块试用(续)
最新(应该是18 年了)nginx unit 发布了新的版本,对于nodejs 的支持有很大的改进,上次测试过,问题还是 比较多,这次使用新版本在测试下对于nodejs 的支持,以及以前block ...
- nginx unit nodejs 模块试用
unit 对于nodejs 的支持是在10.25 发布的,基本能用,但是依然有好多问题,当前在测试的时候就发现,请求之后会block , 相关的issue 已经有人反馈了,最好使用源码编译,方便测 ...
- nginx Unit 服务器
转自: https://github.com/nginx/unit/pull/18/ 感谢: https://www.v2ex.com/t/389528 English 简体中文 繁體中文 NGINX ...
- nginx unit java 试用
unit 当前已经支持java了,当时支持基于servlet 的开发模式,以下是一个简单的学习 基于官方的demo 环境准备 docker-compose文件 version: "3&q ...
- nginx unit 的使用
参考文档:http://unit.nginx.org/configuration/# 安装 可以参考这两篇博客: https://www.cnblogs.com/wang-li/p/9694391.h ...
随机推荐
- bootstrap-table初使用
<table id="table"></table> $('#table').bootstrapTable({ url: 'json/data1.json' ...
- python3中的urllib.parse的常用方法
将URL按一定的格式进行拆分 使用 urllib.parse.urlparse将url分为6个部分,返回一个包含6个字符串项目的元组:协议.位置.路径.参数.查询.片段 参照官方地址:https:// ...
- e.getMessage 为空NULL
在日常代码中免不了要try catch 切忌用try catch 去try 整个方法. 在对象操作之前尽量写上if 空判断. 反例: public void send(){ try{ 代码1:获取对象 ...
- SecureCR 改变背景色和文字颜色
1.打开SecureCR链接Linux服务器,Options->Session Options->Emulation->Terminal 选择Linux (相应的服务器系统)ANSI ...
- 《算法导论》——重复元素的随机化快排Optimization For RandomizedQuickSort
昨天讨论的随机化快排对有重复元素的数组会陷入无限循环.今天带来对其的优化,使其支持重复元素. 只需修改partition函数即可: int partition(int *numArray,int he ...
- Python正则替换字符串函数re.sub用法示例(1)
本文实例讲述了Python正则替换字符串函数re.sub用法.分享给大家供大家参考,具体如下: python re.sub属于python正则的标准库,主要是的功能是用正则匹配要替换的字符串然后把它替 ...
- spark-1
先测试搭好的spark集群: 本地模式测试: 在spark的目录下: ./bin/run-example SparkPi 10 --master local[2] 验证成功: 集群模式 Spark S ...
- idea导入项目
1. 2.导入项目 3.右键项目选择web 4.编辑添加tomcat 5.添加jar.包 6. 7.右键put into 8.安装tomcat 9.引入tomcat 10.把项目布署到tomcat
- kubectl-常用命令
出处https://cloud.tencent.com/developer/article/1140076 kubectl apply -f kubernetes-dashboard.yaml -n ...
- jQuery的appendTo案例
案例要求:点击双击第一个下拉列表框的选项可以把对应选项移到第二个下拉列表框中,选中第一个列表框的选项(可多选)单击-->按钮可使被选中项移动到右边下拉列表框中,单击==>按钮时将左边的所有 ...