【赵渝强老师】Flink的DataSet算子

Flink为了能够处理有边界的数据集和无边界的数据集,提供了对应的DataSet API和DataStream API。我们可以开发对应的Java程序或者Scala程序来完成相应的功能。下面举例了一些DataSet API中的基本的算子。
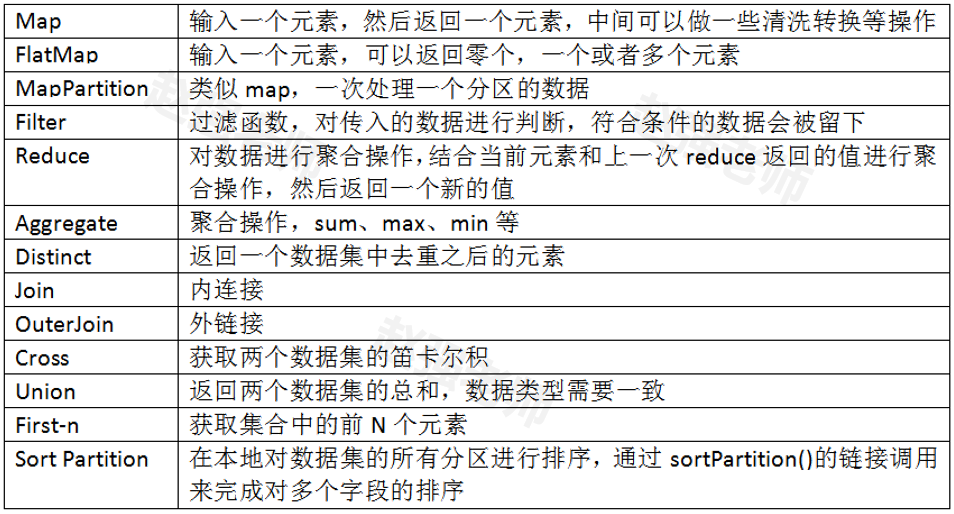
下面我们通过具体的代码来为大家演示每个算子的作用。
1、Map、FlatMap与MapPartition
//获取运行环境

ExecutionEnvironment env = ExecutionEnvironment.getExecutionEnvironment();

ArrayList<String> data = new ArrayList<String>();

data.add("I love Beijing");

data.add("I love China");

data.add("Beijing is the capital of China");

DataSource<String> text = env.fromCollection(data);

DataSet<List<String>> mapData = text.map(new MapFunction<String, List<String>>() {

	public List<String> map(String data) throws Exception {

		String[] words = data.split(" ");

		//创建一个List

		List<String> result = new ArrayList<String>();

		for(String w:words){

			result.add(w);

		}

		return result;

	}

});

mapData.print();

System.out.println("*****************************************");

DataSet<String> flatMapData = text.flatMap(new FlatMapFunction<String, String>() {

	public void flatMap(String data, Collector<String> collection) throws Exception {

		String[] words = data.split(" ");

		for(String w:words){

			collection.collect(w);

		}

	}

});

flatMapData.print();

System.out.println("*****************************************");

/*	new MapPartitionFunction<String, String>

	第一个String:表示分区中的数据元素类型

	第二个String:表示处理后的数据元素类型*/

DataSet<String> mapPartitionData = text.mapPartition(new MapPartitionFunction<String, String>() {

	public void mapPartition(Iterable<String> values, Collector<String> out) throws Exception {

		//针对分区进行操作的好处是:比如要进行数据库的操作,一个分区只需要创建一个Connection

		//values中保存了一个分区的数据

		 Iterator<String> it = values.iterator();

		while (it.hasNext()) {

			String next = it.next();

			String[] split = next.split(" ");

			for (String word : split) {

				out.collect(word);

			}

		}

		//关闭链接

	}

});

mapPartitionData.print();
2、Filter与Distinct
//获取运行环境

ExecutionEnvironment env = ExecutionEnvironment.getExecutionEnvironment();

ArrayList<String> data = new ArrayList<String>();

data.add("I love Beijing");

data.add("I love China");

data.add("Beijing is the capital of China");

DataSource<String> text = env.fromCollection(data);

DataSet<String> flatMapData = text.flatMap(new FlatMapFunction<String, String>() {

	public void flatMap(String data, Collector<String> collection) throws Exception {

		String[] words = data.split(" ");

		for(String w:words){

			collection.collect(w);

		}

	}

});

//去掉重复的单词

flatMapData.distinct().print();

System.out.println("*********************");

//选出长度大于3的单词

flatMapData.filter(new FilterFunction<String>() {

	public boolean filter(String word) throws Exception {

		int length = word.length();

		return length>3?true:false;

	}

}).print();
3、Join操作
//获取运行的环境

ExecutionEnvironment env = ExecutionEnvironment.getExecutionEnvironment();

//创建第一张表:用户ID  姓名

ArrayList<Tuple2<Integer, String>> data1 = new ArrayList<Tuple2<Integer,String>>();

data1.add(new Tuple2(1,"Tom"));

data1.add(new Tuple2(2,"Mike"));

data1.add(new Tuple2(3,"Mary"));

data1.add(new Tuple2(4,"Jone"));

//创建第二张表:用户ID 所在的城市

ArrayList<Tuple2<Integer, String>> data2 = new ArrayList<Tuple2<Integer,String>>();

data2.add(new Tuple2(1,"北京"));

data2.add(new Tuple2(2,"上海"));

data2.add(new Tuple2(3,"广州"));

data2.add(new Tuple2(4,"重庆"));

//实现join的多表查询:用户ID  姓名  所在的程序

DataSet<Tuple2<Integer, String>> table1 = env.fromCollection(data1);

DataSet<Tuple2<Integer, String>> table2 = env.fromCollection(data2);

table1.join(table2).where(0).equalTo(0)

/*第一个Tuple2<Integer,String>:表示第一张表

 * 第二个Tuple2<Integer,String>:表示第二张表

 * Tuple3<Integer,String, String>:多表join连接查询后的返回结果   */

.with(new JoinFunction<Tuple2<Integer,String>, Tuple2<Integer,String>, Tuple3<Integer,String, String>>() {

	public Tuple3<Integer, String, String> join(Tuple2<Integer, String> table1,

			Tuple2<Integer, String> table2) throws Exception {

		return new Tuple3<Integer, String, String>(table1.f0,table1.f1,table2.f1);

	} }).print();
4、笛卡尔积
ExecutionEnvironment env = ExecutionEnvironment.getExecutionEnvironment();

//创建第一张表:用户ID  姓名

ArrayList<Tuple2<Integer, String>> data1 = new ArrayList<Tuple2<Integer,String>>();

data1.add(new Tuple2(1,"Tom"));

data1.add(new Tuple2(2,"Mike"));

data1.add(new Tuple2(3,"Mary"));

data1.add(new Tuple2(4,"Jone"));

//创建第二张表:用户ID 所在的城市

ArrayList<Tuple2<Integer, String>> data2 = new ArrayList<Tuple2<Integer,String>>();

data2.add(new Tuple2(1,"北京"));

data2.add(new Tuple2(2,"上海"));

data2.add(new Tuple2(3,"广州"));

data2.add(new Tuple2(4,"重庆"));

//实现join的多表查询:用户ID  姓名  所在的程序

DataSet<Tuple2<Integer, String>> table1 = env.fromCollection(data1);

DataSet<Tuple2<Integer, String>> table2 = env.fromCollection(data2);

//生成笛卡尔积

table1.cross(table2).print();
5、First-N
ExecutionEnvironment env = ExecutionEnvironment.getExecutionEnvironment();

//这里的数据是:员工姓名、薪水、部门号

DataSet<Tuple3<String, Integer,Integer>> grade =

		env.fromElements(new Tuple3<String, Integer,Integer>("Tom",1000,10),

						 new Tuple3<String, Integer,Integer>("Mary",1500,20),

						 new Tuple3<String, Integer,Integer>("Mike",1200,30),

						 new Tuple3<String, Integer,Integer>("Jerry",2000,10));

//按照插入顺序取前三条记录

grade.first(3).print();

System.out.println("**********************");

//先按照部门号排序,在按照薪水排序

grade.sortPartition(2, Order.ASCENDING).sortPartition(1, Order.ASCENDING).print();

System.out.println("**********************");

//按照部门号分组,求每组的第一条记录

grade.groupBy(2).first(1).print();
6、外链接操作
ExecutionEnvironment env = ExecutionEnvironment.getExecutionEnvironment();

//创建第一张表:用户ID  姓名

ArrayList<Tuple2<Integer, String>> data1 = new ArrayList<Tuple2<Integer,String>>();

data1.add(new Tuple2(1,"Tom"));

data1.add(new Tuple2(3,"Mary"));

data1.add(new Tuple2(4,"Jone"));

//创建第二张表:用户ID 所在的城市

ArrayList<Tuple2<Integer, String>> data2 = new ArrayList<Tuple2<Integer,String>>();

data2.add(new Tuple2(1,"北京"));

data2.add(new Tuple2(2,"上海"));

data2.add(new Tuple2(4,"重庆"));

//实现join的多表查询:用户ID  姓名  所在的程序

DataSet<Tuple2<Integer, String>> table1 = env.fromCollection(data1);

DataSet<Tuple2<Integer, String>> table2 = env.fromCollection(data2);

//左外连接

table1.leftOuterJoin(table2).where(0).equalTo(0)

	  .with(new JoinFunction<Tuple2<Integer,String>, Tuple2<Integer,String>, Tuple3<Integer,String,String>>() {

		public Tuple3<Integer, String, String> join(Tuple2<Integer, String> table1,

				Tuple2<Integer, String> table2) throws Exception {

			// 左外连接表示等号左边的信息会被包含

			if(table2 == null){

				return new Tuple3<Integer, String, String>(table1.f0,table1.f1,null);

			}else{

				return new Tuple3<Integer, String, String>(table1.f0,table1.f1,table2.f1);

			}

		}

	}).print();

System.out.println("***********************************");

//右外连接

table1.rightOuterJoin(table2).where(0).equalTo(0)

	  .with(new JoinFunction<Tuple2<Integer,String>, Tuple2<Integer,String>, Tuple3<Integer,String,String>>() {

		public Tuple3<Integer, String, String> join(Tuple2<Integer, String> table1,

				Tuple2<Integer, String> table2) throws Exception {

			//右外链接表示等号右边的表的信息会被包含

			if(table1 == null){

				return new Tuple3<Integer, String, String>(table2.f0,null,table2.f1);

			}else{

				return new Tuple3<Integer, String, String>(table2.f0,table1.f1,table2.f1);

			}

		}

	}).print();

System.out.println("***********************************");

//全外连接

table1.fullOuterJoin(table2).where(0).equalTo(0)

.with(new JoinFunction<Tuple2<Integer,String>, Tuple2<Integer,String>, Tuple3<Integer,String,String>>() {

	public Tuple3<Integer, String, String> join(Tuple2<Integer, String> table1, Tuple2<Integer, String> table2)

			throws Exception {

		if(table1 == null){

			return new Tuple3<Integer, String, String>(table2.f0,null,table2.f1);

		}else if(table2 == null){

			return new Tuple3<Integer, String, String>(table1.f0,table1.f1,null);

		}else{

			return new Tuple3<Integer, String, String>(table1.f0,table1.f1,table2.f1);

		}

	}

}).print();
【赵渝强老师】Flink的DataSet算子的更多相关文章
- 201871010136—赵艳强《面向对象程序设计(java)》第十三周学习总结
201871010136—赵艳强<面向对象程序设计(java)>第十三周学习总结 博文正文开头格式:(2分) 项目 内容 <面向对象程序设计(java)> https:// ...
- Apache Flink - Batch(DataSet API)
Flink DataSet API编程指南: Flink中的DataSet程序是实现数据集转换的常规程序(例如,过滤,映射,连接,分组).数据集最初是从某些来源创建的(例如,通过读取文件或从本地集合创 ...
- Flink中的算子操作
一.Connect DataStream,DataStream -> ConnectedStream,连接两个保持他们类型的数据流,两个数据流被Connect之后,只是被放在了同一个流中,内部 ...
- Flink的异步算子的原理及使用
1.简介 Flink的特点是高吞吐低延迟.但是Flink中的某环节的数据处理逻辑需要和外部系统交互,调用耗时不可控会显著降低集群性能.这时候就可能需要使用异步算子让耗时操作不需要等待结果返回就可以继续 ...
- 201871010136 -赵艳强《面向对象程序设计(java)》第十六周学习总结
201871010136-赵艳强<面向对象程序设计(java)>第十六周学习总结 项目 内容 这个作业属于哪个课程 <任课教师博客主页链接>https://www.cnbl ...
- flink dataset api使用及原理
随着大数据技术在各行各业的广泛应用,要求能对海量数据进行实时处理的需求越来越多,同时数据处理的业务逻辑也越来越复杂,传统的批处理方式和早期的流式处理框架也越来越难以在延迟性.吞吐量.容错能力以及使用便 ...
- 入门大数据---Flink学习总括
第一节 初识 Flink 在数据激增的时代,催生出了一批计算框架.最早期比较流行的有MapReduce,然后有Spark,直到现在越来越多的公司采用Flink处理.Flink相对前两个框架真正做到了高 ...
- Flink及主流流框架spark,storm比较
干货 | Flink及主流流框架比较 IT刊 百家号17-05-2220:16 引言 随着大数据时代的来临,大数据产品层出不穷.我们最近也对一款业内非常火的大数据产品 - Apache Flink做了 ...
- Flink 灵魂两百问,这谁顶得住?
Flink 学习 https://github.com/zhisheng17/flink-learning 麻烦路过的各位亲给这个项目点个 star,太不易了,写了这么多,算是对我坚持下来的一种鼓励吧 ...
- Flink及Storm、Spark主流流框架比较
转自:http://www.sohu.com/a/142553677_804130 引言 随着大数据时代的来临,大数据产品层出不穷.我们最近也对一款业内非常火的大数据产品 - Apache Flink ...
随机推荐
- 华为matebook 14s笔记本,Chrome浏览器开启硬件加速,屏幕闪屏,黑框,页面屏幕卡死,解决办法
解决办法使用了 https://zhuanlan.zhihu.com/p/644296061 这个连接下的最后一个折中办法解决! 一.现象 Chrome开启"硬件加速模式"后,在观 ...
- 03 OLED显示屏实现
目录 前言 一.软件模拟IIC协议 1.开启IIC协议 2.结束IIC协议 3.传输数据 二.OLED的操作 1.传输数据的准备 2.写入命令 3.写入数据 4.初始化函数 5.设置光标 6.显示字符 ...
- 15、Spring之基于xml的声明式事务
阅读本文前,建议先阅读Spring之基于注解的声明式事务 15.1.环境搭建 创建名为spring_transaction_xml的新module,过程参考13.1节 15.1.1.配置打包方式和依赖 ...
- 【Java】实体类转换框架 MapStruct
简单尝试了下发现比Dozer还有BeanUtil还方便小巧 注解的作用是在生成字节码文件时实现具体GetterSetter方法,实际转换时就是赋值操作,嘎嘎快 参考文章: https://juejin ...
- 【MySQL】Navicat踩坑:Illegal mix of collations (utf8mb4_0900_ai_ci,IMPLICIT) and (utf8mb4_general_ci,IMPLICIT) for operation 'instr'
在Navicat客户端上面执行SQL报错 SQL语句: WITH RECURSIVE transfer (start_station, stop_station, stops, path) AS ( ...
- 【MySQL】java.sql.SQLException: Illegal mix of collations (utf8mb4_0900_ai_ci,IMPLICIT) and (utf8mb4_general_ci,IMPLICIT) for operation '='
问题原因参考: http://t.zoukankan.com/zhulei2-p-13451554.html collations 排序规则 Illegal mix 非法混合 SQL报错指出,操作符等 ...
- python语言下的迷宫游戏的实现猜想
由于本人是研究AI的,尤其是AI的强化学习方向,有时候就会对一些小游戏环境的实现有几分兴趣,因为刚看了有关reinforcement learning解决maze游戏的论文,于是就突发奇想的对这个ma ...
- 【转载】 NetworkManager——nmcli命令连接WIFI和创建热点
版权声明:本文为博主原创文章,遵循 CC 4.0 BY-SA 版权协议,转载请附上原文出处链接和本声明.本文链接:https://blog.csdn.net/u014695839/article/de ...
- 如何在anaconda环境中安装cuda.h和cuda_runtime.h
在前面的文章(几年前的文章)中我们介绍了在anaconda中安装cuda.cudnn后,有介绍了如何在anaconda中安装nvcc.nccl等NVIDIA的各种编译器和库,本文介绍如何在anacon ...
- vscode中设置Python解释器
以前在设置vscode中的Python解释器时都是采用图形化选择的方式来进行的,但是不知怎么的最近这个vscode在手动选择解释器时会出现时而好用时而不好用的情况,因此这里又给出了一种通过设置work ...