wordpress博客系统
wordpress博客系统
LNMP:Linux+nginx+mysql+php
一个操作系统+web网站+一个数据库存放数据+后端编程语言
基于红帽操作系统来搭建
1.需要一个本地yum仓库
[root@server yum.repos.d]# vim local.repo

[local]

name=local

baseurl=file:///media

enabled=1

gpgcheck=0

[root@server yum.repos.d]# yum clean all

Loaded plugins: langpacks, product-id, search-disabled-repos, subscription-manager

This system is not registered to Red Hat Subscription Management. You can use subscription-manager to register.

Cleaning repos: local

Cleaning up everything

[root@server yum.repos.d]# yum repolist

Loaded plugins: langpacks, product-id, search-disabled-repos, subscription-manager

This system is not registered to Red Hat Subscription Management. You can use subscription-manager to register.

local                                                                                                    | 4.1 kB  00:00:00

(1/2): local/group_gz                                                                                    | 136 kB  00:00:00

(2/2): local/primary_db                                                                                  | 3.9 MB  00:00:00

repo id                                                       repo name                                                   status

local                                                         local                                                       4,751

repolist: 4,751

[root@server yum.repos.d]#
2.安装需要软件包,windows的软件包拖入需要进行解压
[root@server ~]# ls

anaconda-ks.cfg  initial-setup-ks.cfg  lnmp.zip  tlsweb.csr  wordpress-4.7.3-zh_CN.zip

[root@server ~]# unzip lnmp.zip

Archive:  lnmp.zip

   creating: lnmp/

   creating: lnmp/lnmp/

  inflating: lnmp/lnmp/alsa-lib-1.1.8-1.el7.x86_64.rpm

  inflating: lnmp/lnmp/apr-1.4.8-5.el7.x86_64.rpm

  inflating: lnmp/lnmp/apr-util-1.5.2-6.el7.x86_64.rpm

  inflating: lnmp/lnmp/atk-2.28.1-1.el7.x86_64.rpm

  inflating: lnmp/lnmp/autoconf-2.69-11.el7.noarch.rpm

  inflating: lnmp/lnmp/automake-1.13.4-3.el7.noarch.rpm

  inflating: lnmp/lnmp/avahi-libs-0.6.31-19.el7.x86_64.rpm

  inflating: lnmp/lnmp/boost-filesystem-1.53.0-25.el7.x86_64.rpm

  ......

  inflating: lnmp/lnmp/xorg-x11-fonts-Type1-7.5-9.el7.noarch.rpm

  inflating: lnmp/lnmp/yaml-cpp-0.5.1-6.el7.x86_64.rpm

[root@server ~]#
3.基于软件包新建一个yum本地仓库
[root@server yum.repos.d]# vim lnmp

[lnmp]

name=lnmp

baseurl=file://root/lnmp/lnmp

gpgcheck=0

enabled=1

[root@server yum.repos.d]# yum clean all

Loaded plugins: langpacks, product-id, search-disabled-repos, subscription-manager

This system is not registered to Red Hat Subscription Management. You can use subscription-manager to register.

Cleaning repos: local

Cleaning up everything

[root@server yum.repos.d]# yum repolist

Loaded plugins: langpacks, product-id, search-disabled-repos, subscription-manager

This system is not registered to Red Hat Subscription Management. You can use subscription-manager to register.

local                                                                                                    | 4.1 kB  00:00:00

(1/2): local/group_gz                                                                                    | 136 kB  00:00:00

(2/2): local/primary_db                                                                                  | 3.9 MB  00:00:00

repo id                                                       repo name                                                   status

local                                                         local                                                       4,751

repolist: 4,751
4.安装软件
yum -y install nginx mariadb-server php php-mysql php-fpm
5.解压wordpress.zip
[root@server ~]# unzip wordpress-4.7.3-zh_CN.zip
6.配置nginx
[root@server html]# cat /etc/nginx/conf.d/default.conf

server {

    listen       80;

    server_name  localhost;

    #charset koi8-r;

    #access_log  /var/log/nginx/host.access.log  main;

    location / {

        root   /usr/share/nginx/html;

        index  index.php index.html index.htm;

    }

    #error_page  404              /404.html;

    # redirect server error pages to the static page /50x.html

    #

    error_page   500 502 503 504  /50x.html;

    location = /50x.html {

        root   /usr/share/nginx/html;

    }

    # proxy the PHP scripts to Apache listening on 127.0.0.1:80

    #

    #location ~ \.php$ {

    #    proxy_pass   http://127.0.0.1;

    #}

    # pass the PHP scripts to FastCGI server listening on 127.0.0.1:9000

    #

    location ~ \.php$ {

        root           /usr/share/nginx/html;

        fastcgi_pass   127.0.0.1:9000;

        fastcgi_index  index.php;

        fastcgi_param  SCRIPT_FILENAME  $document_root$fastcgi_script_name;

        include        fastcgi_params;

    }

    # deny access to .htaccess files, if Apache's document root

    # concurs with nginx's one

    #

    #location ~ /\.ht {

    #    deny  all;

    #}

}
7.配置数据库初始化
[root@server html]# systemctl  start mariadb

[root@server html]# mysql_secure_installation

NOTE: RUNNING ALL PARTS OF THIS SCRIPT IS RECOMMENDED FOR ALL MariaDB

      SERVERS IN PRODUCTION USE!  PLEASE READ EACH STEP CAREFULLY!

In order to log into MariaDB to secure it, we'll need the current

password for the root user.  If you've just installed MariaDB, and

you haven't set the root password yet, the password will be blank,

so you should just press enter here.

Enter current password for root (enter for none):

OK, successfully used password, moving on...

Setting the root password ensures that nobody can log into the MariaDB

root user without the proper authorisation.

Set root password? [Y/n] y

New password:

Re-enter new password:

Password updated successfully!

Reloading privilege tables..

 ... Success!

By default, a MariaDB installation has an anonymous user, allowing anyone

to log into MariaDB without having to have a user account created for

them.  This is intended only for testing, and to make the installation

go a bit smoother.  You should remove them before moving into a

production environment.

Remove anonymous users? [Y/n] y

 ... Success!

Normally, root should only be allowed to connect from 'localhost'.  This

ensures that someone cannot guess at the root password from the network.

Disallow root login remotely? [Y/n] n

 ... skipping.

By default, MariaDB comes with a database named 'test' that anyone can

access.  This is also intended only for testing, and should be removed

before moving into a production environment.

Remove test database and access to it? [Y/n] y

 - Dropping test database...

 ... Success!

 - Removing privileges on test database...

 ... Success!

Reloading the privilege tables will ensure that all changes made so far

will take effect immediately.

Reload privilege tables now? [Y/n] y

 ... Success!

Cleaning up...

All done!  If you've completed all of the above steps, your MariaDB

installation should now be secure.

Thanks for using MariaDB!

mysql  -uroot -p000000

->  create  database  wordpress;

->  show databases;

->  exit

#进入数据库,创建一个WordPress的数据库
8.将wordpress的页面文件导入
 [root@server html]#semanage fcontext -a -t httpd_sys_content_t '/root/wordpress/(/.*)?'

[root@server html]#  mv /root/wordpress/*  .

[root@server html]# ll -Z

-rwxrwxrwx. root root system_u:object_r:httpd_sys_content_t:s0 50x.html

-rwxrwxrwx. root root system_u:object_r:httpd_sys_content_t:s0 index.html

-rw-r--r--. root root system_u:object_r:httpd_sys_content_t:s0 index.php

-rw-r--r--. root root system_u:object_r:httpd_sys_content_t:s0 license.txt

-rw-r--r--. root root system_u:object_r:httpd_sys_content_t:s0 readme.html

-rw-r--r--. root root system_u:object_r:httpd_sys_content_t:s0 wp-activate.php

drwxr-xr-x. root root system_u:object_r:httpd_sys_content_t:s0 wp-admin

-rw-r--r--. root root system_u:object_r:httpd_sys_content_t:s0 wp-blog-header.php

-rw-r--r--. root root system_u:object_r:httpd_sys_content_t:s0 wp-comments-post.php

-rw-r--r--. root root system_u:object_r:httpd_sys_content_t:s0 wp-config-sample.php

drwxr-xr-x. root root system_u:object_r:httpd_sys_content_t:s0 wp-content

-rw-r--r--. root root system_u:object_r:httpd_sys_content_t:s0 wp-cron.php

drwxr-xr-x. root root system_u:object_r:httpd_sys_content_t:s0 wp-includes

-rw-r--r--. root root system_u:object_r:httpd_sys_content_t:s0 wp-links-opml.php

-rw-r--r--. root root system_u:object_r:httpd_sys_content_t:s0 wp-load.php

-rw-r--r--. root root system_u:object_r:httpd_sys_content_t:s0 wp-login.php

-rw-r--r--. root root system_u:object_r:httpd_sys_content_t:s0 wp-mail.php

-rw-r--r--. root root system_u:object_r:httpd_sys_content_t:s0 wp-settings.php

-rw-r--r--. root root system_u:object_r:httpd_sys_content_t:s0 wp-signup.php

-rw-r--r--. root root system_u:object_r:httpd_sys_content_t:s0 wp-trackback.php

-rw-r--r--. root root system_u:object_r:httpd_sys_content_t:s0 xmlrpc.php

[root@server html]# chmod -R 777 .

[root@server html]# ll

total 192

-rwxrwxrwx.  1 root root   494 Aug 13  2019 50x.html

-rwxrwxrwx.  1 root root   612 Aug 13  2019 index.html

-rwxrwxrwx.  1 root root   418 Sep 25  2013 index.php

-rwxrwxrwx.  1 root root 19935 Jan  3  2017 license.txt

-rwxrwxrwx.  1 root root  6956 Mar  7  2017 readme.html

-rwxrwxrwx.  1 root root  5447 Sep 28  2016 wp-activate.php

drwxrwxrwx.  9 root root  4096 Mar  7  2017 wp-admin

-rwxrwxrwx.  1 root root   364 Dec 19  2015 wp-blog-header.php

-rwxrwxrwx.  1 root root  1627 Aug 29  2016 wp-comments-post.php

-rwxrwxrwx.  1 root root  2930 Mar  7  2017 wp-config-sample.php

drwxrwxrwx.  5 root root    69 Mar  7  2017 wp-content

-rwxrwxrwx.  1 root root  3286 May 25  2015 wp-cron.php

drwxrwxrwx. 18 root root  8192 Mar  7  2017 wp-includes

-rwxrwxrwx.  1 root root  2422 Nov 21  2016 wp-links-opml.php

-rwxrwxrwx.  1 root root  3301 Oct 25  2016 wp-load.php

-rwxrwxrwx.  1 root root 33939 Nov 21  2016 wp-login.php

-rwxrwxrwx.  1 root root  8048 Jan 11  2017 wp-mail.php

-rwxrwxrwx.  1 root root 16250 Nov 29  2016 wp-settings.php

-rwxrwxrwx.  1 root root 29896 Oct 19  2016 wp-signup.php

-rwxrwxrwx.  1 root root  4513 Oct 15  2016 wp-trackback.php

-rwxrwxrwx.  1 root root  3065 Sep  1  2016 xmlrpc.php

[root@server html]#
10.配置权限(三步)
(1)文件权限
chmod -R 777 ./
(2)防火墙权限
  firewall-cmd  --permanent  --add-service=http

  firewall-cmd  --permanent  --add-service=mysql

 firewall-cmd  --reload
(3)selinux文件的上下文
semanage fcontext -a -t httpd_sys_content_t '/usr/share/nginx/html/(/.*)?'

  restorecon -RFv .
11.开启服务并设置开机自启
  systemctl enable php-fpm

  systemctl enable mariadb.service

  systemctl enable nginx

    systemctl start php-fpm

  systemctl start mariadb.service

  systemctl start nginx
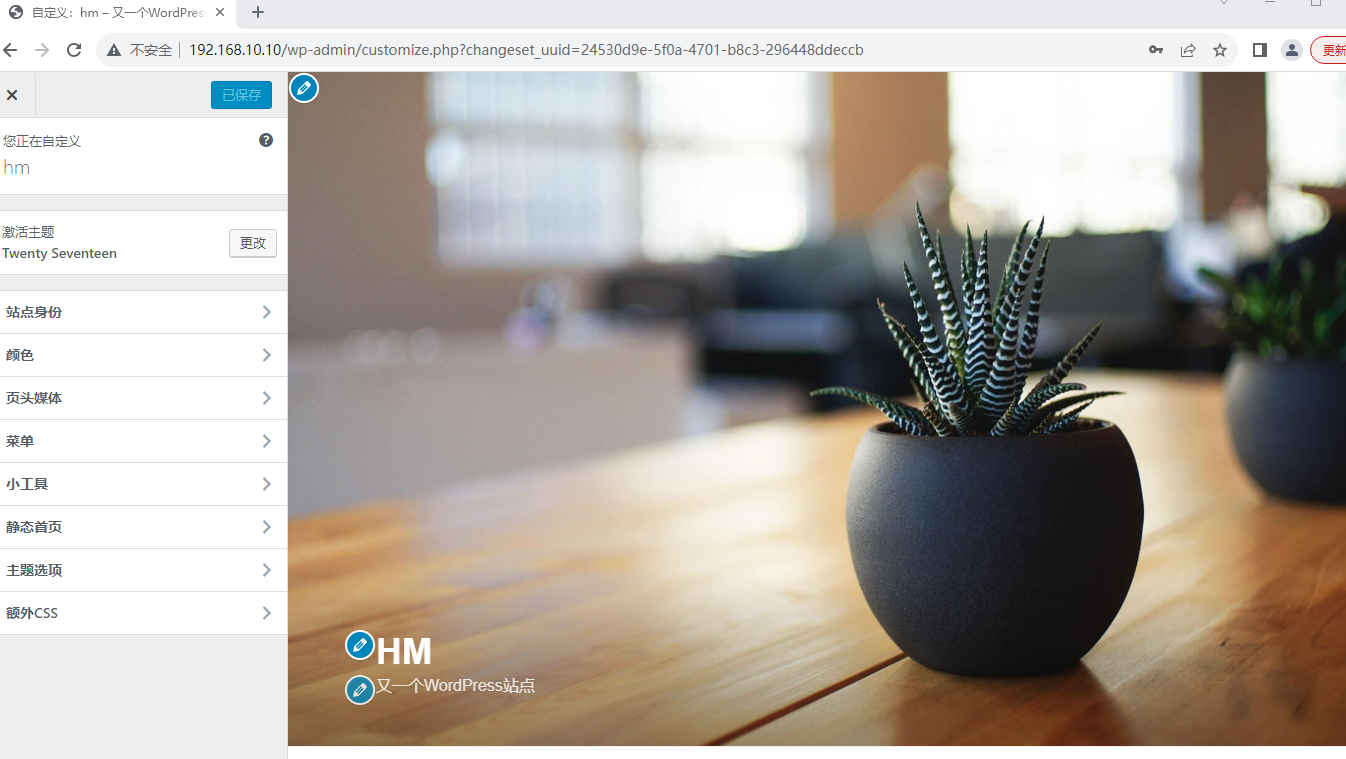
12.访问http://192.168.10.10
wordpress博客系统的更多相关文章
- 使用docker部署WordPress博客系统(win10企业版)
docker介绍: docker 是一个开源的应用容器引擎,让开发者可以打包他们的应用以及依赖包到一个可移植的容器中,然后发布到任何流行的Linux机器上,也可以实现虚拟化,容器是完全使用沙箱机制,相 ...
- Centos 7使用docker部署LAMP搭建wordpress博客系统
0.简要概述 LAMP是目前比较流行的web框架,即Linux+Apache+Mysql+PHP的网站架构方案.docker是目前非常流行的虚拟化应用容器,可以为任何应用创建一个轻量级.可移植的容器. ...
- 巨杉Tech | 十分钟快速搭建 Wordpress 博客系统
介绍 很多互联网应用程序开发人员第一个接触到的网站项目就是博客系统.而全球使用最广的Wordpress常常被用户用来快速搭建个人博客网站.默认情况下,Wordpress一般在后台使用MySQL关系型数 ...
- 在centOS上搭建wordpress博客系统
一.主要内容 1.安装LAMP服务器系统(Linux.Apache.MySQL.PHP ); 2.安装wordpress: 二.具体步骤 一.LAMP环境设置 1.安装LAMP系统,在centOS上可 ...
- WordPress博客系统搜索引擎优化seo全攻略方法
WordPress的文章.评论等很多数据都是存放在数据库的,所以搭建wordpress网站的时间,网站的空间不需要多大,而数据库一定要充足,而在WordPress数据库中主要使用 wp_posts 表 ...
- 使用阿里云 ECS 快速部署 WordPress 博客系统
今天在 阿里云 ECS上 部署了一套 Lamp 系统,建了一个WordPress的网站,把操作过程记录下来,文中所列脚本可以直接应用. 废话不多说直接开动,ECS云服务购买可以点击 阿里云ECS 云主 ...
- k8s_使用k8s部署wordpress博客系统(一)
系统部署流程 使⽤kubernetes部署wordpress+MySQL, 并利⽤NFS去保存我们容器的源代码以及DB数据.搭建好nfs后任意node上的Pod访问db或者业务代码都会有相同的效果,数 ...
- docker 搭建一个wordpress 博客系统(4)
安装lnmp ()下载镜像 [root@server ~]# docker pull mysql:latest #下载mysql镜像 [root@server ~]# docker pull rich ...
- docker部署LAMP架构并部署上线wordpress博客系统
第一步:直接在镜像仓库拉取LAMP镜像 [root@ken-node3 ken]# docker pull tutum/lamp 第二步:查看已经获取到的镜像 [root@ken-node3 ken] ...
- 用Docker-Compose一分钟搭建Wordpress博客系统
环境: CentOS 7.5 Docker 20.10.2 Docker-Compose 1.25.5 [root@localhost ~]# cat /etc/redhat-release Cent ...
随机推荐
- redis cluster 的核心原理分析:gossip 通信、jedis smart 定位、主备切换
节点间的内部通信机制 基础通信原理 redis cluster 节点间采取 gossip 协议进行通信 gossip:互相之间不断通信,保持整个集群所有节点的数据是完整的 而集中式是将集群元数据(节点 ...
- 把 Maven 提交到项目?Maven Wrapper的使用与好处
本文收录于 Github.com/niumoo/JavaNotes,Java 系列文档,数据结构与算法! 本文收录于网站:https://www.wdbyte.com/,我的公众号:程序猿阿朗 前言 ...
- 《c#高级编程》第4章C#4.0中的更改(七)——命名参数和可选参数
一.概念 C#中的命名参数和可选参数是两种函数参数的特殊形式,它们可以提高代码的可读性和灵活性. 命名参数 命名参数允许我们在调用函数时指定参数名称,从而不必按照函数定义时的参数顺序进行传参.这样做可 ...
- maven报错:501 HTTPS Required
maven报错:501 HTTPS Required 简单来说,如果报错中出现http://repo1.maven.org/maven2/的字样的话,那么大概率就是Maven仓库的设置里的地址有问题, ...
- word文档怎么让封面没有页码,页码从正文开始(word 2019)
1.打开需要插入页码的文档,光标放在正文处的开头,然后点击word窗口中的 [布局] ---> 选择[分隔符] -->选择 [分节符] 下面的 [连续]; 2.然后选择word功能区 ...
- HarmonyOS NEXT应用开发案例—使用弹簧曲线实现抖动动画及手机振动效果案例
介绍 本示例介绍使用vibrator.startVibration方法实现手机振动效果,用animateTo显示动画实现点击后的抖动动画. 效果图预览 使用说明 加载完成后显示登录界面,未勾选协议时点 ...
- Fluid 0.5 版本发布:开启数据集缓存在线弹性扩缩容之路
简介: 为了解决大数据.AI 等数据密集型应用在云原生场景下,面临的异构数据源访问复杂.存算分离 I/O 速度慢.场景感知弱调度低效等痛点问题,南京大学PASALab.阿里巴巴.Alluxio 在 2 ...
- 数据分析之重要模块pandas
1.简介 基于Numpy构建 pandas的出现,让Python语言成为使用最广泛而且强大的数据分析环境之一 pandas的主要功能 - 具备诸多功能的两大数据结构 Series.DataFrame( ...
- appium测试混合应用
最近用appium测试公司APP,APP是原生+H5的模式,测试过程中发现大部分H5的页面使用原生的方式可以进行操作,只有少部分H5页面的按钮虽然在uiautomatorviewer的界面能解析出来, ...
- ITIL一定要去认证吗?哪个版本合适
关于ITIL的演进 ITIL是在演进发展中的,v1并不成功,v2 v3讲究流程与控制,其实都是偏向务虚,理论东西较多,能落地的少或许OGC的专家们自己也发现 光靠口头忽悠并不能说服最终用户接受ITIL ...