
JS制作二级联动
JS制作二级联动
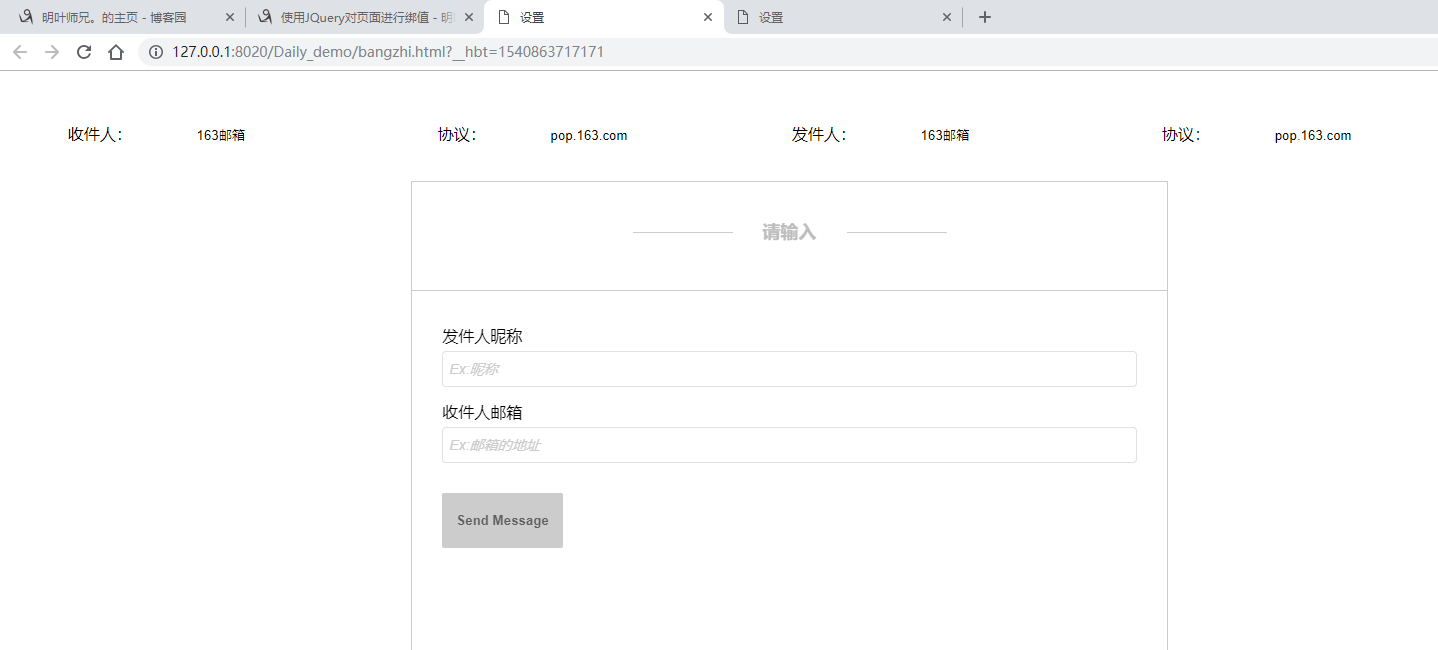
	<!DOCTYPE html PUBLIC "-//W3C//DTD XHTML 1.0 Transitional//EN" "http://www.w3.org/TR/xhtml1/DTD/xhtml1-transitional.dtd">

	<html xmlns="http://www.w3.org/1999/xhtml">

	<head>

	<meta http-equiv="Content-Type" content="text/html; charset=UTF-8">

	<title>设置</title>

	<style>

		.div {

			-webkit-box-sizing: border-box;

			-moz-box-sizing: border-box;

			box-sizing: border-box;

			font-size: 18px;

			border: 1px solid #e1e1e1;

			box-shadow: none;

			width: 100%;

			height: 36px;

			padding: 4px 6px;

			font-size: 14px;

			line-height: 20px;

			color: #555;

			-webkit-border-radius: 4px;

			-moz-border-radius: 4px;

			border-radius: 4px;

			vertical-align: middle;

		}

		select {

			border: none;

			/*清除select的边框样式*/

			outline: none;

			/*清除select聚焦时候的边框颜色*/

			width: 20%;

			/* 将select的宽高等于div的宽高*/

			height: 30px;

			line-height: 30px;

			//隐藏select的下拉图标

			appearance: none;

			-webkit-appearance: none;

			-moz-appearance: none;

			/*//通过padding-left的值让文字居中*/

			padding-left: 60px;

		}

		//使用伪类给select添加自己想用的图标

		div:after {

			content: "";

			width: 14px;

			height: 8px;

			background: url(img/xiala.png) no-repeat center;

			//通过定位将图标放在合适的位置

			position: absolute;

			right: 20px;

			top: 45%;

			//给自定义的图标实现点击下来功能

			pointer-events: none;

		}

	</style>

	<link href="css/demo.css" rel="stylesheet" type="text/css">

	<script src="js/jquery-1.10.2.min.js" type="text/javascript"></script>

	<!--Framework-->

	<script src="js/jquery-1.10.2.min.js" type="text/javascript"></script>

	<script src="js/jquery-ui.js" type="text/javascript"></script>

	<!--End Framework-->

	<script src="js/jquery.ffform.js" type="text/javascript"></script>

	<script src="js/setting_ajax.js" type="text/javascript"></script>

	<script type="text/javascript">

		function setting_click() {

			//alert("点击");

			var province = $("#province").val(); //收件人邮箱名

			var city = $("#city").val(); //收件人传输协议,数值

			var province2 = $("#province2").val(); //发件人邮箱名

			var city2 = $("#city2").val(); //发件人传输协议,数值

			var name = $("#name").val(); //发件人昵称

			var email = $("#email").val(); //收件人邮箱

			var email_port; //端口

			var email_agreement; //协议

			var d = parseInt(city);

			switch(d) {

				case 0:

					email_agreement = "pop3.sohu.com";

					email_port = "110";

					break;

				case 1:

					email_agreement = "pop.126.com";

					email_port = "110";

					break;

				case 2:

					email_agreement = "POP.139.com";

					email_port = "110";

					break;

				case 3:

					email_agreement = "pop.163.com";

					email_port = "110";

					break;

				case 4:

					email_agreement = "pop.qq.com";

					email_port = "110";

					break;

				case 5:

					email_agreement = "pop.exmail.qq.com";

					email_port = "995";

					break;

				case 6:

					email_agreement = "POP.foxmail.com";

					email_port = "110";

					break;

				case 7:

					email_agreement = "pop.china.com";

					email_port = "110";

					break;

				case 8:

					email_agreement = "pop.mail.yahoo.com";

					email_port = "995";

					break;

				case 9:

					email_agreement = "pop.mail.yahoo.com.cn";

					email_port = "995";

					break;

			}

			alert("收件人:_邮箱名称 :  "+province+"_传输协议:"+email_agreement+"_端口:"+email_port);

			var email_port2; //端口

			var email_agreement2; //协议

			var d2 = parseInt(city2);

			switch(d2) {

				case 0:

					email_agreement2 = "smtp.sohu.com";

					email_port2 = "25";

					break;

				case 1:

					email_agreement2 = "smtp.126.com";

					email_port2 = "25";

					break;

				case 2:

					email_agreement2 = "smtp.139.com";

					email_port2 = "25";

					break;

				case 3:

					email_agreement2 = "smtp.163.com";

					email_port2 = "25";

					break;

				case 4:

					email_agreement2 = "smtp.qq.com";

					email_port2 = "25";

					break;

				case 5:

					email_agreement2 = "smtp.exmail.qq.com";

					email_port2 = "587"; //(SSL启用 端口:587/465)

					break;

				case 6:

					email_agreement2 = "smtp.foxmail.com";

					email_port2 = "25";

					break;

				case 7:

					email_agreement2 = "smtp.china.com";

					email_port2 = "25";

					break;

				case 8:

					email_agreement2 = "smtp.mail.yahoo.com";

					email_port2 = "587";

					break;

				case 9:

					email_agreement2 = "smtp.mail.yahoo.com.cn";

					email_port2 = "587";

					break;

			}

			alert("发件人:_邮箱名称 :  "+province2+"_传输协议:"+email_agreement2+"_端口:"+email_port2);

			/* ajax请求 */

			$.ajax({

				url: "",

				type: "post",

				data: {

					"email_name": province, //收件人邮箱名

					"email_agreement": email_agreement, //收件人协议

					"email_port": email_port, //端口

					"email_name2": province2, //发件人邮箱名

					"email_agreement2": email_agreement2, //发件人协议

					"email_port2": email_port2, //端口

					"name": name, //发件人昵称

					"email": email //收件人邮箱

				},

				dataType: "json",

				success: function(data) {

					console.log(data);

					if(data == 1) {

						alert("提交成功!");

					}

				}

			});

		}

	</script>

	<script type="text/javascript">

		$(document).ready(function() {

			$('#form').ffform({

				animation: 'flip',

				submitButton: '#submit',

				validationIndicator: '#validation',

				errorIndicator: '#error',

				successIndicator: '#success',

				'fields': [{

					'id': 'name',

					required: true,

					requiredMsg: 'Name is required',

					type: 'alpha',

					validate: true,

					msg: 'Invalid Name'

				}, {

					'id': 'email',

					required: true,

					requiredMsg: 'E-Mail is required',

					type: 'email',

					validate: true,

					msg: 'Invalid E-Mail Address'

				}, {

					'id': 'phone',

					required: false,

					type: 'custom',

					validate: false,

					msg: 'Invalid Phone #'

				}, {

					'id': 'message',

					required: false,

					type: 'text',

					validate: false,

					msg: ''

				}]

			});

		});

	</script>

</head>

<body style="">

	<center>

		<div style="margin:0 auto;padding: 30px;">

			<form name="form1" method="post" action="" style="width: 100%;">

				收件人:

				<select name="province" id="province" onchange="changeSelect(this.selectedIndex)"></select>

				协议:

				<select name="city" id="city"></select>

				发件人:

				<select name="province2" id="province2" onchange="changeSelect2(this.selectedIndex)"></select>

				协议:

				<select name="city2" id="city2"></select>

			</form>

		</div>

	</center>

	<section id="getintouch" class="bounceIn animated">

		<div class="container" style="border-bottom: 0;">

			<h1>

            <span>请输入</span>

        </h1>

		</div>

		<div class="container">

			<form class="contact" action="#" method="post" id="form">

				<div class="row clearfix">

					<div class="lbl">

						<label for="name">

                    	发件人昵称	</label>

					</div>

					<div class="ctrl">

						<input type="text" id="name" name="name" data-required="true" data-validation="text" data-msg="Invalid Name" placeholder="Ex:昵称">

					</div>

				</div>

				<div class="row clearfix">

					<div class="lbl">

						<label for="email">

                    	收件人邮箱</label>

					</div>

					<div class="ctrl">

						<input type="text" id="email" name="email" data-required="true" data-validation="email" data-msg="Invalid E-Mail" placeholder="Ex:邮箱的地址">

					</div>

				</div>

				<div class="row  clearfix">

					<div class="span10 offset2">

						<input type="button" name="setting_button" id="setting_button" class="submit" value="Send Message" onclick="setting_click()">

					</div>

				</div>

			</form>

			<div id="success">

				Your E-Mail has been sent successfully!</div>

			<div id="error">

				Unable to send e-mail at the moment, please try later.</div>

			<div id="validation">

			</div>

		</div>

	</section>

	<script type="text/javascript">

		var arr_province = ["邮箱名称",

			"搜狐邮箱",

			"126邮箱",

			"139邮箱",

			"163邮箱",

			"QQ邮箱",

			"QQ企业邮箱",

			"Foxmail",

			"china.com",

			"yahoo.com",

			"yahoo.com.cn",

		];

		var arr_city = [

			["传输协议"],

			["pop3.sohu.com"],

			['pop.126.com'],

			["POP.139.com"],

			['pop.163.com'],

			["pop.qq.com"],

			['pop.exmail.qq.com'],

			["POP.foxmail.com"],

			['pop.china.com'],

			["pop.mail.yahoo.com"],

			['pop.mail.yahoo.com.cn']

		];

		var arr_province2 = ["邮箱名称",

			"搜狐邮箱",

			"126邮箱",

			"139邮箱",

			"163邮箱",

			"QQ邮箱",

			"QQ企业邮箱",

			"Foxmail",

			"china.com",

			"yahoo.com",

			"yahoo.com.cn",

		];

		var arr_city2 = [

			["传输协议"],

			["smtp.sohu.com"],

			['smtp.126.com'],

			["smtp.139.com"],

			['smtp.163.com'],

			["smtp.qq.com"],

			['smtp.exmail.qq.com'],

			["SMTP.foxmail.com"],

			['smtp.china.com'],

			["smtp.mail.yahoo.com"],

			['smtp.mail.yahoo.com.cn']

		];

		//网页加载完成,初始化菜单

		window.onload = init; //传入函数地址

		function init() {

			//首先获取对象

			var province = document.form1.province;

			var city = document.form1.city;

			var province2 = document.form1.province2;

			var city2 = document.form1.city2;

			//指定省份中<option>标记的个数

			province.length = arr_province.length;

			province2.length = arr_province2.length;

			//循环将数组中的数据写入<option>标记中

			for(var i = 0; i < arr_province.length; i++) {

				province.options[i].text = arr_province[i];

				province.options[i].value = arr_province[i];

				//province.options[i].value = i;

				province2.options[i].text = arr_province2[i];

				province2.options[i].value = arr_province2[i];

			}

			//修改省份列表的默认选择项

			var index = 0;

			province.selectedIndex = index;

			province2.selectedIndex = index;

			//指定城市中<option>标记的个数

			city.length = arr_city[index].length;

			city2.length = arr_city2[index].length;

			//循环将数组中的数据写入<option>标记中

			for(var j = 0; j < arr_city[index].length; j++) {

				city.options[j].text = arr_city[index][j];

				city.options[j].value = arr_city[index][j];

				city2.options[j].text = arr_city2[index][j];

				city2.options[j].value = arr_city2[index][j];

			}

		}

		function changeSelect(index) {

			//选择对象

			var city = document.form1.city;

			//修改省份列表的选择项

			province.selectedIndex = index;

			//指定城市中<option>标记的个数

			city.length = arr_city[index].length;

			//循环将数组中的数据写入<option>标记中

			for(var j = 0; j < arr_city[index].length; j++) {

				city.options[j].text = arr_city[index][j];

				//city.options[j].value = arr_city[index][j];

				city.options[j].value = j;

			}

		}

		function changeSelect2(index) {

			//选择对象

			var city = document.form1.city2;

			//修改省份列表的选择项

			province2.selectedIndex = index;

			//指定城市中<option>标记的个数

			city2.length = arr_city[index].length;

			//循环将数组中的数据写入<option>标记中

			for(var j = 0; j < arr_city[index].length; j++) {

				city2.options[j].text = arr_city[index][j];

				//city2.options[j].value = arr_city[index][j];

				city2.options[j].value = j;

			}

		}

	</script>

</body>

</html>
JS制作二级联动的更多相关文章
- js:二级联动示例
联动原理 当用户点击省级的下拉选项,选择所在省,下一个下拉选项里的选项,则变成用户选择省下的所有市的信息,不会出现其它省市的信息. 省市数据 把省市数据,保存在js文件中,以json形式保存,以便读取 ...
- js实现二级联动下拉列表菜单
二级联动下拉列表菜单的难点在于对后台返回的数据进行解析,不多逼逼,直接上代码 上图是后台返回的数据 实现代码如下: var deviceNotExist = true;//防止数据重复 if(data ...
- 原生js实现二级联动下拉列表菜单
二级联动下拉列表菜单的难点在于对后台返回的数据进行解析,不多逼逼,直接上代码 上图是后台返回的数据 实现代码如下: var deviceNotExist = true;//防止数据重复 if(data ...
- js省市二级联动实例
//动态创建省市二级联动<!DOCTYPE html><html lang="en"><head> <meta charset=" ...
- js 实现二级联动
onchange 事件 <body> <select id="province" onchange="func1()"> <opt ...
- js省市二级联动
html: <script src="js/city.js"></script> ...... <body> <div class=&qu ...
- js 省市二级联动
<html> <head> <meta charset="UTF-8"> <title></title> </he ...
- 原生js二级联动
今天说的这个是原生js的二级联动,在空白页面里动态添加并作出相对应的效果. 1 //创建两个下拉列表 select标签 是下拉列表 var sel = document.createElement(& ...
- 利用JS实现一个简单的二级联动菜单
前几天在看js的相关内容,所以就简单写了一个二级联动菜单.分享一下. <!DOCTYPE html> <html lang="en"> <head&g ...
随机推荐
- error C2872: ‘ofstream’ : ambiguous symbol
转自VC错误:http://www.vcerror.com/?p=1123 问题描述: 编译时出现: error C2872: 'ofstream' : ambiguous symbol error ...
- xcodebuild自动打包上传到蒲公英的shell脚本
注意: ExportOptions.plist (包含了证书相关信息) 该plist 文件可以通过xcode手动导出ipa之后获取到, 区分appstore 和 development的情况 #! / ...
- chromedriver安装报错
解决方法: 可以使用 npm init -f命令生成package.json,package.json中缺少的字段可以参照模板 package.json进行填充,package.json中的字段 ...
- python排序算法-冒泡和快速排序,解答阿里面试题
''常见的排序算法\ 插入排序/希尔排序/直接排序/堆排序 冒泡排序/快速排序/归序排序/基数排序 给定一个列表,将这个列表进行排序,要求:> 时间复杂度要小于O(n^2) 复杂度:1.时间复杂 ...
- 记录java
1.从今天起,我会将自己在java学习道路上的一些心得体会记录下来.
- latex 查找缺失的库文件
app-portage/pfl contains a program to search in an online database for a Gentoo package containing a ...
- IIS 解决跨域问题
打开 HTTP响应标头 添加如下三条 名称Access-Control-Allow-Origin 值*名称Access-Control-Allow-Headers 值Content-Type,Ac ...
- List<Map>去重并合并数量
今天在查询出的sql中,出现了部门名称和部门ID有重合的数据!当然这样在页面上展示也会容易一起误导!查询出的数据结构如下图 希望根据deptid中 >最后一个节点id把deptname 合并成& ...
- event代表事件的状态,专门负责对事件的处理,它的属性和方法能帮助我们完成很多和用户交互的操作;
IE的event和其他的标准DOM的Event是不一样的,不同的浏览器事件的冒泡机制也是有区别 IE:window.event.cancelBubble = true;//停止冒泡window.eve ...
- k8s之ingress-nginx部署一直提示健康检查10254端口不通过问题就处理
之前部署了一套k8s集群,但是到部署ingress-nginx的时候,一直提示10254端口拒绝不通:如下图. 这是因为我之前装的是docker1.17.默认的驱动是systemd.因为systemd ...