实验四 《Android程序设计》
实验四 《Android程序设计实验报告》-20175131王泽龙
实验四 Android程序设计-1
①实验要求:
Android Stuidio的安装测试:参考《Java和Android开发学习指南(第二版)(EPUBIT,Java for Android 2nd)》第二十四章:
- 参考http://www.cnblogs.com/rocedu/p/6371315.html#SECANDROID,安装 Android Stuidio
- 完成Hello World, 要求修改res目录中的内容,Hello World后要显示自己的学号,自己学号前后一名同学的学号,提交代码运行截图和码云Git链接,截图没有学号要扣分
- 学习Android Stuidio调试应用程序
②实验过程:
-首先是安装Android Studio(这个下载安装倒不是很难,按照老师给的步骤一步一步安装就好,就是配置设备的过程对我来说有点困难,配了两天才把最基础的做好,让我对Android实验有了意思恐惧)
-多余的赘述我就不一一说了,主要说一下我在第一个实验中遇到的困难:
先是在新建项目的时候没有设置好语言(应该是java,我粗心大意设置成了Kotlin),导致后面怎么修改都解决不了问题,后来我把项目重新创建了一次就可以正常运行了
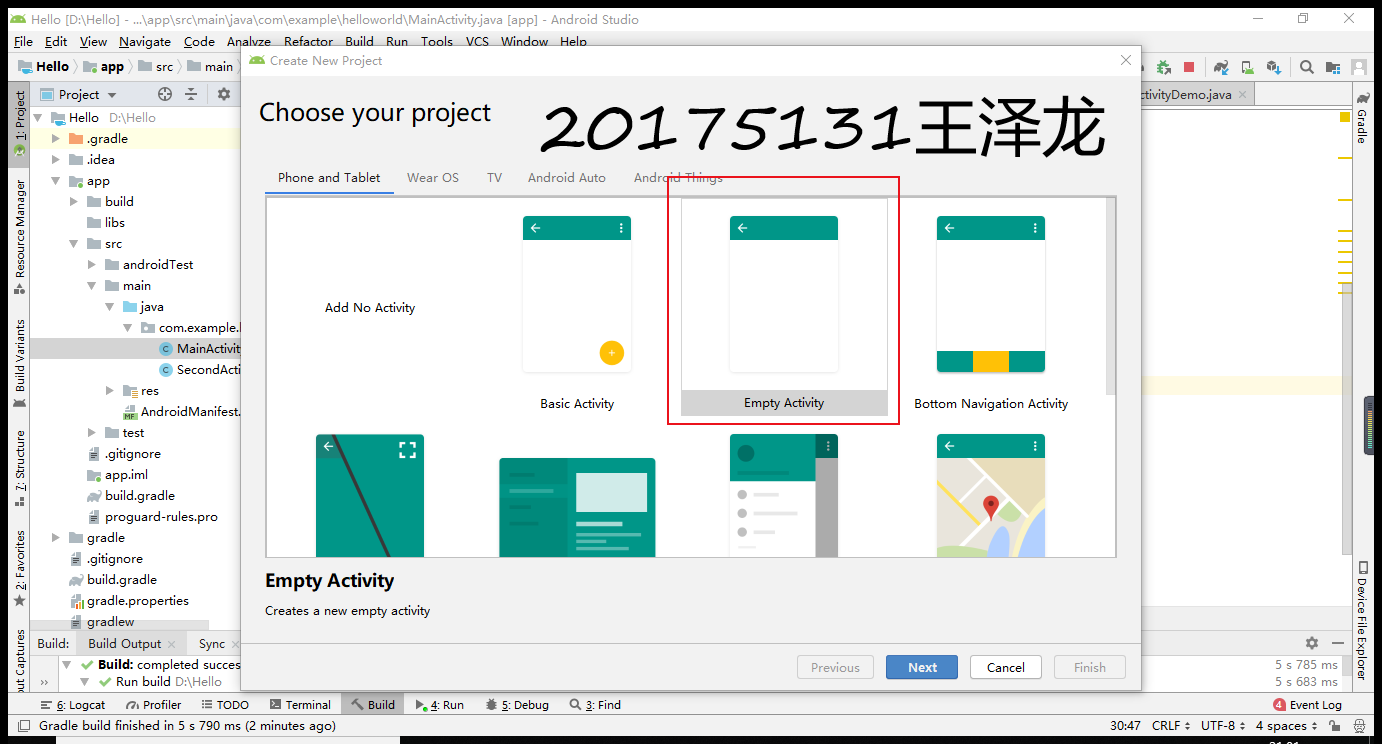
下面这个是重点(和我一样粗心大意的同学可以好好看看)
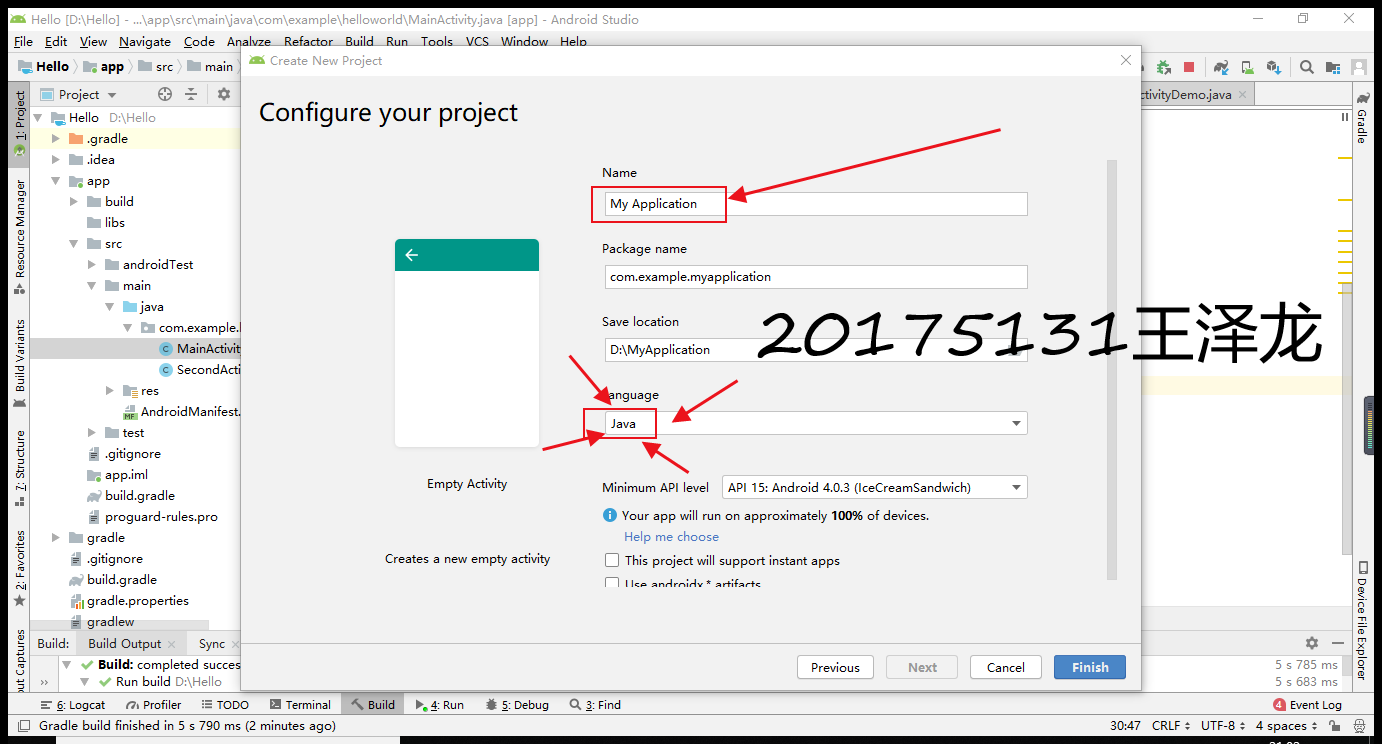
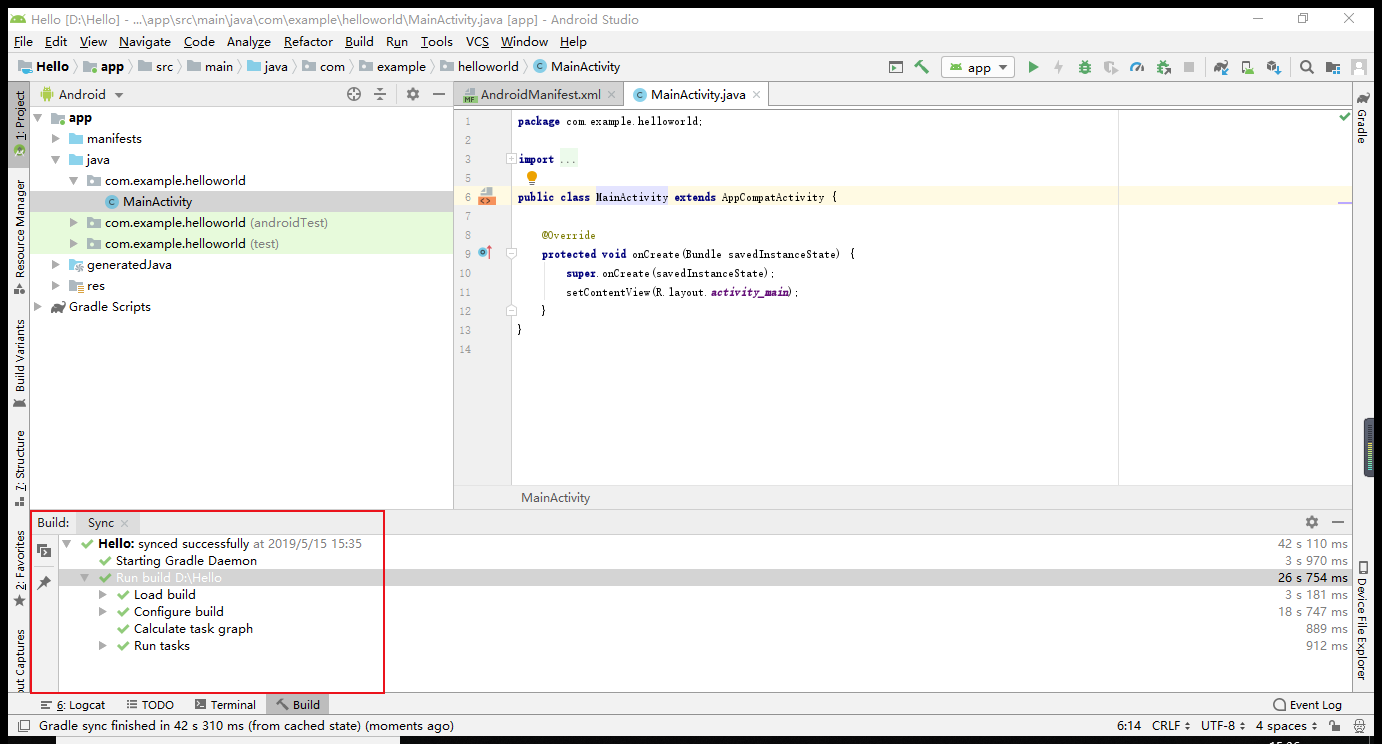
设置好了这两个步骤就可以运行了,HelloWorld在里面是自带的,可以直接运行,我们只需要修改代码即可。下面给出配置好的截图:
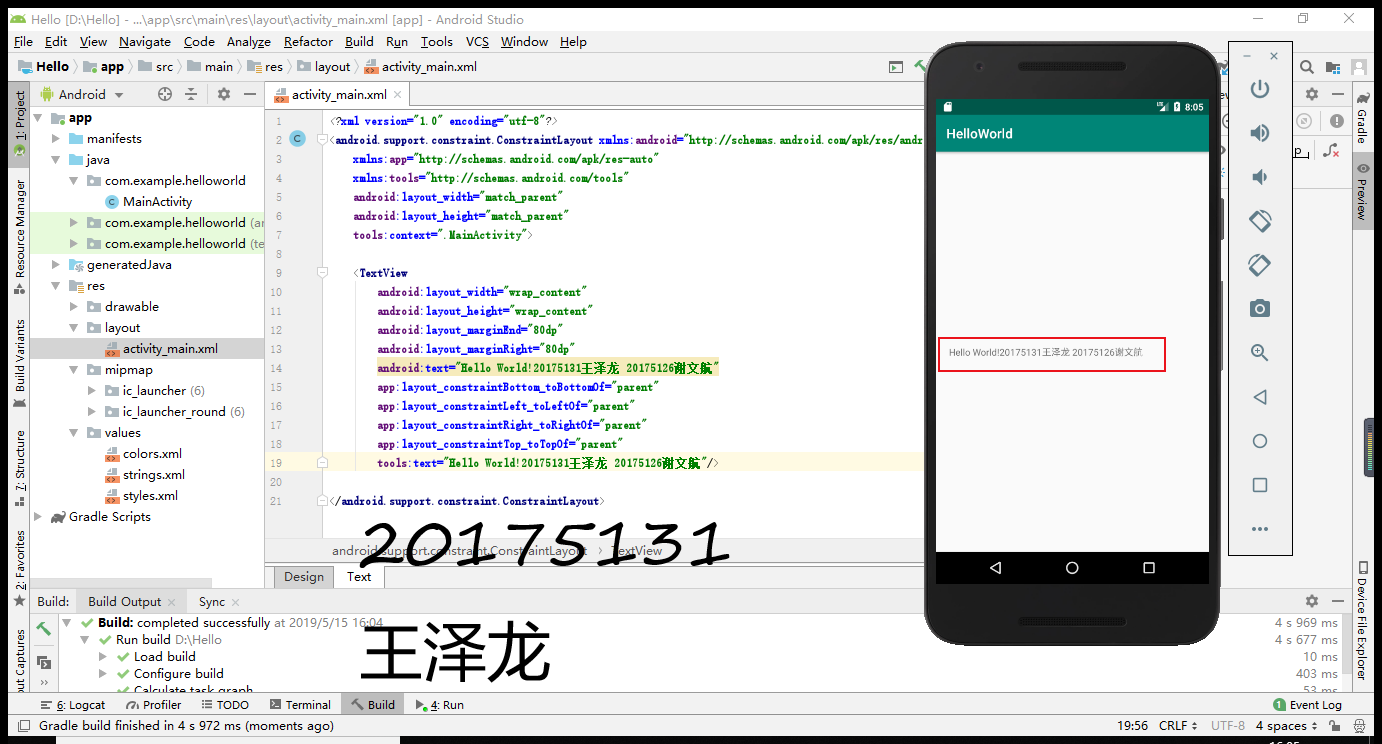
修改代码为:
<android.support.constraint.ConstraintLayout xmlns:android="http://schemas.android.com/apk/res/android"
xmlns:app="http://schemas.android.com/apk/res-auto"
xmlns:tools="http://schemas.android.com/tools"
android:layout_width="match_parent"
android:layout_height="match_parent"
tools:context=".MainActivity">
</android.support.constraint.ConstraintLayout>
运行截图:
实验四 Android程序设计-2
①实验要求:
Activity测试: 参考《Java和Android开发学习指南(第二版)(EPUBIT,Java for Android 2nd)》第二十五章:
- 构建项目,运行教材相关代码
- 创建 ThirdActivity, 在ThirdActivity中显示自己的学号,修改代码让MainActivity启动ThirdActivity
- 提交代码运行截图和码云Git链接,截图要有学号水印,否则会扣分
②实验过程:
-首先要在HelloWorld里面再创建一个Activity
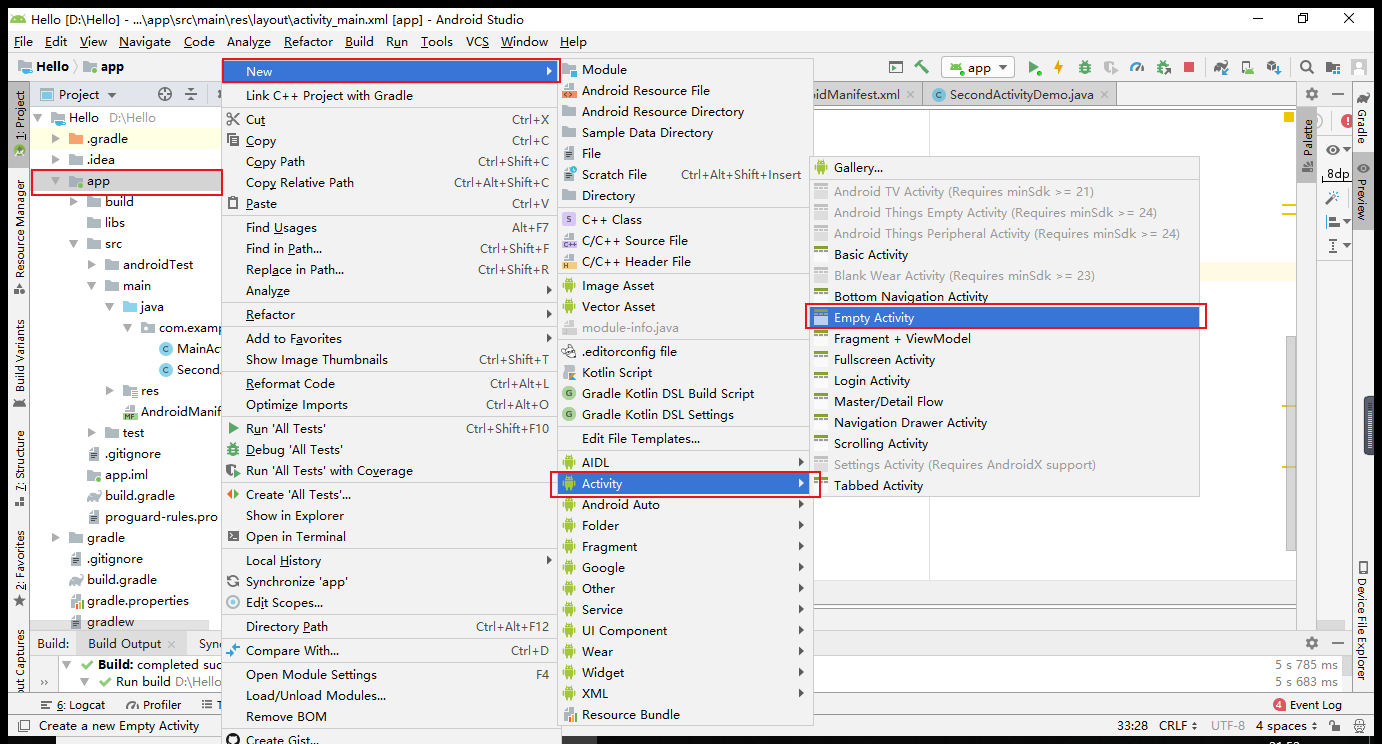
命名为SecondActivityDemo
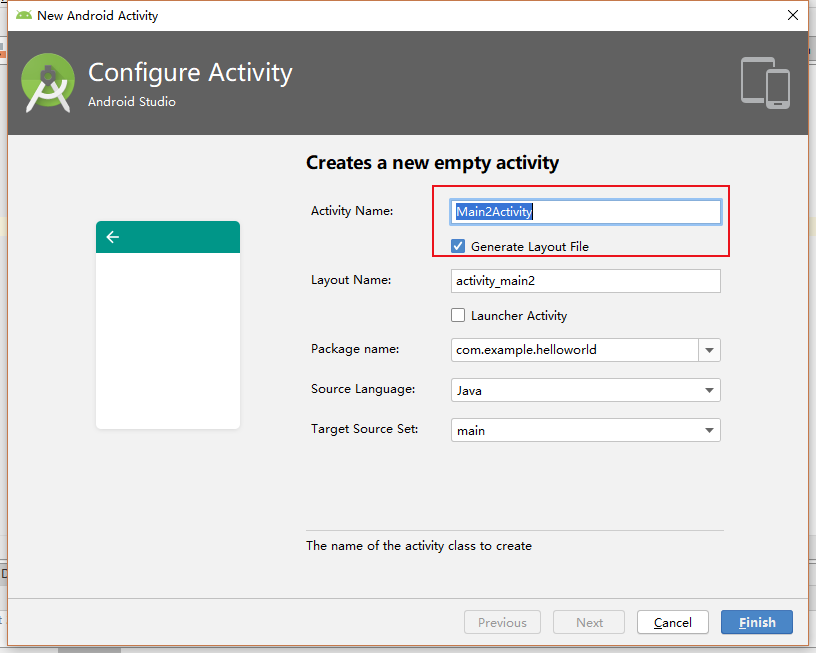
创建好了之后会自动生成两个文件,一个java文件,一个xml文件
代码分别为:
java:
package com.example.helloworld;
import android.support.v7.app.AppCompatActivity;
import android.os.Bundle;
public class SecondActivityDemo extends AppCompatActivity {
@Override

protected void onCreate(Bundle savedInstanceState) {

    super.onCreate(savedInstanceState);

    setContentView(R.layout.activity_second_demo);

}
}
xml:
<android.support.constraint.ConstraintLayout xmlns:android="http://schemas.android.com/apk/res/android"
xmlns:app="http://schemas.android.com/apk/res-auto"
xmlns:tools="http://schemas.android.com/tools"
android:layout_width="match_parent"
android:layout_height="match_parent"
android:orientation="vertical">
<TextView

    android:id="@+id/textView"

    android:layout_width="172dp"

    android:layout_height="139dp"

    android:text="20175131王泽龙"

    tools:layout_editor_absoluteX="153dp"

    tools:layout_editor_absoluteY="311dp"

    tools:ignore="MissingConstraints" />
</android.support.constraint.ConstraintLayout>
-然后在activity_main.xml里建一个新的按钮
添加后的activity_main.xml为:
<android.support.constraint.ConstraintLayout xmlns:android="http://schemas.android.com/apk/res/android"
xmlns:app="http://schemas.android.com/apk/res-auto"
xmlns:tools="http://schemas.android.com/tools"
android:layout_width="match_parent"
android:layout_height="match_parent"
tools:context=".MainActivity">
</android.support.constraint.ConstraintLayout>
-接着再在AndroidMainfest.xml注册:

运行截图:

实验四 Android程序设计-3
①实验要求:
UI测试: 参考《Java和Android开发学习指南(第二版)(EPUBIT,Java for Android 2nd)》第二十六章:
- 构建项目,运行教材相关代码
- 修改代码让Toast消息中显示自己的学号信息
- 提交代码运行截图和码云Git链接,截图要有学号水印,否则会扣分
②实验过程:
-关于Toast的弹窗设计我们只要在MainActivity.java编辑添加方法就行,引用方法并调用。
代码如下:
package com.example.helloworld;
import android.support.v7.app.AppCompatActivity;
import android.os.Bundle;
import android.app.Activity;
import android.graphics.Color;
import android.os.Bundle;
import android.view.Menu;
import android.view.View;
import android.widget.AnalogClock;
import android.app.Activity;
import android.graphics.Color;
import android.os.Bundle;
import android.view.Menu;
import android.view.View;
import android.widget.AnalogClock;
public class MainActivity extends Activity {
int counter = 0;
int[] colors = { Color.BLACK, Color.BLUE, Color.CYAN,
Color.DKGRAY, Color.GRAY, Color.GREEN, Color.LTGRAY,
Color.MAGENTA, Color.RED, Color.WHITE, Color.YELLOW };
@Override
protected void onCreate(Bundle savedInstanceState) {
super.onCreate(savedInstanceState);
setContentView(R.layout.activity_main);
}
@Override
public boolean onCreateOptionsMenu(Menu menu) {
// Inflate the menu; this adds items to the action bar if it
// is present.
getMenuInflater().inflate(R.menu.menu_main, menu);
return true;
}
public void changeColor(View view) {
if (counter == colors.length) {
counter = 0;
}
view.setBackgroundColor(colors[counter++]);
}
}
运行截图:

实验四 Android程序设计-4
①实验要求:
布局测试: 参考《Java和Android开发学习指南(第二版)(EPUBIT,Java for Android 2nd)》第二十七章:
- 构建项目,运行教材相关代码
- 修改布局让P290页的界面与教材不同
- 提交代码运行截图和码云Git链接,截图要有学号水印,否则会扣分
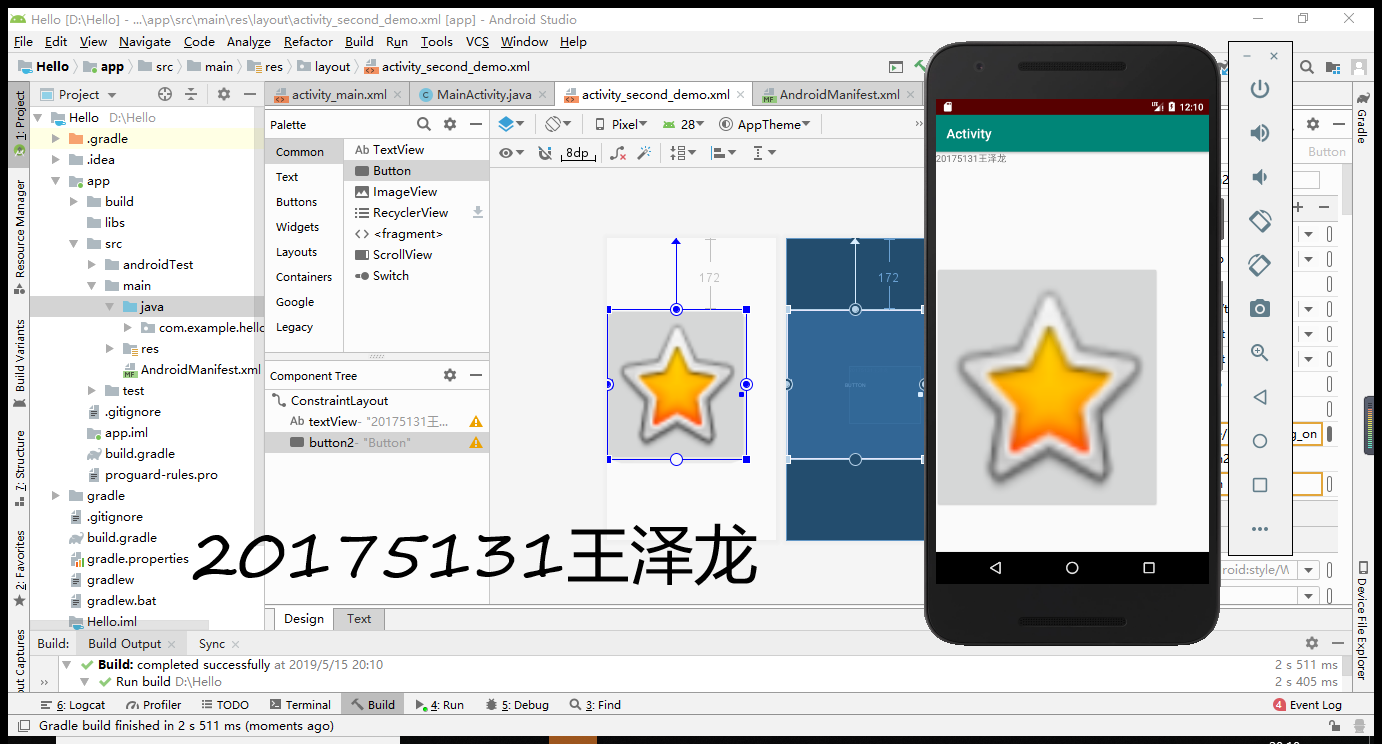
②实验过程:
-只要仔细研究过了Android Studio,你就会发现关于界面设计不需要代码操作,直接在design里设置就行

然后添加一个button项
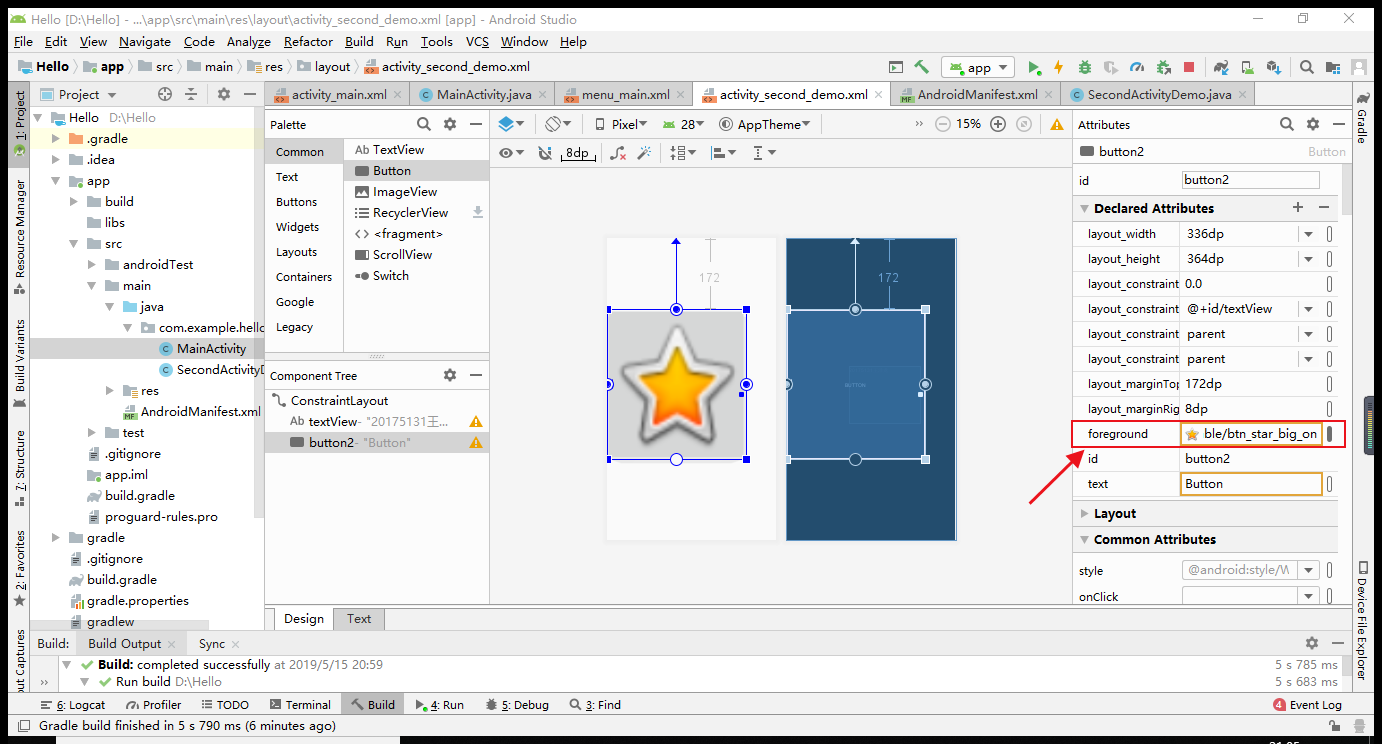
找到foreground点旁边的图片
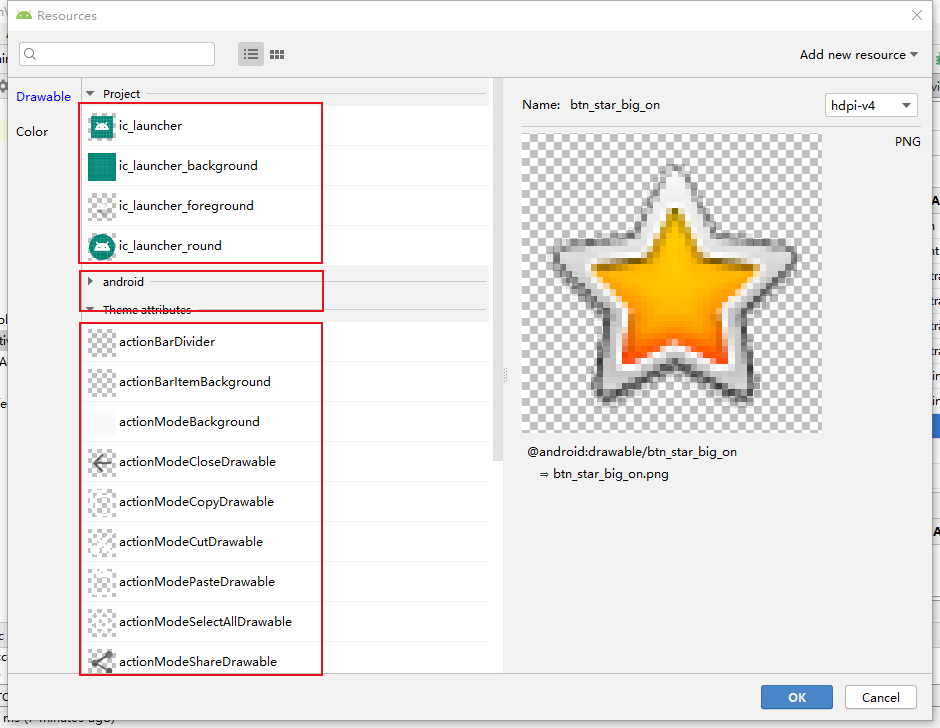
选择,拖拉到合适大小即可。
-运行截图:
实验四 Android程序设计-5
①实验要求:
事件处理测试: 参考《Java和Android开发学习指南(第二版)(EPUBIT,Java for Android 2nd)》第二十八章:
- 构建项目,运行教材相关代码
- 提交代码运行截图和码云Git链接,截图要有学号水印,否则会扣分
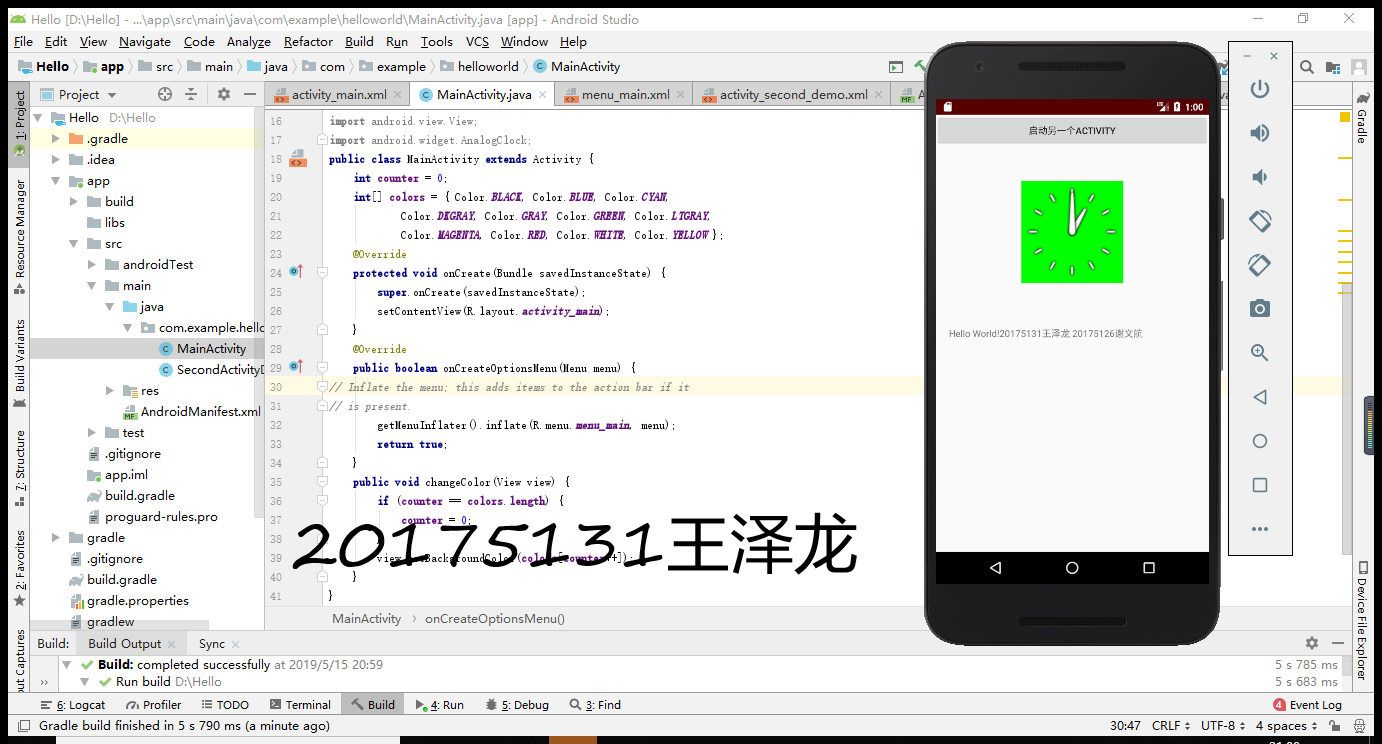
②实验过程:
-在点击屏幕后,时钟背景颜色发生改变
-在MainActivity.java编辑添加方法就行,引用方法并调用。
代码如下:
MainActivity.java:
package com.example.helloworld;
import android.support.v7.app.AppCompatActivity;
import android.os.Bundle;
import android.app.Activity;
import android.graphics.Color;
import android.os.Bundle;
import android.view.Menu;
import android.view.View;
import android.widget.AnalogClock;
import android.app.Activity;
import android.graphics.Color;
import android.os.Bundle;
import android.view.Menu;
import android.view.View;
import android.widget.AnalogClock;
public class MainActivity extends Activity {
int counter = 0;
int[] colors = { Color.BLACK, Color.BLUE, Color.CYAN,
Color.DKGRAY, Color.GRAY, Color.GREEN, Color.LTGRAY,
Color.MAGENTA, Color.RED, Color.WHITE, Color.YELLOW };
@Override
protected void onCreate(Bundle savedInstanceState) {
super.onCreate(savedInstanceState);
setContentView(R.layout.activity_main);
}
@Override
public boolean onCreateOptionsMenu(Menu menu) {
// Inflate the menu; this adds items to the action bar if it
// is present.
getMenuInflater().inflate(R.menu.menu_main, menu);
return true;
}
public void changeColor(View view) {
if (counter == colors.length) {
counter = 0;
}
view.setBackgroundColor(colors[counter++]);
}
}
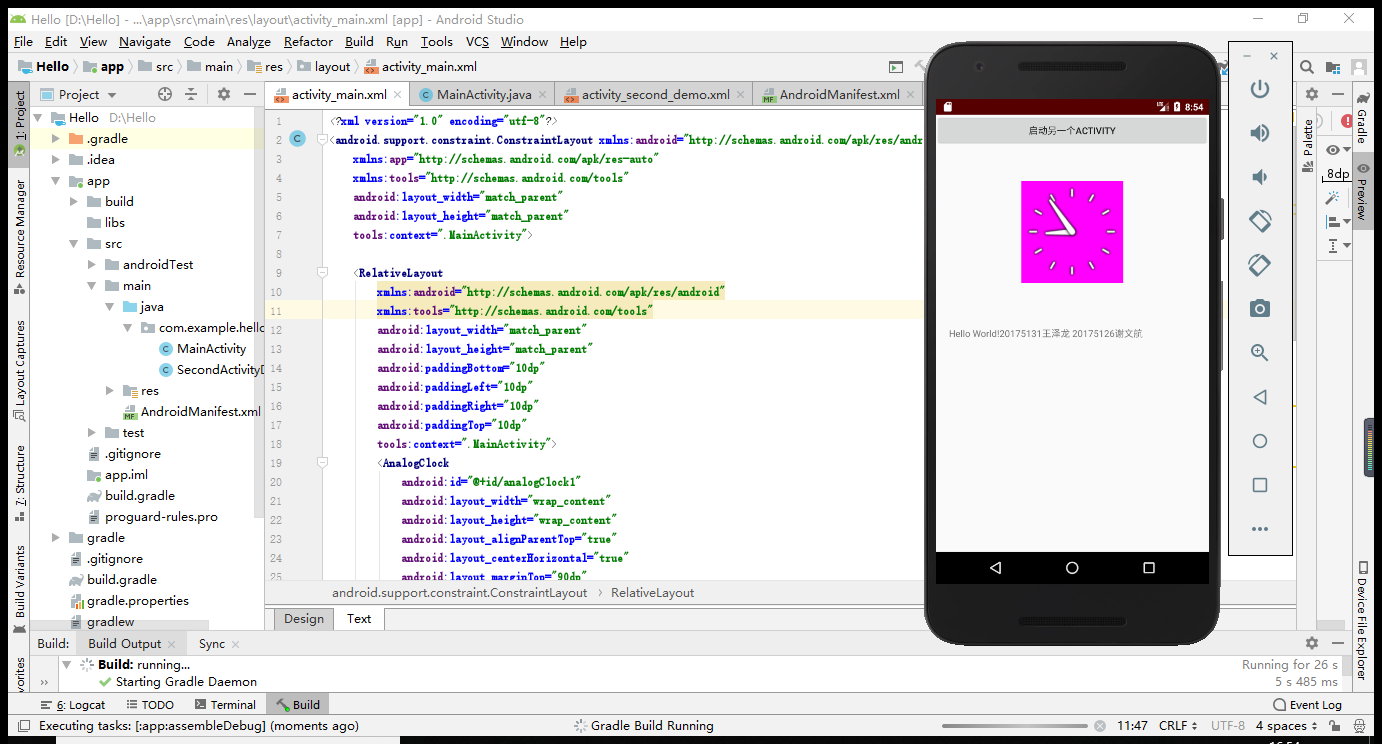
activity_main.xml:
<android.support.constraint.ConstraintLayout xmlns:android="http://schemas.android.com/apk/res/android"
xmlns:app="http://schemas.android.com/apk/res-auto"
xmlns:tools="http://schemas.android.com/tools"
android:layout_width="match_parent"
android:layout_height="match_parent"
tools:context=".MainActivity">
<RelativeLayout

    xmlns:android="http://schemas.android.com/apk/res/android"

    xmlns:tools="http://schemas.android.com/tools"

    android:layout_width="match_parent"

    android:layout_height="match_parent"

    android:paddingBottom="10dp"

    android:paddingLeft="10dp"

    android:paddingRight="10dp"

    android:paddingTop="10dp"

    tools:context=".MainActivity">

    <AnalogClock

        android:id="@+id/analogClock1"

        android:layout_width="wrap_content"

        android:layout_height="wrap_content"

        android:layout_alignParentTop="true"

        android:layout_centerHorizontal="true"

        android:layout_marginTop="90dp"

        android:onClick="changeColor"

        />

</RelativeLayout>

<Button

    android:id="@+id/button1"

    android:layout_width="fill_parent"

    android:layout_height="wrap_content"

    android:text="启动另一个activity"

    tools:ignore="MissingConstraints" />

<TextView

    android:layout_width="wrap_content"

    android:layout_height="wrap_content"

    android:layout_marginEnd="80dp"

    android:layout_marginRight="80dp"

    android:text="Hello World!20175131王泽龙 20175126谢文航"

    app:layout_constraintBottom_toBottomOf="parent"

    app:layout_constraintLeft_toLeftOf="parent"

    app:layout_constraintRight_toRightOf="parent"

    app:layout_constraintTop_toTopOf="parent"

    tools:text="Hello World!20175131王泽龙 20175126谢文航"/>
</android.support.constraint.ConstraintLayout>
-运行截图:
二.遇到的问题和解决方式都在1,2里面体现,对于这次实验,考察的是我们的自学能力,以及对新的软件的掌握。这次的实验和我们的现实世界又近了一步,因为我用的手机就是android系统,让我很感兴趣。我也在这次实验中收获了很多,学到了很多新的知识,在这里我也要感谢我舍友的鼓励和帮助。
三.码云链接
https://gitee.com/WZL-DM/BESTI.java.is.20175131
四.参考资料
1.《Java和Android开发学习指南(第二版)》
2.Android开发简易教程
3.https://www.cnblogs.com/wxhblogs/p/10848431.html#4255843
实验四 《Android程序设计》的更多相关文章
- 实验四 Android程序设计 实验报告
实验四 Android程序设计 实验报告 目录 代码托管地址 Android程序设计-1 Android程序设计-2 Android程序设计-3 Android程序设计-4 Android程序设计-5 ...
- 第十四周实验报告:实验四 Android程序设计
20162317袁逸灏 第十四周实验报告:实验四 Android程序设计 实验内容 Android Studio 实验要求 学会使用Android Studio 学习 活动 以及相关知识内容 学习 U ...
- 20165235实验四 Android程序设计
20165235实验四 Android程序设计 实验课程:JAVA编程设计 实验名称:Android开发 姓名:祁瑛 学号:20165235 实验时间:2018.05.16 指导老师:娄家鹏 Andr ...
- 20165220Java实验四 Android程序设计
一.实验报告封面 课程:Java程序设计 班级:1652班 姓名:葛宇豪 学号:20165220 指导教师:娄嘉鹏 实验日期:2018年5月14日 实验时间:13:45 - 15:25 实验序号:实验 ...
- 20172328《程序设计与数据结构》实验四 Android程序设计报告
20172328<程序设计与数据结构>实验四 Android程序设计报告 课程:<程序设计与数据结构> 班级: 1723 姓名: 李馨雨 学号:20172328 实验教师:王志 ...
- 20172302《程序设计与数据结构》实验四Android程序设计实验报告
课程:<程序设计与数据结构> 班级: 1723 姓名: 侯泽洋 学号:20172302 实验教师:王志强老师 实验日期:2018年5月30日 必修/选修: 必修 1.实验内容 (1)And ...
- 实验四 Android程序设计
20155224 实验四 Android程序设计 实验报告 实验报告封面: 课程:Java程序设计 班级:1652班 姓名:王高源 学号:20165225 指导教师:娄嘉鹏 实验日期:2018年5月1 ...
- 20165236 实验四 Android程序设计
20165236 实验四 Android程序设计 一.实验报告 课程:Java程序设计 班级:1652班 姓名:郭金涛 学号:20165236 指导教师:娄嘉鹏 实验 ...
- 20165205 2017-2018-2 《Java程序设计》实验四 Android程序设计
20165205 2017-2018-2 <Java程序设计>实验四 Android程序设计 实验内容 实验四 Android程序设计-1 Android Stuidio的安装测试: 参考 ...
- 20155205 《Java程序设计》实验四 Android程序设计
20155205 <Java程序设计>实验四 Android程序设计 一.实验内容及步骤 (一) Android Stuidio的安装测试 参考<Java和Android开发学习指南 ...
随机推荐
- js-jssdk微信H5选择多张图片预览并上传(兼容ios,安卓,已测试)
值得注意的是: 1.在微信H5中选择图片运用:wx.chooseImage,成功后返回: res.localIds用于上传图片使用 上传图片:wx.uploadImage. 2.上传图片的时候 ...
- 应用安全 - Windows操作系统 - 漏洞 - 汇总
FTP弱密码 将FTP服务器的密码更改为强密码 vi /etc/vsftpd/vsftpd.conf anonymous_enable=NO #禁止匿名登录 重启ftp服务 Windows匿名用户整改 ...
- github信息安全开源课
尽可能的减少信息差:兄弟们,该知足了,这些资源非常的宝贵了. ### github探索-主题-令人敬畏的名单 令人敬畏的名单: https://github.com/topics/awesome 进入 ...
- 001/Nginx高可用模式下的负载均衡与动静分离(笔记)
Nginx高可用模式下的负载均衡与动静分离 Nginx(engine x)是一个高性能的HTTP和反向代理服务器,具有内存少,并发能力强特点. 1.处理静态文件.索引文件以及自动索引:打开文件描述符缓 ...
- HTML5-Classlist样式操作
<!DOCTYPE html> <html lang="en"> <head> <meta charset="UTF-8&quo ...
- PowerShell - Invoke VBA function
$xl = new-object -comobject Excel.Application $source_wb = $xl.workbooks.open($source) $xl.visible=$ ...
- LayUI Table复杂表头实现
LayUI table官方文档中在介绍复杂表头时的用例仅使用了自动渲染的方式作为参考,而并未用到方法渲染的方式来做用例,这让部分不太熟悉layUI table的开发者会有些头疼,不知道如何在方法渲染中 ...
- C#=> 栈模仿堆的操作
//原理,利用两个栈,互相作用,来模仿堆的效果,先进先出.. using System; using System.Collections.Generic; using System.Linq; us ...
- 74.Maximal Rectangle(数组中的最大矩阵)
Level: Hard 题目描述: Given a 2D binary matrix filled with 0's and 1's, find the largest rectangle con ...
- redis命令行命令
配置文件设置密码认证 修改redis.conf去掉#requirepass foobared前面的#,foobared就是密码,可以进行修改 redis命令设置密码认证config set requi ...