jackson学习之十(终篇):springboot整合(配置类)
欢迎访问我的GitHub
https://github.com/zq2599/blog_demos
内容:所有原创文章分类汇总及配套源码,涉及Java、Docker、Kubernetes、DevOPS等;
系列文章汇总
- jackson学习之一:基本信息
- jackson学习之二:jackson-core
- jackson学习之三:常用API操作
- jackson学习之四:WRAP_ROOT_VALUE(root对象)
- jackson学习之五:JsonInclude注解
- jackson学习之六:常用类注解
- jackson学习之七:常用Field注解
- jackson学习之八:常用方法注解
- jackson学习之九:springboot整合(配置文件)
- jackson学习之十(终篇):springboot整合(配置类)
本篇概览
- 本文是《jackson学习》系列的终篇,经过前面的一系列实战,相信您已可以熟练使用jackson灵活的执行各种json序列化和反序列化操作,那么,本篇就以轻松的方式来完成整个系列吧;
- 上一篇介绍的是在springboot中通过配置文件对jackson做设置,今天要聊的是另一种常用的jackson配置方式:配置类,就是自己编写代码实例化和配置springboot全局使用的ObjectMapper实例;
源码下载
- 如果您不想编码,可以在GitHub下载所有源码,地址和链接信息如下表所示(https://github.com/zq2599/blog_demos):
| 名称 | 链接 | 备注 |
|---|---|---|
| 项目主页 | https://github.com/zq2599/blog_demos | 该项目在GitHub上的主页 |
| git仓库地址(https) | https://github.com/zq2599/blog_demos.git | 该项目源码的仓库地址,https协议 |
| git仓库地址(ssh) | git@github.com:zq2599/blog_demos.git | 该项目源码的仓库地址,ssh协议 |
- 这个git项目中有多个文件夹,本章的应用在jacksondemo文件夹下,如下图红框所示:
- jacksondemo是父子结构的工程,本篇的代码在springbootconfigbean子工程中,如下图:

编码
- 在父工程jacksondemo下新增子工程springbootconfigbean,pom.xml如下:
<?xml version="1.0" encoding="UTF-8"?>

<project xmlns="http://maven.apache.org/POM/4.0.0" xmlns:xsi="http://www.w3.org/2001/XMLSchema-instance"

         xsi:schemaLocation="http://maven.apache.org/POM/4.0.0 https://maven.apache.org/xsd/maven-4.0.0.xsd">

    <modelVersion>4.0.0</modelVersion>

    <parent>

        <artifactId>jacksondemo</artifactId>

        <groupId>com.bolingcavalry</groupId>

        <version>1.0-SNAPSHOT</version>

        <relativePath>../pom.xml</relativePath>

    </parent>

    <groupId>com.bolingcavalry</groupId>

    <artifactId>springbootconfigbean</artifactId>

    <version>0.0.1-SNAPSHOT</version>

    <name>springbootconfigbean</name>

    <description>Demo project for Spring Boot with Jackson, configuration from config bean</description>

    <properties>

        <java.version>1.8</java.version>

    </properties>

    <!--不用spring-boot-starter-parent作为parent时的配置-->

    <dependencyManagement>

        <dependencies>

            <dependency>

                <groupId>org.springframework.boot</groupId>

                <artifactId>spring-boot-dependencies</artifactId>

                <version>2.3.3.RELEASE</version>

                <type>pom</type>

                <scope>import</scope>

            </dependency>

        </dependencies>

    </dependencyManagement>

    <dependencies>

        <dependency>

            <groupId>org.springframework.boot</groupId>

            <artifactId>spring-boot-starter-web</artifactId>

        </dependency>

        <dependency>

            <groupId>org.springframework.boot</groupId>

            <artifactId>spring-boot-starter-test</artifactId>

            <scope>test</scope>

            <exclusions>

                <exclusion>

                    <groupId>org.junit.vintage</groupId>

                    <artifactId>junit-vintage-engine</artifactId>

                </exclusion>

            </exclusions>

        </dependency>

        <!-- swagger依赖 -->

        <dependency>

            <groupId>io.springfox</groupId>

            <artifactId>springfox-swagger2</artifactId>

        </dependency>

        <!-- swagger-ui -->

        <dependency>

            <groupId>io.springfox</groupId>

            <artifactId>springfox-swagger-ui</artifactId>

        </dependency>

    </dependencies>

    <build>

        <plugins>

            <plugin>

                <groupId>org.springframework.boot</groupId>

                <artifactId>spring-boot-maven-plugin</artifactId>

            </plugin>

        </plugins>

    </build>

</project>
- 本文最重要的代码是配置类JacksonConfig.java,如下,需要ConditionalOnMissingBean注解避免冲突,另外还给实例指定了名称customizeObjectMapper,如果应用中通过Autowired使用此实例,需要指定这个名字,避免报错"There is more than one bean of 'ObjectMapper ' type":
@Configuration

public class JacksonConfig {

    @Bean("customizeObjectMapper")

    @Primary

    @ConditionalOnMissingBean(ObjectMapper.class)

    public ObjectMapper getObjectMapper(Jackson2ObjectMapperBuilder builder) {

        ObjectMapper mapper = builder.build();

        // 日期格式

        mapper.setDateFormat(new SimpleDateFormat("yyyy-MM-dd hh:mm:ss"));

        // 美化输出

        mapper.enable(SerializationFeature.INDENT_OUTPUT);

        return mapper;

    }

}
- 对于JacksonConfig.getObjectMapper方法内的设置,如果您想做更多设置,请参考《jackson学习之三:常用API操作》里面的设置内容;
- 启动类依然很简单:
package com.bolingcavalry.springbootconfigbean;

import org.springframework.boot.SpringApplication;

import org.springframework.boot.autoconfigure.SpringBootApplication;

@SpringBootApplication

public class SpringbootConfigBeanApplication {

    public static void main(String[] args) {

        SpringApplication.run(SpringbootConfigBeanApplication.class, args);

    }

}
- swagger配置:
package com.bolingcavalry.springbootconfigbean;

import org.springframework.context.annotation.Bean;

import org.springframework.context.annotation.Configuration;

import springfox.documentation.builders.ApiInfoBuilder;

import springfox.documentation.builders.PathSelectors;

import springfox.documentation.builders.RequestHandlerSelectors;

import springfox.documentation.service.ApiInfo;

import springfox.documentation.service.Contact;

import springfox.documentation.service.Tag;

import springfox.documentation.spi.DocumentationType;

import springfox.documentation.spring.web.plugins.Docket;

import springfox.documentation.swagger2.annotations.EnableSwagger2;

@Configuration

@EnableSwagger2

public class SwaggerConfig {

    @Bean

    public Docket createRestApi() {

        return new Docket(DocumentationType.SWAGGER_2)

                .apiInfo(apiInfo())

                .tags(new Tag("JsonPropertySerializationController", "JsonProperty相关测试"))

                .select()

                // 当前包路径

                .apis(RequestHandlerSelectors.basePackage("com.bolingcavalry.springbootconfigbean.controller"))

                .paths(PathSelectors.any())

                .build();

    }

    //构建 api文档的详细信息函数,注意这里的注解引用的是哪个

    private ApiInfo apiInfo() {

        return new ApiInfoBuilder()

                //页面标题

                .title("SpringBoot整合Jackson(基于配置文件)")

                //创建人

                .contact(new Contact("程序员欣宸", "https://github.com/zq2599/blog_demos", "zq2599@gmail.com"))

                //版本号

                .version("1.0")

                //描述

                .description("API 描述")

                .build();

    }

}
- 最后是测试用的Controller类,要注意的是在使用ObjectMapper实例的地方,用Autowired注解的时候,记得带上Qualifier注解:
package com.bolingcavalry.springbootconfigbean.controller;

import com.bolingcavalry.springbootconfigbean.bean.Test;

import com.fasterxml.jackson.core.JsonProcessingException;

import com.fasterxml.jackson.databind.ObjectMapper;

import io.swagger.annotations.Api;

import io.swagger.annotations.ApiOperation;

import org.slf4j.Logger;

import org.slf4j.LoggerFactory;

import org.springframework.beans.factory.annotation.Autowired;

import org.springframework.beans.factory.annotation.Qualifier;

import org.springframework.web.bind.annotation.RequestBody;

import org.springframework.web.bind.annotation.RequestMapping;

import org.springframework.web.bind.annotation.RequestMethod;

import org.springframework.web.bind.annotation.RestController;

@RestController

@RequestMapping("/jsonproperty")

@Api(tags = {"JsonPropertySerializationController"})

public class JsonPropertySerializationController {

    private static final Logger logger = LoggerFactory.getLogger(JsonPropertySerializationController.class);

    @Qualifier("customizeObjectMapper")

    @Autowired

    ObjectMapper mapper;

    @ApiOperation(value = "测试序列化", notes = "测试序列化")

    @RequestMapping(value = "/serialization", method = RequestMethod.GET)

    public Test serialization() throws JsonProcessingException {

        Test test = new Test();

        logger.info(mapper.writeValueAsString(test));

        return test;

    }

    @ApiOperation(value = "测试反序列化", notes="测试反序列化")

    @RequestMapping(value = "/deserialization",method = RequestMethod.PUT)

    public String deserialization(@RequestBody Test test) {

        return test.toString();

    }

}
验证
- 启动SpringbootConfigBeanApplication后,浏览器打开:http://localhost:8080/swagger-ui.html
- 先验证序列化接口/jsonproperty/serialization:

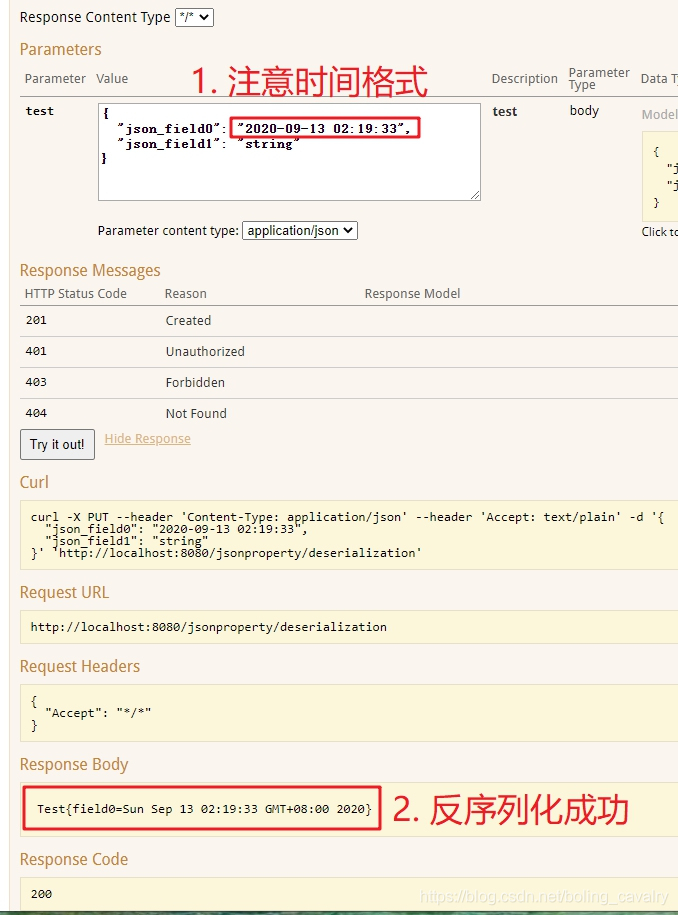
3. 再验证反序列化接口 /jsonproperty/deserialization:
- 至此,整个《jackson学习》系列就全部完成了,希望这十篇内容能够给您带来一些参考,助您在编码过程中更加得心应手的使用Jackson;
你不孤单,欣宸原创一路相伴
欢迎关注公众号:程序员欣宸
微信搜索「程序员欣宸」,我是欣宸,期待与您一同畅游Java世界...
https://github.com/zq2599/blog_demos
jackson学习之十(终篇):springboot整合(配置类)的更多相关文章
- 从.Net到Java学习第十二篇——SpringBoot+JPA提供跨域接口
从.Net到Java学习系列目录 最近又撸了半个月的前端代码,做app离线存储,然后又花了一周去将过去的wcf项目转webapi,java又被落下了,总感觉我特么像斗地主中的癞子牌,变来变去..... ...
- springboot(十四):springboot整合shiro-登录认证和权限管理(转)
springboot(十四):springboot整合shiro-登录认证和权限管理 .embody{ padding:10px 10px 10px; margin:0 -20px; border-b ...
- SpringBoot系列十二:SpringBoot整合 Shiro
声明:本文来源于MLDN培训视频的课堂笔记,写在这里只是为了方便查阅. 1.概念:SpringBoot 整合 Shiro 2.具体内容 Shiro 是现在最为流行的权限认证开发框架,与它起名的只有最初 ...
- 第三篇 SpringBoot整合log4j2详解
源代码:https://pan.baidu.com/s/1d1Lwv1gIvVNltIKVWeEseA 提取码:wff0 SpringBoot整合Log4j2步骤: 1.删除spring-boot-s ...
- rabbitmq学习(五):springboot整合rabbitmq
一.Springboot对rabbitmq的支持 springboot提供了对rabbitmq的支持,并且大大简化了rabbitmq的相关配置.在springboot中,框架帮我们将不同的交换机划分出 ...
- Redis和springboot 整合redisUtil类
一.引入依赖 <dependency> <groupId>org.springframework.boot</groupId> <artifactId> ...
- Redis和SpringBoot整合RedisUtils类
一.引入依赖 <dependency> <groupId>org.springframework.boot</groupId> <artifactId> ...
- springboot项目配置类
一.在springboot项目中,如果不进行配置,直接访问静态页面是无法访问的,需要进行配置,springboot舍弃了XML文件的配置方式,这里我们采用开发配置类的方式.新建MvcConfig类,加 ...
- SpringBoot第十二篇:整合jsp
作者:追梦1819 原文:https://www.cnblogs.com/yanfei1819/p/10953600.html 版权声明:本文为博主原创文章,转载请附上博文链接! 引言 Sprin ...
随机推荐
- 【Linux】cron
每五分钟执行 */5 * * * * 每小时执行 0 * * * * 0 */1 * * * 效果相同 每天执行 0 0 * * * 每周执行 0 0 ...
- P2327 [SCOI2005]扫雷(递推)
题目链接: https://www.luogu.org/problemnew/show/P2327 题目描述 相信大家都玩过扫雷的游戏.那是在一个$n*m$的矩阵里面有一些雷,要你根据一些信息找出雷来 ...
- 单片机—Arduino UNO-R3—学习笔记001
连接方法 下载Arduino软件 安装完成打开如图所示 观察右下角的连接接口"Arduino Uno在COM(X)" 在工具-->端口-->选择之前查看的端口 即为连接 ...
- Pku1236 Network of Schools
题目描述 n个学校构成一个有向图,通过m条边连接,一:问至少向图中多少个学校投放软件,可以使得所有学校直接或者间接的通过边(假设存在边(u,v),则向u投放v可以得到,而向v投放u不能通过v直接得到) ...
- MYSQL基础知识的复习1
数据库(是存放数据的仓库) 1.根据存储量以及安全性上来划分: 大型数据库:DB2 Oracle(毕业) Hbase 银行 公安局(不加班 没网) 移动 中型数据库:mysql sqlserver(. ...
- 向HDFS中指定的文件追加内容,由用户指定内容追加到原有文件的开头或结尾。
1 import java.io.FileInputStream; 2 import java.io.IOException; 3 import java.text.SimpleDateFormat; ...
- CSS居中的常用方式以及优缺点
前言 居中是页面开发中经常遇到的问题. 使用合适的.简单的.兼容性好的居中方式是我们页面仔在整个工作生涯中都要面对的问题. text-align:center 来看这个例子,一张图片和文字进行居中.如 ...
- nginx 配置文件解读
参考:链接 在微服务的体系之下,Nginx正在被越来越多的项目采用作为网关来使用,配合 Lua 做限流.熔断等控制 --源自 nginx Lua 脚本语言,用标准C语言编写并以源代码形式开放, 其设计 ...
- JavaWeb——B/S,C/S结构,HTTP协议
B/S: 开发基于B/S结构项目:目前主要采用三种服务器端语言:JSP,PHP,ASP.NET. 这三种语言构成三种常用应用开发组合:JSP+Oracle组合.PHP+MySQL体系.以及ASP.NE ...
- Spark-读写HBase,SparkStreaming操作,Spark的HBase相关操作
Spark-读写HBase,SparkStreaming操作,Spark的HBase相关操作 1.sparkstreaming实时写入Hbase(saveAsNewAPIHadoopDataset方法 ...