CentOS下搭建VNC/TEAMVIEW/SSH无密码登录
VNC
配置桌面
# 安装gnome桌面环境
yum groupinstall Desktop -y
# 安装中文语言支持包(可选)
yum groupinstall 'Chinese Support' -y
# 设置系统默认语言为中文(可选)
sed -i '/LANG/c\LANG="zh_CN.UTF-8"' /etc/sysconfig/i18n
source /etc/sysconfig/i18n
配置VNC Server
#安装vncserver包
yum install tigervnc tigervnc-server –y
#开启自启动
chkconfig vncserver on
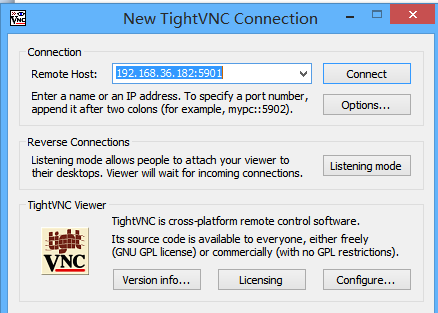
你可以通过UltraVNC Viewer、TigerVNC Viewer或者RealVNC Viewer访问远程桌面了。
#确认vncserver包已经安装
[root@su172 ~]# rpm -qa | egrep -i vnc
tigervnc-server-1.1.0-16.el6.centos.x86_64
[root@su172 ~]#
#确认rpm包配置文件路径
[root@su172 ~]# rpm -ql tigervnc-server-1.1.0-16.el6.centos.x86_64
/etc/rc.d/init.d/vncserver
/etc/sysconfig/vncservers
/usr/bin/Xvnc
/usr/bin/vncconfig
/usr/bin/vncpasswd
/usr/bin/vncserver
/usr/bin/x0vncserver
/usr/share/man/man1/Xvnc.1.gz
/usr/share/man/man1/vncconfig.1.gz
/usr/share/man/man1/vncpasswd.1.gz
/usr/share/man/man1/vncserver.1.gz
/usr/share/man/man1/x0vncserver.1.gz
#root用户启动vncserver
#输入以root用户登录vncserver时的密码
[root@su172 ~]# vncserver
You will require a password to access your desktops.
Password:
Verify:
xauth: (stdin):1: bad display name "su172:1" in "add" command
New 'su172:1 (root)' desktop is su172:1
Creating default startup script /root/.vnc/xstartup
Starting applications specified in /root/.vnc/xstartup
Log file is /root/.vnc/su172:1.log
[root@su172 ~]# cd .vnc/
[root@su172 .vnc]# ls
passwd su172:1.log su172:1.pid xstartup
#普通用户启动vncserver
[appuser@su172 ~]$vncserver
#普通用户需要手工改密码
[appuser@su172 ~]$ vncpasswd
Password:
Verify:
#root验证


#普通user验证


#在Server端进行端口验证
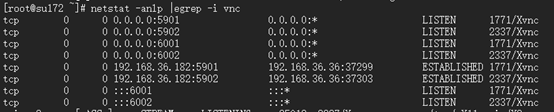
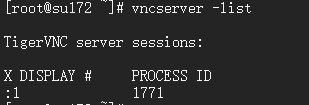
#确认vcn进程

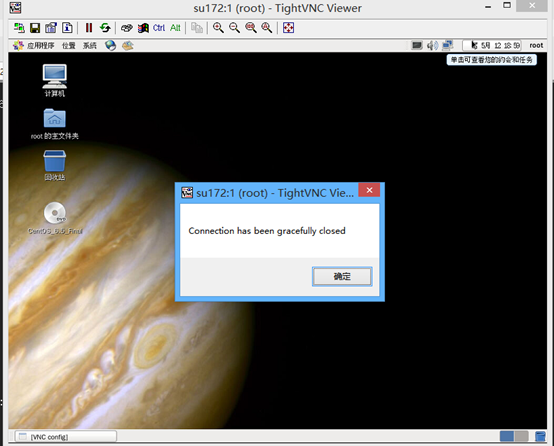
#kill vnc进程验证


#参考
http://www.centoscn.com/image-text/config/2014/1120/4151.html
Teamview
下载
wget https://download.teamviewer.com/download/teamviewer.i686.rpm
安装依赖包
yum install teamviewer_11.0.57095.i686.rpm -y
cd /opt/teamviewer/tv_bin
teamviewer --setup console #设置启动方式为控制台启动
teamviewer --daemon restart #重启teamview服务
teamviewer --info #查看teamview信息
teamviewer --passwd [PASSWD] #设置密码
teamviewer --help #查看帮助
ssh无密码登录
CentOS系统之间有可能需要无密码验证登录,方便拷贝东东,例如oracle rac安装时就有这个东西。所以提前了解很有必要。
node1执行以下步骤:
ssh-keygen -t rsa -P ''
scp /root/.ssh/id_rsa.pub root@192.168.36.182:/root/.ssh/id_rsa.pub181
node2执行以下步骤:
ssh-keygen -t rsa -P ''
scp id_rsa.pub root@192.168.36.181:/root/.ssh/id_rsa.pub182
node1执行:
cat id_rsa.pub182 >>authorized_keys
node2执行
cat id_rsa.pub181 >>authorized_keys
验证
node1验证
ssh 192.168.36.182
node2验证
ssh 192.168.36.181
扩展
-v跟踪
[root@su171 .ssh]# ssh -v 192.168.36.182
OpenSSH_5.3p1, OpenSSL 1.0.1e-fips 11 Feb 2013
debug1: Reading configuration data /etc/ssh/ssh_config
debug1: Applying options for *
debug1: Connecting to 192.168.36.182 [192.168.36.182] port 22.
debug1: Connection established.
debug1: permanently_set_uid: 0/0
debug1: identity file /root/.ssh/identity type -1
debug1: identity file /root/.ssh/identity-cert type -1
debug1: identity file /root/.ssh/id_rsa type 1
debug1: identity file /root/.ssh/id_rsa-cert type -1
debug1: identity file /root/.ssh/id_dsa type -1
debug1: identity file /root/.ssh/id_dsa-cert type -1
debug1: identity file /root/.ssh/id_ecdsa type -1
debug1: identity file /root/.ssh/id_ecdsa-cert type -1
debug1: Remote protocol version 2.0, remote software version OpenSSH_5.3
debug1: match: OpenSSH_5.3 pat OpenSSH*
debug1: Enabling compatibility mode for protocol 2.0
debug1: Local version string SSH-2.0-OpenSSH_5.3
debug1: SSH2_MSG_KEXINIT sent
debug1: SSH2_MSG_KEXINIT received
debug1: kex: server->client aes128-ctr hmac-md5 none
debug1: kex: client->server aes128-ctr hmac-md5 none
debug1: SSH2_MSG_KEX_DH_GEX_REQUEST(1024<1024<8192) sent
debug1: expecting SSH2_MSG_KEX_DH_GEX_GROUP
debug1: SSH2_MSG_KEX_DH_GEX_INIT sent
debug1: expecting SSH2_MSG_KEX_DH_GEX_REPLY
debug1: Host '192.168.36.182' is known and matches the RSA host key.
debug1: Found key in /root/.ssh/known_hosts:1
debug1: ssh_rsa_verify: signature correct
debug1: SSH2_MSG_NEWKEYS sent
debug1: expecting SSH2_MSG_NEWKEYS
debug1: SSH2_MSG_NEWKEYS received
debug1: SSH2_MSG_SERVICE_REQUEST sent
debug1: SSH2_MSG_SERVICE_ACCEPT received
debug1: Authentications that can continue: publickey,gssapi-keyex,gssapi-with-mic,password
debug1: Next authentication method: gssapi-keyex
debug1: No valid Key exchange context
debug1: Next authentication method: gssapi-with-mic
debug1: Unspecified GSS failure. Minor code may provide more information
Cannot determine realm for numeric host address
debug1: Unspecified GSS failure. Minor code may provide more information
Cannot determine realm for numeric host address
debug1: Unspecified GSS failure. Minor code may provide more information
debug1: Unspecified GSS failure. Minor code may provide more information
Cannot determine realm for numeric host address
debug1: Next authentication method: publickey
debug1: Trying private key: /root/.ssh/identity
debug1: Offering public key: /root/.ssh/id_rsa
debug1: Server accepts key: pkalg ssh-rsa blen 277
debug1: read PEM private key done: type RSA
debug1: Authentication succeeded (publickey).
debug1: channel 0: new [client-session]
debug1: Requesting no-more-sessions@openssh.com
debug1: Entering interactive session.
debug1: Sending environment.
debug1: Sending env LANG = en_US.UTF-8
Last login: Thu May 12 23:51:22 2016 from 192.168.36.181
[root@su172 ~]#
CentOS下搭建VNC/TEAMVIEW/SSH无密码登录的更多相关文章
- CentOS 下SSH无密码登录的配置
CentOS 下SSH无密码登录的配置 最近学习Hadoop.它要求各节点之间通过SSH无密码登录,配置SSH的时候费了一番功夫,记录下来,以备忘. 配置SSH无密码登录需要3步: 1.生成公钥和私钥 ...
- CentOS下SSH无密码登录的配置
1.确认本机sshd的配置文件(需要root权限) $ gedit /etc/ssh/sshd_config 找到以下内容,并去掉注释符"#" RSAAuthentication ...
- CentOS配置ssh无密码登录
CentOS配置ssh无密码登录的注意点 前提配置:使用root登录修改配置文件:/etc/ssh/sshd_config,将其中三行的注释去掉,如下: 然后重启ssh服务:service s ...
- ssh-keygen+ssh-copy-id 在linux下实现ssh无密码登录访问(转)
转自:http://blog.csdn.net/pennyliang/article/details/8556662 ssh-keygen+ssh-copy-id 在linux下实现ssh无密码登录访 ...
- CentOS系统实现SSH无密码登录的方法
一.环境配置 1.服务端:CentOS release 5.3 IP:222.73.115.198 2.客服端:CentOS release 5.8 IP:192.168.4.244 二.配置SSH无 ...
- ssh 无密码登录
ssh 无密码登录要使用公钥与私钥.linux下可以用用ssh-keygen生成公钥/私钥对,下面我以CentOS为例. 有机器A(192.168.1.155),B(192.168.1.181).现想 ...
- Linux SSH无密码登录
Linux服务器常见的登录方式有两种:密码登录.秘钥登录.工作中我们最常使用的是用秘钥登录的方法,因为使用秘钥登录更高效.更安全. 如何实现SSH无密码登录: 原理:无密码ssh登录的主要操作为将本机 ...
- ssh 无密码登录要使用公钥与私钥
ssh 无密码登录要使用公钥与私钥.linux下可以用用ssh-keygen生成公钥/私钥对,下面我以CentOS为例. 有机器A(192.168.1.155),B(192.168.1.181).现想 ...
- CentOS下搭建LNMP+WordPress+http2.0教程
此文是本人CentOS下搭建WordPress的一些笔记,环境搭建时间::将看过的几篇文章总结下来,形成一条龙长文.不用大家再找来找去. 本文大概分为此几部分: 一.基础命令更新: 二.服务器加速(非 ...
随机推荐
- 从原生web组件到框架组件源码(一)
温馨提醒,当你觉得看我写的很乱的时候,就对了,那是因为我查阅了大量的资料提取出来的,因为有点东西不太理解,所以你会感觉有的部分重复了,也不是重复,只是后面对前面的内容进行梳理了一些,需要耐心的看到最后 ...
- linux 安装部署
[smb] service smb restart vim /etc/selinux/config systemctl stop firewalld.service(centos7 64) seten ...
- Python UnboundLocalError: local variable 'xxx' referenced before assignment 解决方法
一.报错含义: val=9 def test(): print(val) val = 6 print(val) test() 翻译:本地变量xxx引用前没有定义. 二.报错原因 这是Python变量作 ...
- 毕业一年后接私活赚了10w,还拿了几家大厂offer!
原本计划这周接着写一篇技术文章的,但是没想到忙到天天凌晨回家,几乎没有为下一篇文章做准备的时间(通常写一篇文章需要至少 30 个小时,需要搭进日常下班及周末的休息时间).这周如果写的话精力和时间都达不 ...
- R语言factor类型转numeric
R 语言中为了进行数据分析,比如回归分析,这时候对于数据表格中的factor类型的数据会带来弊端,比如对因子的每一个数据都进行一次回归,这样就显得很复杂,且违背了我们的初衷,需要把factor转换为n ...
- 直播APP源码是如何实现音视频同步的
1. 音视频同步原理 1)时间戳 直播APP源码音视频同步主要用于在音视频流的播放过程中,让同一时刻录制的声音和图像在播放的时候尽可能的在同一个时间输出. 解决直播APP源码音视频同步问题的最佳方案 ...
- ubuntu下安装nginx -php
mysql : sudo apt-get install mysql-server mysql-client nginx: sudo apt-get install nginx安装Nginx稳定版本 ...
- char和signed char不同编译器下的使用反思
遇到一个问题,在使用一个算法的时候出现了仿真正常,但是在使用时出现函数的返回数据只有正值的异常. 在定位算法问题的时候,由算法函数最后的返回值由后向前推,最后发现问题在与char类型的值在不同编译器下 ...
- tomcat 404报错 问题可能之一
一个tomcat下多个应用:我的应用xxx启动不起来,页面报错404: May 29, 2015 5:58:37 PM org.apache.catalina.core.StandardContext ...
- 激情的来源 Imagine how much you love it !
激情来自哪里?我想可能我找到了,精髓就在那个标题! 想象你有多么爱它!你就会爱上他,想象你有多么喜欢某一个东西,你很有可能就喜欢上他,着手去了解他,接触他. 如果带着这种想象状态的激情,工作和学习会有 ...