安装篇四:安装NGINX(1.4.0版本)
#1、NGINX安装
1、安装文件上传软件

    [root@TEST ~]# yum install lrzsz –y     <———拖拽文件

2、检查软件安装的系统环境

    [root@TEST ~]# cat /etc/redhat-release

    [root@TEST ~]# uname -r

3、安装nginx的依赖包(pcre-devel openssl-devel)---假设不进行安装

    [root@TEST ~]# yum install -y pcre-devel openssl-devel

4、下载nginx软件---1.10.2 复制链接地址(统一位置进行下载)

    [root@TEST ~]# cd /server/tools/

    [root@TEST tools]# wget -q http://nginx.org/download/nginx-1.4.0.tar.gz

    说明:软件很小,用心查看一下

5、解压、配置、编译、安装NGINX

    解压要编译安装的软件(解压软件---配置(./configure)---做菜(编译 make)---上菜(安装 make install))

    [root@TEST ~]#  cd /server/tools/

    [root@TEST tools]#  tar xf nginx-1.4.0.tar.gz

    [root@TEST tools]#  cd nginx-1.4.0

    [root@TEST tools]#  ls (里面的内容就是源代码(config readme安装说明)---默认编译会安装到/usr/local目录)

    [root@TEST nginx-1.4.0]#  useradd -s /sbin/nologin -M www        <--- 创建NGINX服务程序www用户

    进行配置,编译,安装

    (说明:每执行下面一个命令,都使用 "echo $?" 进行测试,看返回值是否为0,若为0,则只需下面命令;若返回值不是0,则删除安装包重新执行。

    [root@TEST nginx-1.4.0]#  ./configure --prefix=/application/nginx-1.4.0 --user=www --group=www --with-http_stub_status_module  --with-http_ssl_module

####---------------------------------####

执行命令时,报如下错误信息:

checking for OS

 + Linux 2.6.32-431.el6.x86_64 x86_64

checking for C compiler ... not found

./configure: error: C compiler cc is not found

出现这个错误。那么就是gcc 包没有安装。

[root@TEST nginx-1.4.0]# yum -y install gcc

####---------------------------------####

    [root@TEST nginx-1.4.0]#  echo $?    <————返回值为0,执行下一个命令

    [root@TEST nginx-1.4.0]#  make

    [root@TEST nginx-1.4.0]#  echo $?    <————返回值为0,执行下一个命令

    [root@TEST nginx-1.4.0]#  make install

    [root@TEST nginx-1.4.0]#  echo $?    <————返回值为0,执行下一个命令

6、创建软连接

    软件安装完成要做一个软链接

    [root@TEST nginx-1.4.0]#  ln -s /application/nginx-1.4.0 /application/nginx

7、重启nginx服务;进行首页测试

    [root@TEST nginx-1.4.0]#  /applicaton/nginx/sbin/nginx

    [root@TEST nginx-1.4.0]#  lsof -i:80        <————查看监听情况

8、浏览器访问 http://10.0.0.200            <————能访问到NGINX欢迎页面,说明NGINX安装成功

    至此软件安装完毕:

9、NGINX状态检查

    [root@TEST nginx-1.4.0]#  ps –ef | grep nginx

      root      30716      1  0 15:55 ?        00:00:00 nginx: master process nginx

      www       31453  30716  0 17:40 ?        00:00:00 nginx: worker process

      root      31696  31670  0 18:15 pts/0    00:00:00 grep --color=auto nginx

    [root@TEST nginx-1.4.0]#  netstat –lntup | grep nginx

      tcp        0      0 0.0.0.0:80                  0.0.0.0:*                   LISTEN      4170/nginx
#2、NGINX程序目录结构
[root@www nginx-1.4.0]# ll

drwx------ 2 www  root 4096 Apr 13 22:32 client_body_temp

drwx------ 2 www  root 4096 Apr 13 22:32 fastcgi_temp

drwx------ 2 www  root 4096 Apr 13 22:32 proxy_temp

drwx------ 2 www  root 4096 Apr 13 22:32 scgi_temp

drwx------ 2 www  root 4096 Apr 13 22:32 uwsgi_temp

drwxr-xr-x 2 root root 4096 Apr 13 22:27 conf        <——--- 配置文件保存路径(nginx.conf)

drwxr-xr-x 2 root root 4096 Apr 13 22:27 html        <——--- 站点目录,整合网站资源

drwxr-xr-x 2 root root 4096 Apr 13 22:32 logs        <——--- 日志文件(错误日志文件 访问日志文件  进程pid文件)

drwxr-xr-x 2 root root 4096 Apr 13 22:27 sbin        <——--- 程序命令保存路径
#3、NGINX配置文件说明(nginx.conf)
#说明:原配置文件没有什么作用,必须初始化配置文件

[root@TEST ~]# cd /application/nginx/conf/

[root@TEST conf]# grep -Ev "^$|#" nginx.conf.default >nginx.conf

[root@TEST conf]# cat nginx.conf
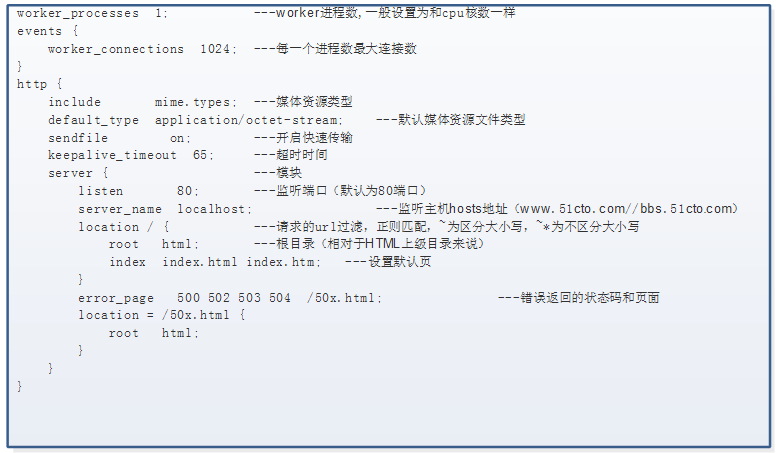
#编写nginx配置文件规范总结:
1) 配置文件中指令或者参数,一定要编写正确(拼写 位置)
2) 每一个区块都是有成对大括号组成
3) 所有区块中的指令信息结尾都要有分好
#4、NGINX常见命令汇总
#启动nginx

[root@TEST ~]# /application/nginx/sbin/nginx

#查看nginx版本

[root@TEST ~]# /application/nginx/sbin/nginx -v

  nginx version: nginx/1.4.0

#配置文件语法检查

[root@TEST ~]# /application/nginx/sbin/nginx -t

#nginx命令帮助

[root@TEST ~]# /application/nginx/sbin/nginx –h

#关闭nginx

[root@TEST ~]# /application/nginx/sbin/nginx -s stop

#平滑重启(当配置文件发送变化时可以使用:(如果配置文件里面涉及ip地址的修改的话,必须使用先关闭服务,再重启的方式))

[root@TEST ~]# /application/nginx/sbin/nginx -s reload

#打开日志文件(一般用于日志切割)

[root@TEST ~]# /application/nginx/sbin/nginx -s reopen
安装篇四:安装NGINX(1.4.0版本)的更多相关文章
- 国内不fq安装K8S四: 安装过程中遇到的问题和解决方法
目录 4 安装过程中遇到的问题和解决方法 4.1 常见问题 4.2 常用的操作命令 4.3 比较好的博客 国内不fq安装K8S一: 安装docker 国内不fq安装K8S二: 安装kubernet 国 ...
- ubuntu16.04安装LNMP(ubuntu+Nginx+mysql+PHP7.0)
系统环境: Ubuntu 16.04.2 LTS nginx version: nginx/1.10.3 (Ubuntu) PHP 7.0.22-0ubuntu0.16.04.1 mysql Ver ...
- Ubuntu 14.04 安装最新稳定版Nginx 1.6.0
如果已经安装,请先卸载sudo apt-get remove nginx最新的稳定版Nginx 1.6.0在ubuntuupdates ppa库中提供,网址http://www.ubuntuupdat ...
- Ubuntu 16.04 安装最新稳定版Nginx 1.6.0
Ubuntu 16.04 默认安装的是nginx 1.14.0 #默认安装方式:apt-get install nginx 1.查看是否安装nginx,如果已经安装,请先卸载 #查看安装版本 d ...
- Linux系统下 MySQL 安装 指南(5.7和8.0 版本)
一. 准备工作 1 删除本地centos7中的mariadb: 查看系统中是否已安装 mariadb 服务: rpm -qa | grep mariadb 或 yum list installed | ...
- YII2.0安装教程,数据库配置前后台 [ 2.0 版本 ]
1.首先下载yii-advanced-app-2.0.6.tgz 2.解压到D:\wamp\www\yii2目录下面将目录advanced下所有文件剪切到 D:\wamp\www\yii2 3.打开c ...
- Nginx系列篇四:Nginx+keepalived搭建一个高可用的双机双主热备
建议:先阅读Nginx+keepalived主从配置,因为此篇是接着上篇开始的 上一篇我们简单的介绍了主从配置及其缺点,我们看一下双主热备配置: 2台Nginx+keepalived互为主备,各自绑定 ...
- [macOS] macOS下,VirtualBox安装CentOS7.4, 搭建nginx, mysql, PHP5.6&PHP7.1
准备工作 网络设置 相关教程:http://www.jianshu.com/p/e6ba699b5992 ifcfg-enp0s3配置 TYPE=Ethernet BOOTPROTO=dhcp DEF ...
- SystemTap 学习笔记 - 安装篇
https://segmentfault.com/a/1190000000671438 在安装前,需要知道下自己的系统环境,我的环境如下: uname -r 2.6.18-308.el5 Linux ...
随机推荐
- 01_Activity生命周期及传递数据
1. Activity的生命周期: 2. Activity启动另一个Activity,并传递数据: package com.example.activitydemo; import android.a ...
- 饱含辛酸开发 WPF CustomControl
引言 不知不觉间WPF开发已有两年光景,或许有很多人会问WPF还需要学习吗?WPF还有前途吗?其实我也很担心这个问题. .Net Core3.x已经支持WPF开发,.Net 5也宣布要支持WPF.是否 ...
- 不是程序员,代码也不能太丑!python官方书写规范:任何人都该了解的 pep8
不是程序员,代码也不能太丑!python官方书写规范:任何人都该了解的 pep8 简介:为什么要强调 书写规范 ?这其实并不关乎"美丑",而是为了 更高的效率(代码阅读.开发.维护 ...
- Python学习随笔:使用xlwings读取和操作Execl文件
一.背景 有2种模块可以对Execl文件,一种是xlwt 方式,需要安装三个库文件 xlrd(读Excel)xlwt(写Excel)xlutils(修改Excel),也是网上介绍文章最多的一种方法,一 ...
- PyQt(Python+Qt)学习随笔:QAbstractItemView的verticalScrollMode和horizontalScrollMode属性
老猿Python博文目录 老猿Python博客地址 一.概述 verticalScrollMode和horizontalScrollMode属性用于控制视图如何在垂直方向和水平方向滚动内容.滚动可以按 ...
- 关于kettle前后无依赖项关系的解决办法
前几日我发了一个关于从cube里提取数据的kettle流程图,当时我测试了是正确的.今天我将N个这样的流程放到一个job里批量处理的时候,错误出现了,纠结了很久.我始终无法理解为什么单独执行是正确的, ...
- Shell命令和流程控制[linux常用命令的使用]
在shell脚本中使用三类命令: unix命令 概念:管道.重定向.backtick 流程控制 1 unix命令 echo "some text":在屏幕上输出信息 ls:文件列表 ...
- POJ_1961
Period Time Limit: 3000MS Memory Limit: 30000K Total Submissions: 19817 Accepted: 9640 Descripti ...
- 【聊技术】在Android中实现自适应文本大小显示
本周的聊技术话题和大家说说如何在Android中实现自适应文本大小显示. 想象一下,在布局中,通常显示文本的区域大小是固定的,但是文本长度并不总是固定的.比如列表中的文章标题.界面下方的按钮文本等等. ...
- 关于VS.Net应用的图标提取方法
.Net的资源文件 VS.Net 支持三种文件类型的resource:.txt..resx..resources. system.resources 名字空间支持三种资源文件: txt 文件,只能有字 ...