springboot +Thymeleaf+UEditor整合记录
1,ueditor官网下载:https://ueditor.baidu.com/website/download.html 下载相应的工具包和源码,ps:源码放到工程中
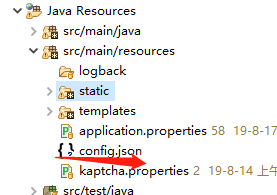
2,解压放到放到项目中,springboot工程创建不再描述过程,resources:下放config.json文件;resources/static/ueditor 放ueditor其他相关内容

3,整理pom.xml文件
	       <!--thymeleaf 模板 -->

		<dependency>

			<groupId>org.springframework.boot</groupId>

			<artifactId>spring-boot-starter-thymeleaf</artifactId>

		</dependency>

		<!-- thymeleaf网页解析 -->

		<dependency>

			<groupId>net.sourceforge.nekohtml</groupId>

			<artifactId>nekohtml</artifactId>

		</dependency>

                <!-- 引入ueditor 需要的工具包 -->

		<dependency>

		    <groupId>org.json</groupId>

		    <artifactId>json</artifactId>

		    <version>20180130</version>

		</dependency>

		<dependency>

		    <groupId>commons-fileupload</groupId>

		    <artifactId>commons-fileupload</artifactId>

		    <version>1.4</version>

		</dependency>

		<dependency>

		    <groupId>commons-codec</groupId>

		    <artifactId>commons-codec</artifactId>

		</dependency>
4,添加UEditorController,跳转到 index页面
import java.io.IOException;

import java.io.PrintWriter;

import javax.servlet.http.HttpServletRequest;

import javax.servlet.http.HttpServletResponse;

import org.springframework.stereotype.Controller;

import org.springframework.web.bind.annotation.RequestMapping;

import com.baidu.ueditor.ActionEnter;

import com.taogou.controller.base.BaseController;

/**

 * 百度编辑富文本

 *

 * @author Administrator

 *

 */

@Controller

public class UEditorController extends BaseController {

	private String prefix = "/ueditor";

	@RequestMapping("/")

	private String showPage() {

		return prefix + "/index";

	}

	@RequestMapping(value = "/config")

	public void config(HttpServletRequest request, HttpServletResponse response) {

		response.setContentType("application/json;charset=utf-8");

		String rootPath = request.getSession().getServletContext().getRealPath("/");

		try {

			String exec = new ActionEnter(request, rootPath).exec();

			PrintWriter writer = response.getWriter();

			writer.write(exec);

			writer.flush();

			writer.close();

		} catch (IOException e) {

			e.printStackTrace();

		}

	}

}
index 页面:修改静态资源路径,其他保持一致
<!DOCTYPE>

<html xmlns:th="http://www.thymeleaf.org">

<head>

    <title>完整demo</title>

    <meta http-equiv="Content-Type" content="text/html;charset=utf-8"/>

    <script type="text/javascript" charset="utf-8" th:src="@{/static/ueditor/ueditor.config.js}"></script>

    <script type="text/javascript" charset="utf-8" th:src="@{/static/ueditor/ueditor.all.min.js}"> </script>

    <!--建议手动加在语言,避免在ie下有时因为加载语言失败导致编辑器加载失败-->

    <!--这里加载的语言文件会覆盖你在配置项目里添加的语言类型,比如你在配置项目里配置的是英文,这里加载的中文,那最后就是中文-->

    <script type="text/javascript" charset="utf-8" th:src="@{/static/ueditor/lang/zh-cn/zh-cn.js}"></script>

    <style type="text/css">

        div{

            width:100%;

        }

    </style>

</head>

<body>
网页输入:http://localhost:8081/ 查看效果

5,上传图片部分整合 :controller 里面的 /config 放到 ueditor.config.js 中
 window.UEDITOR_CONFIG = {

        //为编辑器实例添加一个路径,这个不能被注释

        UEDITOR_HOME_URL: URL

        // 服务器统一请求接口路径

        , serverUrl: "/config"

        //, serverUrl: URL + "/config"

        //工具栏上的所有的功能按钮和下拉框,可以在new编辑器的实例时选择自己需要的重新定义

        , toolbars: [[
此时会发现无法加载 config.json文件,修改源码ConfigManage 下的getConfigPath()方法
private String getConfigPath() {

		// return this.parentPath + File.separator + ConfigManager.configFileName;

		try {

			// 获取classpath下的config.json路径

			// this.getClass().getClassLoader().getResource("config.json").getPath()

			String classPath = this.getClass().getClassLoader().getResource("config.json").toURI().getPath();

			return classPath;

		} catch (URISyntaxException e) {

			return null;

		}

	}
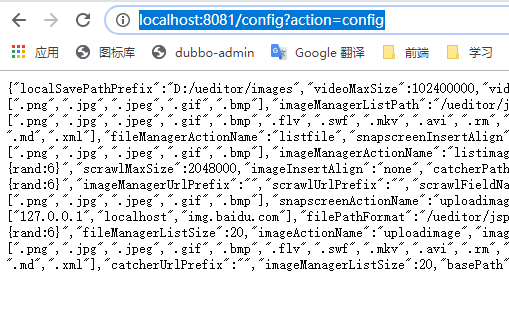
网页输出看看是否正确:http://localhost:8081/config?action=config
6,此时点击上传图片显示 如下
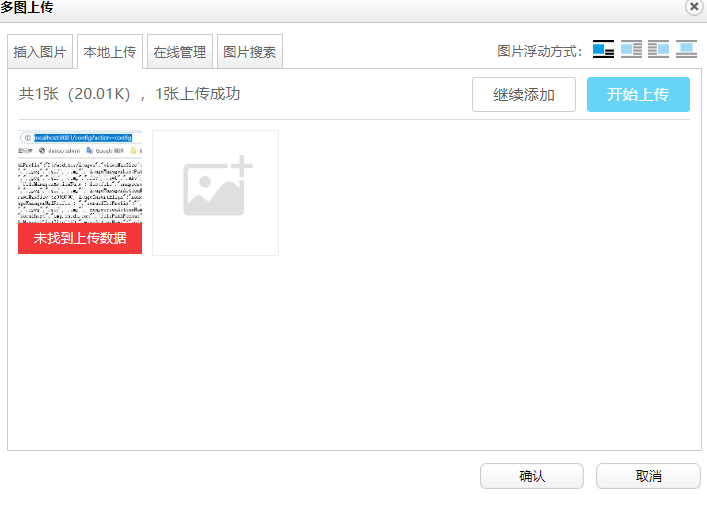
7,在源码: BinaryUploader 类中 把原有的文件上传request请求替换成spring的上传控件
static Logger logger = LoggerFactory.getLogger(BinaryUploader.class);

	public static final State save(HttpServletRequest request, Map<String, Object> conf) {

		FileItemStream fileStream = null;

		boolean isAjaxUpload = request.getHeader("X_Requested_With") != null;

		if (!ServletFileUpload.isMultipartContent(request)) {

			return new BaseState(false, AppInfo.NOT_MULTIPART_CONTENT);

		}

		ServletFileUpload upload = new ServletFileUpload(new DiskFileItemFactory());

		if (isAjaxUpload) {

			upload.setHeaderEncoding("UTF-8");

		}

		try {

			// 把原有的文件上传request请求替换成spring的上传控件

			MultipartHttpServletRequest multipartRequest = (MultipartHttpServletRequest) request;

			MultipartFile multipartFile = multipartRequest.getFile(conf.get("fieldName").toString());

			if (multipartFile == null) {

				return new BaseState(false, 7);

			}

			/*

			 * FileItemIterator iterator = upload.getItemIterator(request); while

			 * (iterator.hasNext()) { fileStream = iterator.next();

			 *

			 * if (!fileStream.isFormField()) break; fileStream = null; } if (fileStream ==

			 * null) { return new BaseState(false, AppInfo.NOTFOUND_UPLOAD_DATA); }

			 */

			String savePath = (String) conf.get("savePath");

			String localSavePathPrefix = (String) conf.get("localSavePathPrefix");

			// spring

			String originFileName = multipartFile.getOriginalFilename();

			String suffix = FileType.getSuffixByFilename(originFileName);

			originFileName = originFileName.substring(0, originFileName.length() - suffix.length());

			savePath = savePath + suffix;

			long maxSize = ((Long) conf.get("maxSize")).longValue();

			if (!validType(suffix, (String[]) conf.get("allowFiles"))) {

				return new BaseState(false, 8);

			}

			savePath = PathFormat.parse(savePath, originFileName);

			localSavePathPrefix = localSavePathPrefix + savePath;

			String physicalPath = localSavePathPrefix;

			logger.info("BinaryUploader physicalPath:{},savePath:{}", localSavePathPrefix, savePath);

			// spring

			InputStream is = multipartFile.getInputStream();

			State storageState = StorageManager.saveFileByInputStream(is, physicalPath, maxSize);

			is.close();

			if (storageState.isSuccess()) {

				storageState.putInfo("url", PathFormat.format(savePath));

				storageState.putInfo("type", suffix);

				storageState.putInfo("original", originFileName + suffix);

			}

			return storageState;

		} catch (IOException e) {

		}

		return new BaseState(false, AppInfo.IO_ERROR);

	}
8,解决图片上传路径问题
在config.json 增加 localSavePathPrefix 地址保存图片
{

     /* 上传图片配置项 */

    "localSavePathPrefix":"D:/ueditor/images",

    /* 上传图片配置项 */

    "imageActionName": "uploadimage", /* 执行上传图片的action名称 */

    "imageFieldName": "upfile", /* 提交的图片表单名称 */

    "imageMaxSize": 2048000, /* 上传大小限制,单位B */

    "imageAllowFiles": [".png", ".jpg", ".jpeg", ".gif", ".bmp"], /* 上传图片格式显示 */

    "imageCompressEnable": true, /* 是否压缩图片,默认是true */

    "imageCompressBorder": 1600, /* 图片压缩最长边限制 */

    "imageInsertAlign": "none", /* 插入的图片浮动方式 */

    "imageUrlPrefix": "", /* 图片访问路径前缀 */

    "imagePathFormat": "/image/{yyyy}{mm}{dd}/{time}{rand:6}", /* 上传保存路径,可以自定义保存路径和文件名格式 */
修改源码:ConfigManager 方法 getConfig
public Map<String, Object> getConfig(int type) {

		Map<String, Object> conf = new HashMap<String, Object>();

		String savePath = null;

		// 增加接收要保存图片的物理路径

		String localSavePathPrefix = null;

		switch (type) {

		case ActionMap.UPLOAD_FILE:

			conf.put("isBase64", "false");

			conf.put("maxSize", this.jsonConfig.getLong("fileMaxSize"));

			conf.put("allowFiles", this.getArray("fileAllowFiles"));

			conf.put("fieldName", this.jsonConfig.getString("fileFieldName"));

			savePath = this.jsonConfig.getString("filePathFormat");

			localSavePathPrefix = this.jsonConfig.getString("localSavePathPrefix");

			break;

		case ActionMap.UPLOAD_IMAGE:

			conf.put("isBase64", "false");

			conf.put("maxSize", this.jsonConfig.getLong("imageMaxSize"));

			conf.put("allowFiles", this.getArray("imageAllowFiles"));

			conf.put("fieldName", this.jsonConfig.getString("imageFieldName"));

			savePath = this.jsonConfig.getString("imagePathFormat");

			localSavePathPrefix = this.jsonConfig.getString("localSavePathPrefix");

			break;

		case ActionMap.UPLOAD_VIDEO:

			conf.put("maxSize", this.jsonConfig.getLong("videoMaxSize"));

			conf.put("allowFiles", this.getArray("videoAllowFiles"));

			conf.put("fieldName", this.jsonConfig.getString("videoFieldName"));

			savePath = this.jsonConfig.getString("videoPathFormat");

			localSavePathPrefix = this.jsonConfig.getString("localSavePathPrefix");

			break;

		case ActionMap.UPLOAD_SCRAWL:

			conf.put("filename", ConfigManager.SCRAWL_FILE_NAME);

			conf.put("maxSize", this.jsonConfig.getLong("scrawlMaxSize"));

			conf.put("fieldName", this.jsonConfig.getString("scrawlFieldName"));

			conf.put("isBase64", "true");

			savePath = this.jsonConfig.getString("scrawlPathFormat");

			localSavePathPrefix = this.jsonConfig.getString("localSavePathPrefix");

			break;

		case ActionMap.CATCH_IMAGE:

			conf.put("filename", ConfigManager.REMOTE_FILE_NAME);

			conf.put("filter", this.getArray("catcherLocalDomain"));

			conf.put("maxSize", this.jsonConfig.getLong("catcherMaxSize"));

			conf.put("allowFiles", this.getArray("catcherAllowFiles"));

			conf.put("fieldName", this.jsonConfig.getString("catcherFieldName") + "[]");

			savePath = this.jsonConfig.getString("catcherPathFormat");

			localSavePathPrefix = this.jsonConfig.getString("localSavePathPrefix");

			break;

		case ActionMap.LIST_IMAGE:

			conf.put("allowFiles", this.getArray("imageManagerAllowFiles"));

			conf.put("dir", this.jsonConfig.getString("imageManagerListPath"));

			conf.put("count", this.jsonConfig.getInt("imageManagerListSize"));

			localSavePathPrefix = this.jsonConfig.getString("localSavePathPrefix");

			break;

		case ActionMap.LIST_FILE:

			conf.put("allowFiles", this.getArray("fileManagerAllowFiles"));

			conf.put("dir", this.jsonConfig.getString("fileManagerListPath"));

			conf.put("count", this.jsonConfig.getInt("fileManagerListSize"));

			localSavePathPrefix = this.jsonConfig.getString("localSavePathPrefix");

			break;

		}

		conf.put("savePath", savePath);

		conf.put("rootPath", this.rootPath);

		// 接收要保存图片的物理路径

		conf.put("localSavePathPrefix", localSavePathPrefix);

		return conf;

	}
然后修改 BinaryUploader 中新增的 localSavePathPrefix
String savePath = (String) conf.get("savePath");

String localSavePathPrefix = (String) conf.get("localSavePathPrefix");
此时点击上传 图片会上传到指定的目录中
图片显示问题 在application.properties 中指定映射地址
#upload img set path

taogou.imagesPath=D:/fileUpload/

spring.mvc.static-path-pattern=/**

spring.resources.static-locations=classpath:/META-INF/resources/,classpath:/resources/,classpath:/static/,classpath:/public/,file:${taogou.imagesPath}
至此 整合完成,
具体情况具体配置,有什么错误请留言指正
springboot +Thymeleaf+UEditor整合记录的更多相关文章
- 【SpringBoot】SpringBoot/MyBatis/MySql/thymeleaf/Log4j整合工程
工程下载地址:https://files.cnblogs.com/files/xiandedanteng/MMSpringWeb20191027-1.rar 工程目录结构如图: 1.创建工程 有些网文 ...
- SpringBoot系列——MyBatis-Plus整合封装
前言 MyBatis-Plus是一款MyBatis的增强工具(简称MP),为简化开发.提高效率,但我们并没有直接使用MP的CRUD接口,而是在原来的基础上封装一层通用代码,单表继承我们的通用代码,实现 ...
- org.springframework.expression.spel.SpelEvaluationException: EL1004E: Method call: Method service() cannot be found on com.my.blog.springboot.thymeleaf.util.MethodTest type
前言 本文中提到的解决方案,源码地址在:springboot-thymeleaf,希望可以帮你解决问题. 至于为什么已经写了一篇文章thymeleaf模板引擎调用java类中的方法,又多此一举的单独整 ...
- springboot 与 shiro 整合 (简洁版)
前言: 网上有很多springboot 与 shiro 整合的资料,有些确实写得很好, 对学习shiro和springboot 都有很大的帮助. 有些朋友比较省事, 直接转发或者复制粘贴.但是没有经过 ...
- 30分钟带你了解Springboot与Mybatis整合最佳实践
前言:Springboot怎么使用想必也无需我多言,Mybitas作为实用性极强的ORM框架也深受广大开发人员喜爱,有关如何整合它们的文章在网络上随处可见.但是今天我会从实战的角度出发,谈谈我对二者结 ...
- SpringBoot与Dubbo整合下篇
(1)pom.xml引入相关依赖jar包,如下: <dependency> <groupId>com.alibaba</groupId> <artifactI ...
- SpringBoot与Shiro整合权限管理实战
SpringBoot与Shiro整合权限管理实战 作者 : Stanley 罗昊 [转载请注明出处和署名,谢谢!] *观看本文章需要有一定SpringBoot整合经验* Shiro框架简介 Apach ...
- springboot + mybatis + mycat整合
1.mycat服务 搭建mycat服务并启动,windows安装参照. 系列文章: [Mycat 简介] [Mycat 配置文件server.xml] [Mycat 配置文件schema.xml] [ ...
- 【SpringBoot】SpingBoot整合AOP
https://blog.csdn.net/lmb55/article/details/82470388 [SpringBoot]SpingBoot整合AOPhttps://blog.csdn.net ...
随机推荐
- 161-PHP 文本替换函数str_replace(二)
<?php $str='Hello world!'; //定义源字符串 $search='o'; //定义将被替换的字符 $replace='O'; //定义替换的字符串 $res=str_re ...
- WinForm读写App.config配置文件
一.配置文件概述: 应用程序配置文件是标准的 XML 文件,XML 标记和属性是区分大小写的.它是可以按需要更改的,开发人员可以使用配置文件来更改设置,而不必重编译应用程序.配置文件的根节点是conf ...
- 设置进程用指定IE版本
function IsWOW64: BOOL; begin Result := False; if GetProcAddress(GetModuleHandle(kernel32), 'IsWow64 ...
- Python MongoDB 创建数据库
章节 Python MySQL 入门 Python MySQL 创建数据库 Python MySQL 创建表 Python MySQL 插入表 Python MySQL Select Python M ...
- oracle函数创建与调用
函数的定义: CREATE OR REPLACE FUNCTION FUNCTION_TEST(PARAMER1 IN VARCHAR, -- 参数的类型不写长度 PARAMER2 OUT VARCH ...
- UVA - 818 Cutting Chains(切断圆环链)(dfs + 二进制法枚举子集)
题意:有n个圆环(n<=15),已知已经扣在一起的圆环,现在需要打开尽量少的圆环,使所有圆环可以组成一条链. 分析:因为不知道要打开哪个环,如果列举所有的可能性,即枚举打开环的所有子集,最多才2 ...
- SpringAOP 使用注解的简单使用
1. 导入jar包 /SpringAOPmy/lib/com.springsource.net.sf.cglib-2.2.0.jar/SpringAOPmy/lib/com.springsource. ...
- Canvas绘制水波进度加载
效果: 用到图片下载: 自定义View: package com.czm.mysinkingview; import android.content.Context; import android.g ...
- cnblogs今天挂了
刚打算搬进来常驻cnblogs,好死不死,它今天11点40分左右挂了.真是不让人省心: 今天把这后面这几个月的随笔放过来,希望能不会被清掉:
- javascript中new操作符的原理
javascript中的new是一个语法糖,对于学过c++,java 和c#等面向对象语言的人来说,以为js里面是有类和对象的区别的,实现上js并没有类,一切皆对象,比java还来的彻底 new的过程 ...