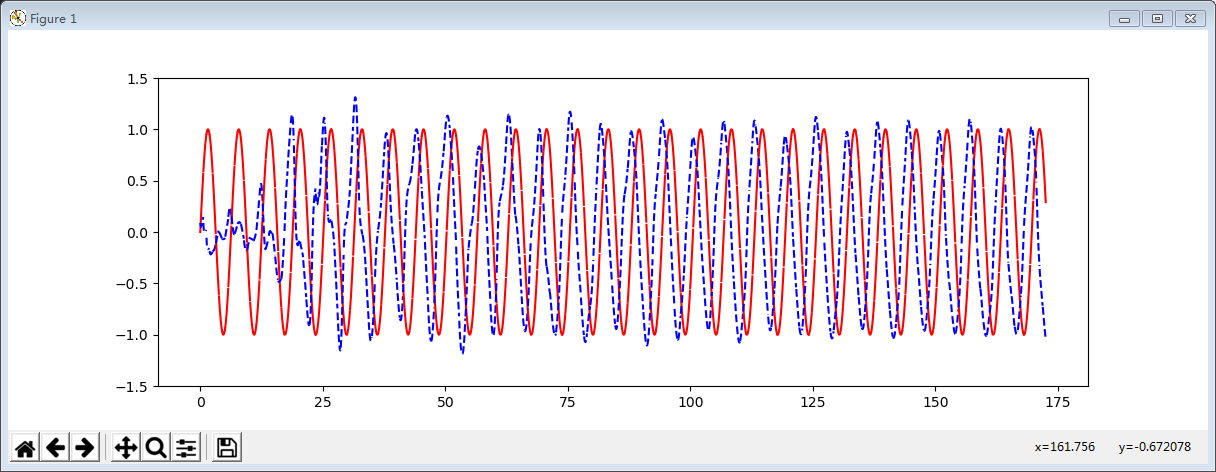
tensorflow1.0 lstm学习曲线
import tensorflow as tf

import numpy as np

import matplotlib.pyplot as plt

BATCH_START = 0

TIME_STEPS = 20

BATCH_SIZE = 20

INPUT_SIZE = 1

OUTPUT_SIZE = 1

CELL_SIZE = 10

LR = 0.0025

def get_batch():

    global BATCH_START, TIME_STEPS

    # xs shape (50batch, 20steps)

    xs = np.arange(BATCH_START, BATCH_START+TIME_STEPS*BATCH_SIZE).reshape((BATCH_SIZE, TIME_STEPS)) / (10*np.pi)

    seq = np.sin(xs)

    res = np.cos(xs)

    BATCH_START += TIME_STEPS

    # plt.plot(xs[0, :], res[0, :], 'r', xs[0, :], seq[0, :], 'b--')

    # plt.show()

    # returned seq, res and xs: shape (batch, step, input)

    return [seq[:, :, np.newaxis], res[:, :, np.newaxis], xs]

class LSTMRNN(object):

    def __init__(self, n_steps, input_size, output_size, cell_size, batch_size):

        self.n_steps = n_steps

        self.input_size = input_size

        self.output_size = output_size

        self.cell_size = cell_size

        self.batch_size = batch_size

        with tf.name_scope('inputs'):

            self.xs = tf.placeholder(tf.float32, [None, n_steps, input_size], name='xs')

            self.ys = tf.placeholder(tf.float32, [None, n_steps, output_size], name='ys')

        with tf.variable_scope('in_hidden'):

            self.add_input_layer()

        with tf.variable_scope('LSTM_cell'):

            self.add_cell()

        with tf.variable_scope('out_hidden'):

            self.add_output_layer()

        with tf.name_scope('cost'):

            self.compute_loss()

        with tf.name_scope('train'):

            self.train_op = tf.train.AdamOptimizer(LR).minimize(self.loss)

    def add_input_layer(self,):

        l_in_x = tf.reshape(self.xs, [-1, self.input_size], name='2_2D')  # (batch*n_step, in_size)

        # Ws (in_size, cell_size)

        Ws_in = self._weight_variable([self.input_size, self.cell_size])

        # bs (cell_size, )

        bs_in = self._bias_variable([self.cell_size,])

        # l_in_y = (batch * n_steps, cell_size)

        with tf.name_scope('Wx_plus_b'):

            l_in_y = tf.matmul(l_in_x, Ws_in) + bs_in

        # reshape l_in_y ==> (batch, n_steps, cell_size)

        self.l_in_y = tf.reshape(l_in_y, [-1, self.n_steps, self.cell_size], name='2_3D')

    def add_cell(self):

        lstm_cell = tf.contrib.rnn.BasicLSTMCell(self.cell_size, forget_bias=1.0, state_is_tuple=True)

        with tf.name_scope('initial_state'):

            self.cell_init_state = lstm_cell.zero_state(self.batch_size, dtype=tf.float32)

        self.cell_outputs, self.cell_final_state = tf.nn.dynamic_rnn(

            lstm_cell, self.l_in_y, initial_state=self.cell_init_state, time_major=False)

    def add_output_layer(self):

        # shape = (batch * steps, cell_size)

        l_out_x = tf.reshape(self.cell_outputs, [-1, self.cell_size], name='2_2D')

        Ws_out = self._weight_variable([self.cell_size, self.output_size])

        bs_out = self._bias_variable([self.output_size, ])

        # shape = (batch * steps, output_size)

        with tf.name_scope('Wx_plus_b'):

            self.pred = tf.matmul(l_out_x, Ws_out) + bs_out

    # def compute_cost(self):

    #     losses = tf.contrib.legacy_seq2seq.sequence_loss_by_example(

    #         [tf.reshape(self.pred, [-1], name='reshape_pred')],

    #         [tf.reshape(self.ys, [-1], name='reshape_target')],

    #         [tf.ones([self.batch_size * self.n_steps], dtype=tf.float32)],

    #         average_across_timesteps=True,

    #         softmax_loss_function=self.ms_error,

    #         name='losses'

    #     )

    #     with tf.name_scope('average_cost'):

    #         self.cost = tf.div(

    #             tf.reduce_sum(losses, name='losses_sum'),

    #             self.batch_size,

    #             name='average_cost')

    def compute_loss(self):

        prediction = tf.reshape(self.pred, [-1], name='reshape_pred')

        ys = tf.reshape(self.ys, [-1], name='reshape_target')

        self.loss = tf.reduce_mean(tf.reduce_sum(tf.square(ys - prediction),

                                                reduction_indices=[0]))

    @staticmethod

    def ms_error(labels, logits):

        return tf.square(tf.subtract(labels, logits))

    def _weight_variable(self, shape, name='weights'):

        initializer = tf.random_normal_initializer(mean=0., stddev=1.,)

        return tf.get_variable(shape=shape, initializer=initializer, name=name)

    def _bias_variable(self, shape, name='biases'):

        initializer = tf.constant_initializer(0.1)

        return tf.get_variable(name=name, shape=shape, initializer=initializer)

if __name__ == '__main__':

    model = LSTMRNN(TIME_STEPS, INPUT_SIZE, OUTPUT_SIZE, CELL_SIZE, BATCH_SIZE)

    sess = tf.Session()

    # tf.initialize_all_variables() no long valid from

    # 2017-03-02 if using tensorflow >= 0.12

    if int((tf.__version__).split('.')[1]) < 12 and int((tf.__version__).split('.')[0]) < 1:

        init = tf.initialize_all_variables()

    else:

        init = tf.global_variables_initializer()

    sess.run(init)

    # relocate to the local dir and run this line to view it on Chrome (http://0.0.0.0:6006/):

    # $ tensorboard --logdir='logs'

    plt.figure(figsize=(12, 4))

    plt.ion()

    plt.show()

    for i in range(300):

        seq, res, xs = get_batch()

        if i == 0:

            feed_dict = {

                    model.xs: seq,

                    model.ys: res,

                    # create initial state

            }

        else:

            feed_dict = {

                model.xs: seq,

                model.ys: res,

                model.cell_init_state: state    # use last state as the initial state for this run

            }

        _, cost, state, pred = sess.run(

            [model.train_op, model.loss, model.cell_final_state, model.pred],

            feed_dict=feed_dict)

        # plotting

        plt.plot(xs[0, :], seq[0].flatten(), 'r', xs[0, :], pred.flatten()[:TIME_STEPS], 'b--')

        plt.ylim((-1.5, 1.5))

        plt.draw()

        plt.pause(0.1)

        if i % 20 == 0:

            print('loss: ', round(cost, 4))
tensorflow1.0 lstm学习曲线的更多相关文章
- Ubuntu14.10安装TensorFlow1.0.1
本文记录了在Ubuntu上安装TensorFlow的步骤.系统环境:Ubuntu14.10 64bitPython版本:Python 2.7.8TensorFlow版:TensorFlow 1.0.1 ...
- tensorflow1.0 构建lstm做图片分类
import tensorflow as tf from tensorflow.examples.tutorials.mnist import input_data #this is data mni ...
- 初用Linux, 安装Ubuntu16.04+NVIDIA387+CUDA8.0+cudnn5.1+TensorFlow1.0.1
因为最近Deep Learning十分热门, 装一下TensorFlow学习一下. 本文主要介绍安装流程, 将自己遇到的问题说明出来, 并记录自己如何处理, 原理方面并没有能力解释. 由于本人之前从来 ...
- tensorflow1.0.0 弃用了几个operator写法
除法和取模运算符(/, //, %)现已匹配 Python(flooring)语义.这也适用于 tf.div 和 tf.mod.为了获取强制的基于整数截断的行为,你可以使用 tf.truncatedi ...
- tensorflow1.0中的改善
TensorFlow 1.0 重大功能及改善 XLA(实验版):初始版本的XLA,针对TensorFlow图(graph)的专用编译器,面向CPU和GPU. TensorFlow Debugger(t ...
- tensorflow1.0 队列FIFOQueue管理实现异步读取训练
import tensorflow as tf #模拟异步子线程 存入样本, 主线程 读取样本 # 1. 定义一个队列,1000 Q = tf.FIFOQueue(1000,tf.float32) # ...
- tensorflow1.0 数据队列FIFOQueue的使用
import tensorflow as tf #模拟一下同步先处理数据,然后才能取数据训练 #tensorflow当中,运行操作有依赖性 #1.首先定义队列 Q = tf.FIFOQueue(3,t ...
- tensorflow1.0 dropout层
""" Please note, this code is only for python 3+. If you are using python 2+, please ...
- tensorflow1.0 构建卷积神经网络
import tensorflow as tf from tensorflow.examples.tutorials.mnist import input_data import os os.envi ...
随机推荐
- java NIO理解分析与基本使用
我前段时间的一篇博客java网络编程--多线程数据收发并行总结了服务端与客户端之间的收发并行实践.原理很简单,就是针对单一客户端,服务端起两个线程分别负责read和write操作,然后线程保持阻塞等待 ...
- AttributeError: module 'tensorflow.python.keras.backend' has no attribute 'get_graph'处理办法
原因:安装的tensorflow版本和keras版本不匹配,只需卸载keras,重新安装自己tensorflow对应的版本. Keras与tensorflow版本匹配查询网站
- iOS 13DarkMode暗黑模式
iOS 13系统的iPhone 在设置-->显示与亮度 -->选择深色 即开启暗黑模式 1.暗黑模式关闭 1.1 APP开发未进行暗黑适配,出现顶部通知栏字体颜色无法改变始终为白色.可以全 ...
- H - Bone Collector
H - Bone Collector Many years ago , in Teddy's hometown there was a man who was called "Bone Co ...
- Vertica的这些事(十二)——-vertica备份与恢复
最近在使用vertica,上网找了很多资料都没有,只有自己看官方文档动手搞一下了,今天搞了vertica的备份与恢复 以下是整理的过程,分享给大家,如有问题欢迎大家指正~ 可加QQ群交流:412191 ...
- Lisp-01: 相关开发环境配置部署
Common Lisp 学习笔记系列01 要学一门编程语言,首先需要将语言的环境配置好.如果想要个直接上手的环境,感谢日本的大神 Shirakumo,打造了一个 Common Lisp 的 IDE - ...
- 配置附加权限和LDAP
配置附加权限和LDAP 补充:调整root的权限为rwx(读,写,执行) 步骤:采用数值形式将目录/root的权限调整为rwx------ 1)查看原来的权限 [root@svr7~]#ls -ld ...
- 浅谈 PCA与SVD
前言 在用数据对模型进行训练时,通常会遇到维度过高,也就是数据的特征太多的问题,有时特征之间还存在一定的相关性,这时如果还使用原数据训练模型,模型的精度会大大下降,因此要降低数据的维度,同时新数据的特 ...
- 让我来教你如何免费使用RHEL小红帽系统
RHEL安装注册过程中遇到的问题 从开始注册到正常使用 如何获取正版RHEL 注意事项 VMware虚拟机下载安装 安装中出现的问题 从开始注册到正常使用 答主是个动手能力比较强的人 ,所以当老师讲到 ...
- 关于Cookie的相关知识点以及使用方法
首先介绍cookie的一些方法 response.addCookie(Cookie cookie)是将一个cookie对象传入客户端. Cookie cookie=new Cookie(String ...