Java——Spring整合Mybatis(IDEA版)
本文适用于初学者:
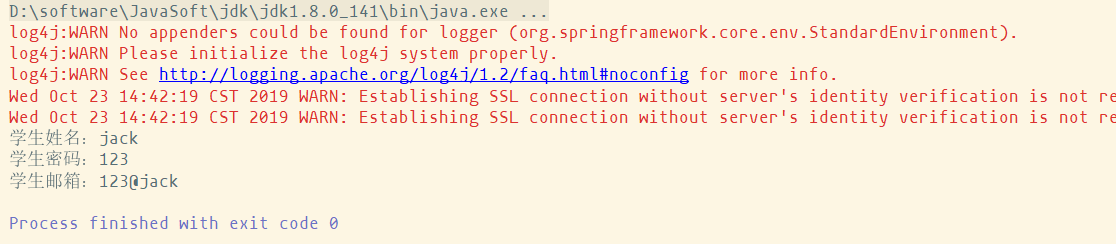
该文主要教大家如何整合spring和mybatis,整合完成效果,可以从数据库中查询出学生信息:
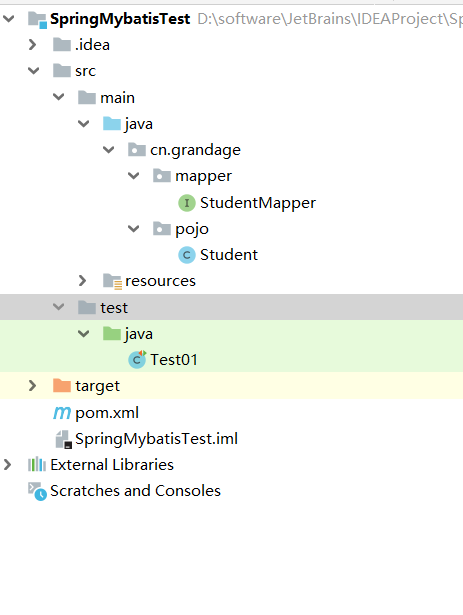
完整的工程目录如下:
整合思路:
- 需要spring来管理数据源信息。
- 需要spring通过单例方式管理SqlSessionFactory。
- 使用SqlSessionFactory创建SqlSession。(spring和mybatis整合自动完成)
- 持久层的mapper都需要由spring进行管理,spring和mybatis整合生成mapper代理对象。
下面开始工程搭建:
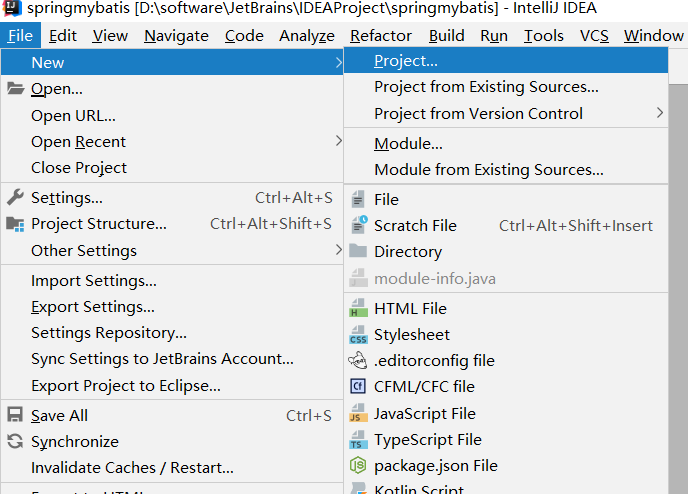
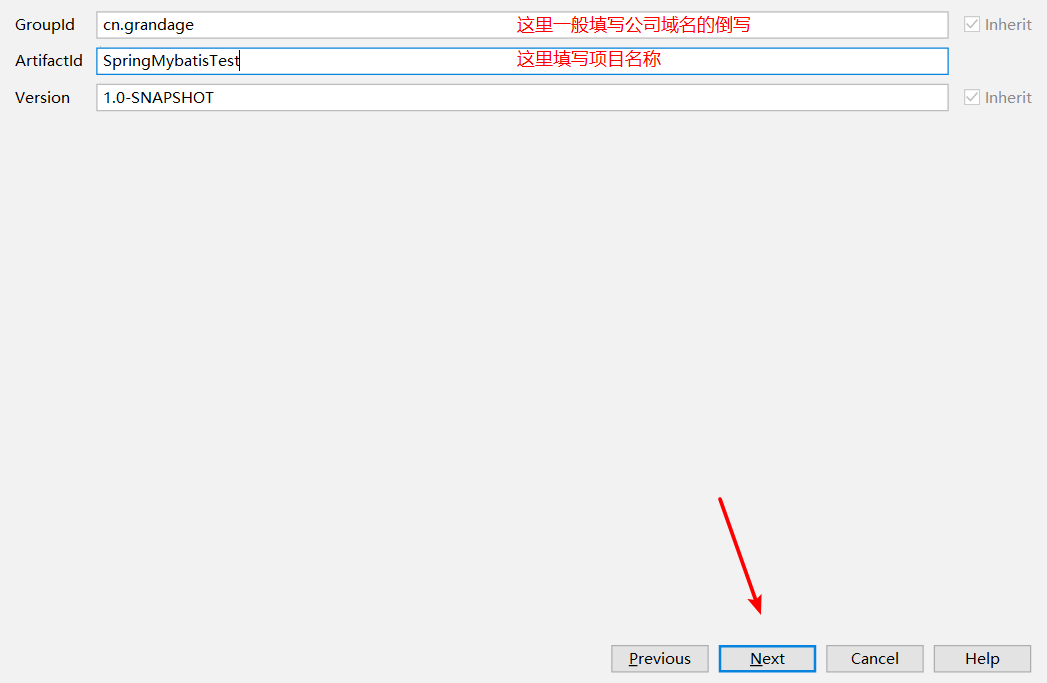
第一步:创建工程 File—New—Project
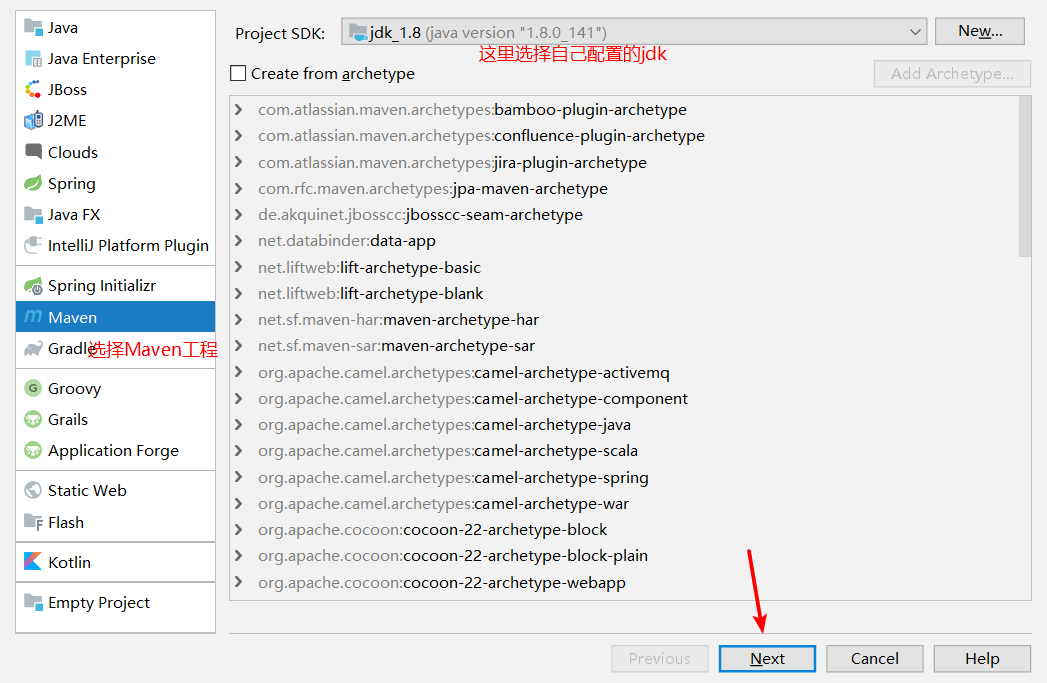
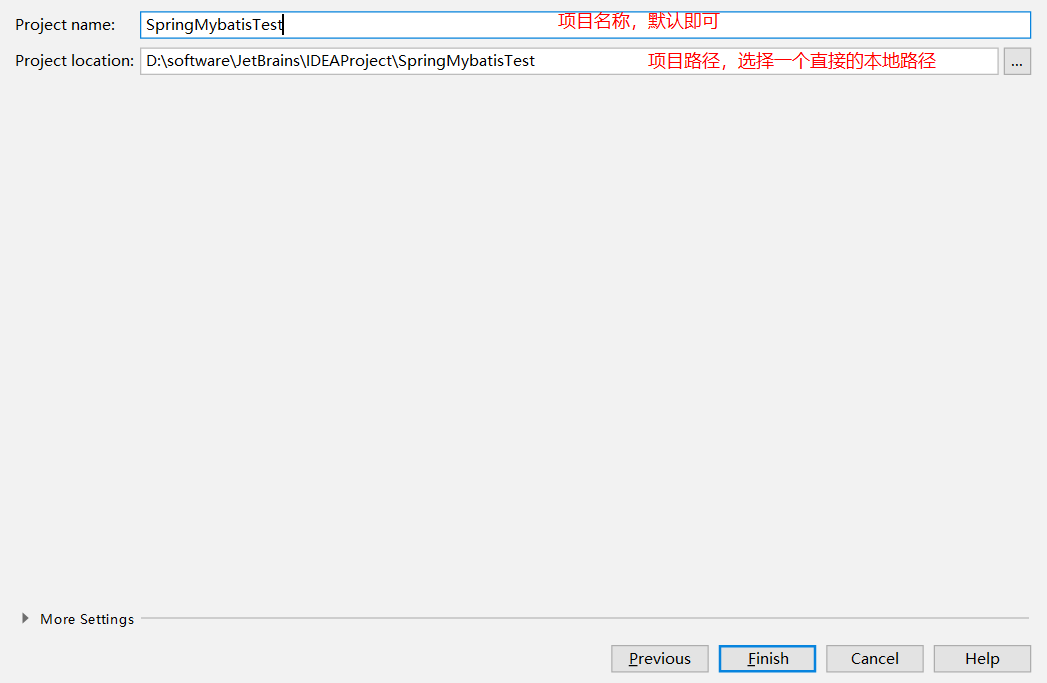
点击Finish完成
注意:项目创建完成会有如下图提示:
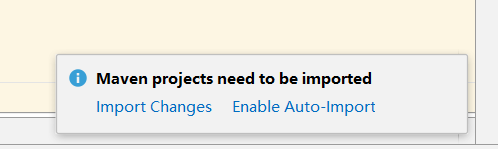
这里是问你是否要自动导入,选择Enable即可,maven便会自动帮你导入jar包
第二步:项目准备
本项目需要用到mysql数据库,首先先在mysql中创建一个数据库,然后创建一张表,sql语句如下:
 CREATE DATABASE /*!32312 IF NOT EXISTS*/`test` /*!40100 DEFAULT CHARACTER SET utf8 */;

 USE `test`;

 /*Table structure for table `student` */

 DROP TABLE IF EXISTS `student`;

 CREATE TABLE `student` (

   `id` int(11) DEFAULT NULL,

   `username` varchar(20) DEFAULT NULL,

   `password` varchar(20) DEFAULT NULL,

   `email` varchar(20) DEFAULT NULL

 ) ENGINE=InnoDB DEFAULT CHARSET=utf8;

 /*Data for the table `student` */

 insert  into `student`(`id`,`username`,`password`,`email`) values

 (1,'jack','','123@jack'),

 (2,'rose','','rose@123');
sql语句
第三步:正式开发
(1)、修改pom文件
 <?xml version="1.0" encoding="UTF-8"?>

 <project xmlns="http://maven.apache.org/POM/4.0.0"

          xmlns:xsi="http://www.w3.org/2001/XMLSchema-instance"

          xsi:schemaLocation="http://maven.apache.org/POM/4.0.0 http://maven.apache.org/xsd/maven-4.0.0.xsd">

     <modelVersion>4.0.0</modelVersion>

     <groupId>cn.grandage</groupId>

     <artifactId>SpringMybatisTest</artifactId>

     <version>1.0-SNAPSHOT</version>

     <properties>

         <!-- spring版本号 -->

         <spring.version>4.1.6.RELEASE</spring.version>

         <!-- mybatis版本号 -->

         <mybatis.version>3.2.6</mybatis.version>

         <!-- log4j日志文件管理包版本 -->

         <slf4j.version>1.7.7</slf4j.version>

         <log4j.version>1.2.17</log4j.version>

     </properties>

     <dependencies>

         <dependency>

             <groupId>junit</groupId>

             <artifactId>junit</artifactId>

             <version>4.11</version>

             <!-- 表示开发的时候引入,发布的时候不会加载此包 -->

             <scope>test</scope>

         </dependency>

         <!-- spring核心包 -->

         <dependency>

             <groupId>org.springframework</groupId>

             <artifactId>spring-core</artifactId>

             <version>${spring.version}</version>

         </dependency>

         <dependency>

             <groupId>org.springframework</groupId>

             <artifactId>spring-web</artifactId>

             <version>${spring.version}</version>

         </dependency>

         <dependency>

             <groupId>org.springframework</groupId>

             <artifactId>spring-oxm</artifactId>

             <version>${spring.version}</version>

         </dependency>

         <dependency>

             <groupId>org.springframework</groupId>

             <artifactId>spring-tx</artifactId>

             <version>${spring.version}</version>

         </dependency>

         <dependency>

             <groupId>org.springframework</groupId>

             <artifactId>spring-jdbc</artifactId>

             <version>${spring.version}</version>

         </dependency>

         <dependency>

             <groupId>org.springframework</groupId>

             <artifactId>spring-webmvc</artifactId>

             <version>${spring.version}</version>

         </dependency>

         <dependency>

             <groupId>org.springframework</groupId>

             <artifactId>spring-aop</artifactId>

             <version>${spring.version}</version>

         </dependency>

         <dependency>

             <groupId>org.springframework</groupId>

             <artifactId>spring-context-support</artifactId>

             <version>${spring.version}</version>

         </dependency>

         <dependency>

             <groupId>org.springframework</groupId>

             <artifactId>spring-test</artifactId>

             <version>${spring.version}</version>

         </dependency>

         <!-- mybatis核心包 -->

         <dependency>

             <groupId>org.mybatis</groupId>

             <artifactId>mybatis</artifactId>

             <version>${mybatis.version}</version>

         </dependency>

         <!-- mybatis/spring包 -->

         <dependency>

             <groupId>org.mybatis</groupId>

             <artifactId>mybatis-spring</artifactId>

             <version>1.2.2</version>

         </dependency>

         <!-- 导入java ee jar 包 -->

         <dependency>

             <groupId>javax</groupId>

             <artifactId>javaee-api</artifactId>

             <version>7.0</version>

         </dependency>

         <!-- 导入Mysql数据库链接jar包 -->

         <dependency>

             <groupId>mysql</groupId>

             <artifactId>mysql-connector-java</artifactId>

             <version>5.1.39</version>

         </dependency>

         <!-- c3p0连接池jar -->

         <dependency>

             <groupId>c3p0</groupId>

             <artifactId>c3p0</artifactId>

             <version>0.9.1.2</version>

         </dependency>

         <!-- 导入dbcp的jar包,用来在applicationContext.xml中配置数据库 -->

         <dependency>

             <groupId>commons-dbcp</groupId>

             <artifactId>commons-dbcp</artifactId>

             <version>1.2.2</version>

         </dependency>

         <!-- JSTL标签类 -->

         <dependency>

             <groupId>jstl</groupId>

             <artifactId>jstl</artifactId>

             <version>1.2</version>

         </dependency>

         <!-- 日志文件管理包 -->

         <!-- log start -->

         <dependency>

             <groupId>log4j</groupId>

             <artifactId>log4j</artifactId>

             <version>${log4j.version}</version>

         </dependency>

         <!-- 格式化对象,方便输出日志 -->

         <dependency>

             <groupId>com.alibaba</groupId>

             <artifactId>fastjson</artifactId>

             <version>1.1.41</version>

         </dependency>

         <dependency>

             <groupId>org.slf4j</groupId>

             <artifactId>slf4j-api</artifactId>

             <version>${slf4j.version}</version>

         </dependency>

         <dependency>

             <groupId>org.slf4j</groupId>

             <artifactId>slf4j-log4j12</artifactId>

             <version>${slf4j.version}</version>

         </dependency>

         <!-- log end -->

         <!-- 映入JSON -->

         <dependency>

             <groupId>org.codehaus.jackson</groupId>

             <artifactId>jackson-mapper-asl</artifactId>

             <version>1.9.13</version>

         </dependency>

         <!-- 上传组件包 -->

         <dependency>

             <groupId>commons-fileupload</groupId>

             <artifactId>commons-fileupload</artifactId>

             <version>1.3.1</version>

         </dependency>

         <dependency>

             <groupId>commons-io</groupId>

             <artifactId>commons-io</artifactId>

             <version>2.4</version>

         </dependency>

         <dependency>

             <groupId>commons-codec</groupId>

             <artifactId>commons-codec</artifactId>

             <version>1.9</version>

         </dependency>

     </dependencies>

 </project>
POM文件
(2)、新建实体类Student:
 package cn.grandage.pojo;

 public class Student {

     private Integer id;

     private String username;

     private String password;

     private String email;

     public Integer getId() {

         return id;

     }

     public void setId(Integer id) {

         this.id = id;

     }

     public String getUsername() {

         return username;

     }

     public void setUsername(String username) {

         this.username = username;

     }

     public String getPassword() {

         return password;

     }

     public void setPassword(String password) {

         this.password = password;

     }

     public String getEmail() {

         return email;

     }

     public void setEmail(String email) {

         this.email = email;

     }

     @Override

     public String toString() {

         return "StudentMapper{" +

                 "id=" + id +

                 ", username='" + username + '\'' +

                 ", password='" + password + '\'' +

                 ", email='" + email + '\'' +

                 '}';

     }

 }
Student
(3)、新建db.properties文件
 db.driver=com.mysql.jdbc.Driver

 #数据库连接字符串(改成自己的连接)

 db.url=jdbc:mysql://localhost:3306/test

 #数据库用户名(这里改成自己的用户名)

 db.username=root

 #数据库密码(这里改成自己的密码)

 db.password=123456
db.properties
(4)、新建StudentMapper接口
 package cn.grandage.mapper;

 import cn.grandage.pojo.Student;

 public interface StudentMapper {

     public Student findStudentById(int id);

 }
StudentMapper
(5)、新建mybatis映射配置文件:
 <?xml version="1.0" encoding="UTF-8" ?>

 <!DOCTYPE mapper

         PUBLIC "-//mybatis.org//DTD Mapper 3.0//EN"

         "http://mybatis.org/dtd/mybatis-3-mapper.dtd">

 <!-- namespace:命名空间,对sql进行一个分类管理 -->

 <!-- 注意:namespace在mapper代理时,具有重要且特殊的作用

     对应mapper接口的全限定名

 -->

 <!--mybatis映射配置文件-->

 <mapper namespace="cn.grandage.mapper.StudentMapper">

     <select id="findStudentById" parameterType="int" resultType="student">

         select * from student where id=#{id}

     </select>

 </mapper>
Student.xml
(6)、新建mybatis核心配置文件
 <?xml version="1.0" encoding="UTF-8" ?>

 <!DOCTYPE configuration

         PUBLIC "-//mybatis.org//DTD Config 3.0//EN"

         "http://mybatis.org/dtd/mybatis-3-config.dtd">

 <configuration>

     <!--mybatis核心配置文件-->

     <!--给类取别名,简化输入,方便映射配置文件中使用-->

    <typeAliases>

        <typeAlias type="cn.grandage.pojo.Student" alias="student"/>

    </typeAliases>

     <!--加载mapper映射配置文件-->

     <mappers>

         <mapper resource="Student.xml"/>

     </mappers>

 </configuration>
SqlMapConfig.xml
(7)、新建spring核心配置文件,并整合mybatis:
 <?xml version="1.0" encoding="UTF-8" ?>

 <!DOCTYPE configuration

         PUBLIC "-//mybatis.org//DTD Config 3.0//EN"

         "http://mybatis.org/dtd/mybatis-3-config.dtd">

 <configuration>

     <!--mybatis核心配置文件-->

     <!--给类取别名,简化输入,方便映射配置文件中使用-->

    <typeAliases>

        <typeAlias type="cn.grandage.pojo.Student" alias="student"/>

    </typeAliases>

     <!--加载mapper映射配置文件-->

     <mappers>

         <mapper resource="Student.xml"/>

     </mappers>

 </configuration>
applicationContext.xml
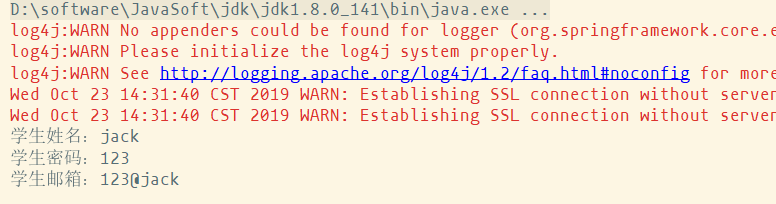
(8)、测试类编写:
 import cn.grandage.mapper.StudentMapper;

 import cn.grandage.pojo.Student;

 import org.junit.Test;

 import org.springframework.context.ApplicationContext;

 import org.springframework.context.support.ClassPathXmlApplicationContext;

 public class Test01 {

     @Test

     public void test01() {

         //获取applicationContext文件并加载

         ApplicationContext ac = new ClassPathXmlApplicationContext("applicationContext.xml");

         //获取StudentDao的bean

         StudentMapper sd = (StudentMapper) ac.getBean("studentMapper");

         Student s = sd.findStudentById(1);

         System.out.println("学生姓名:" + s.getUsername());

         System.out.println("学生密码:" + s.getPassword());

         System.out.println("学生邮箱:" + s.getEmail());

     }

 }
Test01
测试结果:
Java——Spring整合Mybatis(IDEA版)的更多相关文章
- Spring整合Mybatis报 java.lang.ClassNotFoundException:org.springframework.core.metrics.ApplicationStartup,即:spring的版本过高,采用RELEASE稳定版
1.遇到的问题: 今天在弄spring整合mybatis的时候遇到一个小问题,如图所示: 简单来说:就是我的spring的xml文件没找到,我就奇了怪了,我所有的配置都没问题啊! 我pom.xml配置 ...
- Spring Boot2 系列教程 (十三) | 整合 MyBatis (XML 版)
前言 如题,今天介绍 SpringBoot 与 Mybatis 的整合以及 Mybatis 的使用,之前介绍过了 SpringBoot 整合MyBatis 注解版的使用,上一篇介绍过 MyBatis ...
- Java开发学习(十四)----Spring整合Mybatis及Junit
一.Spring整合Mybatis思路分析 1.1 环境准备 步骤1:准备数据库表 Mybatis是来操作数据库表,所以先创建一个数据库及表 create database spring_db cha ...
- Spring学习总结(六)——Spring整合MyBatis完整示例
为了梳理前面学习的内容<Spring整合MyBatis(Maven+MySQL)一>与<Spring整合MyBatis(Maven+MySQL)二>,做一个完整的示例完成一个简 ...
- 【springboot spring mybatis】看我怎么将springboot与spring整合mybatis与druid数据源
目录 概述 1.mybatis 2.druid 壹:spring整合 2.jdbc.properties 3.mybatis-config.xml 二:java代码 1.mapper 2.servic ...
- Spring学习总结(五)——Spring整合MyBatis(Maven+MySQL)二
接着上一篇博客<Spring整合MyBatis(Maven+MySQL)一>继续. Spring的开放性和扩张性在J2EE应用领域得到了充分的证明,与其他优秀框架无缝的集成是Spring最 ...
- spring整合mybatis错误:class path resource [config/spring/springmvc.xml] cannot be opened because it does not exist
spring 整合Mybatis 运行环境:jdk1.7.0_17+tomcat 7 + spring:3.2.0 +mybatis:3.2.7+ eclipse 错误:class path reso ...
- spring 整合Mybatis 《报错集合,总结更新》
错误:java.lang.NoClassDefFoundError: org/aspectj/weaver/reflect/ReflectionWorld$ReflectionWorldExcepti ...
- spring整合mybatis(hibernate)配置
一.Spring整合配置Mybatis spring整合mybatis可以不需要mybatis-config.xml配置文件,直接通过spring配置文件一步到位.一般需要具备如下几个基本配置. 1. ...
随机推荐
- xargs与exec区别
平时使用find命令查找出文件的时候有时候后面有时候用-exec有时候用管道加xargs,这2个到底有什么不同?下面就这2个的不同做简单介绍. 零.实验环境 [root@osker /]# find ...
- mysql 的CURDATE() 与 NOW() 的区别
SELECT CURDATE() 查询出的是当前天的开始时间点,比如今天是 2015.02.03号,那不管我在今天什么时间点查询,结果都是今天的凌晨,即今天的开始的那个时间点,因为它只具体到年月日,没 ...
- 关于在React中 报Super expression must either be null or a function, not undefined (采坑系列)
今天突然在联系React中遇到一开始就报 Super expression must either be null or a function, not undefined 百度,各种方法,.. ...
- Math.max.apply()用法
apply的一些其他巧妙用法 Math.max.apply( null, [12,23,34,45] ); //细心的人可能已经察觉到,在我调用apply方法的时候, // 第一个参数是对象(this ...
- shell脚本知识
1.提示符变量PS1 修改提示符变量:PS1="[u\@\h \t \w]" 修改环境变量设置文件bash_profile需要使用source或者.加上该文件使之生效 位置参数从1 ...
- JAVA—线程(Thread)
1.线程的状态有哪些 我记得在操作系统原理的书上有一张具体的图,暂时找不到书... new:新建状态,被创建出来后未启动时的线程状态. runnable:就绪状态,表示可以运行. blocked:阻塞 ...
- A Bug's Life POJ - 2492 (种类或带权并查集)
这个题目的写法有很多,用二分图染色也可以写,思路很好想,这里我们用关于并查集的两种写法来做. 题目大意:输入x,y表示x和y交配,然后判断是否有同性恋. 1 带权并查集: 我们可以用边的权值来表示一种 ...
- Shell脚本日志关键字监控+告警
最近小张的爬虫程序越来越多,可当爬虫程序报错,不能及时的发现,从而造成某些重要信息不能及时获取的问题,更有甚者,遭到领导的批评.于是就在想有没有一种方法,当爬取信息报错的时候,可以通过邮件或者短信的方 ...
- C++枚举算法
枚举算法 什么是枚举? 枚举,顾名思义,就是用最笨的方法,去解决问题(暴力枚举),一个集的枚举是列出某些有穷序列集的所有成员的程序,或者是一种特定类型对象的计数.这两种类型经常(但不总是)重叠. 枚举 ...
- Tensorflow 模型线上部署
获取源码,请移步笔者的github: tensorflow-serving-tutorial 由于python的灵活性和完备的生态库,使得其成为实现.验证ML算法的不二之选.但是工业界要将模型部署到生 ...