
springboot的安装与初步使用
1、引用springboot框架
- 1、在maven项目底下的pom.xml的中,引用springboot,如下
<?xml version="1.0" encoding="UTF-8"?>

<project xmlns="http://maven.apache.org/POM/4.0.0"

         xmlns:xsi="http://www.w3.org/2001/XMLSchema-instance"

         xsi:schemaLocation="http://maven.apache.org/POM/4.0.0 http://maven.apache.org/xsd/maven-4.0.0.xsd">

    <modelVersion>4.0.0</modelVersion>

	<!--项目父标签中引用springboot框架-->

    <parent>

        <groupId>org.springframework.boot</groupId>

        <artifactId>spring-boot-starter-parent</artifactId>

        <version>2.1.5.RELEASE</version>

        <relativePath/> <!-- lookup parent from repository -->

    </parent>

    <!--artifactId是项目的默认值,每个module名可在后续的module标签中定义-->

    <groupId>com.mycom.apitest</groupId>

    <artifactId>exercise</artifactId>

    <packaging>pom</packaging>

    <version>1.0-SNAPSHOT</version>

    <modules>

        <module>exercise10</module>

        <module>exercise11</module>

        <module>exercise12</module>

        <module>exercise13</module>

    </modules>

	<!--指定build的Java版本-->

    <build>

        <plugins>

            <plugin>

                <groupId>org.apache.maven.plugins</groupId>

                <artifactId>maven-compiler-plugin</artifactId>

                <configuration>

                    <source>1.8</source>

                    <target>1.8</target>

                </configuration>

            </plugin>

        </plugins>

    </build>

</project>
- 2、在module的pom.xml中引入springboot依赖,如下
<?xml version="1.0" encoding="UTF-8"?>

<project xmlns="http://maven.apache.org/POM/4.0.0"

         xmlns:xsi="http://www.w3.org/2001/XMLSchema-instance"

         xsi:schemaLocation="http://maven.apache.org/POM/4.0.0 http://maven.apache.org/xsd/maven-4.0.0.xsd">

    <parent>

        <artifactId>exercise</artifactId>

        <groupId>com.mycom.apitest</groupId>

        <version>1.0-SNAPSHOT</version>

    </parent>

    <modelVersion>4.0.0</modelVersion>

    <artifactId>exercise10</artifactId>

    <properties>

        <java.version>1.8</java.version>

    </properties>

    <dependencies>

        <dependency>

            <groupId>org.springframework.boot</groupId>

            <artifactId>spring-boot-starter-web</artifactId>

        </dependency>

        <dependency>

            <groupId>org.springframework.boot</groupId>

            <artifactId>spring-boot-starter-test</artifactId>

            <scope>test</scope>

        </dependency>

    </dependencies>

</project>
2、运行官网demo
* 新建包hello,并在包下新建测试类SampleController.java,其中内容为官网demo的代码,如下
package hello;

import org.springframework.boot.*;

import org.springframework.boot.autoconfigure.*;

import org.springframework.stereotype.*;

import org.springframework.web.bind.annotation.*;

@Controller

@EnableAutoConfiguration

public class SampleController {

//请求目录

    @RequestMapping("/")   //访问路径为根目录,即域名加端口即可访问

    @ResponseBody         //响应体,home为响应主页

    String home() {

        return "Hello World!";

    }

    //spring应用运行SampleController类

    public static void main(String[] args) throws Exception {

        SpringApplication.run(SampleController.class, args);

    }

}
启用执行结果为:

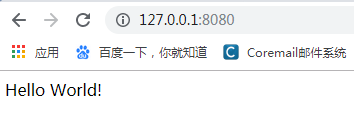
springboot 内嵌的是tomcat 服务,默认的端口是8080,若端口被占用的话,会启动失败。浏览器访问应用如下:
3、返回cookies信息的get接口开发
- 1、在main/java下新建一个入口类:Application.java
import org.springframework.boot.SpringApplication;

import org.springframework.boot.autoconfigure.SpringBootApplication;

import org.springframework.context.annotation.ComponentScan;

@SpringBootApplication       //加这个注解标签,表示将下面的入口类托管

@ComponentScan("com.course.server")              //表示托管给我后,你要我扫描哪个包下的类

public class Application {

    public static void main(String[] args) {

        SpringApplication.run(Application.class,args);     //固定写法,传入参数args与方法中的args相同

    }

}
2、在main/java下新建托管后需要扫描的包com.course.server,并建需要扫描的测试类MyGetMethod.java,如下
无cookie信息返回的写法,MyGetMethod.java
package com.course.server;

import org.springframework.web.bind.annotation.RequestMapping;

import org.springframework.web.bind.annotation.RequestMethod;

import org.springframework.web.bind.annotation.RestController;

@RestController     //表示以下类是需要被扫描的

public class MyGetMethod {

    @RequestMapping(value = "/getCookies",method = RequestMethod.GET)    //请求映射地址和请求方法,即请求路径,可与后面的方法名相同

    public String getCookies(){

        return "恭喜你获取cookies信息成功";       //响应信息

    }

}
- 有cookie信息返回的写法,MyGetMethod.java
package com.course.server;

import org.springframework.web.bind.annotation.RequestMapping;

import org.springframework.web.bind.annotation.RequestMethod;

import org.springframework.web.bind.annotation.RestController;

import javax.servlet.http.Cookie;

import javax.servlet.http.HttpServletResponse;

@RestController     //表示以下类是需要被扫描的

public class MyGetMethod {

    @RequestMapping(value = "/getCookies",method = RequestMethod.GET)    //请求映射地址和请求方法,即请求路径,可与后面的方法名相同

    public String getCookies(HttpServletResponse response){

        //HttpServletRequest   装载请求信息的类

        //HttpServletResponse  装载响应信息的类

        //定义响应的cookie信息

        Cookie cookie = new Cookie("login","true");

        response.addCookie(cookie);   //将cookie信息添加到响应中返回

        return "恭喜你获取cookies信息成功";       //响应信息

    }

}
- 3、在resources下,新建一个配置文件,名字必须为
application.properties,取这个名字,springboot框架才会将这个配置文件自动加载。且里面的字段内容为固定写法,后面具体的值可自定义,比如端口号,这里修改springboot启动的端口为8888,如下:
server.port=${port:8888}
- 4、执行后,访问结果为:

4、一个要求携带cookies信息访问的get接口开发
- 修改MyGetMethod.java部分代码如下
package com.course.server;

import org.springframework.web.bind.annotation.RequestMapping;

import org.springframework.web.bind.annotation.RequestMethod;

import org.springframework.web.bind.annotation.RestController;

import javax.servlet.http.Cookie;

import javax.servlet.http.HttpServletRequest;

import javax.servlet.http.HttpServletResponse;

import java.util.Objects;

@RestController     //表示以下类是需要被扫描的

public class MyGetMethod {

    @RequestMapping(value = "/getCookies",method = RequestMethod.GET)

    public String getCookies(HttpServletResponse response){

        Cookie cookie = new Cookie("login","true");

        response.addCookie(cookie);

        return "恭喜你获取cookies信息成功";

    }

    /*

    * 要求客户端携带cookies访问

    * 这是一个需要携带cookies信息才能访问的get请求

    * */

    @RequestMapping(value = "/get/with/cookies",method = RequestMethod.GET)

    public String getWithCookies(HttpServletRequest request){

        //获取请求中的cookie信息,并存在一维数组中,因可能有多个cookie信息

        Cookie[] cookies = request.getCookies();

        //定义cookie信息为空时的响应信息

        if (Objects.isNull(cookies)){

            return "你必须携带cookies信息来!";

        }

        //将获取到的cookie信息遍历出来比对,比对通过则返回成功相应信息

        for (Cookie cookie : cookies){

            if (cookie.getName().equals("login") &&

                    cookie.getValue().equals("true")){

                return "成功,这是一个需要携带cookies信息才能访问的get请求!";

            }

        }

        //如果获取到的cookie信息比对不正确,则返回以下信息(即除了上面两种情况,剩下的情况都返回以下信息)

        return "你必须携带正确的cookies信息来!!!";

    }

}
5、需携带参数的get请求的两种开发方式
第一种实现方式(参数在问号后面)
- 1、如下是对参数不做校验,传入什么参数都受理,包括空参数,也返回正确的响应(修改MyGetMethod.java部分代码)
package com.course.server;

import org.springframework.web.bind.annotation.RequestMapping;

import org.springframework.web.bind.annotation.RequestMethod;

import org.springframework.web.bind.annotation.RequestParam;

import org.springframework.web.bind.annotation.RestController;

import javax.servlet.http.Cookie;

import javax.servlet.http.HttpServletRequest;

import javax.servlet.http.HttpServletResponse;

import java.util.HashMap;

import java.util.Map;

import java.util.Objects;

@RestController

public class MyGetMethod {

    @RequestMapping(value = "/get/with/param",method = RequestMethod.GET)

    //将参数定义在方法传参位置处,用@RequestParam关键字,如下,需要传两个参数

    //泛数据类型(对象类型)

    public Map<String,Integer> getList(@RequestParam Integer start,

                                       @RequestParam Integer end){

        //泛数据类型的类,在实例化对象时,具体化元素的数据类型

        //响应体,如下返回的是json格式的信息

        Map<String,Integer> myList = new HashMap<>();

        myList.put("鞋",400);

        myList.put("干脆面",1);

        myList.put("衬衫",300);

        return myList;

    }

}
不管传入什么参数值,都会返回正确结果,这种方式可以用于获取传入的参数。结果为:


2、如下是对参数做校验,传入正确的参数,返回正确的信息,否则返回错误信息(修改MyGetMethod.java部分代码)
@RequestMapping(value = "/get/with/param",method = RequestMethod.GET)

//required=true:该参数不能为空;相反required=false:该参数能为空;若不写,则默认为true

public Map<String,Integer> getList(@RequestParam(value = "start", required = false) Integer start,

                                   @RequestParam(value = "end", required = false) Integer end){

    //响应体,如下返回的是json格式的信息

    Map<String, Integer> myList = new HashMap<>();

    if (start.equals(15) && end.equals(30)) {

        myList.put("鞋", 400);

        myList.put("干脆面", 1);

        myList.put("衬衫", 300);

        return myList;

    }

    //参数错误,则返回以下信息,空值则返回500

    myList.put("oh sorry start or end is wrong", 0);

    return myList;

}
第二种实现方式(参数在路径中)(修改MyGetMethod.java部分代码)
/**

 *第2种需要携带参数访问的get请求,用到的是@PathVariable 关键字,因为是参数化的路径,有校验

 * url:  ip:port/get/with/param/10/20

 * */

@RequestMapping(value = "/get/with/param/{start}/{end}")  //另一种请求url

public Map myGetList(@PathVariable Integer start,

                     @PathVariable Integer end){

    Map<String, Integer> myList = new HashMap<>();

    if (start.equals(15) && end.equals(30)) {

        myList.put("鞋", 400);

        myList.put("干脆面", 1);

        myList.put("衬衫", 300);

        return myList;

    }

    //参数错误,则返回以下信息,空值则返回500

    myList.put("oh sorry start or end is wrong", 0);

    return myList;

}

 //不做参数校验

@RequestMapping(value = "/get/with/param2/{start}/{end}")

public Map myGetList2(@PathVariable Integer start,

                     @PathVariable Integer end){

    Map<String,Integer> myList = new HashMap<>();

    myList.put("鞋",400);

    myList.put("衬衫",300);

    myList.put("干脆面",1);

    return myList;

}
springboot的安装与初步使用的更多相关文章
- SpringBoot Docker入门,SpringBoot Docker安装
SpringBoot Docker入门,SpringBoot Docker安装 ================================ ©Copyright 蕃薯耀 2018年4月8日 ht ...
- MySQL安装与初步操作
MySQL是一款出色的中小型关系数据库,做Java Web开发时,要做到数据持久化存储,选择一款数据库软件自然必不可少. 由于MySQL社区版开元免费,功能比较强大,在此以MySQL为例,演示MySQ ...
- JetBrains PyCharm(Professional版本)的下载、安装和初步使用
不多说,直接上干货! 首先谈及这款软件,博主我用的理由:搞机器学习和深度学习! 想学习Python的同学们,在这里隆重介绍一款 Python 的开发工具 pyCharm IDE.这是我最喜欢的 Pyt ...
- VMware下OSSIM 4.1.0的下载、安装和初步使用(图文详解)
不多说,直接上干货! 为什么,我写了一篇OSSIM 5.2.0的,还要再来写OSSIM 4.1.0呢,是因为,OSSIM 5.2.0所需内存较大,8G甚至16G,但是,肯定性能和里面集成组件越高级.也 ...
- kettle的下载、安装和初步使用(Ubuntu 16.04平台下)(图文详解)
不多说,直接上干货! 能够看我这篇博客的博友们,想必是已经具备一定基础了. 扩展博客 kettle的下载.安装和初步使用(windows平台下)(图文详解) kettle的下载 Kettle可以在h ...
- 2019暑期北航培训—预培训作业-IDE的安装与初步使用(Visual Studio版)
这个作业属于那个课程 2019北航软件工程暑期师资培训 这个作业要求在哪里 预培训-IDE的安装与初步使用(Visual Studio版) 我在这个课程的目标是 提高自身实际项目实践能力,掌握帮助学生 ...
- percona-toolkit工具包的安装和初步使用
percona-toolkit工具包的安装和初步使用 原文地址:http://blog.csdn.net/yumushui/article/details/42919601 一.percona-too ...
- Jupyter notebook 安装,初步使用
在学习算法,图像处理过程中,理论结合实际的时候总要写一些程序,我用的是PYTHON.这时候,选择一款称手的工具比较重要.之前我用自带的IDLE,也还可以,但是操作不够便捷,文件组织也不是很好.后来想用 ...
- 关于Maven的安装及初步使用
关于Maven的初步使用 1. 下载: 进入http://maven.apache.org/download.cgi下载 Maven 3.3.1 2. 将压缩包解压到自己的硬盘中,最好放在某个盘 ...
随机推荐
- MariaDB 安装配置记录
1.集群搭建记录 iptables --append INPUT --protocol tcp \ --source 192.168.126.129 --jump ACCEPT iptables -- ...
- PP: Multilevel wavelet decomposition network for interpretable time series analysis
Problem: the important frequency information is lack of effective modelling. ?? what is frequency in ...
- jsp中引用的jstl 和fmt标签-详解
JSTL 核心标签库标签共有13个,功能上分为4类: 1.表达式控制标签:out.set.remove.catch 2.流程控制标签:if.choose.when.otherwise 3.循环标签:f ...
- malloc函数动态分配内存
#include <stdio.h> #include <stdlib.h> //malloc free #include <windows.h> //sleep ...
- .netcore 3.1高性能微服务架构:加入swagger接口文档
本文为原创文章:首发:http://www.zyiz.net/tech/detail-108663.html swagger是什么? Swagger 是一个规范和完整的框架,用于生成.描述.调用和可视 ...
- importing-cleaning-data-in-r-case-studies
目录 importing-cleaning-data-in-r-case-studies 导入数据 查看数据结构 下面的一些都是查数据结构的 separate 拆分单元格 读取指定位置的数据 stri ...
- fastadmin 框架中图片点击放大
fastadmin的原生图片预览,重新打开一个窗口太麻烦,使用layui做一个弹窗式的图片预览 1.将下面代码放在backend-init.js文件中 $('body').on('click', '[ ...
- jdk8-》allMatch、anyMatch、max、min函数
allMatch函数: 检查是否匹配所有元素,只有全部符合才返回true boolean flag = list.stream().allMatch(obj->obj.length()>5 ...
- AD转换器的主要技术指标
1)分辩率(Resolution) 指数字量变化一个最小量时模拟信号的变化量,定义为满刻度与2n的比值.分辩率又称精度,通常以数字信号的位数来表示. 2) 转换速率(Conversion Ra ...
- jsp中 EL表达式 ${}
原文位置:https://zhidao.baidu.com/question/711232806155434565.html jsp标签中的 ${表达式}用来输出或者计算一个表达式的内容,比如${3+ ...