
ALSA driver --PCM 实例创建过程
前面已经写过PCM 实例的创建框架,我们现在来看看PCM 实例是如何创建的。
在调用snd_pcm_new时就会创建一个snd_pcm类型的PCM 实例.
struct snd_pcm {
struct snd_card *card;//PCM device 说挂载的声卡
struct list_head list;//一个Card可能有多个PCM 实例,PCM 实例列表
int device; /* device number *///PCM 实例的索引
unsigned int info_flags;
unsigned short dev_class;
unsigned short dev_subclass;
char id[64];
char name[80];
struct snd_pcm_str streams[2];//PCM的playback和capture stream
struct mutex open_mutex;
wait_queue_head_t open_wait;
void *private_data;//private_data一般为芯片专用信息
void (*private_free) (struct snd_pcm *pcm);//用来释放private_data
bool internal; /* pcm is for internal use only */
bool nonatomic; /* whole PCM operations are in non-atomic context */
#if defined(CONFIG_SND_PCM_OSS) || defined(CONFIG_SND_PCM_OSS_MODULE)
struct snd_pcm_oss oss;
#endif
};
接下来我们来看看在snd_pcm_new中有些什么操作:
static int _snd_pcm_new(struct snd_card *card, const char *id, int device,
int playback_count, int capture_count, bool internal,
struct snd_pcm **rpcm)
{
struct snd_pcm *pcm;
int err;
static struct snd_device_ops ops = {//device的操作函数
.dev_free = snd_pcm_dev_free,
.dev_register = snd_pcm_dev_register,//在device rigister调用
.dev_disconnect = snd_pcm_dev_disconnect,
};
if (snd_BUG_ON(!card))
return -ENXIO;
if (rpcm)
*rpcm = NULL;
pcm = kzalloc(sizeof(*pcm), GFP_KERNEL);//为PCM 实例创建空间
if (!pcm)
return -ENOMEM;
pcm->card = card;//将声卡保存在PCM 实例中
pcm->device = device;
pcm->internal = internal;
mutex_init(&pcm->open_mutex);
init_waitqueue_head(&pcm->open_wait);
INIT_LIST_HEAD(&pcm->list);
if (id)
strlcpy(pcm->id, id, sizeof(pcm->id));
if ((err = snd_pcm_new_stream(pcm, SNDRV_PCM_STREAM_PLAYBACK, playback_count)) < 0) {//为PCM 实例创建playback stream
snd_pcm_free(pcm);
return err;
}
if ((err = snd_pcm_new_stream(pcm, SNDRV_PCM_STREAM_CAPTURE, capture_count)) < 0) {//为PCM 实例创建capture stream
snd_pcm_free(pcm);
return err;
}
if ((err = snd_device_new(card, SNDRV_DEV_PCM, pcm, &ops)) < 0) {//以PCM 实例创建snd_device并挂载到Card上。
snd_pcm_free(pcm);
return err;
}
if (rpcm)
*rpcm = pcm;
return 0;
}
一个PCM 实例分别有一个playback, capture stream,由snd_pcm_new_stream创建。
playback 和capture stream是一个snd_pcm_str的结构体,
struct snd_pcm_str {
int stream; /* stream (direction) *///是playback stream or capture stream
struct snd_pcm *pcm;//当前的PCM 实例
/* -- substreams -- */
unsigned int substream_count;//substream的数目。
unsigned int substream_opened;//已经open的substream数目。每次open +1,close -1.
struct snd_pcm_substream *substream;//playback stream or capture stream的substream链表
#if defined(CONFIG_SND_PCM_OSS) || defined(CONFIG_SND_PCM_OSS_MODULE)
/* -- OSS things -- */
struct snd_pcm_oss_stream oss;
#endif
#ifdef CONFIG_SND_VERBOSE_PROCFS
struct snd_info_entry *proc_root;
struct snd_info_entry *proc_info_entry;
#ifdef CONFIG_SND_PCM_XRUN_DEBUG
unsigned int xrun_debug; /* 0 = disabled, 1 = verbose, 2 = stacktrace */
struct snd_info_entry *proc_xrun_debug_entry;
#endif
#endif
struct snd_kcontrol *chmap_kctl; /* channel-mapping controls */
struct device dev;//stream的device结构
};
substream的结构体snd_pcm_substream :
struct snd_pcm_substream {
struct snd_pcm *pcm;//PCM 实例
struct snd_pcm_str *pstr;//playback stream or substream
void *private_data; /* copied from pcm->private_data *///private_data通常是和PCM 实例的private data相同。
int number;//当前substream的index
char name[32]; /* substream name */
int stream; /* stream (direction) *///是playback or capture的substream
struct pm_qos_request latency_pm_qos_req; /* pm_qos request */
size_t buffer_bytes_max; /* limit ring buffer size *///最大的buffer size
struct snd_dma_buffer dma_buffer;//DMA buffer
size_t dma_max;
/* -- hardware operations -- */
const struct snd_pcm_ops *ops;//substream的操作函数,在创建完PCM 实例后,调用snd_pcm_set_ops设置PCM实例playback stream的每一个substream的操作函数。
/* -- runtime information -- */
struct snd_pcm_runtime *runtime;//runtime信息
/* -- timer section -- */
struct snd_timer *timer; /* timer */
unsigned timer_running: 1; /* time is running */
/* -- next substream -- */
struct snd_pcm_substream *next;
/* -- linked substreams -- */
struct list_head link_list; /* linked list member */
struct snd_pcm_group self_group; /* fake group for non linked substream (with substream lock inside) */
struct snd_pcm_group *group; /* pointer to current group */
/* -- assigned files -- */
void *file;
int ref_count;
atomic_t mmap_count;
unsigned int f_flags;
void (*pcm_release)(struct snd_pcm_substream *);
struct pid *pid;
#if defined(CONFIG_SND_PCM_OSS) || defined(CONFIG_SND_PCM_OSS_MODULE)
/* -- OSS things -- */
struct snd_pcm_oss_substream oss;
#endif
#ifdef CONFIG_SND_VERBOSE_PROCFS
struct snd_info_entry *proc_root;
struct snd_info_entry *proc_info_entry;
struct snd_info_entry *proc_hw_params_entry;
struct snd_info_entry *proc_sw_params_entry;
struct snd_info_entry *proc_status_entry;
struct snd_info_entry *proc_prealloc_entry;
struct snd_info_entry *proc_prealloc_max_entry;
#ifdef CONFIG_SND_PCM_XRUN_DEBUG
struct snd_info_entry *proc_xrun_injection_entry;
#endif
#endif /* CONFIG_SND_VERBOSE_PROCFS */
/* misc flags */
unsigned int hw_opened: 1;
};
/**
* snd_pcm_new_stream - create a new PCM stream
* @pcm: the pcm instance
* @stream: the stream direction, SNDRV_PCM_STREAM_XXX
* @substream_count: the number of substreams
*/
int snd_pcm_new_stream(struct snd_pcm *pcm, int stream, int substream_count)
{
int idx, err;
struct snd_pcm_str *pstr = &pcm->streams[stream];//当前的playback stream or capture stream
struct snd_pcm_substream *substream, *prev;
#if IS_ENABLED(CONFIG_SND_PCM_OSS)
mutex_init(&pstr->oss.setup_mutex);
#endif
pstr->stream = stream;
pstr->pcm = pcm;
pstr->substream_count = substream_count;
if (!substream_count)
return 0;
snd_device_initialize(&pstr->dev, pcm->card);
pstr->dev.groups = pcm_dev_attr_groups;
dev_set_name(&pstr->dev, "pcmC%iD%i%c", pcm->card->number, pcm->device, stream == SNDRV_PCM_STREAM_PLAYBACK ? 'p' : 'c');//playback stream的名字
if (!pcm->internal) {
err = snd_pcm_stream_proc_init(pstr);//将playback stream挂到/proc目录下,我们通过cat可以查看。
if (err < 0) {
pcm_err(pcm, "Error in snd_pcm_stream_proc_init\n");
return err;
}
}
prev = NULL;
for (idx = 0, prev = NULL; idx < substream_count; idx++) {//一个playback stream下可有多个substream,创建substream
substream = kzalloc(sizeof(*substream), GFP_KERNEL);
if (!substream)
return -ENOMEM;
substream->pcm = pcm;
substream->pstr = pstr;
substream->number = idx;
substream->stream = stream;
sprintf(substream->name, "subdevice #%i", idx);
substream->buffer_bytes_max = UINT_MAX;
if (prev == NULL)//将substream链接到playback stream的substream成员中。
pstr->substream = substream;
else
prev->next = substream;
if (!pcm->internal) {
err = snd_pcm_substream_proc_init(substream);//将substream挂到/proc下。
if (err < 0) {
pcm_err(pcm,"Error in snd_pcm_stream_proc_init\n");
if (prev == NULL)
pstr->substream = NULL;
else
prev->next = NULL;
kfree(substream);
return err;
}
}
substream->group = &substream->self_group;
spin_lock_init(&substream->self_group.lock);
mutex_init(&substream->self_group.mutex);
INIT_LIST_HEAD(&substream->self_group.substreams);
list_add_tail(&substream->link_list, &substream->self_group.substreams);
atomic_set(&substream->mmap_count, 0);
prev = substream;
}
return 0;
}
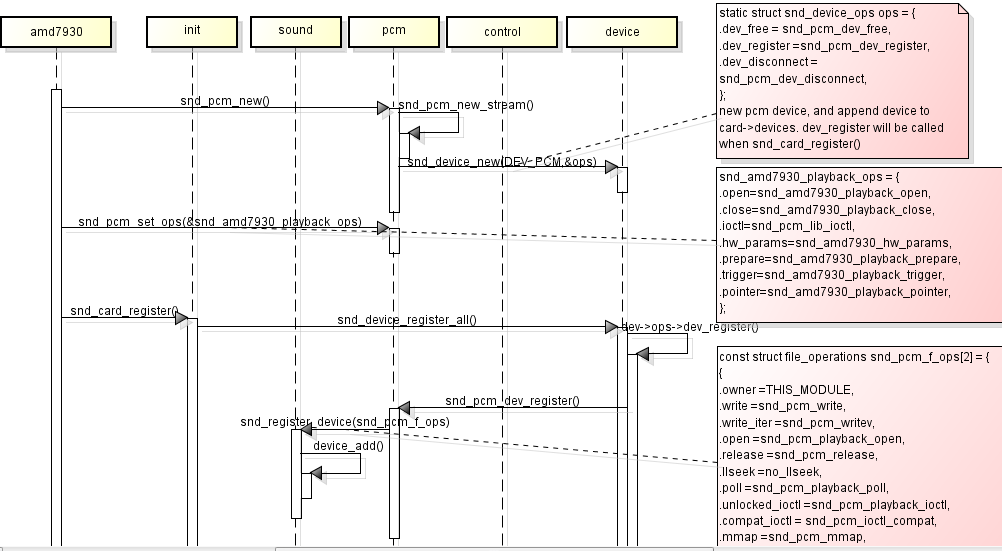
在创建完PCM device后,调用snd_device_new(card, SNDRV_DEV_PCM, pcm, &ops)以PCM 实例创建device 并挂载到card上。
在snd_device_new函数中创建一个snd_device结构,并将此结构加到card的device list中。
在注册card时(调用snd_card_register),就会对card的devcie list中每个device进行注册。
device的注册即调用snd_device_new(card, SNDRV_DEV_PCM, pcm, &ops)函数中最后一个参数的dev_register.
snd_device的dev_register是snd_pcm_dev_register。
static int snd_pcm_dev_register(struct snd_device *device)
{
int cidx, err;
struct snd_pcm_substream *substream;
struct snd_pcm_notify *notify;
struct snd_pcm *pcm;
if (snd_BUG_ON(!device || !device->device_data))
return -ENXIO;
pcm = device->device_data;//snd_device的device_data即PCM实例,是在snd_device_new时将pcm赋值给device_data
if (pcm->internal)
return 0;
mutex_lock(®ister_mutex);
err = snd_pcm_add(pcm);
if (err)
goto unlock;
for (cidx = 0; cidx < 2; cidx++) {
int devtype = -1;
if (pcm->streams[cidx].substream == NULL)
continue;
switch (cidx) {
case SNDRV_PCM_STREAM_PLAYBACK:
devtype = SNDRV_DEVICE_TYPE_PCM_PLAYBACK;
break;
case SNDRV_PCM_STREAM_CAPTURE:
devtype = SNDRV_DEVICE_TYPE_PCM_CAPTURE;
break;
}
/* register pcm */
err = snd_register_device(devtype, pcm->card, pcm->device,&snd_pcm_f_ops[cidx], pcm,&pcm->streams[cidx].dev);//注册device, device是pcm实例的playback stream的device。device的操作函数为snd_pcm_f_ops.
if (err < 0) {
list_del_init(&pcm->list);
goto unlock;
}
for (substream = pcm->streams[cidx].substream; substream; substream = substream->next)
snd_pcm_timer_init(substream);//初始化每个substream 的timer
}
list_for_each_entry(notify, &snd_pcm_notify_list, list)
notify->n_register(pcm);
unlock:
mutex_unlock(®ister_mutex);
return err;
}
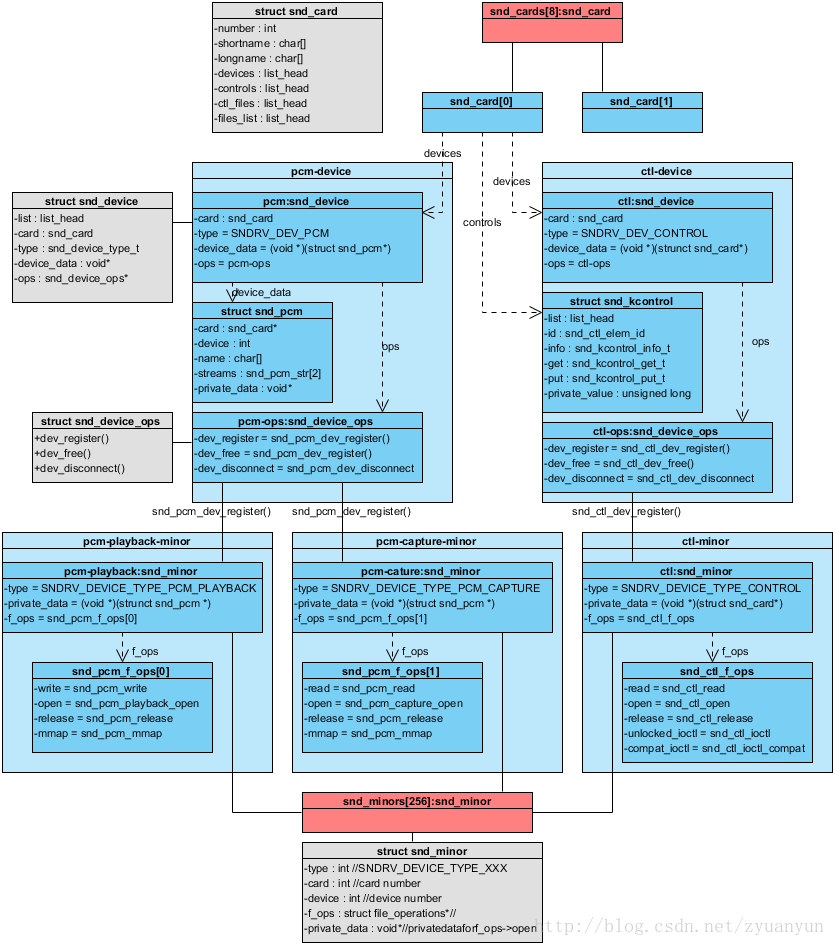
snd_register_device将pcm->streams[cidx].dev(即name为pcmC*D*p的device,在snd_pcm_new_stream创建和指定名字)注册到device 目录中,并创建snd_minor结构体,snd_pcm_f_ops赋值给snd_minor结构体的f_ops,然后加到snd_minors的数组中。找到一个可用的minor,和major(固定是116)组成pcm->streams[cidx].dev这个device的设备号,将设备device_add()加到系统中。
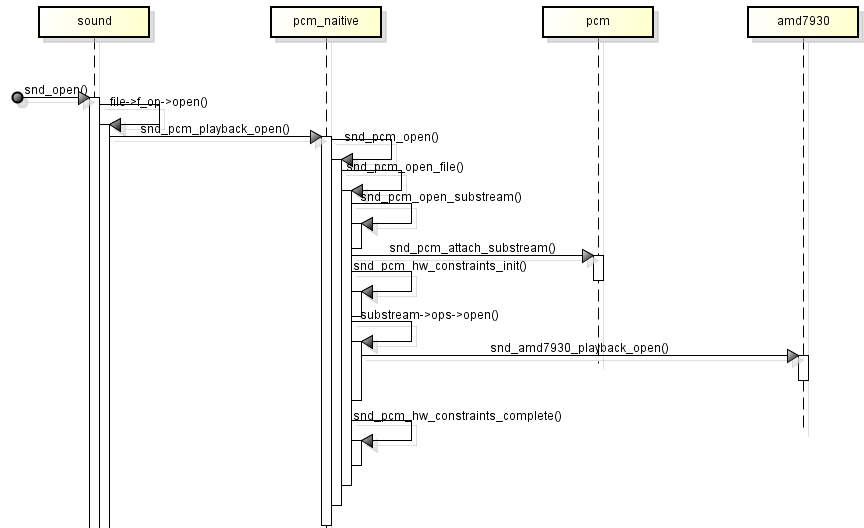
App在调用alsa lib API: snd_pcm_open打开name为pcmC*D*p的device时,就会调用到alsa-core中的snd_open(pcmC*D*p的major和"alsa"字符设备驱动都是116),在snd_open中通过PCM 实例的 inode找到snd_minor结构,并调用snd_minor结构的操作函数(即snd_pcm_f_ops)的open函数。
alsa lib其他API都是在open,获取driver 文件后,通过ioctl到达snd_pcm_f_ops对应的操作函数。
pcm实例的playback stream的device的操作函数:
const struct file_operations snd_pcm_f_ops[2] = {
{
.owner = THIS_MODULE,
.write = snd_pcm_write,
.write_iter = snd_pcm_writev,
.open = snd_pcm_playback_open,
.release = snd_pcm_release,
.llseek = no_llseek,
.poll = snd_pcm_playback_poll,
.unlocked_ioctl = snd_pcm_playback_ioctl,
.compat_ioctl = snd_pcm_ioctl_compat,
.mmap = snd_pcm_mmap,
.fasync = snd_pcm_fasync,
.get_unmapped_area = snd_pcm_get_unmapped_area,
},
{
.owner = THIS_MODULE,
.read = snd_pcm_read,
.read_iter = snd_pcm_readv,
.open = snd_pcm_capture_open,
.release = snd_pcm_release,
.llseek = no_llseek,
.poll = snd_pcm_capture_poll,
.unlocked_ioctl = snd_pcm_capture_ioctl,
.compat_ioctl = snd_pcm_ioctl_compat,
.mmap = snd_pcm_mmap,
.fasync = snd_pcm_fasync,
.get_unmapped_area = snd_pcm_get_unmapped_area,
}
};
ALSA driver --PCM 实例创建过程的更多相关文章
- ALSA driver--PCM实例创建框架
在介绍PCM 之前,我们先给出创建PCM实例的框架. #include <sound/pcm.h> .... /* hardware definition */ static struct ...
- Spring源码浅析之bean实例的创建过程(一)
在之前的文章内容中,简单介绍了bean定义的加载过程,下面这篇的主要内容就是bean实例的创建过程. bean实例的创建方式 ApplicationContext context = new Clas ...
- Spring源码浅析之bean实例的创建过程(二)
在上一篇内容中,介绍了doGetBean方法的源码内容,知道了bean在创建的过程中,有三个范围,单例.多例.Scope,里面都使用到了createBean.下面本篇文章的主要内容,就是围绕creat ...
- [转载]以及部分总结--Linux下创建单机ASM存储的Oracle实例的过程---感谢方总
Linux下单机安装ASM流程总结 一.安装Linux ESXi上传iso镜像至存储目录 创建虚拟机,并且选择主机设备的ISO启动 选择完成时编辑虚拟机设置 配置镜像文件如下: 打开控制台: 并且选择 ...
- ALSA driver基本概念
https://blog.csdn.net/zyuanyun/article/details/59180272#t6 1.Card For each soundcard, a “card” recor ...
- Mybaits 源码解析 (二)----- 根据配置文件创建SqlSessionFactory(Configuration的创建过程)
我们使用mybatis操作数据库都是通过SqlSession的API调用,而创建SqlSession是通过SqlSessionFactory.下面我们就看看SqlSessionFactory的创建过程 ...
- Mybaits 源码解析 (四)----- SqlSession的创建过程(看懂框架源码再也不用死记硬背面试题)
SqlSession是mybatis的核心接口之一,是myabtis接口层的主要组成部分,对外提供了mybatis常用的api.myabtis提供了两个SqlSesion接口的实现,常用的实现类是De ...
- ASP.NET Web API 控制器创建过程(二)
ASP.NET Web API 控制器创建过程(二) 前言 本来这篇随笔应该是在上周就该写出来发布的,由于身体跟不上节奏感冒发烧有心无力,这种天气感冒发烧生不如死,也真正的体会到了什么叫病来如山倒,病 ...
- ASP.NET Web API 控制器创建过程(一)
ASP.NET Web API 控制器创建过程(一) 前言 在前面对管道.路由有了基础的了解过后,本篇将带大家一起学习一下在ASP.NET Web API中控制器的创建过程,这过程分为几个部分下面的内 ...
随机推荐
- 机器学习作业(一)线性回归——Matlab实现
题目太长啦!文档下载[传送门] 第1题 简述:设计一个5*5的单位矩阵. function A = warmUpExercise() A = []; A = eye(5); end 运行结果: 第2题 ...
- 安卓开发中遇到java.net.SocketException: Permission denied
仅需在AndroidManifest.xml添加 <uses-permission android:name="android.permission.INTERNET" /& ...
- JavaScript的Map和Set
JavaScript的Map和Set 1.map:映射(通过key获得value).增.删 2.set:增.删.判断是否包含某个元素 1. Map <!DOCTYPE html><h ...
- Codeforces Round #602 (Div. 2, based on Technocup 2020 Elimination Round 3) C Messy
//因为可以反转n次 所以可以得到任何可以构成的序列 #include<iostream> #include<string> #include<vector> us ...
- 16day 逻辑符号系列
&& 与逻辑符号 前一个命令执行成功, 再执行后面的命令 || 或逻辑符号 前一个命令执行失败, 再执行后面的命令 &&符号实践操作: [root@oldboyedu ...
- MySQL5.5升级至5.7
一.下载免安装MySQL5.7包 下载页面 下载链接 二.替换mysql的安装目录 解压mysql5.7 tar -zxf mysql-5.7.23-linux-glibc2.12-x86_64.ta ...
- 素问 - 使用 PE、PB 做估值
摘自<小韭的学习圈> Q 哪些行业用PE看合适,哪些用PB看合适啊?其中的大致逻辑是什么? A PE = 股价 / 每股收益 使用PE的逻辑是,我们认为一个股票有价值,是因为公司未来能赚钱 ...
- linux 扩展内存
一.逻辑卷创建使用 https://www.cnblogs.com/xiaoluo501395377/archive/2013/05/24/3096087.html fdisk -l pvcreate ...
- Winform中使用Reactivex代替BeginInvoke/Invoke来更新UI数据
首先通过Nuget安装包System.Reactive. ReactiveX项目 Url: https://github.com/Reactive-Extensions/Rx.NET public p ...
- mysql之路4
MYSQL之约束 2.主键约束 349行cnname换成cname