
从maven安装配置到idea成功创建maven项目
在文章开始之前,我还是想安抚下你躁动的心情,说实话这一套操作下来的确花了我不少时间,的确头疼.
不过对于现在在看文章的你,我还是想提倡多多尝试,耐心哈,别砸键盘......废话少说切入正题
一. maven安装
1.确保本地装有JDK
2.去官网:http://maven.apache.org/download.cgi 下载自己所需的版本(在这说明,windows的安装包zip结尾)
3.解压本地,配置环境变量(其他博客有很多提及,在这我就不多截屏和引用了,篇幅过多)
二. 检测maven是否安装成功
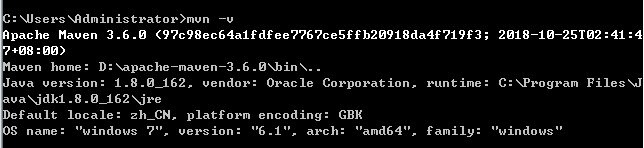
1.WINDOWS+R 进cmd 在dos窗口 敲入 mvn -v
2.若出现下图,说明maven安装成功并且环境变量配置成功
三. maven配置文件setting的配置
md....在这困了两天都没配好,百度了好久,什么改本地仓库,改镜像环境,改什么什么.....巴拉巴拉.....
楼主把百度的maven教程和博客的都翻遍了,还是出错,说到底咱们百度那么多不就为了能正常使用maven吗?直接提供个settings文件如下,简单粗暴
 <?xml version="1.0" encoding="UTF-8"?>

 <!--

 Licensed to the Apache Software Foundation (ASF) under one

 or more contributor license agreements.  See the NOTICE file

 distributed with this work for additional information

 regarding copyright ownership.  The ASF licenses this file

 to you under the Apache License, Version 2.0 (the

 "License"); you may not use this file except in compliance

 with the License.  You may obtain a copy of the License at

     http://www.apache.org/licenses/LICENSE-2.0

 Unless required by applicable law or agreed to in writing,

 software distributed under the License is distributed on an

 "AS IS" BASIS, WITHOUT WARRANTIES OR CONDITIONS OF ANY

 KIND, either express or implied.  See the License for the

 specific language governing permissions and limitations

 under the License.

 -->

 <!--

  | This is the configuration file for Maven. It can be specified at two levels:

  |

  |  1. User Level. This settings.xml file provides configuration for a single user,

  |                 and is normally provided in ${user.home}/.m2/settings.xml.

  |

  |                 NOTE: This location can be overridden with the CLI option:

  |

  |                 -s /path/to/user/settings.xml

  |

  |  2. Global Level. This settings.xml file provides configuration for all Maven

  |                 users on a machine (assuming they're all using the same Maven

  |                 installation). It's normally provided in

  |                 ${maven.home}/conf/settings.xml.

  |

  |                 NOTE: This location can be overridden with the CLI option:

  |

  |                 -gs /path/to/global/settings.xml

  |

  | The sections in this sample file are intended to give you a running start at

  | getting the most out of your Maven installation. Where appropriate, the default

  | values (values used when the setting is not specified) are provided.

  |

  |-->

 <settings xmlns="http://maven.apache.org/SETTINGS/1.0.0"

           xmlns:xsi="http://www.w3.org/2001/XMLSchema-instance"

           xsi:schemaLocation="http://maven.apache.org/SETTINGS/1.0.0 http://maven.apache.org/xsd/settings-1.0.0.xsd">

   <!-- localRepository

    | The path to the local repository maven will use to store artifacts.

    |

    | Default: ${user.home}/.m2/repository

   <localRepository>/path/to/local/repo</localRepository>

   -->

    <!-- 写你本地的仓库路径 -->

   <localRepository>D:\maven_repository</localRepository>

   <!-- interactiveMode

    | This will determine whether maven prompts you when it needs input. If set to false,

    | maven will use a sensible default value, perhaps based on some other setting, for

    | the parameter in question.

    |

    | Default: true

   <interactiveMode>true</interactiveMode>

   -->

   <!-- offline

    | Determines whether maven should attempt to connect to the network when executing a build.

    | This will have an effect on artifact downloads, artifact deployment, and others.

    |

    | Default: false

   <offline>false</offline>

   -->

   <!-- pluginGroups

    | This is a list of additional group identifiers that will be searched when resolving plugins by their prefix, i.e.

    | when invoking a command line like "mvn prefix:goal". Maven will automatically add the group identifiers

    | "org.apache.maven.plugins" and "org.codehaus.mojo" if these are not already contained in the list.

    |-->

   <pluginGroups>

     <!-- pluginGroup

      | Specifies a further group identifier to use for plugin lookup.

     <pluginGroup>com.your.plugins</pluginGroup>

     -->

     <pluginGroup>org.mortbay.jetty</pluginGroup>

   </pluginGroups>

   <!-- proxies

    | This is a list of proxies which can be used on this machine to connect to the network.

    | Unless otherwise specified (by system property or command-line switch), the first proxy

    | specification in this list marked as active will be used.

    |-->

   <proxies>

     <!-- proxy

      | Specification for one proxy, to be used in connecting to the network.

      |

     <proxy>

       <id>optional</id>

       <active>true</active>

       <protocol>http</protocol>

       <username>proxyuser</username>

       <password>proxypass</password>

       <host>proxy.host.net</host>

       <port>80</port>

       <nonProxyHosts>local.net|some.host.com</nonProxyHosts>

     </proxy>

     -->

   </proxies>

   <!-- servers

    | This is a list of authentication profiles, keyed by the server-id used within the system.

    | Authentication profiles can be used whenever maven must make a connection to a remote server.

    |-->

   <servers>

     <server>

         <id>releases</id>

         <username>ali</username>

         <password>ali</password>

       </server>

       <server>

         <id>Snapshots</id>

         <username>ali</username>

         <password>ali</password>

       </server>

   </servers>

   <mirrors>

     <!-- mirror

     <mirror>

       <id>mirrorId</id>

       <mirrorOf>repositoryId</mirrorOf>

       <name>Human Readable Name for this Mirror.</name>

       <url>http://my.repository.com/repo/path</url>

     </mirror>

      -->

     <mirror>

       <!--This sends everything else to /public -->

       <id>nexus</id>

       <mirrorOf>*</mirrorOf>

       <url>http://maven.aliyun.com/nexus/content/groups/public/</url>

     </mirror>

     <mirror>

       <!--This is used to direct the public snapshots repo in the

           profile below over to a different nexus group -->

       <id>nexus-public-snapshots</id>

       <mirrorOf>public-snapshots</mirrorOf>

       <url>http://maven.aliyun.com/nexus/content/repositories/snapshots/</url>

     </mirror>

   </mirrors>

   <profiles>

     <profile>

       <id>development</id>

       <repositories>

         <repository>

           <id>central</id>

           <url>http://central</url>

           <releases><enabled>true</enabled><updatePolicy>always</updatePolicy></releases>

           <snapshots><enabled>true</enabled><updatePolicy>always</updatePolicy></snapshots>

         </repository>

       </repositories>

      <pluginRepositories>

         <pluginRepository>

           <id>central</id>

           <url>http://central</url>

           <releases><enabled>true</enabled><updatePolicy>always</updatePolicy></releases>

           <snapshots><enabled>true</enabled><updatePolicy>always</updatePolicy></snapshots>

         </pluginRepository>

       </pluginRepositories>

     </profile>

     <profile>

       <!--this profile will allow snapshots to be searched when activated-->

       <id>public-snapshots</id>

       <repositories>

         <repository>

           <id>public-snapshots</id>

           <url>http://public-snapshots</url>

           <releases><enabled>false</enabled></releases>

           <snapshots><enabled>true</enabled><updatePolicy>always</updatePolicy></snapshots>

         </repository>

       </repositories>

      <pluginRepositories>

         <pluginRepository>

           <id>public-snapshots</id>

           <url>http://public-snapshots</url>

           <releases><enabled>false</enabled></releases>

           <snapshots><enabled>true</enabled><updatePolicy>always</updatePolicy></snapshots>

         </pluginRepository>

       </pluginRepositories>

     </profile>

   </profiles>

    <activeProfiles>

     <activeProfile>development</activeProfile>

     <activeProfile>public-snapshots</activeProfile>

    </activeProfiles>

 </settings>
上面的setting文件,使用的是国内的阿里云镜像环境,使用时只需将本地仓库的路径改下即可,整个文件直接放入maven文件夹下conf文件夹中,
为保险起见,博主建议在本地仓库文件夹中也放一份
ok,操作完这些,总得检测下是否配置正确
四. 检测本地maven的配置情况是否成功
1.windows+R 进cmd 敲入 mvn help:system
2.若出现下图,说明配置成功
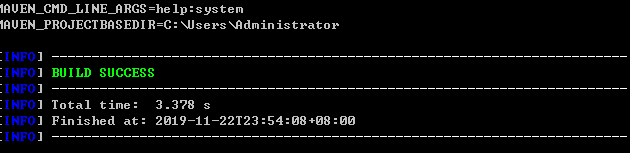
至此,maven的安装配置结束
五.在idea中创建maven项目
先说明下,如果你之前在idea创建maven项目失败,楼主建议将idea的配置全部删除,重新格式化idea配置,不然以下方法依然解决不了问题(亲测)
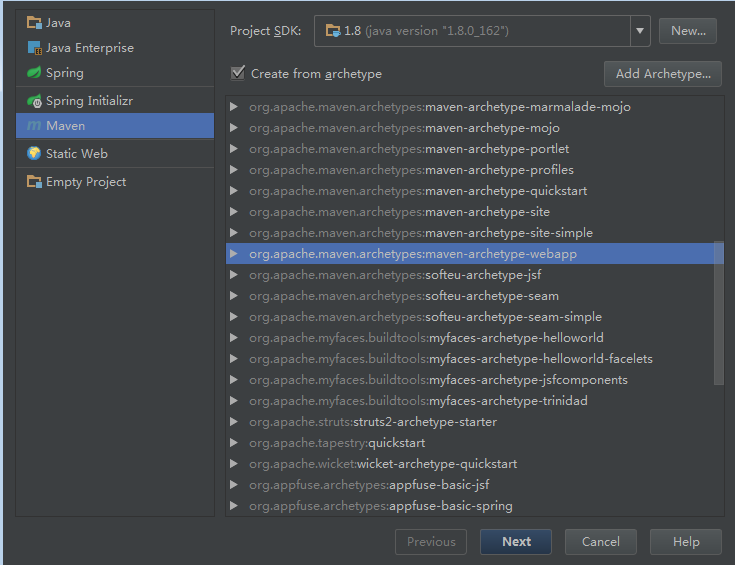
1.打开idea File > New > Project 选中Maven
2.在 Create from archetype 前面打对勾
3.选择 如图所示 然后 next
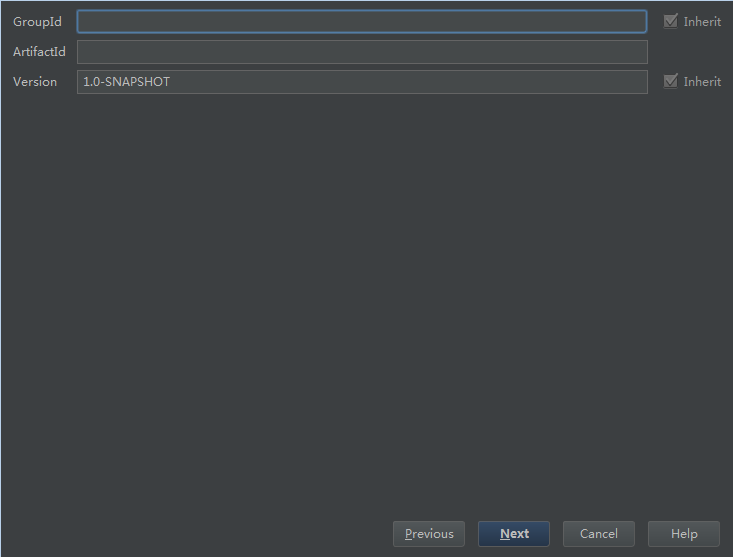
4.随便填
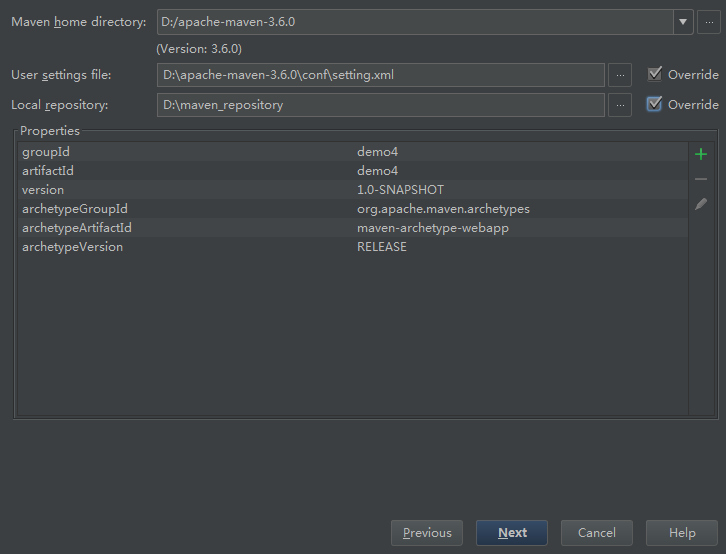
5.这里一定要填写正确,填写maven的安装路径和配置文件 以及自己的仓库路径
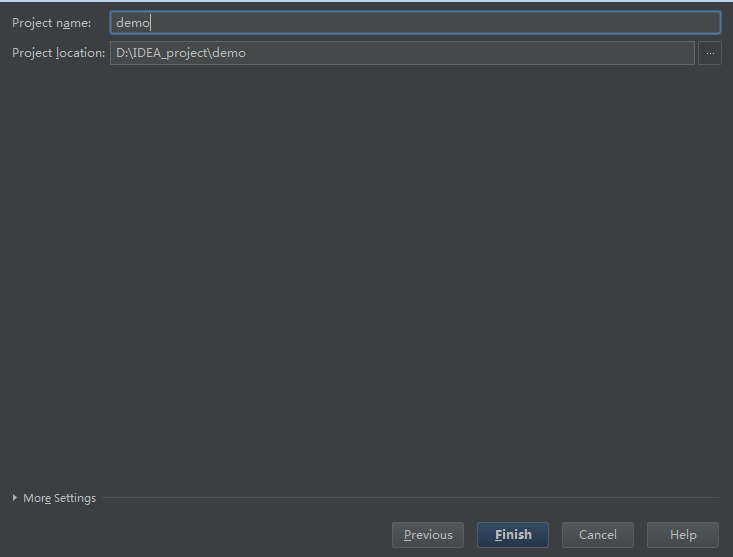
6. 填写项目名,设置项目路径 然后finish
7. 如下图,若出现maven在控制台加载 可以选择让maven自动加载 Enable Auto Import

第一次加载可能会有点慢,因为本地没有jar包,需要去下载
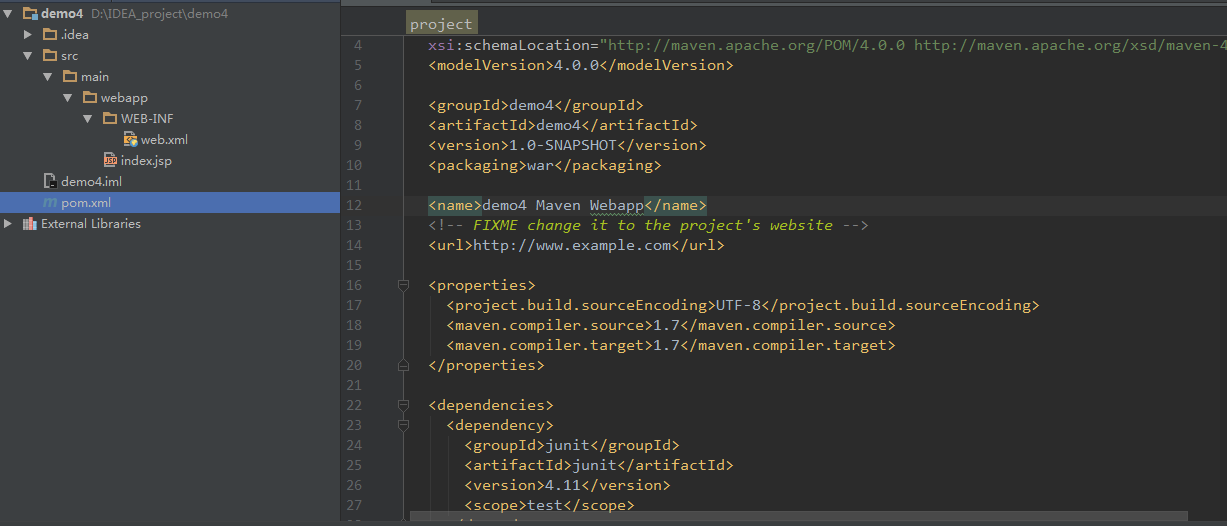
ok 至此maven项目搭建完成 点开项目的pom文件,即可添加项目所需jar包的连接,maven即可正常使用
下图为项目文件列表
好了,开始 coding 吧 ,楼主记住了这次教训,花费大把时间,属实蛋疼
参考博客 : https://www.cnblogs.com/deep-space/p/9542566.html
从maven安装配置到idea成功创建maven项目的更多相关文章
- Spring Boot入门样例-001-Java和Maven安装配置
Spring Boot入门样例-001-Java和Maven安装配置 本文说明Java和Maven在windows下的安装和配置 前言 本Spring Boot入门样例准备工作参考: Spring B ...
- 转载maven安装,配置,入门
转载:http://www.cnblogs.com/dcba1112/archive/2011/05/01/2033805.html 本书代码下载 大家可以从我的网站下载本书的代码:http://ww ...
- Maven学习第2期---Maven安装配置
一.Maven介绍 1.1 何为Maven Maven这个词可以翻译为"知识的积累",也可以翻译为"专家"或"内行".Maven是一个跨平台 ...
- JeePlus:Maven 安装配置
ylbtech-JeePlus:Maven 安装配置 1.返回顶部 1. Maven 安装配置 1 Maven 由于Maven依赖Java运行环境,因此使用Maven之前需要配置Java的运行环境.下 ...
- Maven安装配置及其插件m2e(Eclipse Indigo 和 MyEclipse8.5)的安装配置
Maven安装配置及其插件m2e(Eclipse Indigo 和 MyEclipse8.5)的安装配置 系统:Windows7 使用软件: Maven3.0.3 + Eclipse Indigo ...
- 第一章 Maven 安装配置
Maven基于(POM)项目对象模型,通过一小段描述信息来管理项目的构建.文档.和报告的项目管理软件,类似于php 的管理构建工具composer. 有关详细的Maven学习,可以参考学习https: ...
- Maven安装配置操作
1)下载maven安装包并解压: 2)环境变量配置: 3)编辑环境变量Path,追加%MAVEN_HOME%\bin; 4)maven安装配置后进行dos命令检查:在cmd中输入 mvn -v 5)配 ...
- eclipse弃坑记第一篇之在idea上配置Tomcat环境并创建Javaweb项目的详细步骤原创
IntelliJ IDEA是一款功能强大的开发工具,在代码自动提示.重构.J2EE支持.各类版本工具(如git.svn.github).maven等方面都有很好的应用. IntelliJ IDEA有免 ...
- maven安装配置及使用maven创建一个web项目
今天开始学习使用maven,现在把学习过程中的资料整理在这边. 第一部分.maven安装和配置. http://jingyan.baidu.com/article/295430f136e8e00c7e ...
随机推荐
- springmvc 参数校验/aop失效/@PathVariable 参数为空
添加依赖 <!-- 参数校验 --> <dependency> <groupId>org.hibernate.validator</groupId> & ...
- k8s数据持久化实验
Step 1:创建PV ============================================ apiVersion: v1kind: PersistentVolumemetadat ...
- 【题解】SDOI2010所驼门王的宝藏(强连通分量+优化建图)
[题解]SDOI2010所驼门王的宝藏(强连通分量+优化建图) 最开始我想写线段树优化建图的说,数据结构学傻了233 虽然矩阵很大,但是没什么用,真正有用的是那些关键点 考虑关键点的类型: 横走型 竖 ...
- 浅析vue封装自定义插件
在使用vue的过程中,经常会用到Vue.use,但是大部分对它一知半解,不了解在调用的时候具体做了什么,因此,本文简要概述下在vue中,如何封装自定义插件. 在开始之前,先补充一句,其实利用vue封装 ...
- 从头学pytorch(十四):lenet
卷积神经网络 在之前的文章里,对28 X 28的图像,我们是通过把它展开为长度为784的一维向量,然后送进全连接层,训练出一个分类模型.这样做主要有两个问题 图像在同一列邻近的像素在这个向量中可能相距 ...
- matlab数组相除
%数组的除法 clear all %清空MATLAB中的数据 a=[ ] b=[ ] c=a./b %a/b 对应位置相除 d=a.\b %b/a e=a./ %数组与常数相除 f=a/ 运行结果如下
- 【tf.keras】使用手册
目录 0. 简介 1. 安装 1.1 安装 CUDA 和 cuDNN 2. 数据集 2.1 使用 tensorflow_datasets 导入公共数据集 2.2 数据集过大导致内存溢出 2.3 加载 ...
- VScode(一):C/C++ & MinGW & Code Runner
目录 1 VScode配置安装 2 MinGW配置安装 2.1 MinGW下载安装 2.2 MinGW环境配置 3 VScode编译C/C++ 3.1 扩展插件安装 3.2 项目配置 3.2.1 配置 ...
- winds消息大全
本文链接:https://blog.csdn.net/testcs_dn/article/details/42360547 消息,就是指Windows发出的一个通知,告诉应用程序某个事情发生了.例如, ...
- python小功能记录
本博客会不断完善,记录python小功能. 1. 合并两个字典 # in Python 3.5+ >>> x = {'a': 1, 'b': 2} >>> y = ...