
Spring Boot实战之单元测试
Spring Boot实战之单元测试
本文介绍使用Spring测试框架提供的MockMvc对象,对Restful API进行单元测试
Spring测试框架提供MockMvc对象,可以在不需要客户端-服务端请求的情况下进行MVC测试,完全在服务端这边就可以执行Controller的请求,跟启动了测试服务器一样。
测试开始之前需要建立测试环境,setup方法被@Before修饰。通过MockMvcBuilders工具,使用WebApplicationContext对象作为参数,创建一个MockMvc对象。
MockMvc对象提供一组工具函数用来执行assert判断,都是针对web请求的判断。这组工具的使用方式是函数的链式调用,允许程序员将多个测试用例链接在一起,并进行多个判断。在这个例子中我们用到下面的一些工具函数:
perform(get(...))建立web请求。在我们的第三个用例中,通过MockMvcRequestBuilder执行GET请求。
andExpect(...)可以在perform(...)函数调用后多次调用,表示对多个条件的判断,这个函数的参数类型是ResultMatcher接口,在MockMvcResultMatchers这这个类中提供了很多返回ResultMatcher接口的工具函数。这个函数使得可以检测同一个web请求的多个方面,包括HTTP响应状态码(response status),响应的内容类型(content type),会话中存放的值,检验重定向、model或者header的内容等等。这里需要通过第三方库json-path检测JSON格式的响应数据:检查json数据包含正确的元素类型和对应的值,例如jsonPath("$.name").value("中文测试")用于检查在根目录下有一个名为name的节点,并且该节点对应的值是“testuser”。
本文对rest api的开发不做详细描述,如需了解可以参考 Spring Boot实战之Rest接口开发及数据库基本操作
1、修改pom.xml,添加依赖库json-path,用于检测JSON格式的响应数据
-
<dependency>
-
<groupId>com.jayway.jsonpath</groupId>
-
<artifactId>json-path</artifactId>
-
</dependency>
2、添加用户数据模型UserInfo.java
-
package com.xiaofangtech.sunt.bean;
-
-
import javax.persistence.Entity;
-
import javax.persistence.GeneratedValue;
-
import javax.persistence.GenerationType;
-
import javax.persistence.Id;
-
import javax.persistence.Table;
-
import javax.validation.constraints.Size;
-
-
@Entity
-
@Table(name="t_userinfo")
-
public class UserInfo {
-
@Id
-
@GeneratedValue(strategy = GenerationType.AUTO)
-
private Long id;
-
@Size(min=0, max=32)
-
private String name;
-
-
private Integer age;
-
@Size(min=0, max=255)
-
private String address;
-
-
public Long getId() {
-
return id;
-
}
-
-
public void setId(Long id) {
-
this.id = id;
-
}
-
-
public String getName() {
-
return name;
-
}
-
-
public void setName(String name) {
-
this.name = name;
-
}
-
-
public Integer getAge() {
-
return age;
-
}
-
-
public void setAge(Integer age) {
-
this.age = age;
-
}
-
-
public String getAddress() {
-
return address;
-
}
-
-
public void setAddress(String address) {
-
this.address = address;
-
}
-
}
3、添加控制器UserController.java,用于实现对用户的增删改查
-
package com.xiaofangtech.sunt.controller;
-
-
import java.util.List;
-
-
import org.springframework.beans.factory.annotation.Autowired;
-
import org.springframework.data.jpa.repository.Modifying;
-
import org.springframework.web.bind.annotation.RequestBody;
-
import org.springframework.web.bind.annotation.RequestMapping;
-
import org.springframework.web.bind.annotation.RequestMethod;
-
import org.springframework.web.bind.annotation.RestController;
-
-
import com.xiaofangtech.sunt.bean.UserInfo;
-
import com.xiaofangtech.sunt.repository.UserInfoRepository;
-
import com.xiaofangtech.sunt.utils.*;
-
-
@RestController
-
@RequestMapping("user")
-
public class UserController {
-
@Autowired
-
private UserInfoRepository userRepositoy;
-
-
/***
-
* 根据用户id,获取用户信息
-
* @param id
-
* @return
-
*/
-
@RequestMapping(value="getuser", method=RequestMethod.GET)
-
public Object getUser(Long id)
-
{
-
UserInfo userEntity = userRepositoy.findOne(id);
-
ResultMsg resultMsg = new ResultMsg(ResultStatusCode.OK.getErrcode(), ResultStatusCode.OK.getErrmsg(), userEntity);
-
return resultMsg;
-
}
-
-
/***
-
* 获取所有用户列表
-
* @return
-
*/
-
@RequestMapping(value="getalluser", method=RequestMethod.GET)
-
public Object getUserList()
-
{
-
List<UserInfo> userEntities = (List<UserInfo>) userRepositoy.findAll();
-
ResultMsg resultMsg = new ResultMsg(ResultStatusCode.OK.getErrcode(), ResultStatusCode.OK.getErrmsg(), userEntities);
-
return resultMsg;
-
}
-
-
/***
-
* 新增用户信息
-
* @param userEntity
-
* @return
-
*/
-
@Modifying
-
@RequestMapping(value="adduser", method=RequestMethod.POST)
-
public Object addUser(@RequestBody UserInfo userEntity)
-
{
-
userRepositoy.save(userEntity);
-
ResultMsg resultMsg = new ResultMsg(ResultStatusCode.OK.getErrcode(), ResultStatusCode.OK.getErrmsg(), userEntity);
-
return resultMsg;
-
}
-
-
/***
-
* 更新用户信息
-
* @param userEntity
-
* @return
-
*/
-
@Modifying
-
@RequestMapping(value="updateuser", method=RequestMethod.PUT)
-
public Object updateUser(@RequestBody UserInfo userEntity)
-
{
-
UserInfo user = userRepositoy.findOne(userEntity.getId());
-
if (user != null)
-
{
-
user.setName(userEntity.getName());
-
user.setAge(userEntity.getAge());
-
user.setAddress(userEntity.getAddress());
-
userRepositoy.save(user);
-
}
-
ResultMsg resultMsg = new ResultMsg(ResultStatusCode.OK.getErrcode(), ResultStatusCode.OK.getErrmsg(), user);
-
return resultMsg;
-
}
-
-
/***
-
* 删除用户
-
* @param id
-
* @return
-
*/
-
@Modifying
-
@RequestMapping(value="deleteuser", method=RequestMethod.DELETE)
-
public Object deleteUser(Long id)
-
{
-
try
-
{
-
userRepositoy.delete(id);
-
}
-
catch(Exception exception)
-
{
-
-
}
-
ResultMsg resultMsg = new ResultMsg(ResultStatusCode.OK.getErrcode(), ResultStatusCode.OK.getErrmsg(), null);
-
return resultMsg;
-
}
-
}
4、修改测试类,添加对以上接口进行单元测试的测试用例
-
package com.xiaofangtech.sunt;
-
-
import org.junit.Before;
-
import org.junit.Test;
-
import org.junit.runner.RunWith;
-
import org.springframework.beans.factory.annotation.Autowired;
-
import org.springframework.boot.test.SpringApplicationConfiguration;
-
import org.springframework.http.MediaType;
-
import org.springframework.test.context.junit4.SpringJUnit4ClassRunner;
-
import org.springframework.test.context.web.WebAppConfiguration;
-
import org.springframework.test.web.servlet.MockMvc;
-
import org.springframework.test.web.servlet.setup.MockMvcBuilders;
-
import org.springframework.web.context.WebApplicationContext;
-
-
import com.fasterxml.jackson.databind.ObjectMapper;
-
import com.xiaofangtech.sunt.bean.UserInfo;
-
-
import static org.springframework.test.web.servlet.request.MockMvcRequestBuilders.*;
-
import static org.springframework.test.web.servlet.result.MockMvcResultMatchers.*;
-
import static org.hamcrest.Matchers.*;
-
//这是JUnit的注解,通过这个注解让SpringJUnit4ClassRunner这个类提供Spring测试上下文。
-
@RunWith(SpringJUnit4ClassRunner.class)
-
//这是Spring Boot注解,为了进行集成测试,需要通过这个注解加载和配置Spring应用上下
-
@SpringApplicationConfiguration(classes = SpringJUnitTestApplication.class)
-
@WebAppConfiguration
-
public class SpringJUnitTestApplicationTests {
-
-
@Autowired
-
private WebApplicationContext context;
-
-
private MockMvc mockMvc;
-
-
@Before
-
public void setupMockMvc() throws Exception {
-
mockMvc = MockMvcBuilders.webAppContextSetup(context).build();
-
}
-
-
-
/***
-
* 测试添加用户接口
-
* @throws Exception
-
*/
-
@Test
-
public void testAddUser() throws Exception
-
{
-
//构造添加的用户信息
-
UserInfo userInfo = new UserInfo();
-
userInfo.setName("testuser2");
-
userInfo.setAge(29);
-
userInfo.setAddress("北京");
-
ObjectMapper mapper = new ObjectMapper();
-
-
//调用接口,传入添加的用户参数
-
mockMvc.perform(post("/user/adduser")
-
.contentType(MediaType.APPLICATION_JSON_UTF8)
-
.content(mapper.writeValueAsString(userInfo)))
-
//判断返回值,是否达到预期,测试示例中的返回值的结构如下{"errcode":0,"errmsg":"OK","p2pdata":null}
-
.andExpect(status().isOk())
-
.andExpect(content().contentType(MediaType.APPLICATION_JSON_UTF8))
-
//使用jsonPath解析返回值,判断具体的内容
-
.andExpect(jsonPath("$.errcode", is(0)))
-
.andExpect(jsonPath("$.p2pdata", notNullValue()))
-
.andExpect(jsonPath("$.p2pdata.id", not(0)))
-
.andExpect(jsonPath("$.p2pdata.name", is("testuser2")));
-
}
-
-
/***
-
* 测试更新用户信息接口
-
* @throws Exception
-
*/
-
@Test
-
public void testUpdateUser() throws Exception
-
{
-
//构造添加的用户信息,更新id为2的用户的用户信息
-
UserInfo userInfo = new UserInfo();
-
userInfo.setId((long)2);
-
userInfo.setName("testuser");
-
userInfo.setAge(26);
-
userInfo.setAddress("南京");
-
ObjectMapper mapper = new ObjectMapper();
-
-
mockMvc.perform(put("/user/updateuser")
-
.contentType(MediaType.APPLICATION_JSON_UTF8)
-
.content(mapper.writeValueAsString(userInfo)))
-
//判断返回值,是否达到预期,测试示例中的返回值的结构如下
-
//{"errcode":0,"errmsg":"OK","p2pdata":null}
-
.andExpect(status().isOk())
-
.andExpect(content().contentType(MediaType.APPLICATION_JSON_UTF8))
-
.andExpect(jsonPath("$.errcode", is(0)))
-
.andExpect(jsonPath("$.p2pdata", notNullValue()))
-
.andExpect(jsonPath("$.p2pdata.id", is(2)))
-
.andExpect(jsonPath("$.p2pdata.name", is("testuser")))
-
.andExpect(jsonPath("$.p2pdata.age", is(26)))
-
.andExpect(jsonPath("$.p2pdata.address", is("南京")));
-
}
-
-
/***
-
* 测试根据用户id获取用户信息接口
-
* @throws Exception
-
*/
-
@Test
-
public void testGetUser() throws Exception
-
{
-
mockMvc.perform(get("/user/getuser?id=2"))
-
.andExpect(status().isOk())
-
.andExpect(content().contentType(MediaType.APPLICATION_JSON_UTF8))
-
.andExpect(jsonPath("$.errcode", is(0)))
-
.andExpect(jsonPath("$.p2pdata", notNullValue()))
-
.andExpect(jsonPath("$.p2pdata.id", is(2)))
-
.andExpect(jsonPath("$.p2pdata.name", is("testuser")))
-
.andExpect(jsonPath("$.p2pdata.age", is(26)))
-
.andExpect(jsonPath("$.p2pdata.address", is("南京")));
-
}
-
-
/***
-
* 测试获取用户列表接口
-
* @throws Exception
-
*/
-
@Test
-
public void testGetUsers() throws Exception
-
{
-
mockMvc.perform(get("/user/getalluser"))
-
.andExpect(status().isOk())
-
.andExpect(content().contentType(MediaType.APPLICATION_JSON_UTF8))
-
.andExpect(jsonPath("$.errcode", is(0)))
-
.andExpect(jsonPath("$.p2pdata", notNullValue()));
-
}
-
}
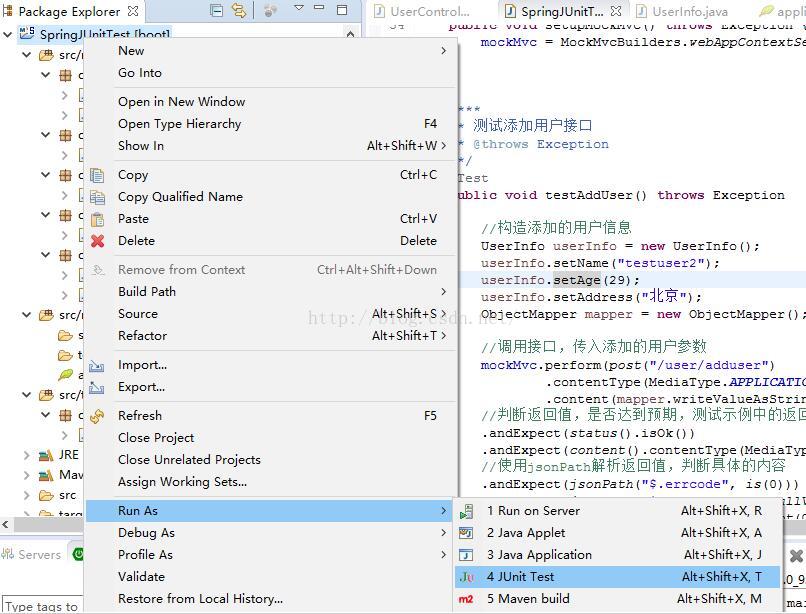
5、运行测试,执行JUnit Test
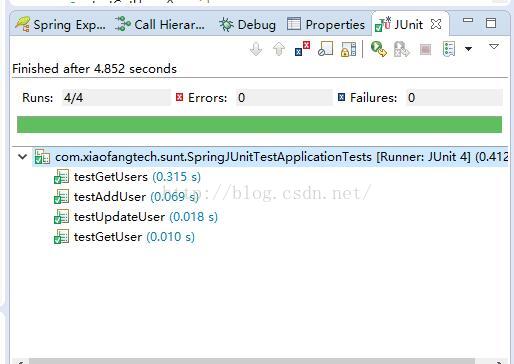
一共执行4个测试用例,全都通过
原文地址:https://blog.csdn.net/sun_t89/article/details/52185952
Spring Boot实战之单元测试的更多相关文章
- Spring Boot实战系列-----------邮件发送
快速导航 添加Maven依赖 配置文件增加邮箱相关配置 Service.Test项目代码构建 五种邮件发送类型讲解 文本邮件 html邮件 附件邮件 html内嵌图片邮件 模板邮件 问题汇总 添加ma ...
- spring boot实战(第十三篇)自动配置原理分析
前言 spring Boot中引入了自动配置,让开发者利用起来更加的简便.快捷,本篇讲利用RabbitMQ的自动配置为例讲分析下Spring Boot中的自动配置原理. 在上一篇末尾讲述了Spring ...
- spring boot实战(第十二篇)整合RabbitMQ
前言 最近几篇文章将围绕消息中间件RabbitMQ展开,对于RabbitMQ基本概念这里不阐述,主要讲解RabbitMQ的基本用法.Java客户端API介绍.spring Boot与RabbitMQ整 ...
- 《spring boot 实战》读书笔记
前言:虽然已经用spring boot开发过一套系统,但是之前都是拿来主义,没有系统的,全面的了解过这套框架.现在通过学习<spring boot实战>这本书,希望温故知新.顺便实现自己的 ...
- Spring Boot 实战与原理分析视频课程
Spring Boot 实战与原理分析视频课程 链接:https://pan.baidu.com/share/init?surl=PeykcoeqZtd1d9lN9V_F-A 提取码: 关注公众号[G ...
- spring boot实战(第一篇)第一个案例
版权声明:本文为博主原创文章,未经博主允许不得转载. 目录(?)[+] spring boot实战(第一篇)第一个案例 前言 写在前面的话 一直想将spring boot相关内容写成一个系列的 ...
- [转] Spring Boot实战之Filter实现使用JWT进行接口认证
[From] http://blog.csdn.net/sun_t89/article/details/51923017 Spring Boot实战之Filter实现使用JWT进行接口认证 jwt(j ...
- 【spring boot】10.spring boot下的单元测试
spring boot下的单元测试,思前想后还是需要单独用一章篇幅来看看. 然后在看了介绍和使用时候,我感觉并不想多去看了. 但是还是给后来人留下参考的路径: 官网说明:https://spring. ...
- 9.Spring Boot实战之配置使用Logback进行日志记录
转自:https://blog.csdn.net/meiliangdeng1990/article/details/54300227 Spring Boot实战之配置使用Logback进行日志记录 在 ...
随机推荐
- SPSS能做Cochran-Armitage趋势检验吗
SPSS能做Cochran-Armitage趋势检验吗 Cochran-Armitage (CA) 趋势检验是一种用于分析1个二分类变量和1个有序分类变量关联性的统计方法,由Cochran和Armti ...
- 【JZOJ4923】【NOIP2017提高组模拟12.17】巧克力狂欢
题目描述 Alice和Bob有一棵树(无根.无向),在第i个点上有ai个巧克力.首先,两人个选择一个起点(不同的),获得点上的巧克力:接着两人轮流操作(Alice先),操作的定义是:在树上找一个两人都 ...
- oracle dbms_repcat_admin能带来什么安全隐患
如果一个用户能执行dbms_repcat_admin包,将获得极大的系统权限. 以下情况可能获得该包的执行权限: 1.在sys下grant execute on dbms_repcat_admin t ...
- 2019-9-2-win10-uwp-右击浮出窗在点击位置
title author date CreateTime categories win10 uwp 右击浮出窗在点击位置 lindexi 2019-09-02 12:57:38 +0800 2018- ...
- 如何实现两个input框的同步更新
class MVVM { constructor(options) { this.$options = options; this.$el = options.el; this.$data = opt ...
- Hadoop应用程序示例2
- linux内核分析笔记----中断和中断处理程序
中断还是中断,我讲了很多次的中断了,今天还是要讲中断,为啥呢?因为在操作系统中,中断是必须要讲的.. 那么什么叫中断呢, 中断还是打断,这样一说你就不明白了.唉,中断还真是有点像打断.我们知道linu ...
- 6、mysql的安装
1.安装mysql-Server,并输入root密码 sudo apt-get install mysql-server 2.安装mysql客户端 sudo apt-get install mysql ...
- Project Euler Problem 24-Lexicographic permutations
全排列的生成,c++的next_permutation是O(n)生成全排列的.具体的O(n)生成全排列的算法,在 布鲁迪 的那本组合数学中有讲解(课本之外,我就看过这一本组合数学),冯速老师翻译的,具 ...
- H3C 分页显示