基于Amoeba读写分离
Amoeba
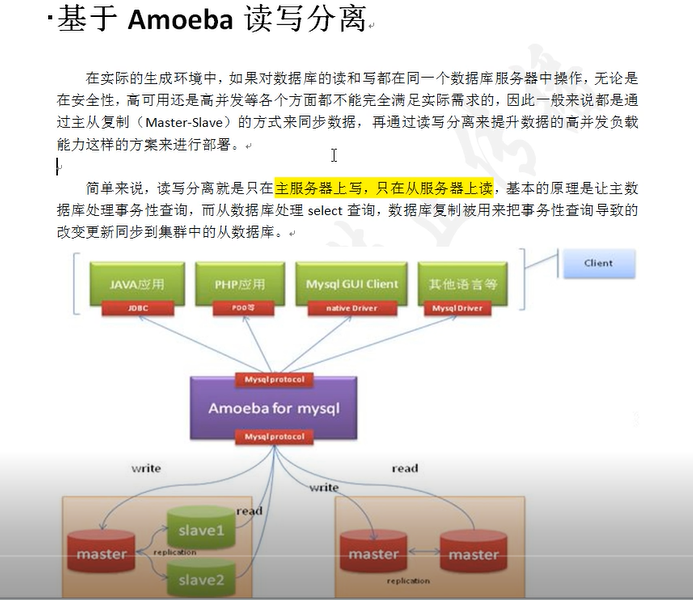
原理:amoeba相当于业务员,处理client的读写请求,并将读写请求分开处理。amoeba和master以及slave都有联系,如果是读的请求,amoeba就从slave读取信息反馈给client;如果是写的请求,amoeba会将相关数据写入master。
实验设备:其中master、slave1、slave2是接上一个MYSQL主从复制操作
master:192.168.200.125
slave1:192.168.200.124
slave2:192.168.200.111
amoeba:192.168.200.130
client:192.168.200.122
Amoeba操作:安装java因为Amoeba是基于jdk1.5版本开发的(版本1.5-1.7不建议使用高版本)
1:导入amoeba以及jdk源码包并修改主配置文件
[root@localhost ~]# rz
z waiting to receive.**B0100000023be50
[root@localhost ~]# ls
amoeba-mysql-binary-2.2.0.tar.gz apache-tomcat-8.5.40.tar.gz jdk-7u65-linux-x64.tar.gz
anaconda-ks.cfg initial-setup-ks.cfg original-ks.cfg
[root@localhost ~]# tar xf jdk-7u65-linux-x64.tar.gz
[root@localhost ~]# mv jdk1.7.0_65/ /usr/local/java
[root@localhost ~]# vim /etc/profile
在末尾添加如下五行

JAVA_HOME=/usr/local/java

CLASSPATH=$CLASSPATH:$JAVA_HOME/lib:$JAVA_HOME/jre/lib

PATH=$PATH:$JAVA_HOME/lib:$JAVA_HOME/jre/bin:$HOME/bin

AMOEBA_HOME=/usr/local/amoeba

PATH=$PATH:$AMOEBA_HOME/bin
[root@localhost ~]# source /etc/profile
[root@localhost ~]# java -version
2:删除高版本java程序文件
[root@localhost ~]# rm -rf /usr/bin/java
[root@localhost ~]# source /etc/profile
[root@localhost ~]# java -version
3:安装并配置Amoeba
[root@localhost ~]# mkdir /usr/local/amoeba
[root@localhost ~]# tar xf amoeba-mysql-binary-2.2.0.tar.gz -C /usr/local/amoeba/
[root@localhost ~]# chmod -R 775 /usr/local/amoeba/
4:配置Amoeba读写分离。两个slave读负载均衡
编辑amoeba.xml配置文件
[root@localhost ~]# cd /usr/local/amoeba/conf/
[root@localhost conf]# ls
access_list.conf amoeba.xml dbServers.xml functionMap.xml log4j.xml ruleFunctionMap.xml
amoeba.dtd dbserver.dtd function.dtd log4j.dtd rule.dtd rule.xml
[root@localhost conf]# cp amoeba.xml amoeba.xml.bak
[root@localhost conf]# vim amoeba.xml
35行左右修改用户名和登入密码
# 提供客户端连接amoeba时需要使用这里设定的账号 (这里的账号密码和amoeba连接后端数据库服务器的密码无关)

<property name="user">amoeba</property>

<property name="password"></property>

115行左右修改
<property name="defaultPool">master</property> #默认找master
<property name="writePool">master</property> #写的值交给master
<property name="readPool">slaves</property> #读交给slaves(slaves包括:slave1、slave2)
[root@localhost conf]# cp dbServers.xml dbServers.xml.bak
[root@localhost conf]# vim dbServers.xml
23行左右修改:

<property name="port"></property>

<!-- mysql schema -->

<property name="schema">test</property>

<!-- mysql user -->

<property name="user">test</property>                  #在master、slave1、slave2三台服务器中配置Amoeba访问授权的用户:

<!--  mysql password-->

<property name="password">.com</property>           #授权的密码

45行左右修改:
<dbServer name="master" parent="abstractServer"> #dbServer指定服务器为master
<factoryConfig>
<!-- mysql ip -->
<property name="ipAddress">192.168.200.125</property> #dbServer指定服务器为ip
</factoryConfig>
</dbServer>
<dbServer name="slave1" parent="abstractServer"> #dbServer指定服务器为slave1
<factoryConfig>
<!-- mysql ip -->
<property name="ipAddress">192.168.200.124</property> #dbServer指定服务器为ip
</factoryConfig>
</dbServer>
<dbServer name="slave2" parent="abstractServer"> #dbServer指定服务器为slave2
<factoryConfig>
<!-- mysql ip -->
<property name="ipAddress">192.168.200.111</property> #dbServer指定服务器为ip
</factoryConfig>
</dbServer>
66行左右修改:
<dbServer name="slaves" virtual="true"> #声明组为slaves
<poolConfig class="com.meidusa.amoeba.server.MultipleServerPool">
<!-- Load balancing strategy: 1=ROUNDROBIN , 2=WEIGHTBASED , 3=HA-->
<property name="loadbalance">1</property> #声明为1表示轮询
<!-- Separated by commas,such as: server1,server2,server1 -->
<property name="poolNames">slave1,slave2</property> #声明组的成员
[root@localhost conf]# vim /usr/local/amoeba/bin/amoeba
58行修改如下:

   原:DEFAULT_OPTS="-server -Xms256m -Xmx256m -Xss128k"
修改后:DEFAULT_OPTS="-server -Xms256m -Xmx256m -Xss256k"
[root@localhost ~]# vim /etc/my.cnf
max_allowed_packet = 16M
5:配置无误后,启动Amoeba软件,默认端口为TCP协议8066
[root@localhost conf]# /usr/local/amoeba/bin/amoeba start &
[root@localhost conf]# netstat -anpt | grep 8066
tcp6 0 0 :::8066 :::* LISTEN 18841/java
6:关闭防火墙
[root@localhost conf]# systemctl stop firewalld
[root@localhost conf]# iptables -F
[root@localhost conf]# setenforce 0
master主机服务器测试:
创建一个库以及表,会自动同步到各个从服务器上,然后关掉各个服务器上的slave功能,再分别插入语句测试
MariaDB [(none)]> create database db_test;
Query OK, 1 row affected (0.00 sec)
MariaDB [(none)]> show databases;
+--------------------+
| Database |
+--------------------+
| information_schema |
| cmx |
| db_test |
| liuxiang |
| mysql |
| performance_schema |
+--------------------+
6 rows in set (0.00 sec)
MariaDB [(none)]> grant all on *.* to 'test'@'192.168.200.%' identified by '123.com'; #配置Amoeba的访问授权
Query OK, 0 rows affected (0.15 sec)
MariaDB [(none)]> flush privileges;
Query OK, 0 rows affected (0.01 sec)
MariaDB [(none)]> use db_test;
Database changed
MariaDB [db_test]> create table student(id int(10),name varchar(10),address varchar(20));
Query OK, 0 rows affected (0.01 sec)
MariaDB [db_test]> insert into student(id,name,address) values('1','crushlinux','this_is_master');
Query OK, 1 row affected (0.01 sec)
master测试来自client的数据:
MariaDB [db_test]> select * from student;
+------+------------+----------------+
| id | name | address |
+------+------------+----------------+
| 1 | crushlinux | this_is_master |
| 4 | crushlinux | this_is_client |
+------+------------+----------------+
2 rows in set (0.00 sec)
两台slave从服务器测试操作一致:
允许200网段内的账号为test密码为123.com的主机连接数据库
MariaDB [(none)]> grant all on *.* to 'test'@'192.168.200.%' identified by '123.com'; #slave1、slave2都配置这个Amoeba的访问授权
Query OK, 0 rows affected (0.15 sec)
MariaDB [(none)]> flush privileges;
Query OK, 0 rows affected (0.01 sec)
MariaDB [(none)]> show databases;
+--------------------+
| Database |
+--------------------+
| information_schema |
| client |
| cmx |
| db_test |
| liuxiang |
| mydb |
| mysql |
| performance_schema |
| shuifei |
| var |
| yg |
+--------------------+
11 rows in set (0.13 sec)
MariaDB [(none)l]> use db_test;
Reading table information for completion of table and column names
You can turn off this feature to get a quicker startup with -A
Database changed
MariaDB [db_test]> select * from student;
+------+------------+----------------+
| id | name | address |
+------+------------+----------------+
| 1 | crushlinux | this_is_master |
| 2 | crushlinux | this_is_slave1 |
+------+------------+----------------+
2 rows in set (0.00 sec)
MariaDB [(none)]> stop slave; #主服务器插入完数据后再执行stop slave
Query OK, 0 rows affected (0.01 sec)
MariaDB [db_test]> insert into student values('2','crushlinux','this_is_slave1'); #slave2改为('3,'crushlinux','this_is_slave2');
Query OK, 1 row affected (0.00 sec)
MariaDB [(none)]> start slave;
Query OK, 0 rows affected (0.00 sec)
测试来自client的数据:
MariaDB [(none)]> select * from db_test.student; #slave1的测试
+------+------------+----------------+
| id | name | address |
+------+------------+----------------+
| 1 | crushlinux | this_is_master |
| 2 | crushlinux | this_is_slave1 |
| 4 | crushlinux | this_is_client |
+------+------------+----------------+
3 rows in set (0.00 sec)
MariaDB [(none)]> select * from db_test.student; #slave2的测试
+------+------------+----------------+
| id | name | address |
+------+------------+----------------+
| 1 | crushlinux | this_is_master |
| 3 | crushlinux | this_is_slave2 |
| 4 | crushlinux | this_is_client |
+------+------------+----------------+
3 rows in set (0.00 sec)
Client机配置:
安装mariadb做访问amoeba机的测试
[root@localhost ~]# yum install mariadb mariadb-server -y
远程登陆mysql客户端通过指定amoeba配置文件中指定的用户名、密码、和端口以及amoeba服务器ip地址链接mysql数据库
[root@localhost ~]# mysql -u amoeba -p123456 -h 192.168.200.130 -P 8066
Welcome to the MariaDB monitor. Commands end with ; or \g.
Your MySQL connection id is 411716403
Server version: 5.1.45-mysql-amoeba-proxy-2.2.0
Copyright (c) 2000, 2018, Oracle, MariaDB Corporation Ab and others.
Type 'help;' or '\h' for help. Type '\c' to clear the current input statement.
测试读操作:
MySQL [db_test]> select * from student;
ERROR 2006 (HY000): MySQL server has gone away
No connection. Trying to reconnect...
Connection id: 1696547550
Current database: db_test
+------+------------+----------------+
| id | name | address |
+------+------------+----------------+
| 1 | crushlinux | this_is_master |
| 2 | crushlinux | this_is_slave1 |
+------+------------+----------------+
2 rows in set (0.20 sec)
MySQL [db_test]> select * from student;
+------+------------+----------------+
| id | name | address |
+------+------------+----------------+
| 1 | crushlinux | this_is_master |
| 3 | crushlinux | this_is_slave2 |
+------+------------+----------------+
2 rows in set (0.01 sec)
MySQL [db_test]> select * from student;
+------+------------+----------------+
| id | name | address |
+------+------------+----------------+
| 1 | crushlinux | this_is_master |
| 2 | crushlinux | this_is_slave1 |
+------+------------+----------------+
2 rows in set (0.01 sec)
MySQL [db_test]> select * from student;
+------+------------+----------------+
| id | name | address |
+------+------------+----------------+
| 1 | crushlinux | this_is_master |
| 3 | crushlinux | this_is_slave2 |
+------+------------+----------------+
2 rows in set (0.01 sec)
测试写操作:
MySQL [db_test]> insert into student values('4','crushlinux','this_is_client');
Query OK, 1 row affected (0.01 sec)
MySQL [db_test]> select * from student;
+------+------------+----------------+
| id | name | address |
+------+------------+----------------+
| 1 | crushlinux | this_is_master |
| 2 | crushlinux | this_is_slave1 |
| 4 | crushlinux | this_is_client |
+------+------------+----------------+
3 rows in set (0.01 sec)
MySQL [db_test]> select * from student;
+------+------------+----------------+
| id | name | address |
+------+------------+----------------+
| 1 | crushlinux | this_is_master |
| 3 | crushlinux | this_is_slave2 |
| 4 | crushlinux | this_is_client |
+------+------------+----------------+
3 rows in set (0.01 sec)
测试完成可读可写!
基于Amoeba读写分离的更多相关文章
- amoeba读写分离
第一单元 高性能mysql读写分离的实现 5.1 mysql读写分离 5.1.1 mysql读写分离概述 5.1.2 mysql读写分离原理 5.2 mysql读写分离配置 ...
- 001.Amoeba读写分离部署
一 Amoeba简介 Amoeba(变形虫)项目,该开源框架于2008年 开始发布一款 Amoeba forMysql软件.这个软件致力于MySQL的分布式数据库前端代理层,它主要在应用层访问MySQ ...
- Amoeba读写分离(MySQL)
实验操作环境: centos服务器 三台机器 role: 192.168.189.129 master-主 192.168.189.130 master-从 192.168.189.131 ...
- mysql主从之基于atlas读写分离
一 mysql读写分离的概念 写在主库,主库一般只有一个,读可以分配在多个从库上,如果写压力不大的话,也能把读分配到主库上. 实现是基于atlas实现的,atlas是数据库的中间件,程序只需要连接at ...
- 基于Spring读写分离
为什么是基于Spring的呢,因为实现方案基于Spring的事务以及AbstractRoutingDataSource(spring中的一个基础类,可以在其中放多个数据源,然后根据一些规则来确定当前需 ...
- mysql基于Altas读写分离并实现高可用
实验环境准备: master:192.168.200.111 slave1:192.168.200.112 slave2:192.168.200.113 Altas:192.168.200.114 c ...
- Mysql 基于 Amoeba 的 读写分离
首先说明一下amoeba 跟 MySQL proxy在读写分离的使用上面的区别: 在MySQL proxy 6.0版本 上面如果想要读写分离并且 读集群.写集群 机器比较多情况下,用mysql pro ...
- Linux下Mysql主从复制(Master-Slave)与读写分离(Amoeba)实践
一.为什么要做Mysql的主从复制(读写分离)?通俗来讲,如果对数据库的读和写都在同一个数据库服务器中操作,业务系统性能会降低.为了提升业务系统性能,优化用户体验,可以通过做主从复制(读写分离)来减轻 ...
- Mysql读写分离方案-Amoeba环境部署记录
Mysql的读写分离可以使用MySQL Proxy,也可以使用Amoeba.Amoeba(变形虫)项目是一个类似MySQL Proxy的分布式数据库中间代理层软件,是由陈思儒开发的一个开源的java项 ...
随机推荐
- 基于.NET Core winform的录音、字幕软件HTWCore的技术总结
HTWCore是一款基于.NET Core的winform客户端程序,可以用来处理各种会议,记录,讲座,讲课等等来源的音视频,运用语音识别.视频内容提取等技术整理成word文档.项目中运用了以下技术: ...
- 给html元素添加自定义属性,并且用jquery进行筛选
例如有多个div,想要实现类似radio的效果. <div name="teacher" selected="selected">tch1</ ...
- Android开发实战——记账本(6)
开发日志——(6) 今天将app签名打包,并部署在了真机上.真机上的截图: 运行成功:
- 网络知识杂谈 - https - 原理简述
概述 简单描述 https 尽量介绍它的原理 实际的机制, 可能会更加复杂一些... 背景 这玩意, 困扰我好多年了 今天开始, 想做个了断 之前工作也接触过, 但从我的角度来说, 认识很浅 会配置 ...
- Go_CSP并发模型
go语言的最大两个亮点,一个是goroutine,一个就是chan了.二者合体的典型应用CSP,基本就是大家认可的并行开发神器,简化了并行程序的开发难度,我们来看一下CSP. 11.1.CSP是什么 ...
- ansible笔记(8):初识ansible playbook
回顾总结:我们来想象一个工作场景,看看怎样把之前的知识点应用到这个工作场景中.假设,我们想要在192.168.10.2主机上安装nginx并启动,我们可以在ansible控制主机中执行如下3条命令. ...
- unittest学习5-断言
unittest提供了以下断言方式: 方法 检查 新进 assertEqual(a, b) a == b assertNotEqual(a, b) a != b assertTrue(x) b ...
- AC3 exponent coding
1.overview AC-3编码的audio信号中的频率系数由浮点型数据表示,并将其归一化到0~1之间. transform coefficient由exponent和mantissa组成. 设tr ...
- ASP.NET Core Web API 控制器与方法返回输出
DATA ACCESS LAYER 在一些不同的示例教程中,我们可能看到 DAL 的实现在主项目中,并且每个控制器中都有实例.我们不建议这么做. 当我们编写 DAL 时,我们应该将其作为一个独立的服务 ...
- 1.1 Eclipse下载安装(+java环境)
可直接上官网下载:http://www.eclipse.org/downloads/ 直接下载地址:http://www.eclipse.org/downloads/download.php?file ...