lvs-nat 模式-piranha
系统: redhat 6.5 mini
|
机器名 |
ip |
vip |
gw |
|
lvs01(主lvs) |
192.168.10.10(外网) 192.168.20.10(内网) |
192.168.10.254 |
|
|
lvs02(备lvs) |
192.168.20.10(外网) 192.168.20.20(内网) |
192.168.10.254 |
|
|
rs01 (web) |
192.168.20.100 |
192.168.20.254 |
192.168.20.254 |
|
rs02 (web) |
192.168.20.200 |
192.168.20.254 |
192.168.20.254 |
1、 在各个机器上配置ip地址,机器名,关闭selinux,同步时间
[root@lvs01 ~]# hostname
lvs01
[root@lvs01 ~]# getenforce
Disabled
[root@lvs02 ~]# hostname
lvs02
[root@lvs02 ~]# getenforce
Disabled
[root@rs01 ~]# hostname
rs01
[root@rs01 ~]# getenforce
Disabled
[root@rs02 ~]# hostname
rs02
[root@rs02 ~]# getenforce
Disabled
[root@lvs01 yum.repos.d]# cat /etc/hosts
192.168.20.10 lvs01
192.168.20.20 lvs02
192.168.20.100 rs01
192.168.20.200 rs02
[root@lvs01 yum.repos.d]# ntpdate 0.rhel.pool.ntp.org
[root@lvs02 yum.repos.d]# ntpdate 0.rhel.pool.ntp.org
[root@rs01 yum.repos.d]# ntpdate 0.rhel.pool.ntp.org
[root@rs02 yum.repos.d]# ntpdate 0.rhel.pool.ntp.org
2、 在各个机器关闭防火墙,配置yum源
[root@lvs01 yum.repos.d]# service iptables stop
[root@lvs01 yum.repos.d]# chkconfig iptables off
[root@lvs02 ~]# service iptables stop
[root@lvs02 ~]# chkconfig iptables off
[root@rs01 ~]# service iptables stop
[root@rs01 ~]# chkconfig iptables off
[root@rs02 ~]# service iptables stop
[root@rs02 ~]# chkconfig iptables off
[root@lvs01 yum.repos.d]# service iptables stop
[root@lvs01 yum.repos.d]# chkconfig iptables off
[root@lvs01 yum.repos.d]# cat rhel-source.repo
[base]
name=base
baseurl=file:///mnt
enabled=1
gpgcheck=0
[LB]
name=LB
baseurl=file:///mnt/LoadBalancer
enabled=1
gpgcheck=0
[HA]
name=HA
baseurl=file:///mnt/HighAvailability
enabled=1
gpgcheck=0
[RS]
name=RS
baseurl=file:///mnt/ResilientStorage
enabled=1
gpgcheck=0
[root@lvs01 yum.repos.d]# scp rhel-source.repo lvs02:/etc/yum.repos.d/rhel-source.repo
3、 在rs01.rs02上部署web服务
[root@rs01 ~]# yum install -y httpd
[root@rs01 ~]# echo "rs01">/var/www/html/index.html
[root@rs01 ~]# service httpd restart
[root@rs01 ~]# chkconfig httpd on
[root@rs02 ~]# yum install -y httpd
[root@rs02 ~]# echo "rs02">/var/www/html/index.html
[root@rs02 ~]# service httpd restart
[root@rs02 ~]# chkconfig httpd on
4、 在lvs01,lvs02安装LB,开启路由转发功能,在lvs01上配置lvs集群登录用户和密码
[root@lvs01 yum.repos.d]# yum groupinstall "Load Balancer"
[root@lvs02 yum.repos.d]# yum groupinstall "Load Balancer"
[root@lvs01 yum.repos.d]# vi /etc/sysctl.conf
net.ipv4.ip_forward = 1
[root@lvs01 yum.repos.d]# sysctl –p
[root@lvs02 yum.repos.d]# vi /etc/sysctl.conf
net.ipv4.ip_forward = 1
[root@lvs02 yum.repos.d]# sysctl –p
[root@lvs01 yum.repos.d]# piranha-passwd
New Password:
Verify:
Adding password for user piranha
[root@lvs01 yum.repos.d]# /etc/init.d/piranha-gui start
[root@lvs01 yum.repos.d]# chkconfig piranha-gui on
5、 通过浏览器来配置lvs集群
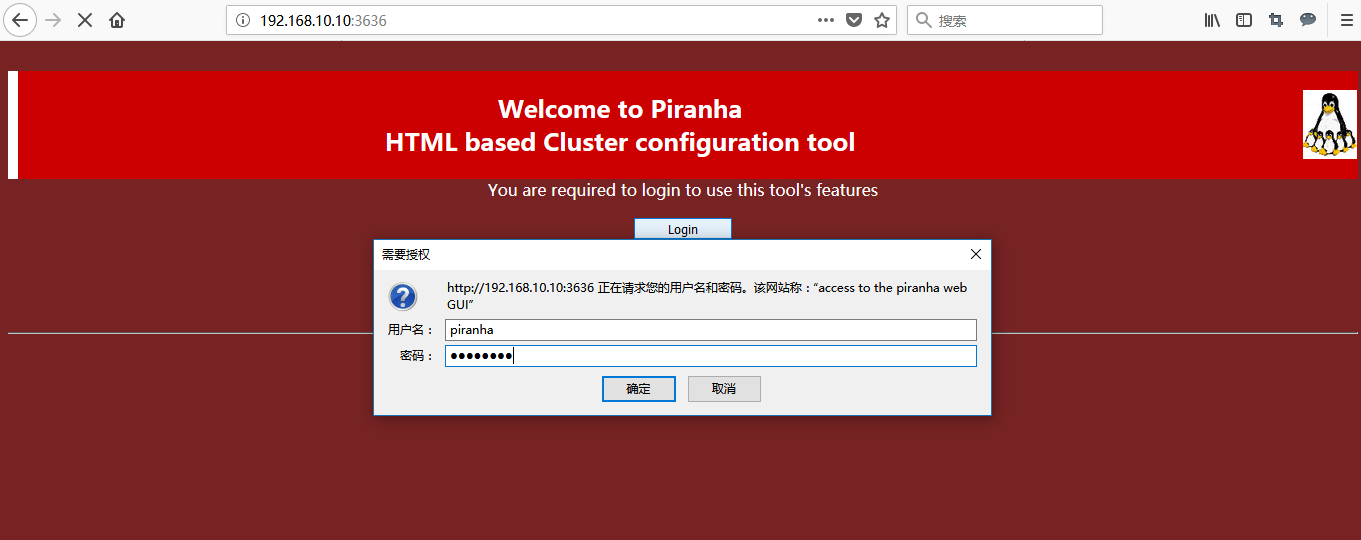
5.1 在浏览器输入http://192.168.10.10:3636,点击login,输入用户名和密码
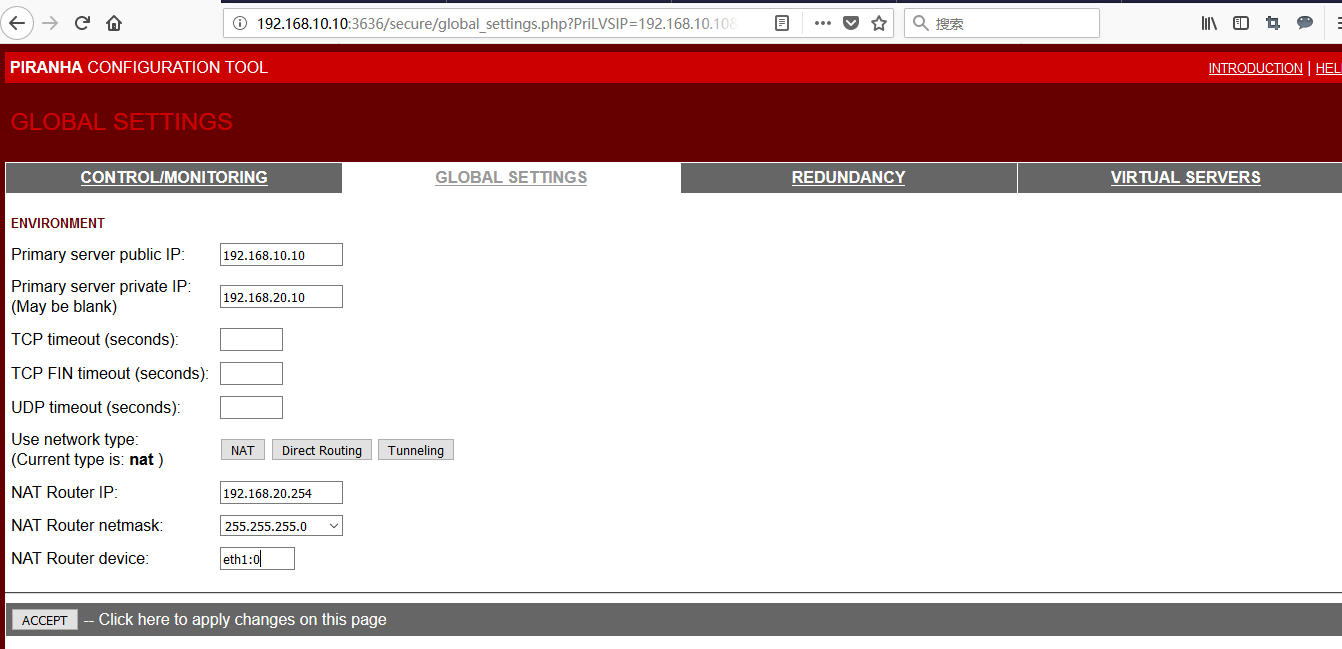
5.2 配置lvs01,选择nat 模式,最后点击accept
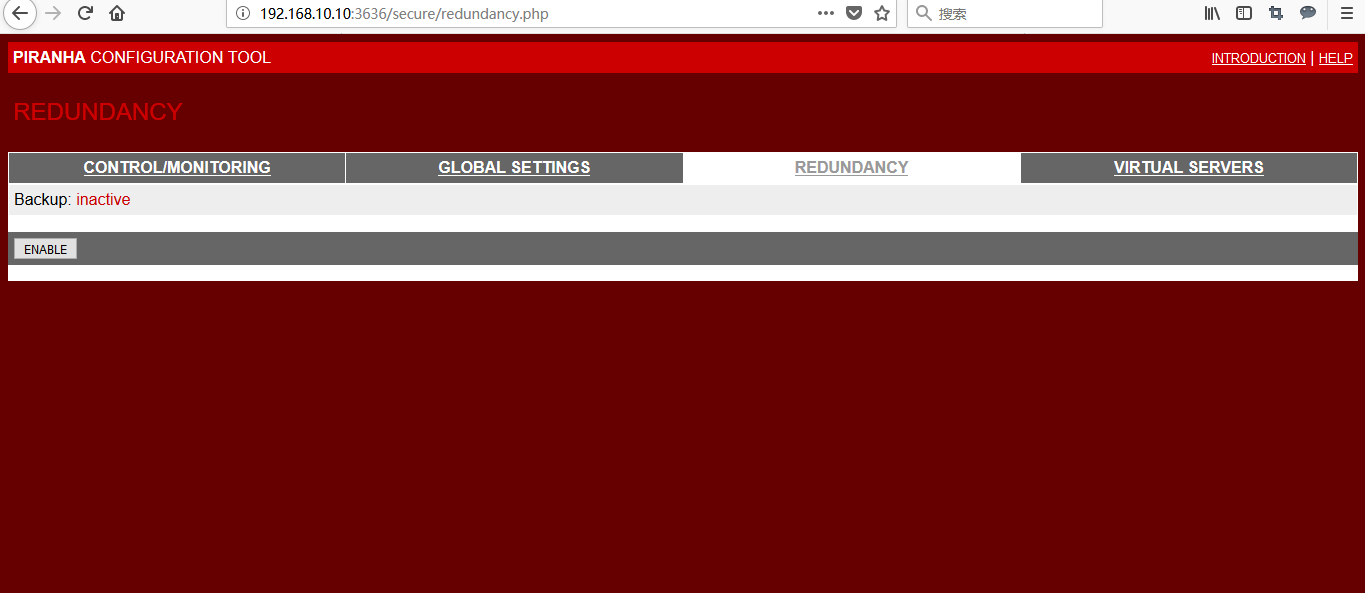
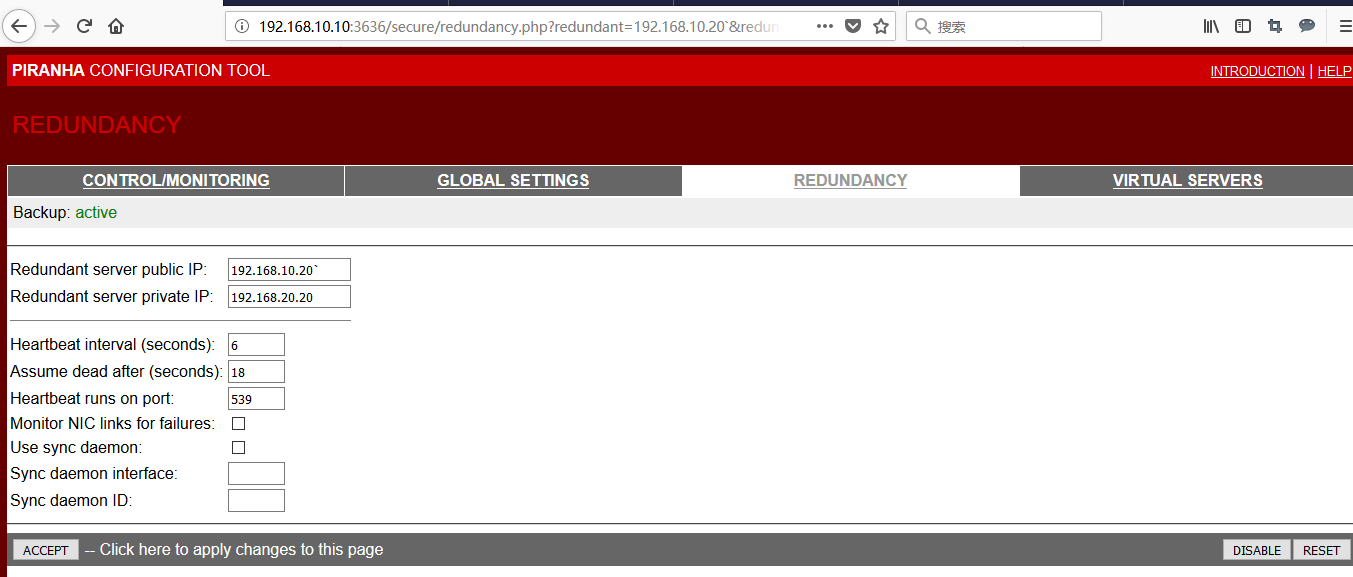
5.3 配置lvs02的ip,先点击ENABLE,配置ip 后,最后点击accept确定
5.4 配置对外的服务,点击add->edit->accept
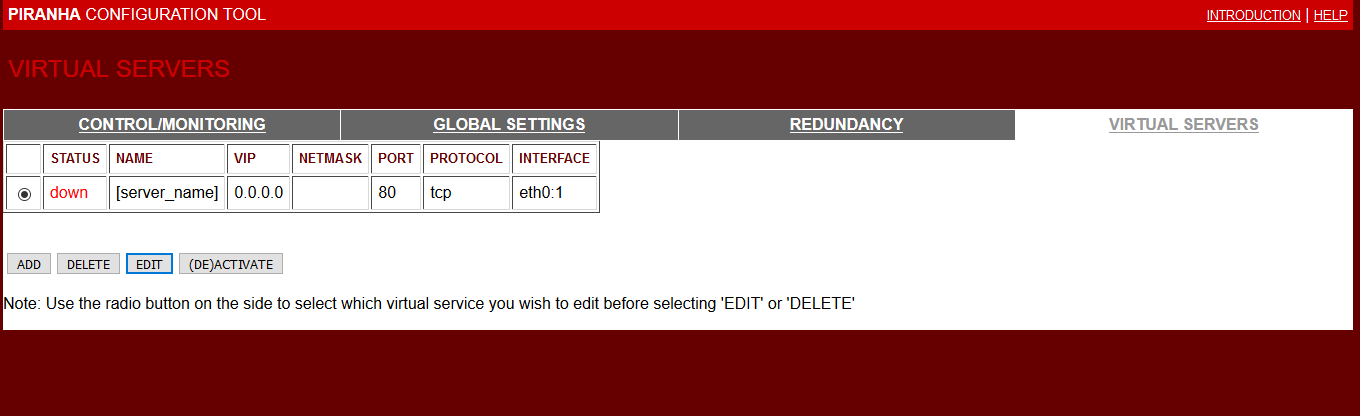
5.5 配置真实服务器(rs01和rs02)步骤add->edit->accept->active


5.6 up对外服务的vip

5.7 将在lvs01 上的配置文件复制到lvs02 上,
[root@lvs01 ~]# scp /etc/sysconfig/ha/lvs.cf lvs02:/etc/sysconfig/ha/lvs.cf
root@lvs02's password:
lvs.cf 100% 865 0.8KB/s 00:00
[root@lvs01 ~]# cat /etc/sysconfig/ha/lvs.cf
serial_no = 17
primary = 192.168.10.10
primary_private = 192.168.20.10
service = lvs
backup_active = 1
backup = 192.168.10.20
backup_private = 192.168.20.20
heartbeat = 1
heartbeat_port = 539
keepalive = 6
deadtime = 18
network = nat
nat_router = 192.168.20.254 eth1:0
nat_nmask = 255.255.255.0
debug_level = NONE
monitor_links = 0
syncdaemon = 0
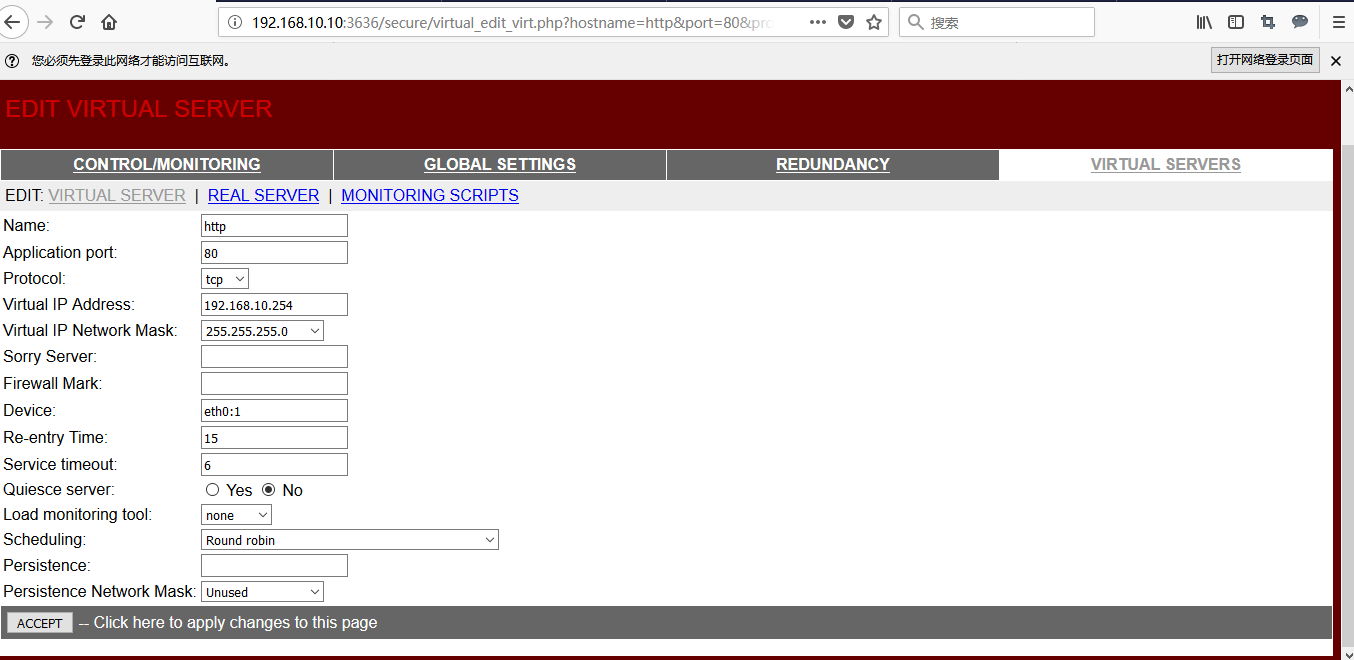
virtual http {
active = 1
address = 192.168.10.254 eth0:1
vip_nmask = 255.255.255.0
port = 80
send = "GET / HTTP/1.0\r\n\r\n"
expect = "HTTP"
use_regex = 0
load_monitor = none
scheduler = rr
protocol = tcp
timeout = 6
reentry = 15
quiesce_server = 0
server rs01 {
address = 192.168.20.100
active = 1
weight = 1
}
server rs02 {
address = 192.168.20.200
active = 1
weight = 2
}
}
5.8 在lvs01,lvs02 上启动负载均衡的监控进程
[root@lvs01 ~]# /etc/init.d/pulse restart
Shutting down pulse: [失败]
Starting pulse: [确定]
[root@lvs01 ~]# chkconfig pulse on
[root@lvs02 ~]# /etc/init.d/pulse restart
Shutting down pulse: [失败]
Starting pulse: [确定]
[root@lvs02 ~]# chkconfig pulse on
5.9 查看lvs的正常运行状态

6、 测试
6.1 访问vip,web的内容是后台两台真实服务器网页内容,轮替提供服务
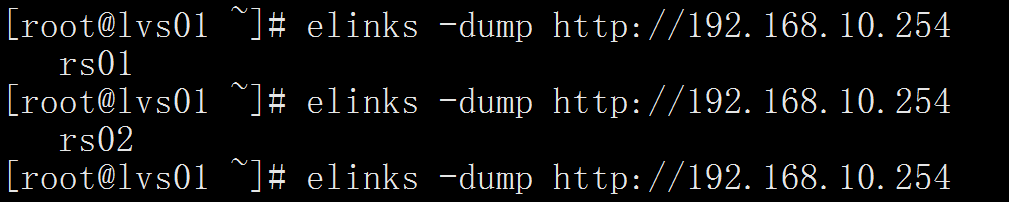
6.2 lvs01失效的情况下服务依然可用(我直接把lvs01关机了)
[root@lvs02 ~]# elinks -dump http://192.168.10.254
rs01
lvs-nat 模式-piranha的更多相关文章
- Vmware虚拟机配置LVS/NAT模式遇到的坑。
这两天在研究LVS的负载均衡,先从最简单的LVS/NAT模式开始入手. 最后配置完之后能够相互之间Ping通,并且能够直接访问real服务器提供的web服务,而且防火墙也已经关闭了. 但是通过访问LV ...
- 负载均衡集群相关、LVS介绍、LVS调度算法、LVS NAT模式搭建
1.负载均衡集群相关 2.LVS的三种模式:NAT.DR .IP tunnel 3. LVS的调度算法(共有8种) 4.LVS NAT模式搭建准备条件: 在分发服务器上安装:yum install ...
- 负载均衡集群介绍、LVS介绍、LVS调度算法、LVS NAT模式搭建
7月4日任务 18.6 负载均衡集群介绍18.7 LVS介绍18.8 LVS调度算法18.9/18.10 LVS NAT模式搭建 扩展lvs 三种模式详解 http://www.it165.net/a ...
- Linux centosVMware 负载均衡集群介绍、LVS介绍、LVS调度算法、LVS NAT模式搭建
一.负载均衡集群介绍 主流开源软件LVS.keepalived.haproxy.nginx等 其中LVS属于4层(网络OSI 7层模型),nginx属于7层,haproxy既可以认为是4层,也可以当做 ...
- 负载均衡集群介绍 LVS介绍 LVS调度算法 LVS NAT模式搭建
LVS BAT模式搭建 更改主机名: hostnamectl set-hostname centos7-three bash 准备工作 • 三台机器 • 分发器,也叫调度器(简写为dir) • 内网: ...
- [LVS] 用keepalived实现LVS NAT模式高可用性
默认前提是LVS已经可以正常工作了. 因为是NAT模式,RS的路由要指向LVS的接口地址,所以需要一个统一的后台浮动地址,使得RS都指向这个浮动IP.否则在切换时,会导致RS回包到DOWN掉的LVS上 ...
- LVS NAT模式实践
client:192.168.4.10/24 proxy:192.168.2.5/24 192.168.4.5/24 web1:192.168.4.100/24 web2:192.168.4.200/ ...
- 负载均衡 Lvs nat 模式笔记
nat技术(网络地址转换) 缺点就是进入和返回都通过调度器的服务器,未来可能会成为瓶颈 实验:nat 模式 先在调度器安装ipvsadm 后再添加网卡,后面就连不上网了(yum -y install ...
- LVS NAT模式
LVS-NAT 三台虚拟机都是centos 6.5 关闭防火墙和selinux 角色 IP地址 备注 LVS负载调度器 eth0:192.168.119.128(内网) eth1:192.168.94 ...
- CentOS 6.3下部署LVS(NAT模式)+keepalived实现高性能高可用负载均衡
一.简介 VS/NAT原理图: 二.系统环境 实验拓扑: 系统平台:CentOS 6.3 Kernel:2.6.32-279.el6.i686 LVS版本:ipvsadm-1.26 keepalive ...
随机推荐
- MySQL学习记录(不断更新)
MySQL设置数据集为UTF8仍无法输入中文的解决办法: 我们的机器默认为gbk,因此可在进入数据库之前,使用以下这条语句将默认编码改为gbk,注意没有单引号,也不要用分号. mysql -uroot ...
- python中的变量,运算符
范例: name = 'Crossin' myVar = 123 price = 5.99 visible = True “=”的作用是把右边的值赋予给左边的变量. python中有四种较为常见的数据 ...
- LeetCode - 728. Self Dividing Numbers
A self-dividing number is a number that is divisible by every digit it contains. For example, 128 is ...
- ★Linux桌面系统技巧(作为客户端)
[安装chrome浏览器]* 下载(已下载完成):32位:wget https://dl.google.com/linux/direct/google-chrome-stable_current_i3 ...
- nginx+tomcat单个域名及多个域名配置
同步首发:http://www.yuanrengu.com/index.php/20171130.html 项目开发接近尾声,开始着手在生产环境部署项目,开发阶段部署项目都没用nginx.项目是采用S ...
- Tomcat8+Spring-Security 启用安全通道(https)的一步步实现
近日学习Spring Security框架,学习到利用安全框架完成系统的安全通道控制时,来来回回遇到了不少问题.spring教程上写的略简单,对于我等小白来讲不足以支撑看书编码,好在网络上有资料可以查 ...
- MYSQL索引的类型和索引的方式
索引的类型: normal:表示普通索引 unique:表示唯一的,不允许重复的索引,如果该字段信息保证不会重复例如身份证号用作索引时,可设置为unique full textl: 表示 全文搜索的索 ...
- 剑指offer第二天
18.二叉树的镜像 操作给定的二叉树,将其变换为源二叉树的镜像. /** public class TreeNode { int val = 0; TreeNode left = null; Tree ...
- window7 x64 vs2015 如何编译 libqr 二维码生成库?
1.下载libqr库 下载地址:https://github.com/rsky/qrcode 注:因 libqr 依赖 zlib 库,所以首先编译 zlib库 zlib 库编译指南:http://ww ...
- spring boot admin + spring boot actuator + erueka 微服务监控
关于spring boot actuator简单使用,请看 简单的spring boot actuator 使用,点击这里 spring boot admin 最新的正式版本是1.5.3 与 spri ...