使用Boostrap框架写一个登录\注册界面
Bootstrap是一个Web前端开发框架,使用它提供的css、js文件可以简单、方便地美化HTML控件。一般情况下,对控件的美化需要我们自己编写css代码,并通过标签选择器、类选择器、ID选择器为指定的控件使用。Bootstrap框架为各种控件定义好了很多的类(class),在引入相关文件后,为控件添加相应的类,控件就变成了这个类所规定的样子了。Bootstrap现在有两个版本,Bootstrap 3和Bootstrap 4。关于Bootstrap的更多信息,请查看相关文档:http://www.bootcss.com/,http://www.runoob.com/bootstrap4/bootstrap4-install.html。
Bootstrap小例子
新建一个HTML页面,引入在线的Bootstrap CDN。
 <html>

 <head>

     <meta charset="utf-8">

     <title>Bootstrap示例</title>

     <!-- 新 Bootstrap4 核心 CSS 文件 -->

     <link rel="stylesheet" href="https://cdn.bootcss.com/bootstrap/4.1.0/css/bootstrap.min.css">

     <!-- jQuery文件。务必在bootstrap.min.js 之前引入 -->

     <script src="https://cdn.bootcss.com/jquery/3.2.1/jquery.min.js"></script>

     <!-- popper.min.js 用于弹窗、提示、下拉菜单 -->

     <script src="https://cdn.bootcss.com/popper.js/1.12.5/umd/popper.min.js"></script>

     <!-- 最新的 Bootstrap4 核心 JavaScript 文件 -->

     <script src="https://cdn.bootcss.com/bootstrap/4.1.0/js/bootstrap.min.js"></script>

 </head>

 <body>

 </body>

 </html>
在<body>标签中添加一个Button。
 <body>

     <button>一个button</button>

 </body>
运行后结果为: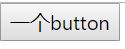
为这个button添加所属的类(class)。
 <body>

     <button class='btn'>一个button</button>

 </body>
结果为: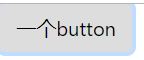
按钮的样子发生了变化,点击这个按钮还会出现浅蓝色的边框。为按钮进行其他类的添加。
 <body>

     <button class='btn btn-primary'>一个button</button>

 </body>
结果为:
除了btn-primary,还有btn-secondary,btn-success,btn-info,btn-warning,btn-danger,btn-dark,btn-light,btn-link。每一种按钮颜色不同,点击后边框的颜色也不同。
 <body>

     <button class='btn'>基本按钮</button>

     <button class='btn btn-primary'>主要按钮</button>

     <button class='btn btn-secondary'>次要按钮</button>

     <button class='btn btn-success'>成功</button>

     <button class='btn btn-info'>信息</button>

     <button class='btn btn-warning'>警告</button>

     <button class='btn btn-danger'>危险</button>

     <button class='btn btn-dark'>黑色</button>

     <button class='btn btn-light'>浅色</button>

     <button class='btn btn-link'>链接</button>

 </body>
各种样式的button

熟悉了Bootstrap的基本使用,我们就可以进行登录\注册界面的编写了。自己编写css代码也可以写出好看的界面,但使用Bootstrap框架会省去大量的工作,对css的要求也没有那么高。
一、创建一个asp.net空项目并复制数据库到App_Data文件夹
打开Web.config文件,编写数据库连接字符串。
   <!-- 数据库连接-->

   <connectionStrings>

     <add name="connectionString"

          connectionString="Data Source=(LocalDB)\MSSQLLocalDB;AttachDbFilename=|DataDirectory|\data1.mdf;Integrated Security=True"

          providerName="System.Data.SqlClient"/>

   </connectionStrings>
有关创建asp.net空项目、新建App_Data文件夹(文件夹的名字不能更改,否则无法创建数据库的连接)、复制数据库、更改Web.config文件的更多信息,请查看:两种方法实现asp.net方案的前后端数据交互(aspx文件、html+ashx+ajax)。
二、编写HTML页面
右键项目,新建login.html,register.html,login.ashx,register.ashx。有关ashx文件(Generic Handler一般处理程序)和ajax的有关内容、数据库访问的具体语句,请查看:两种方法实现asp.net方案的前后端数据交互(aspx文件、html+ashx+ajax)。
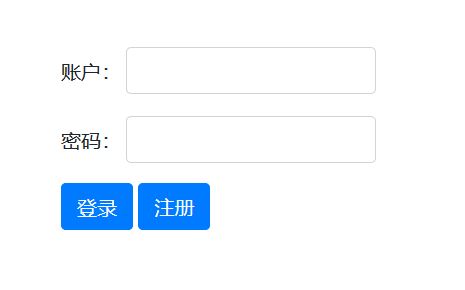
打开HTML页面login.html,进行登录表单的编写。
 <body>

     <!-- 登录表单 -->

     <form style="margin-left:500px;margin-top:200px;">

         <div class="form-group">

             <label for="user" stype="display:inline;">账户:</label>

             <input type="text" class="form-control" id="user" style="display:inline;width:200px;"autocomplete="off" />

         </div>

         <div class="form-group">

             <label for="password" style="display:inline;">密码:</label>

             <input type="text" class="form-control" id="password" style="display:inline;width:200px;"autocomplete="off" />

         </div>

         <button type="submit" class="btn btn-primary">登录</button>

         <button type="submit" class="btn btn-primary">注册</button>

     </form>

 </body>
在最外侧写上<form>标签,输入框、标签、按钮就写在<form>里面。一个标签对应一个输入框,把它们放在一个div里并为div添加类form-group。在这个div内部,为input起个ID名字,label中添加属性for,值就是它对应的input输入框的ID。这样设置结构更清晰,也使用了Bootstrap提供的行距、间距等等。如果不这样写,也可以,但可能会遇到一些问题。label和input的display方式都是inline,行内显示。autocomplete=off清除输入框的历史输入记录。在form表单最后,添加两个button。
点击注册按钮将跳转到register.html进行注册,点击登录按钮,如果用户名和密码正确,则跳转到主界面index.html。
为两个button添加事件。window.open("跳转的网址或页面","打开方式"),这是window.open()的一种写法,打开方式有4种:_self,_parent,_top,_blank,_blank是打开一个新的窗口,_self是在当前页面打开目标页面,但这里不知道什么原因,_self参数用不了(没有解决)。这里关于asp.net有个小的提示,当编辑好代码并保存后,点击调试或者右键解决方案管理器中的文件-用浏览器打开,有时候代码并没有更新,需要在浏览器中打开源码进行确认。可以交换使用不同的浏览器进行调试。
 <!DOCTYPE html>

 <html>

 <head>

     <meta charset="utf-8" />

     <title>登录界面</title>

     <!-- 新 Bootstrap4 核心 CSS 文件 -->

     <link rel="stylesheet" href="https://cdn.bootcss.com/bootstrap/4.1.0/css/bootstrap.min.css">

     <!-- jQuery文件。务必在bootstrap.min.js 之前引入 -->

     <script src="https://cdn.bootcss.com/jquery/3.2.1/jquery.min.js"></script>

     <!-- popper.min.js 用于弹窗、提示、下拉菜单 -->

     <script src="https://cdn.bootcss.com/popper.js/1.12.5/umd/popper.min.js"></script>

     <!-- 最新的 Bootstrap4 核心 JavaScript 文件 -->

     <script src="https://cdn.bootcss.com/bootstrap/4.1.0/js/bootstrap.min.js"></script>

     <script>

         function register() {

             //跳转到注册界面register.html进行注册

             window.open("register.html", "_blank");  //_self,_parent,_top,_blank

         }

         function login() {

             //登录逻辑

         }

     </script>

 </head>

 <body>

     <!-- 登录表单 -->

     <form style="margin-left:500px;margin-top:200px;">

         <div class="form-group">

             <label for="user" stype="display:inline;">账户:</label>

             <input type="text" class="form-control" id="user" style="display:inline;width:200px;"autocomplete="off" />

         </div>

         <div class="form-group">

             <label for="password" style="display:inline;">密码:</label>

             <input type="text" class="form-control" id="password" style="display:inline;width:200px;"autocomplete="off" />

         </div>

         <button type="submit" class="btn btn-primary" onclick="login()">登录</button>

         <button type="submit" class="btn btn-primary" onclick="register()">注册</button>

     </form>

 </body>

 </html>
在login.html页面中,点击注册按钮将跳转到register.html页面进行注册。下面我们对register.html页面进行编辑。
编写register.html页面,和刚才的登录界面大体相同,只是去掉了登录按钮。在ajax的编写里,要特别注意的是异步async要设置成false,读者可以试一下true和false的区别。
 <!DOCTYPE html>

 <html>

 <head>

     <meta charset="utf-8" />

     <title>注册界面</title>

     <!-- 新 Bootstrap4 核心 CSS 文件 -->

     <link rel="stylesheet" href="https://cdn.bootcss.com/bootstrap/4.1.0/css/bootstrap.min.css">

     <!-- jQuery文件。务必在bootstrap.min.js 之前引入 -->

     <script src="https://cdn.bootcss.com/jquery/3.2.1/jquery.min.js"></script>

     <!-- popper.min.js 用于弹窗、提示、下拉菜单 -->

     <script src="https://cdn.bootcss.com/popper.js/1.12.5/umd/popper.min.js"></script>

     <!-- 最新的 Bootstrap4 核心 JavaScript 文件 -->

     <script src="https://cdn.bootcss.com/bootstrap/4.1.0/js/bootstrap.min.js"></script>

     <script>

         function register() {

             //jQuery写法

             var user = $('#user').val();

             var password = $('#password').val();

             //JavaScript原生写法

             //var user = document.getElementById('user').value;

             //var password = document.getElementById('password').value;

             $.ajax({

                 type: "post",  //post put get 等等

                 url: "register.ashx",

                 //编写注册功能时,要将异步设置为false(缺省为true)

                 //如果async是ture,对于FireFox浏览器,会刷新掉alert()弹出框的内容

                 //对于Chrome浏览器,第一次注册时会执行error的回调函数,输出“请求在连接过程中出现错误..”

                 async:false,

                 data: {  //要传入ashx文件的数据

                     "user": user,

                     "password": password

                 },

                 success: function (data, textStatus) {

                     //连接至ashx文件成功时,执行函数

                     //data是从ashx文件返回来的信息,可以是字符串也可以是一个对象

                     //如果data是字符串,则可以输出data的值

                     //如果data是对象,则可以将这个对象的各属性值赋给其他变量

                     //textStatus是表示状态的字符串,这里textStatus的值是"success"

                     alert(data);

                 },

                 error: function (XMLHttpRequest, textStatus, errorThrown) {  //连接至ashx文件失败时,执行函数

                     //XMLHttpRequest在这个例子里没有用到

                     //textStatus是表示状态的字符串,这里textStatus的值是"error"

                     //errorThrown包含连接失败的信息,可以输出查看

                     alert("请求在连接过程中出现错误..\n" + errorThrown);

                 }

             });

         }

     </script>

 </head>

 <body>

 <!-- 注册表单 -->

     <form style="margin-left:500px;margin-top:200px;">

         <div class="form-group">

             <label for="user" stype="display:inline;">账户:</label>

             <input type="text" class="form-control" id="user" style="display:inline;width:200px;" autocomplete="off" />

         </div>

         <div class="form-group">

             <label for="password" style="display:inline;">密码:</label>

             <input type="text" class="form-control" id="password" style="display:inline;width:200px;" autocomplete="off" />

         </div>

         <button type="submit" class="btn btn-primary" onclick="register()">确认注册</button>

     </form>

 </body>

 </html>
注册功能对应的register.ashx文件:
using System;
using System.Collections.Generic;
using System.Linq;
using System.Web; using System.Data;
using System.Data.SqlClient; namespace 登录注册
{
/// <summary>
/// Summary description for register
/// </summary>
public class register : IHttpHandler
{
//数据库连接字符串
string connectionString = System.Configuration.ConfigurationManager.ConnectionStrings["connectionString"].ToString(); public void ProcessRequest(HttpContext context)
{
context.Response.ContentType = "text/plain";
//context.Response.Write("Hello World"); string user = context.Request["user"];
string password = context.Request["password"]; SqlConnection conn = new SqlConnection(connectionString);
conn.Open(); SqlCommand cmd = new SqlCommand();
cmd.Connection = conn;
cmd.CommandText = "SELECT * FROM 用户表 WHERE 用户名='" + user + "'"; try
{
if (cmd.ExecuteScalar() != null)
{
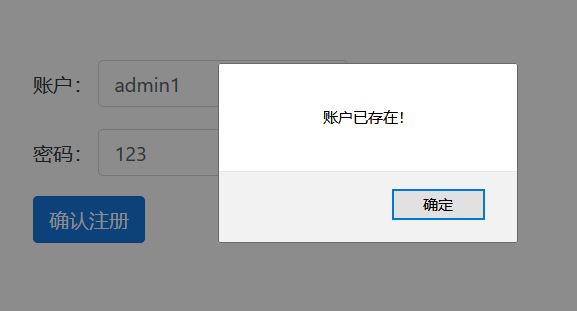
context.Response.Write("账户已存在!");
}
else
{
cmd.CommandText = "INSERT INTO 用户表 VALUES('" + user + "','" + password + "')";
if (cmd.ExecuteNonQuery() != )
{
context.Response.Write("信息添加成功!\n用户名=" + user + "\n密码=" + password);
}
else
{
context.Response.Write("信息添加失败..");
}
}
}
catch(Exception e)
{
context.Response.Write("命令执行过程中出现错误..\n" + e.Message);
} conn.Close();
} public bool IsReusable
{
get
{
return false;
}
}
}
}
register.ashx
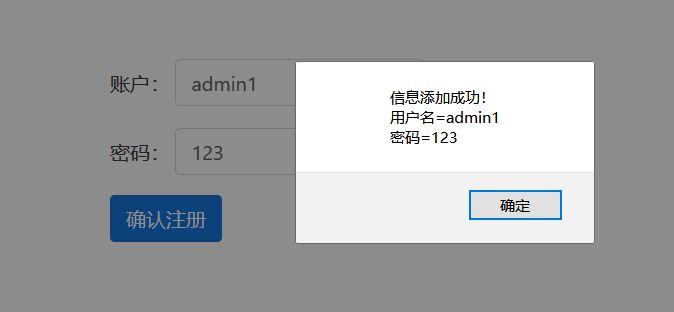
注册的运行结果:
注册功能编写完成,进行登录功能的编写,在function login(){ $.ajax() }中,与注册界面相同,同样要注意异步async要设置成false。
<!DOCTYPE html>
<html>
<head>
<meta charset="utf-8" />
<title>登录界面</title> <!-- 新 Bootstrap4 核心 CSS 文件 -->
<link rel="stylesheet" href="https://cdn.bootcss.com/bootstrap/4.1.0/css/bootstrap.min.css"> <!-- jQuery文件。务必在bootstrap.min.js 之前引入 -->
<script src="https://cdn.bootcss.com/jquery/3.2.1/jquery.min.js"></script> <!-- popper.min.js 用于弹窗、提示、下拉菜单 -->
<script src="https://cdn.bootcss.com/popper.js/1.12.5/umd/popper.min.js"></script> <!-- 最新的 Bootstrap4 核心 JavaScript 文件 -->
<script src="https://cdn.bootcss.com/bootstrap/4.1.0/js/bootstrap.min.js"></script> <script>
function register() {
//跳转到注册界面register.html进行注册
window.open("register.html", "_blank"); //_self,_parent,_top,_blank
}
function login() {
//登录逻辑
//jQuery写法
var user = $('#user').val();
var password = $('#password').val();
//JavaScript原生写法
//var user = document.getElementById('user').value;
//var password = document.getElementById('password').value;
$.ajax({
type: "post", //post put get 等等
url: "login.ashx",
//编写登录功能时,要将异步设置为false(缺省为true)
//如果async是ture,对于FireFox浏览器,会刷新掉alert()弹出框的内容
//对于Chrome浏览器,第一次注册时会执行error的回调函数,输出“请求在连接过程中出现错误..”
async:false,
data: { //要传入ashx文件的数据
"user": user,
"password": password
},
success: function (data, textStatus) {
//连接至ashx文件成功时,执行函数
//data是从ashx文件返回来的信息,可以是字符串也可以是一个对象
//如果data是字符串,则可以输出data的值
//如果data是对象,则可以将这个对象的各属性值赋给其他变量
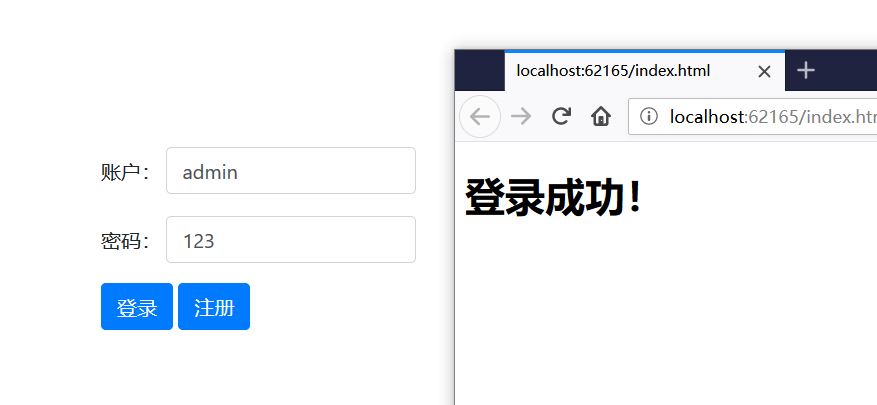
//textStatus是表示状态的字符串,这里textStatus的值是"success" if (data == "admin") {
window.open("index.html", "_blank");
}
else {
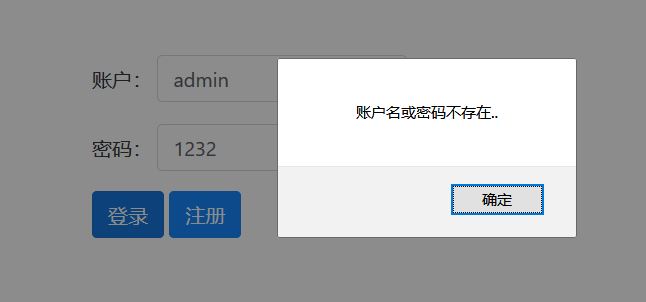
alert(data); //这里data是从ashx文件返回的“账户名或密码不存在..
}
},
error: function (XMLHttpRequest, textStatus, errorThrown) { //连接至ashx文件失败时,执行函数
//XMLHttpRequest在这个例子里没有用到
//textStatus是表示状态的字符串,这里textStatus的值是"error"
//errorThrown包含连接失败的信息,可以输出查看
alert("请求在连接过程中出现错误..\n" + errorThrown);
}
});
}
</script>
</head>
<body>
<!-- 登录表单 -->
<form style="margin-left:500px;margin-top:200px;">
<div class="form-group">
<label for="user" stype="display:inline;">账户:</label>
<input type="text" class="form-control" id="user" style="display:inline;width:200px;"autocomplete="off" />
</div>
<div class="form-group">
<label for="password" style="display:inline;">密码:</label>
<input type="text" class="form-control" id="password" style="display:inline;width:200px;"autocomplete="off" />
</div>
<button type="submit" class="btn btn-primary" onclick="login()">登录</button>
<button type="submit" class="btn btn-primary" onclick="register()">注册</button>
</form>
</body>
</html>
相应login.ashx代码:
 using System;

 using System.Collections.Generic;

 using System.Linq;

 using System.Web;

 using System.Data;

 using System.Data.SqlClient;

 namespace 登录注册

 {

     /// <summary>

     /// Summary description for login

     /// </summary>

     public class login : IHttpHandler

     {

         public void ProcessRequest(HttpContext context)

         {

             //数据库连接字符串

             string connectionString = System.Configuration.ConfigurationManager.ConnectionStrings["connectionString"].ToString();

             context.Response.ContentType = "text/plain";

             //context.Response.Write("Hello World");

             string user = context.Request["user"];

             string password = context.Request["password"];

             SqlConnection conn = new SqlConnection(connectionString);

             conn.Open();

             SqlCommand cmd = new SqlCommand();

             cmd.Connection = conn;

             cmd.CommandText="SELECT * FROM 用户表 WHERE 用户名='"+user+"' AND 密码='" + password + "'";

             try

             {

                 if (cmd.ExecuteScalar() != null)

                 {

                     context.Response.Write("admin");

                 }

                 else

                 {

                     context.Response.Write("账户名或密码不存在..");

                 }

             }

             catch(Exception e)

             {

                 context.Response.Write("命令执行过程中出现错误..\n" + e.Message);

             }

             conn.Close();

         }

         public bool IsReusable

         {

             get

             {

                 return false;

             }

         }

     }

 }
login.ashx
登录界面运行结果:
这个例子使用的工程文件的链接分享(Visual Studio 2017):https://pan.baidu.com/s/1wMlgIp7Iw3fF5_eBhECDvw
使用Boostrap框架写一个登录\注册界面的更多相关文章
- Java-Web 用html和css写一个EasyMall注册界面
要求: html代码: <!DOCTYPE html> <html> <head> <title>EasyMall注册页面</title> ...
- 使用 Flask 框架写用户登录功能的Demo时碰到的各种坑(五)——实现注册功能
使用 Flask 框架写用户登录功能的Demo时碰到的各种坑(一)——创建应用 使用 Flask 框架写用户登录功能的Demo时碰到的各种坑(二)——使用蓝图功能进行模块化 使用 Flask 框架写用 ...
- HTML登录注册界面怎么制作?
在没有学习CSS样式的前提下,是如何做一个简单的注册界面的. 一.表单标签(form) 首先我们先写一个<form></form>的标签,form标签属于表单标签,通常我们的登 ...
- 使用 Flask 框架写用户登录功能的Demo时碰到的各种坑(一)——创建应用
使用 Flask 框架写用户登录功能的Demo时碰到的各种坑(一)——创建应用 使用 Flask 框架写用户登录功能的Demo时碰到的各种坑(二)——使用蓝图功能进行模块化 使用 Flask 框架写用 ...
- 使用 Flask 框架写用户登录功能的Demo时碰到的各种坑(二)——使用蓝图功能进行模块化
使用 Flask 框架写用户登录功能的Demo时碰到的各种坑(一)——创建应用 使用 Flask 框架写用户登录功能的Demo时碰到的各种坑(二)——使用蓝图功能进行模块化 使用 Flask 框架写用 ...
- 使用 Flask 框架写用户登录功能的Demo时碰到的各种坑(三)——使用Flask-Login库实现登录功能
使用 Flask 框架写用户登录功能的Demo时碰到的各种坑(一)——创建应用 使用 Flask 框架写用户登录功能的Demo时碰到的各种坑(二)——使用蓝图功能进行模块化 使用 Flask 框架写用 ...
- 如何快速使用Access实现一个登录验证界面?
大三上学期期末总结,嗯,没错,上学期,写在新学期开始,hhhh. 上学期末的时候信管班的一个同学问我会不会Access,能不能它实现一个登录验证界面,说实话,之前对Access只是有所耳闻,随便敷衍了 ...
- 使用 Flask 框架写用户登录功能的Demo时碰到的各种坑(四)——对 run.py 的调整
使用 Flask 框架写用户登录功能的Demo时碰到的各种坑(一)——创建应用 使用 Flask 框架写用户登录功能的Demo时碰到的各种坑(二)——使用蓝图功能进行模块化 使用 Flask 框架写用 ...
- Python 实现简单的登录注册界面
Python 实现简单的登录注册界面 注意:编写代码之前需要导入很重要的包 import tkinter as tk import pickle from tkinter import message ...
随机推荐
- 为什么设置overflow为hidden可以清除浮动带来的影响
1.问题起源 在平时的业务开发写CSS中,为了满足页面布局,元素的浮动特性我们用的不能再多了.使用浮动的确能够解决一些布局问题,但是也带了一些副作用影响,比如,父元素高度塌陷,我们有好几种可以清除浮动 ...
- es6学习笔记-async函数
1 前情摘要 前段时间时间进行项目开发,需求安排不是很合理,导致一直高强度的加班工作,这一个月不是常说的996,简直是936,还好熬过来了.在此期间不是刚学会了es6的promise,在项目有用到pr ...
- 【递归打卡2】求两个有序数组的第K小数
[题目] 给定两个有序数组arr1和arr2,已知两个数组的长度分别为 m1 和 m2,求两个数组中的第 K 小数.要求时间复杂度O(log(m1 + m2)). [举例] 例如 arr1 = [1, ...
- 补习系列(18)-springboot H2 迷你数据库
目录 关于 H2 一.H2 用作本地数据库 1. 引入依赖: 2. 配置文件 3. 样例数据 二.H2 用于单元测试 1. 依赖包 2. 测试配置 3. 测试代码 小结 关于 H2 H2 数据库是一个 ...
- c#在pictureBox控件上绘制多个矩形框及删除绘制的矩形框
在pictureBox上每次只绘制一个矩形框,绘制下一个矩形框时上次绘制的矩形框取消,代码如链接:https://www.cnblogs.com/luxiao/p/5625196.html 在绘制矩形 ...
- 简述Java变量和强制转换类型
简述Java变量和强制转换类型 java变量 1. java变量 变量:顾名思义,就是在java执行程序过程中可以发生改变的量,就好比方程式中的未知数X一样. 变量的内存分配过程 int a ; // ...
- Windows Server 2016-Windows 时间服务概览
同步 Windows 时间服务 (W32Time) 的日期和时间的所有运行 Active Directory 域服务 (AD DS) 的计算机. 时间同步至关重要的许多 Windows 服务和的业务线 ...
- css+js调整当前界面背景音量
展示效果 html代码: <div> <audio id="audio" controls src="https://dbl.5518pay.com/r ...
- eureka2.0页面404报错问题--之坑
eureka页面报错问题404页面如下 在复制pom文件的时候,记得启动eureka注册中心的pom文件引入依赖是否正确 启动类注解也要注意是否引用正确
- body标签中l的相关标签
字体标签: h1~h6.font. u.b,.strong. em. sup. sub 排版标签: div,.span.br.hr.center.pre 图片标签: img 超链接: a 列表标签: ...