
C++ 单链表的实现
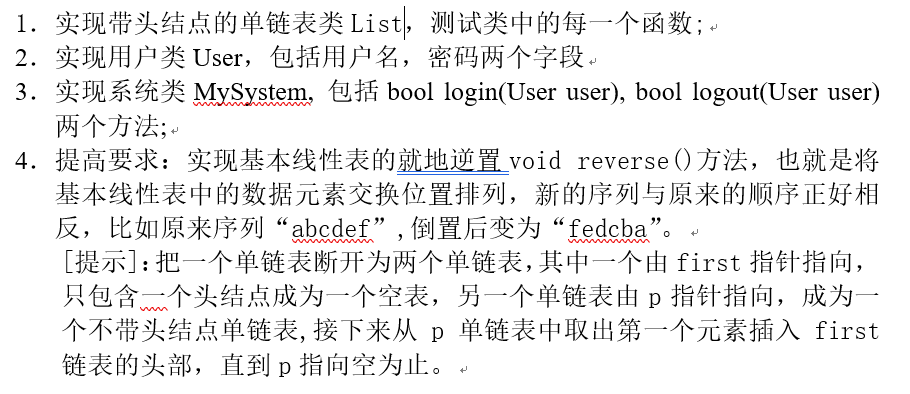
#ifndef LINKEDLIST_H

#define LINKEDLIST_H

#define MAXLEN 256

template <class T>

struct LinkedList {

    struct Node {

        Node* next = ; // necessary!!!

        T key;

    };

    Node* head = ;

    T* listSearch(const T& k);

    void listInsert(const T& k);

    void listDelete(const T& k);

    void reverse();

};

template <class T>

T* LinkedList<T>::listSearch(const T& k) {

    Node* x = head;

    while (x !=  && x->key != k) {

        x = x->next;

    }

    if (x == ) {

        return ;

    }

    T* temp = &(x->key);

    return temp; // Returns a pointer to the data

}

template <class T>

void LinkedList<T>::listInsert(const T& k) {

    Node* x = new Node();

    x->key = k;

    if (head != ) {

        x->next = head;

    }

    head = x;

}

template <class T>

void LinkedList<T>::listDelete(const T& k) {

    Node* deleteOne = head;

    Node* last = ;

    while (deleteOne !=  && deleteOne->key != k) {

        last = deleteOne;

        deleteOne = deleteOne->next;

    }

    if (deleteOne == ) {

        ;

    } else if (deleteOne == head) {

        head = deleteOne->next;

    } else {

        last->next = deleteOne->next;

    }

}

template <class T>

void LinkedList<T>::reverse() {

    Node* temp[MAXLEN];

    for (int i = ; i != MAXLEN; ++i) {

        temp[i] = ;

    }

    int k = ;

    Node* x = head;

    while (x != ) {

        temp[k] = x;

        x = x->next;

        ++k;

    }

    temp[]->next = ;

    head = temp[k-];

    for (int i = ; i != k; ++i) {

        temp[i]->next = temp[i-];

    }

}

#endif

#ifndef USER_H

#define USER_H

#include <string>

struct User {

    std::string username;

    std::string password;

    User(std::string x, std::string y): username(x), password(y) {}

    User() = default;

    bool operator==(const User &left) {

        if (this->username == left.username) return true;

        return false;

    }

    bool operator!=(const User &left) {

        if (this->username != left.username) return true;

        return false;

    }

};

#endif

#ifndef MYSYSTEM_H

#define MYSYSTEM_H

struct MySystem {

    LinkedList<User> onlineList;

    bool login(User user);

    bool logout(User user);

};

bool MySystem::login(User user) {

    onlineList.listInsert(user);

    if (onlineList.listSearch(user) != ) return true;

    return false;

}

bool MySystem::logout(User user) {

    onlineList.listDelete(user);

    if (onlineList.listSearch(user) == ) return true;

    return false;

}

#endif

#include <iostream>

using namespace std;

int main()

{

    LinkedList<int> listInt;

    listInt.listInsert();

    listInt.listInsert();

    listInt.listInsert();

    listInt.listInsert();

    listInt.listInsert();

    listInt.listDelete();

    listInt.reverse();

    cout << listInt.listSearch() << endl;

    cout << listInt.listSearch() << endl;

    cout << listInt.listSearch() << endl;

    return ;

}
二叉树相关,留着备用:
#include <stdio.h>

#include <iostream>

#include <queue>

using namespace std;

typedef struct bnode {

    int data;

    struct bnode *lc, *rc;

} bnode_type;

// 前序遍历

int prosearch(bnode_type *root) {

    if (root != NULL) {

        printf("%c\n", root->data);

        prosearch(root->lc);

        prosearch(root->rc);

    }

    return ;

}

// 后序遍历

int postsearch(bnode_type *root) {

    if (root != NULL) {

        prosearch(root->lc);

        prosearch(root->rc);

        printf("%c\n", root->data);

    }

    return ;

}

// 前序建立二叉树

bnode_type* creat(bnode_type* root) {

    char c;

    cout << "Enter:" << endl;

    cin >> c;

    if (c != '#') {

        root = new bnode_type();

        root->data = c;

        root->lc = creat(root->lc);

        root->rc = creat(root->rc);

    } else {

        root = NULL;

    }

    return root;

}

// 计算树的高度

int deepth(bnode_type* root) {

    if (root != NULL) {

        int a = deepth(root->lc);

        int b = deepth(root->rc);

        return ((a > b) ? a+ : b+);

    }

    return ;

}

// 计算节点数量

int nodes(bnode_type* root) {

    if (root != NULL) {

        return nodes(root->lc) + nodes(root->rc) + ;

    }

    return ;

}

// 层序遍历

queue<bnode_type*> mark;

void levelOrderTraverse(bnode_type* root) {

    if (root == NULL) return;

    mark.push(root);

    while (mark.size() != ) {

        bnode_type* temp = mark.front();

        printf("%c\n", temp->data);

        if (temp->lc != NULL) mark.push(temp->lc);

        if (temp->rc != NULL) mark.push(temp->rc);

        mark.pop();

    }

}

int main()

{

    /* 前序地建立二叉树,输入#表示节点为空 */

    bnode_type* p = NULL;

    p = creat(p);

    cout << "deepth=" << deepth(p) << endl; //

    cout << "nodes=" << nodes(p) << endl; //

    levelOrderTraverse(p);

    return ;

}
C++ 单链表的实现的更多相关文章
- 时间复杂度分别为 O(n)和 O(1)的删除单链表结点的方法
有一个单链表,提供了头指针和一个结点指针,设计一个函数,在 O(1)时间内删除该结点指针指向的结点. 众所周知,链表无法随机存储,只能从头到尾去遍历整个链表,遇到目标节点之后删除之,这是最常规的思路和 ...
- 单链表的C++实现(采用模板类)
采用模板类实现的好处是,不用拘泥于特定的数据类型.就像活字印刷术,制定好模板,就可以批量印刷,比手抄要强多少倍! 此处不具体介绍泛型编程,还是着重叙述链表的定义和相关操作. 链表结构定义 定义单链表 ...
- Java实现单链表的各种操作
Java实现单链表的各种操作 主要内容:1.单链表的基本操作 2.删除重复数据 3.找到倒数第k个元素 4.实现链表的反转 5.从尾到头输出链表 6.找到中间节点 7.检测链表是否有环 8.在 ...
- [LeetCode] Linked List Cycle II 单链表中的环之二
Given a linked list, return the node where the cycle begins. If there is no cycle, return null. Foll ...
- c++单链表基本功能
head_LinkNode.h /*单链表类的头文件*/#include<assert.h>#include"compare.h"typedef int status; ...
- 单链表、循环链表的JS实现
数据结构系列前言: 数据结构作为程序员的基本知识,需要我们每个人牢牢掌握.近期我也展开了对数据结构的二次学习,来弥补当年挖的坑...... 当时上课的时候也就是跟着听课,没有亲自实现任何一种数据结 ...
- C代码实现非循环单链表
C代码实现非循环单链表, 直接上代码. # include <stdio.h> # include <stdlib.h> # include <malloc.h> ...
- 分离的思想结合单链表实现级联组件:CascadeView
本文介绍自己最近做省市级联的类似的级联功能的实现思路,为了尽可能地做到职责分离跟表现与行为分离,这个功能拆分成了2个组件并用到了单链表来实现关键的级联逻辑,下一段有演示效果的gif图.虽然这是个很常见 ...
- 数据结构:单链表结构字符串(python版)添加了三个新功能
#!/urs/bin/env python # -*- coding:utf-8 -*- #异常类 class stringTypeError(TypeError): pass #节点类 class ...
- 数据结构:单链表结构字符串(python版)改进
此篇文章的replace实现了字符串类的多次匹配,但依然有些不足. 因为python字符串对象为不变对象,所以replace方法并不修改原先的字符串,而是返回修改后的字符串. 而此字符串对象时用单链表 ...
随机推荐
- Imageview如何设置背景颜色
ImageView.setBackgroundColor(android.graphics.Color.parseColor("#ffffff")); ImageView.setB ...
- k8s滚动升级
为了服务升级过程中提供可持续的不中断的服务,Kubernetes 提供了rolling update机制,具体配置需要修改对应服务的yaml文件 参数解析: minReadySeconds: 100 ...
- dreamweaver中Dw设置svn进行版本控制
需要工具: VisualSVN dwcs5+ 点击查看教程
- wxshop_my移动端前端开发项目
**************************************************************************************************** ...
- 飘城旅游网pc,流式,响应式布局
相关视频教程http://pan.baidu.com/s/1o77wirK 我的源码链接:http://pan.baidu.com/s/1czTsKI
- Java关键字final、static总结
对Java关键字Final和Static进行总结. 一.final 根据程序上下文环境,Java关键字final有“这是无法改变的”或者“终态的”含义,它可以修饰非抽象类.非抽象类成员方 ...
- AOP通知无法切入指定方法
AOP通知,切入指定方法时拦截不到,可能是拦截的方法本身是被本类的其他方法调用的,根据AOP反射原理是无法拦截本类中方法调用的方法的.如: class AImpl implements AIf { s ...
- Exchange Port
Get-POPSettings-110 Get-IMAPSettings-143 Exchange Network Port References Exchange Server 2000 http: ...
- 引入 netty网关,向flume提交数据
netty 处理http请求 package com.test; import io.netty.bootstrap.ServerBootstrap;import io.netty.channel. ...
- python基础-第七篇-7.2面向对象(进阶篇)
进入到今天的探索前,我先对上节内容进行一下回顾: 面向对象是一种编程方式,此编程方式的实现是基于对类和对象的使用 类是一个模板,模板中包装了多个函数可供使用 对象是基于类创建的,实例用于调用被包装在类 ...