
TI XDC工具入门简介
1. XDC(Express DSP Component)是TI提供的一个命令行工具,它可以生成并使用实时软件组件包,它包括一系列工具,这些工具可以允许你将你的C语言代码组织成类似于java的包管理方式,具有面向对象的特性,因为它还有一个名字,叫做eXpanDed C.

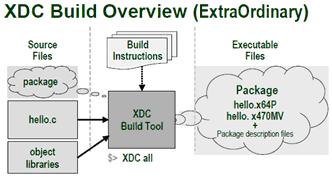
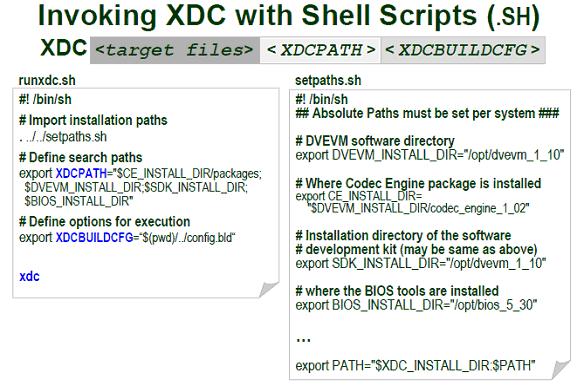
2. 以上两图说明了XDC的工作方式:通过相关文件设定操作指令,读入源码、库文件以及已经存在的组件包最终生成可执行文件.
3. Package------XDC工作的基本单元.包括有:源码、库文件以及元数据;元数据这包含有该包的版本信息和依赖信息,以及模块(Module)信息.
4. XDC使用方法:

5. XDC需要的文件:config.bld package.bld package.xdc
Package.xdc -------------描述该包的名称,版本信息,依赖文件,模块信息等

Config.bld --------------描述XDC要使用的编译工具的相关信息,如不同CPU所使用的编译工具目录,每种编译工具的编译选项,连接选项等基本信息;

Package.bld -------------------描述对于该包需要生成的平台,profile(debug,release).通过Javascript脚本添加源码到生成执行文件的信息中.
Package.mak-------------------由XDC生成的文件,用于最终编译可执行文件.
6. XDC工作流程:

7. 使用XDC所需的文件:源码、package.bld、package.xdc、config.bld.同时需要通过shell脚本将DVEVM的安装位置导出为环境变量.
各代码如下:
Config.bld样本代码:
 + expand sourceview plaincopy to clipboardprint?

 var MVArm9 = xdc.useModule("gnu.targets.MVArm9");

 MVArm9.rootDir = "/opt/DVS357/mv_pro_4.0/montavista/pro/devkit/arm/v5t_le";

 MVArm9.lnkOpts.suffix = "-lpthread " + MVArm9.lnkOpts.suffix;

 var Linux86=xdc.useModule("gnu.targets.Linux86");

 Linux86.rootDir = "/usr";

 Linux86.lnkOpts.suffix = "-lpthread " + Linux86.lnkOpts.suffix;

 Build.targets = [ Linux86,MVArm9,];

 var MVArm9 = xdc.useModule("gnu.targets.MVArm9");

 MVArm9.rootDir = "/opt/DVS357/mv_pro_4.0/montavista/pro/devkit/arm/v5t_le";

 MVArm9.lnkOpts.suffix = "-lpthread " + MVArm9.lnkOpts.suffix;

 var Linux86=xdc.useModule("gnu.targets.Linux86");

 Linux86.rootDir = "/usr";

 Linux86.lnkOpts.suffix = "-lpthread " + Linux86.lnkOpts.suffix;

 Build.targets = [ Linux86,MVArm9,];
Runxdc.sh样本代码:
 view plaincopy to clipboardprint?

 #! /bin/sh

 #  import install paths

 #  putting the first period before the shell invokation keeps the changes

 #      to environment variables set here. Otherwise, changes to environment

 #      are only within the context of the executed script

 ./setpaths.sh

 #  Define search paths for included packages

 export XDCPATH="$CE_INSTALL_DIR/packages"

 #  Define options for execution

 export XDCBUILDCFG=$(pwd)"/config.bld

 #  Execute xdc command to make all packages

 /opt/DVS357/dvevm_1_20/xdc_2_94/xdc $@ -P *

 #! /bin/sh

 #  import install paths

 #  putting the first period before the shell invokation keeps the changes

 #      to environment variables set here. Otherwise, changes to environment

 #      are only within the context of the executed script

 ./setpaths.sh

 #  Define search paths for included packages

 export XDCPATH="$CE_INSTALL_DIR/packages"

 #  Define options for execution

 export XDCBUILDCFG=$(pwd)"/config.bld

 #  Execute xdc command to make all packages

 /opt/DVS357/dvevm_1_20/xdc_2_94/xdc $@ -P *
Setpaths.sh样本代码:
 #!/bin/sh

 export DVEVM_INSTALL_DIR="/opt/DVS357/dvevm_1_20/"

 export BIOS_INSTALL_DIR=$DVEVM_INSTALL_DIR/bios_5_31_01

 export CG_INSTALL_DIR=$DVEVM_INSTALL_DIR/cg6x_6_0_14

 export CMEM_INSTALL_DIR=$DVEVM_INSTALL_DIR/cmem_1_02

 export CE_INSTALL_DIR=$DVEVM_INSTALL_DIR/codec_engine_1_10_01

 export CS_INSTALL_DIR=$DVEVM_INSTALL_DIR/codec_servers_1_23

 export DSPLINK_INSTALL_DIR=$DVEVM_INSTALL_DIR/dsplink_1_30_08_02

 export FMWK_INSTALL_DIR=$DVEVM_INSTALL_DIR/framework_components_1_10_04

 export XDAIS_INSTALL_DIR=$DVEVM_INSTALL_DIR/xdais_5_10

 export XDC_INSTALL_DIR=$DVEVM_INSTALL_DIR/xdc_2_94

 export PATH=$XDC_INSTALL_DIR:$PATH

 #!/bin/sh

 export DVEVM_INSTALL_DIR="/opt/DVS357/dvevm_1_20/"

 export BIOS_INSTALL_DIR=$DVEVM_INSTALL_DIR/bios_5_31_01

 export CG_INSTALL_DIR=$DVEVM_INSTALL_DIR/cg6x_6_0_14

 export CMEM_INSTALL_DIR=$DVEVM_INSTALL_DIR/cmem_1_02

 export CE_INSTALL_DIR=$DVEVM_INSTALL_DIR/codec_engine_1_10_01

 export CS_INSTALL_DIR=$DVEVM_INSTALL_DIR/codec_servers_1_23

 export DSPLINK_INSTALL_DIR=$DVEVM_INSTALL_DIR/dsplink_1_30_08_02

 export FMWK_INSTALL_DIR=$DVEVM_INSTALL_DIR/framework_components_1_10_04

 export XDAIS_INSTALL_DIR=$DVEVM_INSTALL_DIR/xdais_5_10

 export XDC_INSTALL_DIR=$DVEVM_INSTALL_DIR/xdc_2_94

 export PATH=$XDC_INSTALL_DIR:$PATH
package.bld样本代码:
 + expand sourceview plaincopy to clipboardprint?

 var targs = [MVArm9, Linux86];

 var profiles = ["debug", "release"];

 //  Define the base name for the executable(s) built

 var basename = "app";

 //  The following code uses the java.io.File.list() method to generate an array

 //      of all files in the current directory ('.') and then sorts out .c files

 var sources = java.io.File('.').list();

 var csources = [];

 for (var i = 0; i < sources.length; i++){

        if(String(sources[i]).match(/.*\.c$/))

                 csources.push(sources[i]);

 }

 //  The build phase cycles through the arrays of build targets and profiles

 //       and adds an executable for each combination

 for (var i = 0; i < targs.length; i++) {

      for(var j = 0; j < profiles.length; j++){

         Pkg.addExecutable( basename + "_" + profiles[j], targs[i],

 targs[i].platform, {

                      cfgScript: null,

                      profile: profiles[j],

                 }

                 ).addObjects( csources );

      }

 }

 var targs = [MVArm9, Linux86];

 var profiles = ["debug", "release"];

 //  Define the base name for the executable(s) built

 var basename = "app";

 //  The following code uses the java.io.File.list() method to generate an array

 //      of all files in the current directory ('.') and then sorts out .c files

 var sources = java.io.File('.').list();

 var csources = [];

 for (var i = 0; i < sources.length; i++){

        if(String(sources[i]).match(/.*\.c$/))

                 csources.push(sources[i]);

 }

 //  The build phase cycles through the arrays of build targets and profiles

 //       and adds an executable for each combination

 for (var i = 0; i < targs.length; i++) {

      for(var j = 0; j < profiles.length; j++){

         Pkg.addExecutable( basename + "_" + profiles[j], targs[i],

 targs[i].platform, {

                      cfgScript: null,

                      profile: profiles[j],

                 }

                 ).addObjects( csources );

      }

 }
本文转自:http://csharp.usr.cc/forum.php?mod=viewthread&tid=52028&page=1
TI XDC工具入门简介的更多相关文章
- 掌握 Ajax,第 1 部分: Ajax 入门简介
转:http://www.ibm.com/developerworks/cn/xml/wa-ajaxintro1.html 掌握 Ajax,第 1 部分: Ajax 入门简介 理解 Ajax 及其工作 ...
- (转)Web Service入门简介(一个简单的WebService示例)
Web Service入门简介 一.Web Service简介 1.1.Web Service基本概念 Web Service也叫XML Web Service WebService是一种可以接收从I ...
- ASP.NET Core学习之一 入门简介
一.入门简介 在学习之前,要先了解ASP.NET Core是什么?为什么?很多人学习新技术功利心很重,恨不得立马就学会了. 其实,那样做很不好,马马虎虎,联系过程中又花费非常多的时间去解决所遇到的“问 ...
- Web Service入门简介(一个简单的WebService示例)
Web Service入门简介 一.Web Service简介 1.1.Web Service基本概念 Web Service也叫XML Web Service WebService是一种可以接收从I ...
- Android精通教程-第一节Android入门简介
前言 大家好,给大家带来Android精通教程-第一节Android入门简介的概述,希望你们喜欢 每日一句 If life were predictable it would cease to be ...
- Markdown入门简介
参考 http://sspai.com/25137 作者: Te_Lee 文章来源: 少数派 Markdown入门简介(使用工具Haroopad) 一.使用的工具----haroopad(http:/ ...
- Orange的数据挖掘工具入门使用
Orange的数据挖掘工具入门使用 声明: 1)本报告由博客园bitpeach撰写,版权所有,免费转载,请注明出处,并请勿作商业用途. 2)若本文档内有侵权文字或图片等内容,请联系作者bitpeach ...
- Django笔记 —— 入门简介
最近在学习Django,打算玩玩网页后台方面的东西,因为一直很好奇但却没怎么接触过.Django对我来说是一个全新的内容,思路想来也是全新的,或许并不能写得很明白,所以大家就凑合着看吧- 本篇笔记(其 ...
- 1 Processing入门简介
1 Processing入门简介 1.1 Before you start Processing是一个为开发面向图形的应用(visually oriented application)而生的简单易用的 ...
随机推荐
- 《DSP using MATLAB》示例 Example 6.25
代码: % x = [-0.9, 0.81]; [y, L, B] = QCoeff(x, 3) % Unquantized parameters r = 0.9; theta = pi/3; a1 ...
- 安装WampServer关闭mysql服务后打不开了
WampServer自带了mysql精简班的数据库了 WampServer自带 的mysql和你独立安装的mysql端口号冲突了 mysql默认的端口号是3306 建议你修改WampServer的数据 ...
- elixir grpc 试用
备注: elixir grpc 封装测试 1. 安装 a. 安装 protoc 参考相关文档,比较简单 b. 安装elixir grpc 插件 protoc-gen-elixir 同时配置环 ...
- FastAdmin 无刷新地址改变
FastAdmin 无刷新地址改变 群里有人问 FastAdmin 是不是用了 pjax? 之前有看到 Karson 回复过,其实 FastAdmin 用的是 HTML5 的一个History API ...
- 笔记:FastAdmin 之 jQuery 选择器 $("[name$='[]']", form) 学习
笔记:FastAdmin 之 jQuery 选择器 $("[name$='[]']", form) 学习 $("[name$='[]']", form)这个是什 ...
- Java列表分页查询结果导出到CSV文件,导入CSV文件并解析
import java.io.BufferedReader; import java.io.BufferedWriter; import java.io.File; import java.io.Fi ...
- C++中如何在顺序容器中删除符合特定条件的元素
以前很少做删除操作,vector一直当成数组用,而实际追求效率时又经常舍弃vector选用C风格数组.看<C++ Primer>到顺序容器删除这节时试着实现课后习题结果一动手我就出错了. ...
- [转][Java]语法规范
先来个 阿里的 Java 开发手册(2017.5.20 发布 v1.2.0 .pdf) 本文来自:http://blog.csdn.net/sinat_27115575/article/details ...
- 常见的sql server 链接问题------持续更新
问题1:超时时间已到.超时时间已到,但是尚未从池中获取连接.出现这种情况可能是因为所有池连接均在使用,并且达到了最大池大小 再查询窗口输入exec sp_who2进行查询链接消耗资源 可能出现的情况是 ...
- Java测试用例简介
最近需要向组内其他成员普及一下关于Java测试用例的相关知识,特在此进行一下简单的学习和总结. JUnit简介 JUnit是一个开源的Java单元测试框架,JUnit4对原有的JUnit框架进行了大幅 ...