MongoDB 基础命令 (MongoDB Shell)
1、我们 mongodb 安装成功后,用上一篇的方法启动 mongodb服务 然后使用 mongodb shell 来做数据库的增删改查
2、创建数据库
语法:
use 数据库名称
案例:
> use juyou

switched to db juyou

> show dbs

admin   .000GB

config  .000GB

local   .000GB
这时创建完成过,使用命令查询数据库却没有我们刚创建的数据库,这时因为刚创建的数据库没有数据,下面我们在数据库中插入一条数据
> db.juyou.insert({"name":"聚优福利"})

WriteResult({ "nInserted" :  })

> show dbs

admin   .000GB

config  .000GB

juyou   .000GB

local   .000GB
这时就能看到刚刚创建的数据库了
3、删除数据库
语法:
db.dropDatabase()
案例:
首先我们先查询一下所有的数据库
> show dbs

admin   .000GB

config  .000GB

juyou   .000GB

local   .000GB
然后我们可以使用 db 来查看当前的数据库
> db

juyou
当前链接的数据库就是 juyou,如果不是可以使用 use juyou 命令切换到 juyou 数据库
> use juyou

switched to db juyou
执行删除命令
> db.dropDatabase()

{ "dropped" : "juyou", "ok" :  }
然后再我们再查询一下所有数据库
> show dbs

admin   .000GB

config  .000GB

local   .000GB
已经成功删除了
4、创建集合
语法:
db.createCollection(name, options)
- name:集合名称
- options: 可选参数
案例:
创建一个名为 userinfo 的集合
> db.createCollection("userinfo")

{ "ok" :  }

> show collections

userinfo
创建成功后可以使用 show collections 命令查询已有集合
5、插入文档
语法:
db.集合名称.insert(document)
案例:
在 juyou 集合下的 userinfo 文档中插入一条数据
> db.userinfo.insert({name:"郭大爷","sex":"男","age":"不详"})

WriteResult({ "nInserted" :  })

> db.userinfo.find()

{ "_id" : ObjectId("5abaf679a3aadbe625070c4f"), "name" : "郭大爷", "sex" : "男", "age" : "不详" }
插入成功后,可以使用 find() 来查询刚刚插入的数据,下面会对查询做详细的讲解,这里不多做解释
可以看到插入数据后,多了一列 _id 的数据,在文档中 mongodb 会将 _id 字段自动设置为主键,如果不指定mongodb会自动生成
自动生成的 ObjectId 是由时间戳、MachineID(电脑的 mac 地址)、进程ID以及自增计数器组成的,基本上不会重复
> db.userinfo.insert({"_id":,name:"郭少爷","sex":"男","age":"不详"})

WriteResult({ "nInserted" :  })

> db.userinfo.find()

{ "_id" : ObjectId("5abaf679a3aadbe625070c4f"), "name" : "郭大爷", "sex" : "男", "age" : "不详" }

{ "_id" : , "name" : "郭少爷", "sex" : "男", "age" : "不详" }
也可以在插入数据时指定 _id 值,在之前使用mongodb开发中会指定给 _id 值,使用GUID(全球唯一标识)代替
我们也可以先将要插入的数据定义成变量
> var user = {name:"郭老师",sex:"男",age:""}

> db.userinfo.insert(user)

WriteResult({ "nInserted" :  })

> db.userinfo.find()

{ "_id" : ObjectId("5abaf679a3aadbe625070c4f"), "name" : "郭大爷", "sex" : "男", "age" : "不详" }

{ "_id" : , "name" : "郭少爷", "sex" : "男", "age" : "不详" }

{ "_id" : ObjectId("5abb05afa3aadbe625070c50"), "name" : "郭老师", "sex" : "男", "age" : "" }
mongodb 在3.2版本后 提供了一次插入多条数据的方法 insertMany() ,我们下面把上面的三条数据删除,然后试一下一次插入多条数据
> db.userinfo.remove({})

WriteResult({ "nRemoved" :  })

> db.userinfo.find()
> var users = [

   {

     _id:,

     name:"郭大爷",

     sex:"男",

     age:""

   },

   {

     _id:,

     name:"郭老师",

     sex:"男",

     age:"不详"

   },

   {

     _id:,

     name:"郭少爷",

     sex:"男",

     age:""

   }

 ]

> db.userinfo.insertMany(users)

{ "acknowledged" : true, "insertedIds" : [ , ,  ] }

> db.userinfo.find()

{ "_id" : , "name" : "郭大爷", "sex" : "男", "age" : "" }

{ "_id" : , "name" : "郭老师", "sex" : "男", "age" : "不详" }

{ "_id" : , "name" : "郭少爷", "sex" : "男", "age" : "" }
这样我们可以直接插入一个数组
6、更新文档
更新文档有 update() 和 save() 两个方法,接下来分别介绍
update() 语法:
db.collection.update(

   <query>,

   <update>,

   {

     upsert: <boolean>,

     multi: <boolean>,

     writeConcern: <document>

   }

)
- query:条件,相当于sql update时where条件
- update: 要更新的内容,类似 sql 的 set 后面的内容
案例:
我们先查询一下,郭老师的年龄是不详,现在我们根据主键_id来把年龄更新成20岁
> db.userinfo.find()

{ "_id" : , "name" : "郭大爷", "sex" : "男", "age" : "" }

{ "_id" : , "name" : "郭老师", "sex" : "男", "age" : "不详" }

{ "_id" : , "name" : "郭少爷", "sex" : "男", "age" : "" }

> db.userinfo.update({"_id":},{$set:{"age":""}})

WriteResult({ "nMatched" : , "nUpserted" : , "nModified" :  })

> db.userinfo.find()

{ "_id" : , "name" : "郭大爷", "sex" : "男", "age" : "" }

{ "_id" : , "name" : "郭老师", "sex" : "男", "age" : "" }

{ "_id" : , "name" : "郭少爷", "sex" : "男", "age" : "" }
已经成功将郭老师的年龄改成20,然后我们看到在更新命令中又一个 $set 的关键词,这个是更新操作符,接下来我们介绍一下操作符
- $inc:将文档中的数字字段,增加值。比如个郭老师的年龄增加5岁就可以用这个操作符
- $set:将文档中的字段,更新为传入的字段。上面已经演示过了
- $unset:将文档中的某个字段删除
- $rename:给字段重命名
- (下面的操作符都是用来操作文档中类型是数组的字段)
- $push:将传入的参数追加到,文档中某个字段中,要追加的字段必须是数组类型
- $addToSet:在文档某个数组类型的字段中增加值,和上面两个操作符类似,不过这个操作符在增加值时,数组中不能存在要增加的值
- $pop:删除文档数组类型字段中第一个 {$pop:{name:1}} 或者最后一个值 {$pop:{name:-1}}
- $pull:删除和传入参数相等的第一个值
- $pullAll:和 $pull 一样删除值,$pullAll 可以传入数组,一次删除多个值
- 参考文档:https://blog.csdn.net/u014344668/article/details/52460682
save() 语法:
db.collection.save(

   <document>,

   {

     writeConcern: <document>

   }

)
- docment:文档
案例:
先查询一下所有的用户,然后把_id为2的用户年龄改为不详。save() 方法会根据主键_id为条件替换文档
> db.userinfo.find()

{ "_id" : , "name" : "郭大爷", "sex" : "男", "age" : "" }

{ "_id" : , "name" : "郭老师", "sex" : "男", "age" : "" }

{ "_id" : , "name" : "郭少爷", "sex" : "男", "age" : "" }

> var user = { "_id" : , "name" : "郭老师", "sex" : "男", "age" : "不详" }

> db.userinfo.save(user)

WriteResult({ "nMatched" : , "nUpserted" : , "nModified" :  })

> db.userinfo.find()

{ "_id" : , "name" : "郭大爷", "sex" : "男", "age" : "" }

{ "_id" : , "name" : "郭老师", "sex" : "男", "age" : "不详" }

{ "_id" : , "name" : "郭少爷", "sex" : "男", "age" : "" }
问题:
save() 方法是以主键_id作条件,来替换文档,如果在传入的文档中没有主键_id,会怎么样?下面我们试一下
> var user = { "name" : "郭老师", "sex" : "男", "age" : "不详" }

> db.userinfo.save(user)

WriteResult({ "nInserted" :  })

> db.userinfo.find()

{ "_id" : , "name" : "郭大爷", "sex" : "男", "age" : "" }

{ "_id" : , "name" : "郭老师", "sex" : "男", "age" : "不详" }

{ "_id" : , "name" : "郭少爷", "sex" : "男", "age" : "" }

{ "_id" : ObjectId("5abb2f42a3aadbe625070c51"), "name" : "郭老师", "sex" : "男", "age" : "不详" }
也可以执行成功,不过没有更新其中的一个文档,却新插入了一条数据
7、查询文档
语法:
db.collection.find(query, projection)
- query:查询条件
案例:
可以在 find() 方法后面在 pertty() 方法以格式化的方式显示文档
> db.userinfo.find()

{ "_id" : , "name" : "郭大爷", "sex" : "男", "age" : "" }

{ "_id" : , "name" : "郭老师", "sex" : "男", "age" : "不详" }

{ "_id" : , "name" : "郭少爷", "sex" : "男", "age" : "" }

{ "_id" : ObjectId("5abb2f42a3aadbe625070c51"), "name" : "郭老师", "sex" : "男", "age" : "不详" }

> db.userinfo.find().pretty()

{ "_id" : , "name" : "郭大爷", "sex" : "男", "age" : "" }

{ "_id" : , "name" : "郭老师", "sex" : "男", "age" : "不详" }

{ "_id" : , "name" : "郭少爷", "sex" : "男", "age" : "" }

{

    "_id" : ObjectId("5abb2f42a3aadbe625070c51"),

    "name" : "郭老师",

    "sex" : "男",

    "age" : "不详"

}
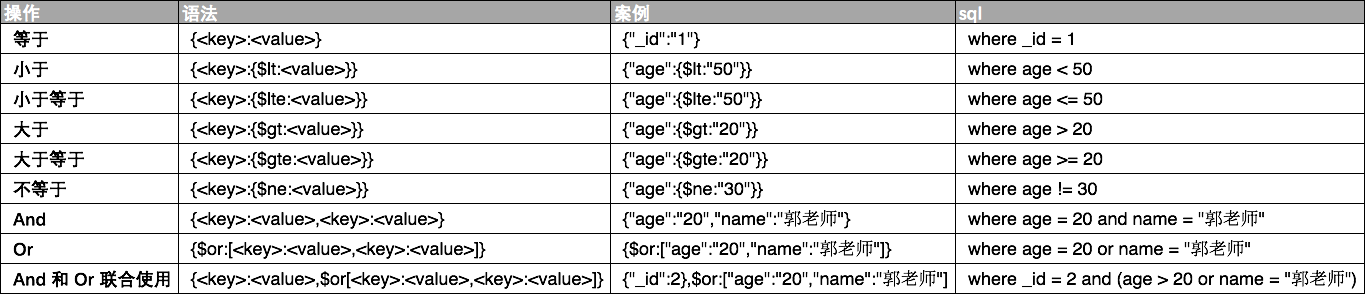
mongodb query 条件与 sql where 条件 对比
8、$type 操作符
匹配字段类型
> db.userinfo.find()

{ "_id" : , "age" :  }

{ "_id" : , "name" : "郭老师", "sex" : "男", "age" : "不详" }

{ "_id" : , "age" :  }

{ "_id" : ObjectId("5abb2f42a3aadbe625070c51"), "name" : "郭老师", "sex" : "男", "age" : "不详" }

> db.userinfo.find({"age":{$type:}})

{ "_id" : , "name" : "郭老师", "sex" : "男", "age" : "不详" }

{ "_id" : ObjectId("5abb2f42a3aadbe625070c51"), "name" : "郭老师", "sex" : "男", "age" : "不详" }
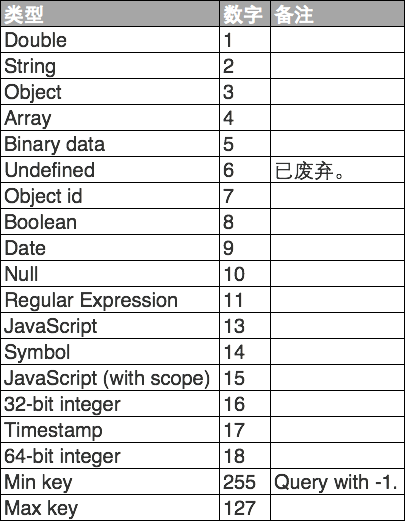
上面我们把字段 age 类型为 String 的文档查询出来,下面是 mongodb 中类型和数字的对照表
9、Limit() 方法与 Skip() 方法
Limit()
语法
db.集合名称.find().limit(数量)
取集合中指定数量的数据
案例
 db.userinfo.find()

{ "_id" : , "name" : "郭大爷", "sex" : "男", "age" : "" }

{ "_id" : , "name" : "郭老师", "sex" : "男", "age" : "不详" }

{ "_id" : , "name" : "郭少爷", "sex" : "男", "age" : "" }

> db.userinfo.find().limit()

{ "_id" : , "name" : "郭大爷", "sex" : "男", "age" : "" }

{ "_id" : , "name" : "郭老师", "sex" : "男", "age" : "不详" }
Skip()
语法
db.集合名称.find().skip(数量)
在集合中取数据时跳过指定量数据
案例
> db.userinfo.find()

{ "_id" : , "name" : "郭大爷", "sex" : "男", "age" : "" }

{ "_id" : , "name" : "郭老师", "sex" : "男", "age" : "不详" }

{ "_id" : , "name" : "郭少爷", "sex" : "男", "age" : "" }

> db.userinfo.find().skip()

{ "_id" : , "name" : "郭老师", "sex" : "男", "age" : "不详" }

{ "_id" : , "name" : "郭少爷", "sex" : "男", "age" : "" }
这两个方法配合使用,就可以达到分页的目的
10、排序
语法
>db.collection.find().sort({key:})
key:指定排序列,1代表正序、-1代表倒序
案例
> db.userinfo.find()

{ "_id" : , "name" : "郭大爷", "sex" : "男", "age" : "" }

{ "_id" : , "name" : "郭老师", "sex" : "男", "age" : "不详" }

{ "_id" : , "name" : "郭少爷", "sex" : "男", "age" : "" }

> db.userinfo.find().sort({"age":})

{ "_id" : , "name" : "郭少爷", "sex" : "男", "age" : "" }

{ "_id" : , "name" : "郭大爷", "sex" : "男", "age" : "" }

{ "_id" : , "name" : "郭老师", "sex" : "男", "age" : "不详" }

> db.userinfo.find().sort({"age":-})

{ "_id" : , "name" : "郭老师", "sex" : "男", "age" : "不详" }

{ "_id" : , "name" : "郭大爷", "sex" : "男", "age" : "" }

{ "_id" : , "name" : "郭少爷", "sex" : "男", "age" : "" }

>
上面分别是不排序、根据age正序、根据age倒序查询
11、删除文档
语法
db.collection.remove(

   <query>,

   <justOne>

)
- query:删除的条件
- justOne:如果为 true 或者 1,只删除满足条件的第一个文档
案例
> db.userinfo.find()

{ "_id" : , "name" : "郭大爷", "sex" : "男", "age" : "" }

{ "_id" : , "name" : "郭老师", "sex" : "男", "age" : "不详" }

{ "_id" : , "name" : "郭少爷", "sex" : "男", "age" : "" }

> db.userinfo.remove({"sex":"男"},true)

WriteResult({ "nRemoved" :  })

> db.userinfo.find()

{ "_id" : , "name" : "郭老师", "sex" : "男", "age" : "不详" }

{ "_id" : , "name" : "郭少爷", "sex" : "男", "age" : "" }

> db.userinfo.remove({"sex":"男"})

WriteResult({ "nRemoved" :  })

> db.userinfo.find()
>
12、删除集合
语法
db.collection.drop()
案例
> show collections

userinfo

> db.userinfo.drop()

true

> show collections

>
MongoDB 基础命令 (MongoDB Shell)的更多相关文章
- MongoDB基础命令笔记
一.创建数据库 use foobar 二.创建集合 db.persons.insert({name:"zhaomin",age:23}) 三.查找 db.persons.find( ...
- MongoDB 基础命令行
本文专门介绍MongoDB的命令行操作.其实,这些操作在MongoDB官网提供的Quick Reference上都有,但是英文的,为了方便,这里将其稍微整理下,方便查阅. 登录和退出 mongo命令直 ...
- MongoDB基础命令
MongoDB 入门命令 查看当前数据库 > show dbs admin 0.000GB config 0.000GB local 0.000GB > -- use databaseNa ...
- MongoDB基础命令及操作
MongoDB:NoSQL数据库 MongoDB中的重要指示点 MongoDB中的三要素 数据库 集合 文档 MongoDB中的数据存储是以Bson的形式存储的,Bson是二进制的json,所以看上去 ...
- 2、链接数据库+mongodb基础命令行+小demo
链接数据库并且打印出数据的流程:1.在CMD里面输入 mongod 2.在CMD里面输入 mongo 3.在输入mongodb命令行里面进行操作,首先输入 show dbs 来查看是否能够链接得上库4 ...
- MongoDB 基础命令——数据库表的增删改查——遍历操作表中的记录
分组排序查询最大记录 //对 "catagory" 不等于 null 的数据进行分组查询,且查询结果倒序 db.getCollection('userAccount').aggre ...
- MongoDB 基础命令使用学习记录
1. 启动 mongod 几个常用命令说明:--dbpath : 指定数据库相关文件的存储目录 --logpath: 指定日志文件的存储目录 --port: 指定数据库的端口,默认是 27017 -- ...
- Mongodb基础知识----Mongodb权威指南阅读
文档是Mongodb中数据的基本单元,类型关系型数据库中的行,每个文档都有一个键值唯一的键_id.集合可以看做拥有动态模式的表. Mongodb一个实例可以拥有多个相互独立的数据库. Mongodb区 ...
- Linux 基础命令3 shell
echo 显示一行文本 各种展开的实例 波浪线展开 算术表达式展开 支持的运算 奇怪的花括号展开 花括号的..用法 花括号(任选一个)的嵌套 参数展开$符很重要哦(一种展开做另一种的参数) 命令的替换 ...
随机推荐
- 对java前后端分离的理解
到目前为止,身为一个java后端开发人员的我, 在工作期间,无非就是ui设计页面,前端开发html,之后将做好的页面交给我,我负责后台逻辑一件html的页面渲染. 好好滴一个后台开发人员,莫名其妙的做 ...
- 洛谷——P2393 yyy loves Maths II
P2393 yyy loves Maths II 题目背景 上次蒟蒻redbag可把yyy气坏了,yyy说他只是小学生,蒟蒻redbag这次不坑他了. 题目描述 redbag给了yyy很多个数,要yy ...
- 在 HTTP Request 中加入特定的 Header
转:http://www.findspace.name/easycoding/1137 要加入 header,需要使用 Request 对象: #code1 import urllib2 reques ...
- 深入理解javascript函数系列第三篇
前面的话 函数是javascript中特殊的对象,可以拥有属性和方法,就像普通的对象拥有属性和方法一样.甚至可以用Function()构造函数来创建新的函数对象.本文是深入理解javascript函数 ...
- java8新特性——方法引用与构造器引用
上篇文章简单学习了java8内置得4大核心函数式接口,这类接口可以解决我们遇到得大多数得业务场景得问题.今天来简单学习一下方法引用与构造器引用. 一.方法引用 方法引用:若lambda 体中得内容已经 ...
- New Year Tree 【DFS序+线段树区间查询修改+二进制保存状态】
题目链接[http://codeforces.com/problemset/problem/620/E] 题意:给出n个数,每个数有一个初始的颜色.由这n个数组成一颗树.有两种操作1.将以节点u为根的 ...
- 【BZOJ 4027】 4027: [HEOI2015]兔子与樱花 (贪心)
4027: [HEOI2015]兔子与樱花 Description 很久很久之前,森林里住着一群兔子.有一天,兔子们突然决定要去看樱花.兔子们所在森林里的樱花树很特殊.樱花树由n个树枝分叉点组成,编号 ...
- Linux下burg引导
用得比较久了,比grub顺手: 安装: sudo add-apt-repository ppa:n-muench/burg; sudo apt-get update; sudo apt-get ins ...
- [BZOJ4892][TJOI2017]DNA(后缀数组)
题目描述 加里敦大学的生物研究所,发现了决定人喜不喜欢吃藕的基因序列S,有这个序列的碱基序列就会表现出喜欢吃藕的性状,但是研究人员发现对碱基序列S,任意修改其中不超过3个碱基,依然能够表现出吃藕的性状 ...
- Spring Mvc 前台数据的获取、SpringMvc 表单数据的获取
首先在web.xml 里面配置一个编码过滤器 <!-- springmvc框架本身没有处理请求编码,我们自己配置一个请求编码过滤器 --> <filter> <filte ...