
CSS(二):选择器
一、基本选择器
1、标签选择器
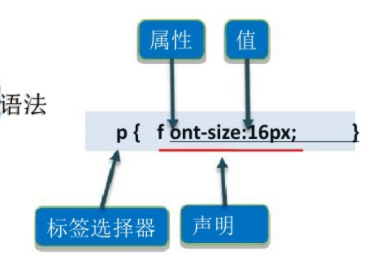
HTML标签作为标签选择器的名称,例如<h1>~<h6>、<p>等。
语法:
p{font-size: 16px;}
p:标签选择器。
font-size: 16px; 声明。
font-size:属性。
16px 属性值。
示例:
 <!DOCTYPE>

 <html>

 <head>

   <meta charset="utf-8" />

   <title>基本选择器</title>

   <style type="text/css">

      /*多行注释:标签选择器*/

      p{

           color: red;

      }

      h1{

           font-weight: normal;

           font-size: 12px;

      }

   </style>

 </head>

 <body>

     <p>我是p标签</p>

     <h1>我是h1标签</h1>

 </body>

 </html>
效果:

2、类选择器
语法:
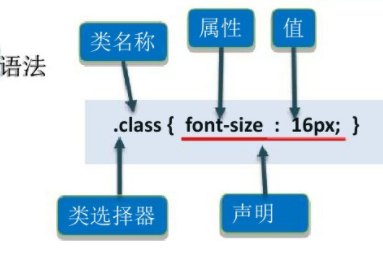
.class {font-size:16px;}
.class:类选择器。
class:类名称。
font-size:16px;声明。
font-size:属性。
16px:属性值。
注意:
类选择器一定以"."开头,后面跟类名。
使用类选择器:
<标签名 class="类名称">标签内容</标签名称>
注意:
网页中可给不同标签使用相同的class。
示例:
<!DOCTYPE>

<html>

<head>

  <meta charset="utf-8" />

  <title>类选择器</title>

  <style type="text/css">

     /*类选择器:.class*/

     .box{

      font-weight: bold;

      font-size: 16px;

      color: blue;

     }

  </style>

</head>

<body>

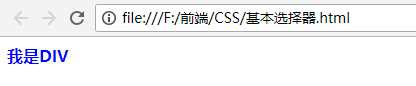
    <div class="box">我是DIV</div>

</body>

</html>
效果:
3、ID选择器
id选择器可以为标有特定id的HTML元素指定特定的样式。
语法:
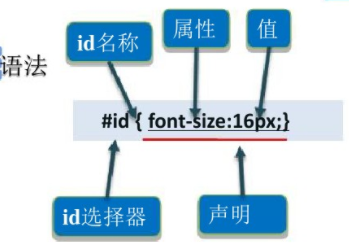
#id名称{声明}
注意:
ID选择器以“#”开头,后面跟选择器名称.
#id {font-size:16px;}
#id:ID选择器。
id:id名称。
font-size:16px;声明。
font-size:属性。
16px:属性值。
使用ID选择器:
<标签名 id="ID选择器名称">标签内容</标签名>
注意:
网页中标签的ID不能重复,唯一存在。
<!DOCTYPE>

<html>

<head>

  <meta charset="utf-8" />

  <title>类选择器</title>

  <style type="text/css">

     /*ID选择器:.#ID名称*/

     #small{

         background: red;

         font-size: 20px;

     }

  </style>

</head>

<body>

    <span id="small">我是span标签</span>

</body>

</html>
效果:

在现代布局中,id选择器常常用于建立派生选择器
例如:
#sidebar p{

    font-style: italic;

    text-align: right;

    margin-top: 1em;

}
上面的样式只会应用于出现在id是sidebar的元素内的段落。
即使被标注为sidebar的元素只能在文档中出现一次,这个id选择器作为派生选择器也可以被使用很多次。
例如:
#sidebar p{

    font-style: italic;

    text-align: right;

    margin-top: 1em;

}

#sidebar h2{

    font-size: 1em;

    font-weight: normal;

    font-style: italic;

    margin:;

    line-height: 1.5;

    text-align: center;

}
在这里,与页面中的其他 p 元素明显不同的是,sidebar 内的 p 元素得到了特殊的处理,同时,与页面中其他所有 h2 元素明显不同的是,sidebar 中的 h2 元素也得到了不同的特殊处理。
二、复合选择器
1、并集选择器(又称群组选择器)
示例
p,#id,.class{
font-weight: normal;
font-size: 12px;
}
经验:
1、多个选择器之间可以是多个不同或相同的类型。
2、多个选择器之间必须使用英文半角输入法逗号","隔开。
示例:
<!DOCTYPE>

<html>

<head>

  <meta charset="utf-8" />

  <title>类选择器</title>

  <style type="text/css">

  /* 实现效果:文字都是红色*/

  /* 实现方式1:使用各自的选择器实现*/

     /* h3{

          color: red;

      }

      .two{

          color: red;

      }

      p{

          color: red;

      }

      #four{

          color: red;

      }*/

     /*实现方式2:使用并集选择器,可以减少代码的书写*/

     h3,.two,p,#four{

         color: red;

     }

     /*使用了并集选择器之后,还可以在单独设置p标签*/

     p{

         font-size: 50px;

     }

  </style>

</head>

<body>

    <h3>第一个标题</h3>

    <h2 class="two">第二个标题</h2>

    <p>第二段文字内容</p>

    <h1 id="four">第三个标题</h1>

</body>

</html>
效果:

2、交集选择器(指定标签选择器)
语法:
h3.second{
font-size:14px;
color:green;
}
经验:
1、格式为:标签+类选择器 或 标签+ID选择器。
2、选择器之间不能有空格。
示例:
<!DOCTYPE>

<html>

<head>

  <meta charset="utf-8" />

  <title>交集选择器(指定标签选择器)</title>

</head>

<body>

    <h3>第一个标题</h3>

    <h3 class="two">第二个标题</h3>

    <p class="two">第二段文字内容</p>

    <h1 id="four">第三个标题</h1>

</body>

</html>
a、先定义一个h3选择器,字体颜色为blue:
h3{

     color: blue;

}
这是查看效果:

这是所有的h3标签的字体颜色都会变成蓝色,这并不是我们想要的效果。
b、定义类选择器:
.two{

        color: blue;

}
这是在查看网页效果:

这是所有class为two的标签的字体颜色都变为了蓝色。
c、定义交集选择器
h3.two{

        color: blue;

}
这是在查看网页的效果:
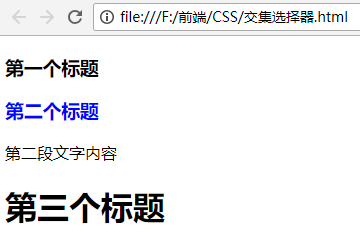
这时会发现,只有第二个h3标签的字体颜色变成了蓝色,其他标签的字体颜色不会变。
完整示例:
<!DOCTYPE html>

<html lang="en">

<head>

    <meta charset="UTF-8">

    <meta name="viewport" content="width=device-width, initial-scale=1.0">

    <meta http-equiv="X-UA-Compatible" content="ie=edge">

    <title>交集选择器(指定标签选择器)</title>

    <style type="text/css">

    /*所有h3标签的文字都会变成蓝色*/

    /*  h3{

        color: blue;

    } */

    /*所有class为two的标签的字体颜色都变成了蓝色*/

    /*   .two{

        color: blue;

    } */

    /*读法:名字为two的h3标签

      只有第二个h3标签的字体颜色才会变成蓝色,p标签的颜色不会变

      写法:标签+类选择器

    */

    h3.two{

        color: blue;

    }

    /*

    读法:名字为two的p标签

    只有p标签的字体颜色才会变成黄色,h3标签的颜色不会变

    */

    p.two{

        color: yellow;

    }

    /*

    写法:标签+ID选择器

    */

    h1#four{

        color: green;

    }

    </style>

</head>

<body>

    <h3>第一个标题</h3>

    <h3 class="two">第二个标题</h3>

    <p class="two">第二段文字内容</p>

    <h1 id="four">第三个标题</h1>

</body>

</html>
效果:

3、后代选择器
语法:
p a{
font-size:14px;
color:green;
}
经验
1、选择器之间可以是多个不同或相同类型并有层级关系的;
2、选择器之间用空格隔开;
3、格式:标签 标签选择器或标签 类选择器或标签 ID选择器。
示例:
先定义如下的HTML结构:
<!DOCTYPE html>

<html lang="en">

<head>

    <meta charset="UTF-8">

    <meta name="viewport" content="width=device-width, initial-scale=1.0">

    <meta http-equiv="X-UA-Compatible" content="ie=edge">

    <title>后代选择器</title>

</head>

<body>

    <div class="box">

        <h3>hello</h3>

        <p>欢迎大家</p>

        <p>一起学习进步!</p>

    </div>

    <h3>Hello World</h3>

</body>

</html>
效果:

要实现的效果:Div里面的h3标签的字体变为红色,和DIV平级的h3标签的字体颜色不变。
如果定义h3标签字体样式为红色:
h3{

     color: red;

}
效果:
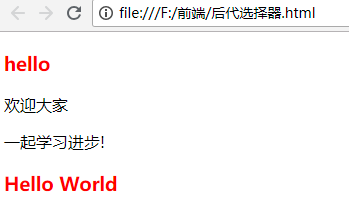
这时会发现所有的h3标签的字体颜色都变为了红色。
这时可以使用下面的样式:
div h3{

       color: red;

}
效果:
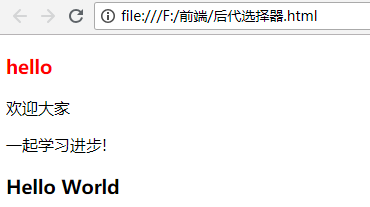
这样就只有DIV里面的h3标签的字体颜色变成红色。
如果在DIV的p标签里面又添加了一个h3标签会是什么效果呢?HTML结构如下:
<div class="box">

        <h3>hello</h3>

        <p>欢迎大家</p>

        <p>一起学习进步!

            <h3>我的p标签下面的h3</h3>

        </p>

</div>

<h3>Hello World</h3>
效果:

说明:
只要h3在DIV里面,无论是直属的子级,或者是子级的子级,都会应用该样式。
在看下面的例子:
<!DOCTYPE html>

<html lang="en">

<head>

    <meta charset="UTF-8">

    <meta name="viewport" content="width=device-width, initial-scale=1.0">

    <meta http-equiv="X-UA-Compatible" content="ie=edge">

    <title>后代选择器</title>

    <style type="text/css">

        /* 所有的h3标签的字体都会变成红色 */

       /*  h3{

            color: red;

        } */

        div h3{

            color: red;

        }

        div .first{

            font-weight: bold;

            color: yellow;

        }

    </style>

</head>

<body>

    <div class="box">

        <h3>hello</h3>

        <p class="first">欢迎大家</p>

        <p>一起学习进步!

            <h3>我的p标签下面的h3</h3>

        </p>

    </div>

    <h3>Hello World</h3>

</body>

</html>
效果:
 .
.
三、通配选择器
使用*表示通配选择器,表示所有标签都应用该样式。
例如:
<!DOCTYPE html>

<html lang="en">

<head>

    <meta charset="UTF-8">

    <meta name="viewport" content="width=device-width, initial-scale=1.0">

    <meta http-equiv="X-UA-Compatible" content="ie=edge">

    <title>通配选择器</title>

    <style type="text/css">

       *{

           color: red;

       }

    </style>

</head>

<body>

    <div class="box">

        <h3>hello</h3>

        <p class="first">欢迎大家</p>

        <p>一起学习进步!

            <h3>我的p标签下面的h3</h3>

        </p>

    </div>

    <h3>Hello World</h3>

</body>

</html>
效果:

练习:
实现如下的网页样式:

HTML代码结构如下:
“如梦令”为h3标签且class为title。
“译文”为h3标签且id为translation。
诗词和翻译段落都为p标签,但翻译段落的class为second。
要去:
1、“如梦令”和“译文”字体大小为20px;
2、“译文”字体颜色为蓝色。
3、翻译段落的字体颜色为绿色。
代码如下:
<!DOCTYPE html>

<html lang="en">

<head>

    <meta charset="UTF-8">

    <meta name="viewport" content="width=device-width, initial-scale=1.0">

    <meta http-equiv="X-UA-Compatible" content="ie=edge">

    <title>CSS练习</title>

    <style type="text/css">

        h3{

            font-size: 20px;

        }

        /*交集选择器(指定标签选择器)*/

        /*id为translation的h3标签的字体颜色为蓝色*/

        h3#translation{

            color: blue;

        }

        /*class为second的p标签的字体颜色为绿色*/

        p.second{

            color: green;

        }

    </style>

</head>

<body>

    <h3 class="title">如梦令</h3>

    <hr />

    <p>

        昨夜雨疏风骤,浓睡不消残酒。<br />

        试问卷帘人,却道"海棠依旧"。<br />

        "知否?知否?应为绿肥红瘦"

    </p>

    <h3 id="translation">译文</h3>

    <p class="second">

        昨夜雨点稀疏,晚风急猛,我虽然睡了一夜,<br />

        扔有余罪未消。试问卷帘的侍女:海棠花怎么<br/>

        样?她说海棠花依然如旧。知道吗?知道吗?<br />

        应是绿叶繁茂,红花凋零。

    </p>

</body>

</html>
效果:

三、选择器优先级
1、标签选择器和类选择器比较
看下面的示例代码:
<!DOCTYPE html>

<html lang="en">

<head>

    <meta charset="UTF-8">

    <meta name="viewport" content="width=device-width, initial-scale=1.0">

    <meta http-equiv="X-UA-Compatible" content="ie=edge">

    <title>标签选择器和类选择器优先级比较</title>

    <style type="text/css">

       /*标签选择器*/

       h2{

           color: red;

       }

       /*类选择器*/

       .first{

           color: blue;

       }

    </style>

</head>

<body>

    <h2>标签选择器</h2>

    <h2 class="first">类选择器</h2>

</body>

</html>
效果:

从截图中可以看出:类选择器的优先级高于标签选择器。
注意:
更换<style>标签中标签选择器和类选择器的先后顺序得到的结果也是一样的。
2、标签选择器和ID选择器的比较
<!DOCTYPE html>

<html lang="en">

<head>

    <meta charset="UTF-8">

    <meta name="viewport" content="width=device-width, initial-scale=1.0">

    <meta http-equiv="X-UA-Compatible" content="ie=edge">

    <title>标签选择器和ID选择器的比较</title>

    <style type="text/css">

        /*标签选择器*/

        h2{

            color: red;

        }

        /*id选择器*/

        #first{

            color: blue;

        }

     </style>

</head>

<body>

        <h2>标签选择器</h2>

        <h2 id="first">id选择器</h2>

</body>

</html>
效果:

从图中可以看出:id选择器的优先级高于标签选择器。
3、类选择器和id选择器的比较
看下面的代码:
<!DOCTYPE html>

<html lang="en">

<head>

    <meta charset="UTF-8">

    <meta name="viewport" content="width=device-width, initial-scale=1.0">

    <meta http-equiv="X-UA-Compatible" content="ie=edge">

    <title>类选择器和ID选择器的比较</title>

    <style type="text/css">

        /*类选择器*/

        .first{

            color: red;

        }

        /*id选择器*/

        #second{

            color: blue;

        }

     </style>

</head>

<body>

        <h2 class="first" id="second">类选择器和id选择器优先级比较</h2>

</body>

</html>
效果:
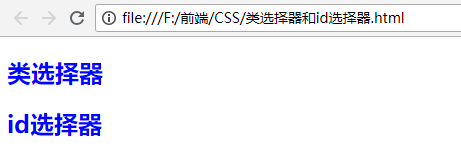
从截图中可以看出:id选择器的优先级高于类选择器。
总结:
基本选择器的优先级:ID选择器>类选择器>标签选择器。
CSS(二):选择器的更多相关文章
- IE7浏览器下CSS属性选择器二三事
一.为何专门说起IE7 以前,或者说数年前,我们从事桌面端网页开发的时候,基本上都还要兼顾IE6浏览器, 即使有些特性,IE7支持,我们也会忽略之.于是,我们会不自然地把IE6和IE7浏览器归为一路货 ...
- CSS基础选择器(选择器的优先级),CSS样式块( 长度/颜色/显示方式/文本样式),盒模型组成,盒模型-block,盒模型布局
CSS基础选择器 (1)id选择器: # => 标签拥有 id="user" 属性 <style> #user { width: 200px; ...
- CSS常用选择器的认识
---恢复内容开始--- 前言:在CSS中选择器的种类有很多很多,但是在实际的工作中,我们经常会用到的分为两大类:基础选择器和复合选择器这两个大类,学习选择器的目的就是为了在复杂的页面中能够快速定位到 ...
- css高级选择器&盒模型
css高级选择器&盒模型 1.组合选择器 群组选择器 /* 每个选择器为可以为三种基础选择器的任意一个,用逗号隔开,控制多个*/ div,.div,#div{ color:red } 后代(子 ...
- css样式——选择器(三)
https://www.cnblogs.com/haiyan123/p/7552235.html 1.怎么找到标签 2.如何操作标签的对象 一.css概述 CSS是Cascading Style Sh ...
- CSS 1. 选择器
1.css的介绍 CSS是指层叠样式表(Cascading Style Sheets),样式定义如何显示HTML元素,样式通常又会存在于样式表中.也就是说把HTML元素的样式都统一收集起来写在一个地方 ...
- CSS 分类 选择器
CSS:层叠样式表(英文全称:Cascading Style Sheets) 后缀名:css 标志 style 对网页中元素位置的排版进行像素级精 ...
- 小tip: CSS后代选择器可能的错误认识——张鑫旭
一.关于类选择器的一个问题 假设有下面一个面试题,CSS代码如下: .red { color: red; } .green { color: green; } HTML如下: <div clas ...
- CSS 从入门到放弃系列:CSS的选择器和优先级
CSS的选择器和优先级 CSS的N种选择器 !important 其实这个玩意不算什么选择器,放在这只是为了突出这个选择器优先级或者说权重的从高到低而已.. 内联方式(行间样式) <div st ...
- css 引入方式以及css的选择器
一.css的引入方式: 1.行内样式 <div> <p style="color: red">我是一个段落</p> </div> 2 ...
随机推荐
- angularjs中ng-repeat的使用
第一个例子:使用ng-repeat最简单的例子 <html ng-app="myApp"> <head> <title>angularjs-de ...
- Spring 的ioc
Spring的两个非常重要的功能ioc和aop 依赖反转:依赖对象的获得被反转:很多非凡的应用都是由两个或多个类通过彼此的合作来上线业务逻辑.这使得每一个对象都须要与其它对象合作,也就是说 一个对象获 ...
- 解决Android SDK Manager下载问题和android studio每次启动都要在fetching Android sdk compoment information
1.能解决国内访问Google服务器的困难启动 Android SDK Manager ,打开主界面,依次选择「Tools」.「Options...」,弹出『Android SDK Manager - ...
- 基于 bootstrap 的数据展示--bootgrid 样式改动。
bootgrid 的官网案例 http://www.jquery-bootgrid.com/Examples 官方demo 样式 基于项目须要,取消了一些不须要 的功能,改动了源代码 最后样式成了这样 ...
- javascript 获取页面尺寸/位置
************************************************************************//ie中如果全部不给定值则会都为零(宽和高在设置一个的 ...
- Bootstrap 3 Menu Generator
Bootstrap 3 Menu Generator
- iOS 全屏侧滑/UIScrollView/UISlider间滑动冲突
代码地址如下:http://www.demodashi.com/demo/13848.html 效果预览 一.前期准备 有一个支持全屏侧滑返回的视图控制器ViewController,ViewCont ...
- 【LeetCode】106. Construct Binary Tree from Inorder and Postorder Traversal
Construct Binary Tree from Inorder and Postorder Traversal Given inorder and postorder traversal of ...
- mosquitto配置文件详解
安装完成之后,所有配置文件会被放置于/etc/mosquitto/目录下,其中最重要的就是Mosquitto的配置文件,即mosquitto.conf,以下是详细的配置参数说明. # Config f ...
- android 屏幕上面画线
作业如下:在android屏幕上面任意画线 package feng.f121.drawline;//本人创建的包名,每人有每人的不同的包 import java.security.PublicKey ...