Android——布局(线性布局linearLayout,表格布局TableLayout,帧布局FrameLayout)
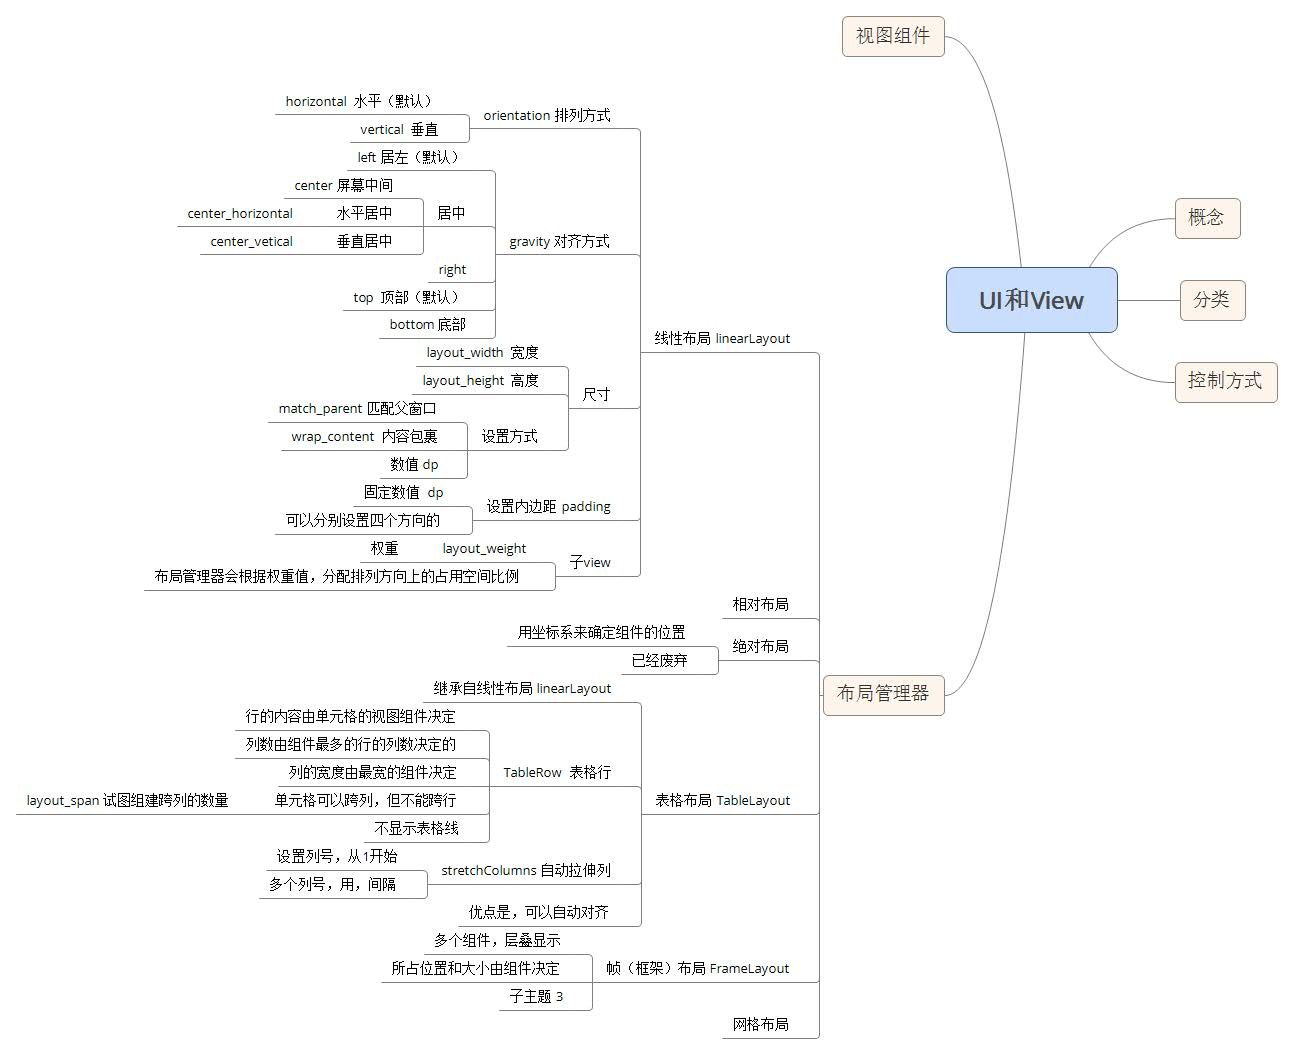
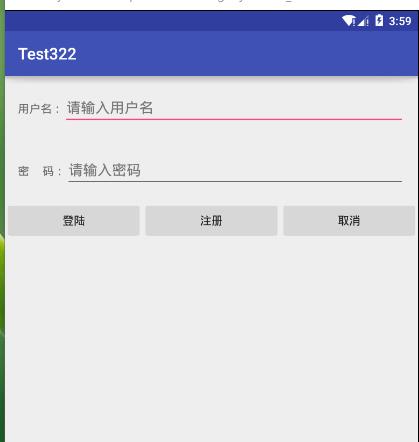
线性布局:
<?xml version="1.0" encoding="utf-8"?>

<LinearLayout xmlns:android="http://schemas.android.com/apk/res/android"

    xmlns:tools="http://schemas.android.com/tools"

    android:layout_width="match_parent"

    android:layout_height="match_parent"

    tools:context="com.example.chenshuai.test322.MainActivity"

    android:orientation="vertical"

   android:gravity="center_horizontal"

    >

    <LinearLayout

        android:layout_width="match_parent"

        android:layout_height="wrap_content"

        android:padding="16dp">

        <TextView

            android:layout_width="wrap_content"

            android:layout_height="wrap_content"

            android:text="用户名:"

            />

        <EditText

            android:layout_width="match_parent"

            android:layout_height="wrap_content"

            android:hint="请输入用户名"/><!--默认值-->

    </LinearLayout>

    <LinearLayout

        android:layout_width="match_parent"

        android:layout_height="wrap_content"

        android:padding="16dp">

        <TextView

            android:layout_width="wrap_content"

            android:layout_height="wrap_content"

            android:text="密     码:"

            />

        <EditText

            android:layout_width="match_parent"

            android:layout_height="wrap_content"

            android:hint="请输入密码"

            android:password="true"/><!--密码输入框-->

    </LinearLayout>

    <LinearLayout

        android:layout_width="match_parent"

        android:layout_height="wrap_content"

        android:gravity="center_horizontal">

        <Button

            android:layout_width="0dp"

            android:layout_height="wrap_content"

            android:text="登陆"

            android:layout_weight="1"/><!--权重-->

        <Button

            android:layout_width="0dp"

            android:layout_height="wrap_content"

            android:text="注册"

            android:id="@+id/button2"

            android:layout_weight="1"/>

        <Button

            android:layout_width="0dp"

            android:layout_height="wrap_content"

            android:text="取消"

            android:layout_weight="1"/>

    </LinearLayout>

</LinearLayout>
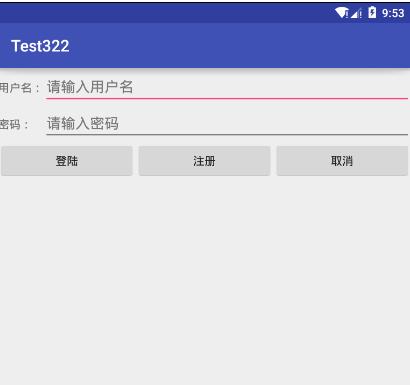
表格布局
<?xml version="1.0" encoding="utf-8"?>

<TableLayout xmlns:android="http://schemas.android.com/apk/res/android"

    android:layout_width="match_parent"

    android:layout_height="match_parent"

    android:stretchColumns="1,2">

    <TableRow>

        <TextView

            android:layout_width="wrap_content"

            android:layout_height="wrap_content"

            android:text="用户名:"

            />

        <EditText

            android:layout_width="match_parent"

            android:layout_height="wrap_content"

            android:layout_span="2"

            android:hint="请输入用户名"/>

    </TableRow>

    <TableRow>

        <TextView

            android:layout_width="wrap_content"

            android:layout_height="wrap_content"

            android:text="密码:"

            />

        <EditText

            android:layout_width="match_parent"

            android:layout_height="wrap_content"

            android:password="true"

            android:layout_span="2"

            android:hint="请输入密码"/>

    </TableRow>

    <TableRow>

        <Button

            android:layout_width="0dp"

            android:layout_height="wrap_content"

            android:text="登陆"

            android:layout_weight="1"/><!--用权重对应的数值设为0dp-->

        <Button

            android:layout_width="0dp"

            android:layout_height="wrap_content"

            android:text="注册"

            android:id="@+id/button2"

            android:layout_weight="1"/>

        <Button

            android:layout_width="0dp"

            android:layout_height="wrap_content"

            android:text="取消"

            android:layout_weight="1"/>

    </TableRow>

</TableLayout>
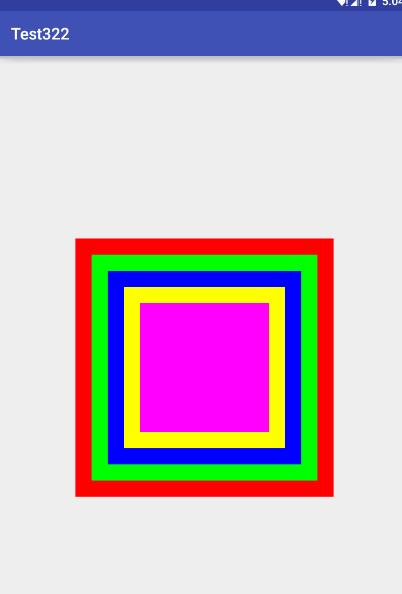
帧布局
<?xml version="1.0" encoding="utf-8"?>

<FrameLayout xmlns:android="http://schemas.android.com/apk/res/android"

    android:layout_width="match_parent"

    android:layout_height="match_parent">

    <TextView

        android:layout_width="wrap_content"

        android:layout_height="wrap_content"

        android:width="320dp"

        android:height="320dp"

        android:layout_gravity="center"

        android:background="#f00"/><!--红色-->

    <TextView

        android:layout_width="wrap_content"

        android:layout_height="wrap_content"

        android:width="280dp"

        android:height="280dp"

        android:layout_gravity="center"

        android:background="#0f0"/><!--绿色-->

    <TextView

        android:layout_width="wrap_content"

        android:layout_height="wrap_content"

        android:width="240dp"

        android:height="240dp"

        android:layout_gravity="center"

        android:background="#00f"/><!--蓝色-->

    <TextView

        android:layout_width="wrap_content"

        android:layout_height="wrap_content"

        android:width="200dp"

        android:height="200dp"

        android:layout_gravity="center"

        android:background="#ff0"/><!--黄色-->

    <TextView

        android:layout_width="wrap_content"

        android:layout_height="wrap_content"

        android:width="160dp"

        android:height="160dp"

        android:layout_gravity="center"

        android:background="#f0f"/><!--紫色-->

</FrameLayout>
Android——布局(线性布局linearLayout,表格布局TableLayout,帧布局FrameLayout)的更多相关文章
- Android 自学之帧布局 FrameLayout
帧布局(FrameLayout)直接继承了ViewGroup组件: 帧布局容器为每一个加入其中的组件都创建了一个空白的区域,这个区域我们称之为一帧,所有每个组件都占据一帧,这些都会根据gravity属 ...
- Android开发5:布局管理器2(表格布局TableLayout)
版本:Android4.3 API18 学习整理:liuxinming 概念 TableLayout继承了LinearLayout,因此它的本质依然是线性布局管理器. 表格布局采 ...
- Android -- UI布局管理,相对布局,线性布局,表格布局,绝对布局,帧布局
1. 相对布局 <RelativeLayout xmlns:android="http://schemas.android.com/apk/res/android" xmln ...
- Android五大布局详解——LinearLayout(线性布局)
Android五大布局 本篇开始介绍Android的五大布局的知识,一个丰富的界面显示总是要有众多的控件来组成的,那么怎样才能让这些控件能够按你的想法进行摆放,从而自定义你所想要的用户界面呢?这就牵涉 ...
- Android精通:TableLayout布局,GridLayout网格布局,FrameLayout帧布局,AbsoluteLayout绝对布局,RelativeLayout相对布局
在Android中提供了几个常用布局: LinearLayout线性布局 RelativeLayout相对布局 FrameLayout帧布局 AbsoluteLayout绝对布局 TableLayou ...
- [转]浅谈Android五大布局(二)——RelativeLayout和TableLayout
在浅谈Android五大布局(一)中已经描述了LinearLayout(线性布局).FrameLayout(单帧布局)和AbsoulteLayout(绝对布局)三种布局结构,剩下的两种布局Relati ...
- Android布局管理器(表格布局)
表格布局有TableLayout所代表,TableLayout继承了LinearLayout,因此他的本质依然是LinearLayout. 表格布局采用行.列的形式来进行管理,在使用的时候不需要声明多 ...
- Android笔记(七) Android中的布局——线性布局
我们的软件是由好多个界面组成的,而每个界面又由N多个控件组成,Android中借助布局来让各个空间有条不紊的摆放在界面上. 可以把布局看作是一个可以放置很多控件的容器,它可以按照一定的规律调整控件的位 ...
- 一步一步学android之布局管理器——LinearLayout
线性布局是最基本的一种布局,在基本控件篇幅中用到的都是LinearLayout,线性布局有两种方式,前面也有用到,一种是垂直的(vertical),一种是水平的(horizontal).我们同样来看下 ...
随机推荐
- [ES6] 05. The leg keyword -- 3. Block Scope
In ES6, IIFE is not necessary: // IIFE写法 (function () { var tmp = ...; ... }()); // 块级作用域写法 { let tm ...
- [RSpec] LEVEL 1: INTRODUCTION
Install RSpec: Describe Lets start writing a specification for the Tweet class. Write a describe blo ...
- UNIX网络编程学习笔记:值-结果(value-result)参数
前言 当把套接口地址结构传递给套接口函数时,总是通过指针来传递的,即传递的是一个指向结构的指针.结构的长度也作为参数来传递,其传递的方式取决于结构的传递方向:从进程到内核,还是从内核到进程. 1.从进 ...
- Android Studio优秀插件汇总
- JavaScript操作符
一元操作符 只能操作一个值的操作符叫做一元操作符. 递增和递减操作符 递增和递减操作符遵循下列规则: 在应用于一个包含有效数字字符的字符串时,先将其转换为数字值,再执行加减 1 的操作 ...
- android开发之数据库游标未关闭导致
replacements=[Ljava.lang.String;@4192fea8HARDWARE=hw7d501lmatchers=[Ljava.lang.String;@4192fe28RADIO ...
- 查看IE浏览器安装的插件
请移步至文章:http://blog.sina.com.cn/u/6452627072
- 如何配置 Oracle VirtualBox 中的客户机与物理机网络
当你在 Oracle VirtualBox 虚拟机软件 中安装了各种操作系统时,你可能需要实现物理机与虚拟机之间的相互访问. 在这篇文章中,我们将会以最简单明了的方式来说明如何配置客户机与 Linux ...
- 【laravel54】composer install与composer update的区别
1.基础概念: 我们需要明白laravel项目里面有2个配置文件,composer.json和composer.lock文件,前者是下载的依赖包配置文件,后者是锁定的包版本信息. 使用之前,需要cd ...
- Android 5.0最应该实现的8个期望
毫无疑问,Android 5 将是令人兴奋的操作系统,因为 Android4.0 至 4.4 版本之间并没有显著的差异,显然谷歌会在 5.0 版本中进行一些较大幅度的革新.那么,代号为“柠檬芝士蛋糕” ...