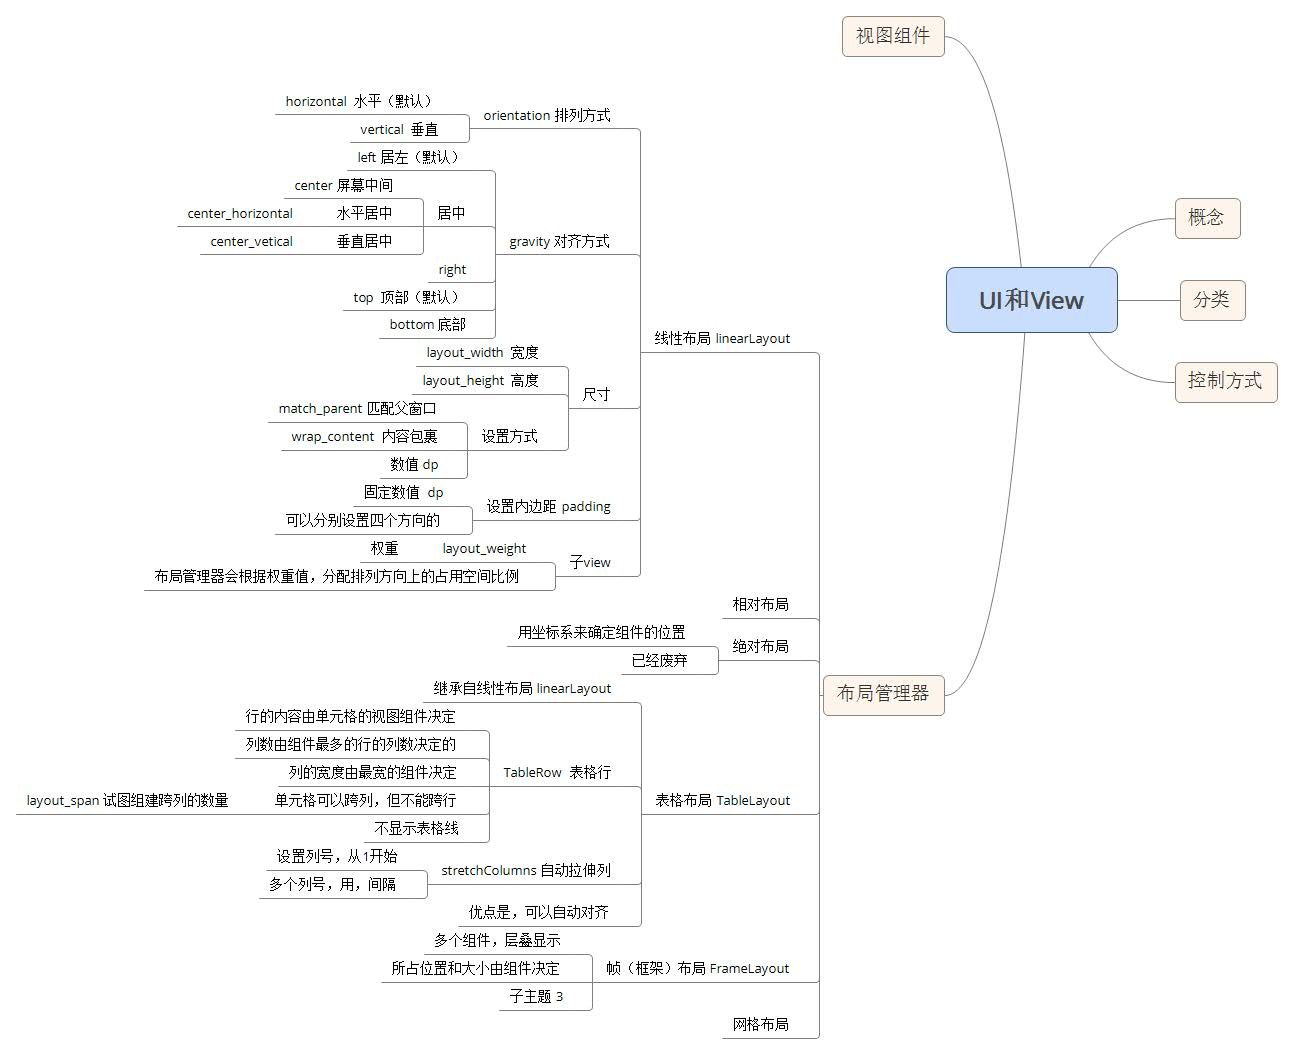
Android——布局(线性布局linearLayout,表格布局TableLayout,帧布局FrameLayout)
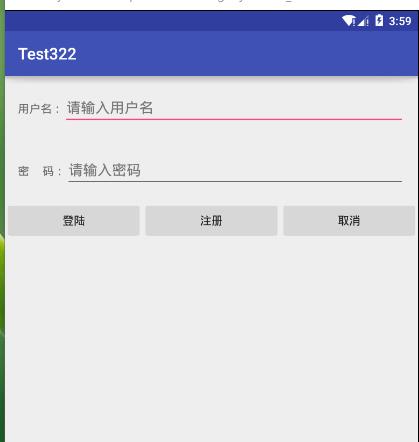
线性布局:
<?xml version="1.0" encoding="utf-8"?>

<LinearLayout xmlns:android="http://schemas.android.com/apk/res/android"

    xmlns:tools="http://schemas.android.com/tools"

    android:layout_width="match_parent"

    android:layout_height="match_parent"

    tools:context="com.example.chenshuai.test322.MainActivity"

    android:orientation="vertical"

   android:gravity="center_horizontal"

    >

    <LinearLayout

        android:layout_width="match_parent"

        android:layout_height="wrap_content"

        android:padding="16dp">

        <TextView

            android:layout_width="wrap_content"

            android:layout_height="wrap_content"

            android:text="用户名:"

            />

        <EditText

            android:layout_width="match_parent"

            android:layout_height="wrap_content"

            android:hint="请输入用户名"/><!--默认值-->

    </LinearLayout>

    <LinearLayout

        android:layout_width="match_parent"

        android:layout_height="wrap_content"

        android:padding="16dp">

        <TextView

            android:layout_width="wrap_content"

            android:layout_height="wrap_content"

            android:text="密     码:"

            />

        <EditText

            android:layout_width="match_parent"

            android:layout_height="wrap_content"

            android:hint="请输入密码"

            android:password="true"/><!--密码输入框-->

    </LinearLayout>

    <LinearLayout

        android:layout_width="match_parent"

        android:layout_height="wrap_content"

        android:gravity="center_horizontal">

        <Button

            android:layout_width="0dp"

            android:layout_height="wrap_content"

            android:text="登陆"

            android:layout_weight="1"/><!--权重-->

        <Button

            android:layout_width="0dp"

            android:layout_height="wrap_content"

            android:text="注册"

            android:id="@+id/button2"

            android:layout_weight="1"/>

        <Button

            android:layout_width="0dp"

            android:layout_height="wrap_content"

            android:text="取消"

            android:layout_weight="1"/>

    </LinearLayout>

</LinearLayout>
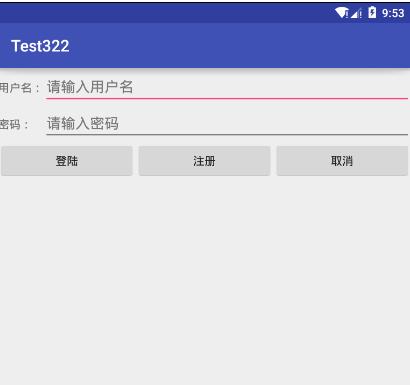
表格布局
<?xml version="1.0" encoding="utf-8"?>

<TableLayout xmlns:android="http://schemas.android.com/apk/res/android"

    android:layout_width="match_parent"

    android:layout_height="match_parent"

    android:stretchColumns="1,2">

    <TableRow>

        <TextView

            android:layout_width="wrap_content"

            android:layout_height="wrap_content"

            android:text="用户名:"

            />

        <EditText

            android:layout_width="match_parent"

            android:layout_height="wrap_content"

            android:layout_span="2"

            android:hint="请输入用户名"/>

    </TableRow>

    <TableRow>

        <TextView

            android:layout_width="wrap_content"

            android:layout_height="wrap_content"

            android:text="密码:"

            />

        <EditText

            android:layout_width="match_parent"

            android:layout_height="wrap_content"

            android:password="true"

            android:layout_span="2"

            android:hint="请输入密码"/>

    </TableRow>

    <TableRow>

        <Button

            android:layout_width="0dp"

            android:layout_height="wrap_content"

            android:text="登陆"

            android:layout_weight="1"/><!--用权重对应的数值设为0dp-->

        <Button

            android:layout_width="0dp"

            android:layout_height="wrap_content"

            android:text="注册"

            android:id="@+id/button2"

            android:layout_weight="1"/>

        <Button

            android:layout_width="0dp"

            android:layout_height="wrap_content"

            android:text="取消"

            android:layout_weight="1"/>

    </TableRow>

</TableLayout>
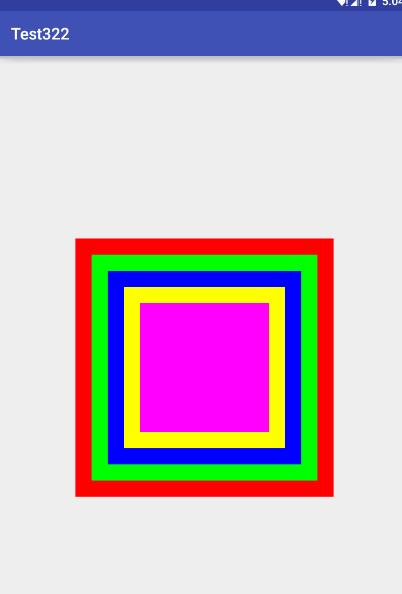
帧布局
<?xml version="1.0" encoding="utf-8"?>

<FrameLayout xmlns:android="http://schemas.android.com/apk/res/android"

    android:layout_width="match_parent"

    android:layout_height="match_parent">

    <TextView

        android:layout_width="wrap_content"

        android:layout_height="wrap_content"

        android:width="320dp"

        android:height="320dp"

        android:layout_gravity="center"

        android:background="#f00"/><!--红色-->

    <TextView

        android:layout_width="wrap_content"

        android:layout_height="wrap_content"

        android:width="280dp"

        android:height="280dp"

        android:layout_gravity="center"

        android:background="#0f0"/><!--绿色-->

    <TextView

        android:layout_width="wrap_content"

        android:layout_height="wrap_content"

        android:width="240dp"

        android:height="240dp"

        android:layout_gravity="center"

        android:background="#00f"/><!--蓝色-->

    <TextView

        android:layout_width="wrap_content"

        android:layout_height="wrap_content"

        android:width="200dp"

        android:height="200dp"

        android:layout_gravity="center"

        android:background="#ff0"/><!--黄色-->

    <TextView

        android:layout_width="wrap_content"

        android:layout_height="wrap_content"

        android:width="160dp"

        android:height="160dp"

        android:layout_gravity="center"

        android:background="#f0f"/><!--紫色-->

</FrameLayout>
Android——布局(线性布局linearLayout,表格布局TableLayout,帧布局FrameLayout)的更多相关文章
- Android 自学之帧布局 FrameLayout
帧布局(FrameLayout)直接继承了ViewGroup组件: 帧布局容器为每一个加入其中的组件都创建了一个空白的区域,这个区域我们称之为一帧,所有每个组件都占据一帧,这些都会根据gravity属 ...
- Android开发5:布局管理器2(表格布局TableLayout)
版本:Android4.3 API18 学习整理:liuxinming 概念 TableLayout继承了LinearLayout,因此它的本质依然是线性布局管理器. 表格布局采 ...
- Android -- UI布局管理,相对布局,线性布局,表格布局,绝对布局,帧布局
1. 相对布局 <RelativeLayout xmlns:android="http://schemas.android.com/apk/res/android" xmln ...
- Android五大布局详解——LinearLayout(线性布局)
Android五大布局 本篇开始介绍Android的五大布局的知识,一个丰富的界面显示总是要有众多的控件来组成的,那么怎样才能让这些控件能够按你的想法进行摆放,从而自定义你所想要的用户界面呢?这就牵涉 ...
- Android精通:TableLayout布局,GridLayout网格布局,FrameLayout帧布局,AbsoluteLayout绝对布局,RelativeLayout相对布局
在Android中提供了几个常用布局: LinearLayout线性布局 RelativeLayout相对布局 FrameLayout帧布局 AbsoluteLayout绝对布局 TableLayou ...
- [转]浅谈Android五大布局(二)——RelativeLayout和TableLayout
在浅谈Android五大布局(一)中已经描述了LinearLayout(线性布局).FrameLayout(单帧布局)和AbsoulteLayout(绝对布局)三种布局结构,剩下的两种布局Relati ...
- Android布局管理器(表格布局)
表格布局有TableLayout所代表,TableLayout继承了LinearLayout,因此他的本质依然是LinearLayout. 表格布局采用行.列的形式来进行管理,在使用的时候不需要声明多 ...
- Android笔记(七) Android中的布局——线性布局
我们的软件是由好多个界面组成的,而每个界面又由N多个控件组成,Android中借助布局来让各个空间有条不紊的摆放在界面上. 可以把布局看作是一个可以放置很多控件的容器,它可以按照一定的规律调整控件的位 ...
- 一步一步学android之布局管理器——LinearLayout
线性布局是最基本的一种布局,在基本控件篇幅中用到的都是LinearLayout,线性布局有两种方式,前面也有用到,一种是垂直的(vertical),一种是水平的(horizontal).我们同样来看下 ...
随机推荐
- 【干货合集】Docker快速入门与进阶
收录待用,修改转载已取得腾讯云授权 Docker 在众多技术中,绝对是当红炸子鸡.这年头,如果你不懂一点容器,不学一些Docker,还怎么出去跟人炫耀技术? Docker 也是云计算技术中较为热门的一 ...
- [置顶] All about control file in Oracle Database
--数据库实例启动的三个阶段: NOMOUNT(START):打开初始化参数文件 MOUNT:打开控制文件 OPEN:打开数据文件和日志文件 --控制文件 控制文件的作用:管理数据库的状态和描述数据库 ...
- 【笔记】css 1像素边框
有时候在移动端显示1像素的边框时 可能因为dpi 的原因造成像素有变差 所以为了达到显示的像素达到预期效果就要编写一个css 通用类达到1像素边框的效果 关于dpi 的解释请看张鑫旭老师的文章:htt ...
- 【实践】简洁大方的summernote 富文本编辑器插件的用发——小技巧
前面说到summernote 的上传,可是我要知道怎么获取内容呀,很简单调用一下函数便可: 获取内容: $("#user-work-content").summernote(&qu ...
- HYSBZ 1012 最大数maxnumber
思路:在单调队列不更新列首.由于查询区间大小不确定,所以不能保证下次是否还用到它 #include <cstdio> #include <cstring> #include & ...
- UNIX网络编程读书笔记:套接口地址结构
前言 大多数套接口函数都需要一个指向套接口地址结构的指针作为参数.每个协议族都定义它自己的套接口地址结构.这些结构的名字均以"sockaddr_"开头,并以对应每个协议族的唯一后缀 ...
- jquery翻页
http://js.itivy.com/simplePagination.js/index.html#page-10 http://www.oschina.net/news/41941/7-html5 ...
- Python 创建特殊元组tuple
创建1个元素的tuple (1,) 创建单元素tupletuple和list一样,可以包含 0 个.1个和任意多个元素.包含多个元素的 tuple,前面我们已经创建过了.包含 0 个元素的 tupl ...
- chrome 禁止自动更新
禁止chrome自动更新 CreateTime--2017年7月4日09:07:01Author:Marydon 版本号:59.0.3071.115 x64 第一步:禁止Google更新服务 参考 ...
- javascript 图片预加载
<!DOCTYPE > <html xmlns="http://www.w3.org/1999/xhtml"> <head> <meta ...