
Netty源码分析第4章(pipeline)---->第3节: handler的删除
Netty源码分析第四章: pipeline
第三节: handler的删除
上一小节我们学习了添加handler的逻辑操作, 这一小节我们学习删除handler的相关逻辑
如果用户在业务逻辑中进行ctx.pipeline().remove(this)这样的写法, 或者ch.pipeline().remove(new SimpleHandler())这样的写法, 则就是对handler进行删除, 我们学习过添加handler的逻辑, 所以对handler删除操作理解起来也会比较容易
我们首先跟到defaultChannelPipeline的remove(handler)的方法中:
public final ChannelPipeline remove(ChannelHandler handler) {

    remove(getContextOrDie(handler));

    return this;

}
方法体里有个remove()方法, 传入一个 getContextOrDie(handler) 参数, 这个 getContextOrDie(handler) , 其实就是根据handler拿到其包装类HandlerContext对象
我们跟到getContextPrDie这个方法中:
private AbstractChannelHandlerContext getContextOrDie(ChannelHandler handler) {

    AbstractChannelHandlerContext ctx = (AbstractChannelHandlerContext) context(handler);

    //代码省略

}
这里仍然会通过context(handler)方法去寻找, 再跟进去:
public final ChannelHandlerContext context(ChannelHandler handler) {

    if (handler == null) {

        throw new NullPointerException("handler");

    }

    //从头遍历节点

    AbstractChannelHandlerContext ctx = head.next;

    for (;;) {

        if (ctx == null) {

            return null;

        }

        //找到handler

        if (ctx.handler() == handler) {

            return ctx;

        }

        ctx = ctx.next;

    }

}
这里我们看到寻找的方法也非常的简单, 就是从头结点开始遍历, 遍历到如果其包装的handler对象是传入的handler对象, 则返回找到的handlerContext
回到remove(handler)方法:
public final ChannelPipeline remove(ChannelHandler handler) {

    remove(getContextOrDie(handler));

    return this;

}
继续跟到remove方法中:
private AbstractChannelHandlerContext remove(final AbstractChannelHandlerContext ctx) {

    //当前删除的节点不能是head, 也不能是tail

    assert ctx != head && ctx != tail;

    synchronized (this) {

        //执行删除操作

        remove0(ctx);

        if (!registered) {

            callHandlerCallbackLater(ctx, false);

            return ctx;

        }

        //回调删除handler事件

        EventExecutor executor = ctx.executor();

        if (!executor.inEventLoop()) {

            executor.execute(new Runnable() {

                @Override

                public void run() {

                    callHandlerRemoved0(ctx);

                }

            });

            return ctx;

        }

    }

    callHandlerRemoved0(ctx);

    return ctx;

}
首先要断言删除的节点不能是tail和head
然后通过remove0(ctx)进行实际的删除操作, 跟到remove0(ctx)中:
private static void remove0(AbstractChannelHandlerContext ctx) {

    //当前节点的前置节点

    AbstractChannelHandlerContext prev = ctx.prev;

    //当前节点的后置节点

    AbstractChannelHandlerContext next = ctx.next;

    //前置节点的下一个节点设置为后置节点

    prev.next = next;

    //后置节点的上一个节点设置为前置节点

    next.prev = prev;

}
这里的操作也非常简单, 做了一个指针移动的操作, 熟悉双向链表的小伙伴应该不会陌生, 删除节点逻辑大概如下图所示:
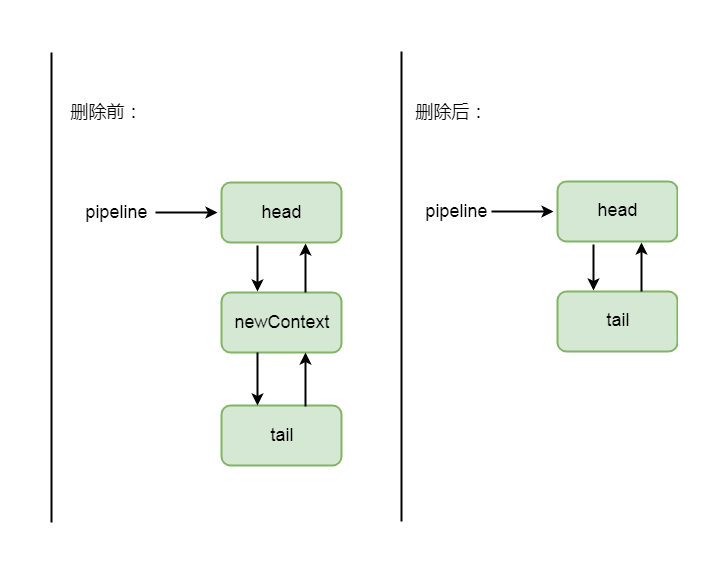
4-3-1
回到remove(ctx)方法:
private AbstractChannelHandlerContext remove(final AbstractChannelHandlerContext ctx) {

    //当前删除的节点不能是head, 也不能是tail

    assert ctx != head && ctx != tail;

    synchronized (this) {

        //执行删除操作

        remove0(ctx);

        if (!registered) {

            callHandlerCallbackLater(ctx, false);

            return ctx;

        }

        //回调删除handler事件

        EventExecutor executor = ctx.executor();

        if (!executor.inEventLoop()) {

            executor.execute(new Runnable() {

                @Override

                public void run() {

                    callHandlerRemoved0(ctx);

                }

            });

            return ctx;

        }

    }

    callHandlerRemoved0(ctx);

    return ctx;

}
我们继续往下看, 如果当前线程不是eventLoop线程则将回调删除事件封装成task放在taskQueue中让eventLoop线程进行执行, 否则, 则直接执行回调删除事件
跟到callHandlerRemoved0(ctx)方法中:
private void callHandlerRemoved0(final AbstractChannelHandlerContext ctx) {

    try {

        try {

            //调用handler的handlerRemoved方法

            ctx.handler().handlerRemoved(ctx);

        } finally {

            //将当前节点状态设置为已移除

            ctx.setRemoved();

        }

    } catch (Throwable t) {

        fireExceptionCaught(new ChannelPipelineException(

                ctx.handler().getClass().getName() + ".handlerRemoved() has thrown an exception.", t));

    }

}
与添加handler的逻辑一样, 这里会调用当前handler的handlerRemoved方法, 如果用户没有重写该方法, 则会调用其父类的方法, 方法体在ChannelHandlerAdapter类中有定义, 我们跟进去
public void handlerRemoved(ChannelHandlerContext ctx) throws Exception {

}
同添加handler一样, 也是一个空实现, 这里用户可以通过重写来添加自己需要的逻辑
以上就是删除handler的相关操作
Netty源码分析第4章(pipeline)---->第3节: handler的删除的更多相关文章
- Netty源码分析第4章(pipeline)---->第2节: handler的添加
Netty源码分析第四章: pipeline 第二节: Handler的添加 添加handler, 我们以用户代码为例进行剖析: .childHandler(new ChannelInitialize ...
- Netty源码分析第4章(pipeline)---->第4节: 传播inbound事件
Netty源码分析第四章: pipeline 第四节: 传播inbound事件 有关于inbound事件, 在概述中做过简单的介绍, 就是以自己为基准, 流向自己的事件, 比如最常见的channelR ...
- Netty源码分析第4章(pipeline)---->第5节: 传播outbound事件
Netty源码分析第五章: pipeline 第五节: 传播outBound事件 了解了inbound事件的传播过程, 对于学习outbound事件传输的流程, 也不会太困难 在我们业务代码中, 有可 ...
- Netty源码分析第4章(pipeline)---->第6节: 传播异常事件
Netty源码分析第四章: pipeline 第6节: 传播异常事件 讲完了inbound事件和outbound事件的传输流程, 这一小节剖析异常事件的传输流程 首先我们看一个最最简单的异常处理的场景 ...
- Netty源码分析第4章(pipeline)---->第7节: 前章节内容回顾
Netty源码分析第四章: pipeline 第七节: 前章节内容回顾 我们在第一章和第三章中, 遗留了很多有关事件传输的相关逻辑, 这里带大家一一回顾 首先看两个问题: 1.在客户端接入的时候, N ...
- Netty源码分析第4章(pipeline)---->第1节: pipeline的创建
Netty源码分析第四章: pipeline 概述: pipeline, 顾名思义, 就是管道的意思, 在netty中, 事件在pipeline中传输, 用户可以中断事件, 添加自己的事件处理逻辑, ...
- Netty源码分析第5章(ByteBuf)---->第10节: SocketChannel读取数据过程
Netty源码分析第五章: ByteBuf 第十节: SocketChannel读取数据过程 我们第三章分析过客户端接入的流程, 这一小节带大家剖析客户端发送数据, Server读取数据的流程: 首先 ...
- Netty源码分析第5章(ByteBuf)---->第4节: PooledByteBufAllocator简述
Netty源码分析第五章: ByteBuf 第四节: PooledByteBufAllocator简述 上一小节简单介绍了ByteBufAllocator以及其子类UnPooledByteBufAll ...
- Netty源码分析第5章(ByteBuf)---->第5节: directArena分配缓冲区概述
Netty源码分析第五章: ByteBuf 第五节: directArena分配缓冲区概述 上一小节简单分析了PooledByteBufAllocator中, 线程局部缓存和arean的相关逻辑, 这 ...
随机推荐
- 在myeclipse的工作环境上配置默认编码为UTF-8
将默认环境转为UTF-8,看图分析: 在windows->Preferences上 这样整个环境就变成UTF-8,只是这样还不够, 还须要,假设你须要所有文件都设为UTF-8,就: wa ...
- jenkins webhook 配置
1. 安装插件 系统管理"->"插件管理"->"可选插件",选择Gitlab Hook Plugin GitLab Plugin,Gitl ...
- regex_search
在regex_match()里边只能看到regex和输入的字符串是不是全部匹配上了,匹配上了就返回true,否则false.然而他不能返回匹配到的子字符串:regex_search()和regex_m ...
- .Net实现Word文档及导出
参考网址: http://www.jb51.net/article/25062.htm(实用性) http://wenku.baidu.com/link?url=44O7Dua49DrZ-PF2QU7 ...
- 在CentOS/RHEL 6.4上安装Chromium
是的,之前Google就说了,由于CentOS/RHEL 6已经是过期的系统,所以不再会有Chrome了.虽然后来由于引起了社区的抗议,从而改口,不再提CentOS/RHEL 6是过期系统了:但是,目 ...
- iOS 多线程:『RunLoop』详尽总结
1. RunLoop 简介 1.1 什么是 RunLoop? 可以理解为字面意思:Run 表示运行,Loop 表示循环.结合在一起就是运行的循环的意思.哈哈,我更愿意翻译为『跑圈』.直观理解就像是不停 ...
- 实现点击到底部、顶部、指定div功能
顶部: $(".back_top").click(function () { scrollTo(0, 0); }); function goTop() { $('html, bod ...
- MySQL数据表命令
显示表的相关信息: show table status like "表名": show table status like "表名" \G 格式化, ...
- scribe日志系统安装笔记
版本历史 2011-02-12 17:36:57 完成文章2011-02-23 10:49:12 更新,修正部分文字 目前web访问日志为crontab定时清空,而且负载均衡后,访问随机分配到一台服务 ...
- 20155308 加分题-mybash的实现(第五周)
20155308 加分题-mybash的实现(第五周) 实验要求 使用fork,exec,wait实现mybash 写出伪代码,产品代码和测试代码 发表知识理解,实现过程和问题解决的博客(包含代码托管 ...