
centos下kubernetes+flannel部署(旧)
更合理的部署方式参见《Centos下Kubernetes+Flannel部署(新)》
一、准备工作
1. 三台centos主机
k8s(即kubernetes,下同)master: 10.16.42.200
k8s node1: 10.16.42.198
k8s node2: 10.16.42.199
2. 程序下载(百度网盘):k8s-1.0.1(也可以使用测试版k8s-1.1.2.beta),Docker-1.8.2,cadvisor-0.14.0,etcd-2.2.1,flannel-0.5.5
二、ETCD集群部署
分别向三台主机的/etc/hosts文件中追加如下设置:
10.16.42.198 bx--

10.16.42.199 bx--

10.16.42.200 bx--
在三台主机中分别解压etcd.tar,将其中的 etcd 和 etcdctl 复制到你的工作目录(如 /openxxs/bin,下同)。
在200的/openxxs/bin目录下创建脚本start_etcd.sh并执行:
 #!/bin/bash

 etcd_token=kb2-etcd-cluster

 local_name=kbetcd0

 local_ip=10.16.42.200

 local_peer_port=

 local_client_port1=

 local_client_port2=

 node1_name=kbetcd1

 node1_ip=10.16.42.198

 node1_port=

 node2_name=kbetcd2

 node2_ip=10.16.42.199

 node2_port=

 ./etcd -name $local_name \

 -initial-advertise-peer-urls http://$local_ip:$local_peer_port \

 -listen-peer-urls http://0.0.0.0:$local_peer_port \

 -listen-client-urls http://0.0.0.0:$local_client_port1,http://0.0.0.0:$local_client_port2 \

 -advertise-client-urls http://$local_ip:$local_client_port1,http://$local_ip:$local_client_port2 \

 -initial-cluster-token $etcd_token \

 -initial-cluster $local_name=http://$local_ip:$local_peer_port,$node1_name=http://$node1_ip:$node1_port,$node2_name=http://$node2_ip:$node2_port \

 -initial-cluster-state new
在198的/openxxs/bin目录下创建脚本start_etcd.sh并执行:
 #!/bin/bash

 etcd_token=kb2-etcd-cluster

 local_name=kbetcd1

 local_ip=10.16.42.198

 local_peer_port=

 local_client_port1=

 local_client_port2=

 node1_name=kbetcd0

 node1_ip=10.16.42.200

 node1_port=

 node2_name=kbetcd2

 node2_ip=10.16.42.199

 node2_port=

 ./etcd -name $local_name \

 -initial-advertise-peer-urls http://$local_ip:$local_peer_port \

 -listen-peer-urls http://0.0.0.0:$local_peer_port \

 -listen-client-urls http://0.0.0.0:$local_client_port1,http://0.0.0.0:$local_client_port2 \

 -advertise-client-urls http://$local_ip:$local_client_port1,http://$local_ip:$local_client_port2 \

 -initial-cluster-token $etcd_token \

 -initial-cluster $local_name=http://$local_ip:$local_peer_port,$node1_name=http://$node1_ip:$node1_port,$node2_name=http://$node2_ip:$node2_port \

 -initial-cluster-state new &
在199的/openxxs/bin目录下创建脚本start_etcd.sh并执行:
 #!/bin/bash

 etcd_token=kb2-etcd-cluster

 local_name=kbetcd2

 local_ip=10.16.42.199

 local_peer_port=

 local_client_port1=

 local_client_port2=

 node1_name=kbetcd1

 node1_ip=10.16.42.198

 node1_port=

 node2_name=kbetcd0

 node2_ip=10.16.42.200

 node2_port=

 ./etcd -name $local_name \

 -initial-advertise-peer-urls http://$local_ip:$local_peer_port \

 -listen-peer-urls http://0.0.0.0:$local_peer_port \

 -listen-client-urls http://0.0.0.0:$local_client_port1,http://0.0.0.0:$local_client_port2 \

 -advertise-client-urls http://$local_ip:$local_client_port1,http://$local_ip:$local_client_port2 \

 -initial-cluster-token $etcd_token \

 -initial-cluster $local_name=http://$local_ip:$local_peer_port,$node1_name=http://$node1_ip:$node1_port,$node2_name=http://$node2_ip:$node2_port \

 -initial-cluster-state new &
在各主机上执行类似如下命令查看etcd是否正常运行:
 curl -L http://10.16.42.198:4012/version

 curl -L http://10.16.42.199:4012/version

 curl -L http://10.16.42.200:4012/version
如果返回值均为 “{"etcdserver":"2.2.1","etcdcluster":"2.2.0"}” 说明ETCD部署成功。
三、Docker安装与设置
yum install docker-engine-1.8.-.el7.centos.x86_64.rpm -y
各个主机上安装成功后,修改 /etc/sysconfig/docker 文件为:
OPTIONS="-g /opt/scs/docker --insecure-registry 10.11.150.76:5000"
其中的--insecure-registry表示使用自己私有的镜像仓库。
修改 /lib/systemd/system/docker.service 内容为:
 [Unit]

 Description=Docker Application Container Engine

 Documentation=https://docs.docker.com

 After=network.target docker.socket

 Requires=docker.socket

 [Service]

 Type=notify

 EnvironmentFile=/etc/sysconfig/docker

 ExecStart=/usr/bin/docker -d $OPTIONS \

           $DOCKER_STORAGE_OPTIONS \

           $DOCKER_NETWORK_OPTIONS \

           $ADD_REGISTRY \

           $BLOCK_REGISTRY \

           $INSECURE_REGISTRY

 #ExecStart=/usr/bin/docker daemon -H fd://

 MountFlags=slave

 LimitNOFILE=

 LimitNPROC=

 LimitCORE=infinity

 [Install]

 WantedBy=multi-user.target
注意,k8s会托管你的docker,如果之前在主机上用docker创建或运行了一些容器,注意数据的备份。
四、Flannel安装与设置
yum localinstall flannel-0.5.-.fc24.x86_64.rpm
各个主机上安装成功后,修改 /etc/sysconfig/flanneld 内容为:
# Flanneld configuration options

# etcd url location.  Point this to the server where etcd runs

FLANNEL_ETCD="http://10.16.42.200:4012"

# etcd config key.  This is the configuration key that flannel queries

# For address range assignment

FLANNEL_ETCD_KEY="/coreos.com/network"

# Any additional options that you want to pass

#FLANNEL_OPTIONS=""
即确定flanneld使用的etcd服务地址和etcd中存储flannel相关设置的key值。
修改 /lib/systemd/system/flanneld.service 内容为:
 [Unit]

 Description=Flanneld overlay address etcd agent

 After=network.target

 After=network-online.target

 Wants=network-online.target

 After=etcd.service

 Before=docker.service

 [Service]

 Type=notify

 EnvironmentFile=/etc/sysconfig/flanneld

 EnvironmentFile=-/etc/sysconfig/docker-network

 ExecStart=/usr/bin/flanneld -etcd-endpoints=${FLANNEL_ETCD} -etcd-prefix=${FLANNEL_ETCD_KEY} $FLANNEL_OPTIONS

 ExecStartPost=/usr/libexec/flannel/mk-docker-opts.sh -k DOCKER_NETWORK_OPTIONS -d /run/flannel/docker

 Restart=on-failure

 [Install]

 WantedBy=multi-user.target

 RequiredBy=docker.service
五、具体部署过程
1. 启动ETCD
ETCD是k8s正常运行的基础,因此按照第二步中的方式运行脚本并测试部署成功后再进行其它程序的启动。
2. 启动Flannel
启动Flannel前停止docker、iptables和firewall服务的运行:
systemctl stop docker

systemctl disable iptables-services firewalld

systemctl stop iptables-services firewalld
使用 ps aux | grep docker 查看 docker 是不是以 daemon 的形式运行着。如果是,kill 掉该进程。
使用 ifconfig 查看是否存在 docker0 及 flannel 相关的网桥。如果有,使用 ip link delete docker0 删除。
以上准备工作做好后,还需要往ETCD中写入flannel的相关配置,即在 200 主机上创建 flannel-config.json 文件,内容为:
{

    "Network": "172.16.0.0/12",

    "SubnetLen": ,

    "Backend": {

        "Type": "vxlan",

        "VNI":

    }

}
即规定了flannel可用的子网段和网络包封装方式,然后将其写入ETCD中(注意这里的key值和Flannel启动的FLANNEL_ETCD_KEY参数值保持一致):
./etcdctl --peers=http://10.16.42.200:4012 set /coreos.com/network/config < flannel-config.json
然后在各个主机上启动flannel:
systemctl start flanneld
3. 启动docker
在各个主机上启动docker服务:
systemctl start docker
然后使用ifconfig查看docker0和flannel.1的IP网段,如果flannel.1的网段包含了docker0的网段,则说明flannel的配置和启动是没问题的。
4. 启动master上的k8s服务
./kube-apiserver --logtostderr=true --v= --etcd_servers=http://127.0.0.1:4012 --kubelet_port=10250 --allow_privileged=false --service-cluster-ip-range=172.16.0.0/12 --insecure-bind-address=0.0.0.0 --insecure-port=8080 &

./kube-controller-manager --logtostderr=true --v= --master=http://bx-42-200:8080 --cloud-provider="" &

./kube-scheduler --logtostderr=true --v= --master=http://bx-42-200:8080 &
注意在启动 kube-controller-manager 时可能会报如下错误:
plugins.go:] No cloud provider specified.

controllermanager.go:] Failed to start service controller: ServiceController should not be run without a cloudprovider.
这是由 --cloud-provider 的值为空或未指定该参数造成的,但对整体的k8s运行无太大影响,所以可以忽略(该bug参见github讨论:戳这里)。
5. 启动node上的k8s服务
./kube-proxy --logtostderr=true --v= --master=http://bx-42-200:8080 --proxy-mode=iptables &

./kubelet --logtostderr=true --v= --api_servers=http://bx-42-200:8080 --address=0.0.0.0 --allow_privileged=false --pod-infra-container-image=10.11.150.76:5000/kubernetes/pause:latest &
注意这里的 --pod-infra-container-image 参数设置。每个pod启动时都要先启动一个/kubernetes/pause:latest容器来进行一些基本的初始化工作,而默认该镜像的下载地址为 gcr.io/google_containers/pause:0.8.0 。由于GWF的存在可能会连接不上该资源,所以可以将该镜像下载下来之后再push到自己的docker本地仓库中,启动 kubelet 时从本地仓库中读取即可。
还有注意 --proxy-mode=iptables 参数是在k8s 1.1实验版本中才有的,其含义的官方解释如下:
--proxy-mode="": Which proxy mode to use: 'userspace' (older, stable) or 'iptables' (experimental). If blank, look at the Node object on the Kubernetes API and respect the 'net.experimental.kubernetes.io/proxy-mode' annotation if provided. Otherwise use the best-available proxy (currently userspace, but may change in future versions). If the iptables proxy is selected, regardless of how, but the system's kernel or iptables versions are insufficient, this always falls back to the userspace proxy.
如果不支持 --proxy-mode=iptables 则会报类似如下错误:
W1119 ::12.187930     server.go:] Failed to start in resource-only container "/kube-proxy": write /sys/fs/cgroup/memory/kube-proxy/memory.swappiness: invalid argument

E1119 ::12.198572     proxier.go:] Error removing userspace rule: error checking rule: exit status : iptables v1.4.21: Couldn't load target `KUBE-PORTALS-HOST':No such file or directory

Try `iptables -h' or 'iptables --help' for more information.

E1119 ::12.200286     proxier.go:] Error removing userspace rule: error checking rule: exit status : iptables v1.4.21: Couldn't load target `KUBE-PORTALS-CONTAINER':No such file or directory

Try `iptables -h' or 'iptables --help' for more information.

E1119 ::12.202162     proxier.go:] Error removing userspace rule: error checking rule: exit status : iptables v1.4.21: Couldn't load target `KUBE-NODEPORT-HOST':No such file or directory

Try `iptables -h' or 'iptables --help' for more information.

E1119 ::12.204058     proxier.go:] Error removing userspace rule: error checking rule: exit status : iptables v1.4.21: Couldn't load target `KUBE-NODEPORT-CONTAINER':No such file or directory

Try `iptables -h' or 'iptables --help' for more information.

E1119 ::12.205848     proxier.go:] Error flushing userspace chain: error flushing chain "KUBE-PORTALS-CONTAINER": exit status : iptables: No chain/target/match by that name.

E1119 ::12.207467     proxier.go:] Error flushing userspace chain: error flushing chain "KUBE-PORTALS-HOST": exit status : iptables: No chain/target/match by that name.

E1119 ::12.209000     proxier.go:] Error flushing userspace chain: error flushing chain "KUBE-NODEPORT-HOST": exit status : iptables: No chain/target/match by that name.

E1119 ::12.210580     proxier.go:] Error flushing userspace chain: error flushing chain "KUBE-NODEPORT-CONTAINER": exit status : iptables: No chain/target/match by that name.
六、测试
以上部署完成之后,在任意主机上执行以下命令查看结点状态:
./kubectl -s 10.16.42.200: get nodes
如果返回类似如下内容则说明apiserver是正常服务的:
NAME        LABELS                             STATUS    AGE

bx--   kubernetes.io/hostname=bx--   Ready     1d

bx--   kubernetes.io/hostname=bx--   Ready     1d
创建 test.yaml 文件,内容如下:
 apiVersion: v1

 kind: ReplicationController

 metadata:

     name: test-

 spec:

   replicas:

   template:

     metadata:

       labels:

         app: test-

     spec:

       containers:

         - name: iperf

           image: 10.11.150.76:/openxxs/iperf:1.2

       nodeSelector:

         kubernetes.io/hostname: bx--

 ---

 apiVersion: v1

 kind: ReplicationController

 metadata:

     name: test-

 spec:

   replicas:

   template:

     metadata:

       labels:

         app: test-

     spec:

       containers:

         - name: iperf

           image: 10.11.150.76:/openxxs/iperf:1.2

       nodeSelector:

         kubernetes.io/hostname: bx--

 ---

 apiVersion: v1

 kind: ReplicationController

 metadata:

     name: test-

 spec:

   replicas:

   template:

     metadata:

       labels:

         app: test-

     spec:

       containers:

         - name: iperf

           image: 10.11.150.76:/openxxs/iperf:1.2

       nodeSelector:

         kubernetes.io/hostname: bx--

 ---

 apiVersion: v1

 kind: ReplicationController

 metadata:

     name: test-

 spec:

   replicas:

   template:

     metadata:

       labels:

         app: test-

     spec:

       containers:

         - name: iperf

           image: 10.11.150.76:/openxxs/iperf:1.2

       nodeSelector:

         kubernetes.io/hostname: bx--
表示在198上创建 test-1 和 test-2 两个pod,在199上创建 test-3 和 test-4 两个pod。注意其中的 image 等参数根据实际情况进行修改。
通过test.yaml创建pods:
./kubectl -s 10.16.42.200: create -f test.yaml
通过 get pods 查看pods的创建和运行状态:
./kubectl -s 10.16.42.200: get pods
如果创建成功并正常运行则会显示类似如下内容:
NAME                    READY     STATUS    RESTARTS   AGE

test--a9dn3            /       Running             1d

test--64urt            /       Running             1d

test--edt2l            /       Running             1d

test--l6egg            /       Running             1d
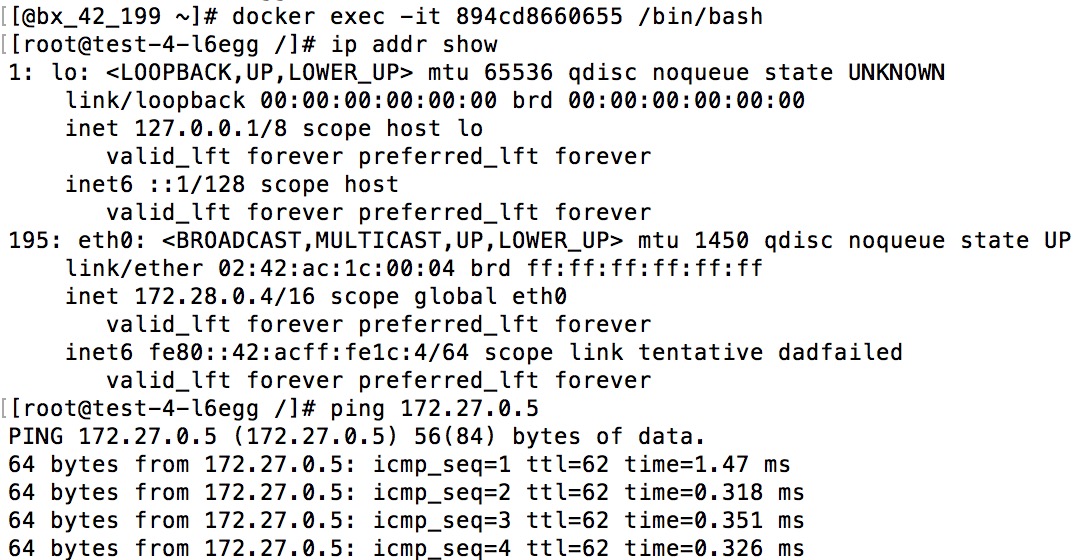
在198上通过 docker exec 进入test-2对应的容器,通过 ip addr show 查看IP;同样在199上进入test-4对应的容器查看IP。然后在 test-2和 test-4 容器中互相ping 对方的IP,如果ping通了,说明flannel也正常工作了。

centos下kubernetes+flannel部署(旧)的更多相关文章
- Centos下Kubernetes+Flannel部署(新)
一.准备工作 1) 三台centos主机 k8s master: 10.11.151.97 tc-151-97 k8s node1: 10.11.151.100 tc-151-100 k8s no ...
- 《.NET 5.0 背锅案》第6集-案发现场回顾:故障情况下 Kubernetes 的部署表现
第1集:验证 .NET 5.0 正式版 docker 镜像问题 第2集:码中的小窟窿,背后的大坑,发现重要嫌犯 EnyimMemcachedCore 第3集-剧情反转:EnyimMemcachedCo ...
- CentOS下利用Docker部署Surging
原文:CentOS下利用Docker部署Surging 1. 安装Centos, 配置固定ip配置文件地址vi /etc/sysconfig/network-scripts/ifcfg-ens33`` ...
- Centos下PPTP环境部署记录
PPTP(点到点隧道协议)是一种用于让远程用户拨号连接到本地的ISP,通过因特网安全远程访问公司资源的新型技术.它能将PPP(点到点协议)帧封装成IP数据包,以便能够在基于IP的互联网上进行传输.PP ...
- 手把手0基础Centos下安装与部署paddleOcr 教程
!!!以下内容为作者原创,首发于个人博客园&掘金平台.未经原作者同意与许可,任何人.任何组织不得以任何形式转载.原创不易,如果对您的问题提供了些许帮助,希望得到您的点赞支持. 0.paddle ...
- Centos下SVN环境部署记录
大多数情况下,我们日常工作中用的版本控制系统都会选择分布式的Git,它相比于集中式的SVN有很多优势.但是有些项目软件基于自身限制,可能只支持SVN做工程同步.废话就不多说了,下面记录下SVN的部署和 ...
- 转载:分布式文件系统 - FastDFS 在 CentOS 下配置安装部署(2)
原文:http://blog.mayongfa.cn/193.html 一.安装 Nginx 和 fastdfs-nginx-module 安装 Nginx 请看:从零开始学 Java - CentO ...
- Centos下使用Docker部署asp.net core项目
本文讲述 CentOS 系统 Docker 中部署 asp.net core开源项目 abp 的过程 步骤 1. 拉取 asp.net core 基础镜像 docker pull microsoft/ ...
- (转)Centos下,Docker部署Yapi接口管理平台
接口测试的工具很多,公司引进了接口管理平台Yapi,自己尝试直接搭建,从安装Nodejs到配置MongoDB数据库,再到安装yapi的时候,遇到浏览器打开本地服务器Ip地址后,没有显示部署内容...没 ...
随机推荐
- 201709025工作日记--更新UI方法
1.handler+Thread 和 runOnUIThread 和 handler.post 方法 区别: 从实现原理上,两者别无二致,runOnUiThread也是借助Handler实现的. 对 ...
- Spring mvc,jQuery和JSON数据交互
一.实验环境的搭建 1.Spring mvc jar. 导入spring mvc运行所需jar包.导入如下(有多余) 2.json的支持jar 3.加入jQuery. 选用jquery-3.0.0.m ...
- 计算服务器的pv量算法
如何计算服务器能够承受多大的pv? 你想建设一个能承受500万PV/每天的网站吗? 500万PV是什么概念?服务器每秒要处理多少个请求才能应对?如果计算呢? PV是什么: PV是page view ...
- ZOJ2418 Matrix 2017-04-18 21:05 73人阅读 评论(0) 收藏
Matrix Time Limit: 2 Seconds Memory Limit: 65536 KB Given an n*n matrix A, whose entries Ai,j a ...
- Boost库安装理解
Boost安装的安装,以及在VS2013下的使用 1. 为什么要安装? boost是一个开源库,因为开源库可以跨平台,可以通过在不同的“硬件”平台上.所以需要安装的操作. 安装,然后编译生成“静态链接 ...
- hbase使用MapReduce操作3(实现将 fruit 表中的一部分数据,通过 MR 迁入到 fruit_mr 表中)
Runner类 实现将 fruit 表中的一部分数据,通过 MR 迁入到 fruit_mr 表中. package com.yjsj.hbase_mr; import org.apache.hadoo ...
- D3 drag
<!DOCTYPE html> <html lang="en"> <head> <meta charset="UTF-8&quo ...
- 取Mac地址
uses Nb30; //一般用默认的 0 就可以了 ):string; var ncb : TNCB; {NetBios控制块} AdapterS : TAdapterStatus; {网卡状态结构 ...
- 拷贝构造函数——防篡改
对于普通类型的对象来说,他们之间的复制是简单的,比如: int a = 88; int b = a; 而类和普通对象不同,类对象内部结构一般较为复杂,存在各种成员变量. #include <io ...
- Python学习-25.Python中的分数
在Python中,不止有浮点数(float),而且还有分数(Fraction)这个类型. 要使用分数,必须引入一个模块. import fractions 然后就可以声明一个分数了 x = fract ...