
Angular6 学习笔记——组件详解之组件通讯
angular6.x系列的学习笔记记录,仍在不断完善中,学习地址:
系列目录
(1)组件详解之模板语法
(2)组件详解之组件通讯
(3)内容投影, ViewChild和ContentChild
(4)指令
(5)路由
目录章节
1 前言
2 Angular组件间的通讯
2.1 父子组件间的通讯
2.1.1 父组件设置子组件属性
2.1.2 父组件调用子组件事件
2.1.3 子组件向父组件发射事件
2.2 非父子组件通讯
2.2.1 Service
2.2.2 路由传值
2.2.2.1 传递一个值
2.2.2.2 传递一个对象
3 通用方式实现通讯
3.1 localStorage
3.2 服务端
1前言
前端框架,例如extjs,vue,angular等,都是或趋于组件化,所以组件间的通讯,是一个亟需解决的问题
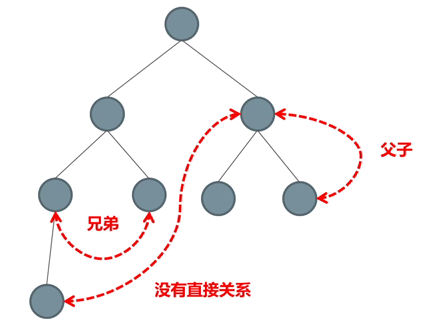
一般而且言,这些组件之间都会形成这种树形结构
图片来源:大漠穷秋
组件之间会有下列3种关系:
1父子关系
2兄弟关系
3没有直接关系
通常采用下列方式处理(某些方式是框架特有)组件间的通讯,如下:
1父子组件之间的交互(@Input/@Output/模板变量/@ViewChild)
2非父子组件(Service/localStorage)
3还可以利用Session等服务器端的解决方法
2Angular组件间的通讯
2.1父子组件之间的通讯
在父子组件之间通讯:
@Input:是属性绑定,父组件向子组件传递数据
@Output:是事件绑定,子组件向父组件传递数据的同时触发事件
2.1.1在父组件设置子组件上面的的属性
通过@input绑定子组件的属性,注意属性得是公开public的,私有private属性是无法传递的
es6新语法get/set.为属性提供了一个方便习惯的读/写方式, 拦截属性的存取行为。
在父组件设置该属性,就能够通过set方法来修改,从而实现在父组件设置子组件属性
代码如下
<h1>{{childTitle}}</h1>
子组件模板文件
 import { Component, OnInit, Input } from '@angular/core';

 @Component({

   selector: 'app-child',

   templateUrl: './child.component.html',

   styleUrls: ['./child.component.sass']

 })

 export class ChildComponent implements OnInit {

   private _childTitle: string = '子组件标题';

   @Input()

   set childTitle(childTitle: string) {

     this._childTitle = childTitle;

   }

   get childTitle(): string {

     return this._childTitle;

   }

   constructor() { }

   ngOnInit() {

   }

 }
子组件Ts文件
 <p>

   parent-and-child works!

 </p>

 <app-child childTitle="可设置子组件标题"></app-child>
父组件模板文件
 import { Component, OnInit } from '@angular/core';

 @Component({

   selector: 'app-parent',

   templateUrl: './parent-and-child.component.html',

   styleUrls: ['./parent-and-child.component.sass']

 })

 export class ParentAndChildComponent implements OnInit {

   constructor() { }

   ngOnInit() {

   }

 }
父组件Ts文件
2.1.2父组件直接调用子组件的方法
通过模板内部定义子组件变量,在父组件上可以直接调用子组件的方法,如下:
<p>child work</p>
子组件模板文件
 import { Component, OnInit, Input } from '@angular/core';

 @Component({

   selector: 'app-child',

   templateUrl: './child.component.html',

   styleUrls: ['./child.component.sass']

 })

 export class ChildComponent implements OnInit {

   constructor() { }

   ngOnInit() {

   }

   childPrint() {

     alert("来自子组件的打印");

   }

 }
子组件Ts文件
 <p>

   parent-and-child works!

 </p>

 <app-child #child></app-child>

 <button (click)="child.childPrint()"></button>
父组件模板文件
 import { Component, OnInit } from '@angular/core';

 @Component({

   selector: 'app-parent',

   templateUrl: './parent-and-child.component.html',

   styleUrls: ['./parent-and-child.component.sass']

 })

 export class ParentAndChildComponent implements OnInit {

   constructor() { }

   ngOnInit() {

   }

 }
父组件Ts文件
2.1.3父组件接受子组件派发的事件
通过@Output在子组件绑定一个事件发射器,在父组件通过事件绑定监听该事件
这样在子组件派发一个事件,父组件就能够收到
<p>child work</p>
子组件模板文件
 import { Component, OnInit, Output, EventEmitter } from '@angular/core';

 @Component({

   selector: 'app-child',

   templateUrl: './child.component.html',

   styleUrls: ['./child.component.sass']

 })

 export class ChildComponent implements OnInit {

   @Output()

   initEmit = new EventEmitter<string>();

   constructor() { }

   ngOnInit() {

     this.initEmit.emit("子组件初始化成功");

   }

 }
子组件TS文件
 <p>

   parent-and-child works!

 </p>

 <app-child (initEmit)="accept($event)"></app-child>
父组件模板文件
 import { Component, OnInit, Output, EventEmitter } from '@angular/core';

 @Component({

   selector: 'app-parent',

   templateUrl: './parent-and-child.component.html',

   styleUrls: ['./parent-and-child.component.sass']

 })

 export class ParentAndChildComponent implements OnInit {

   constructor() { }

   ngOnInit() {

   }

   accept(msg:string) {

     alert(msg);

   }

 }
父组件TS文件
2.2没有直接关系的组件
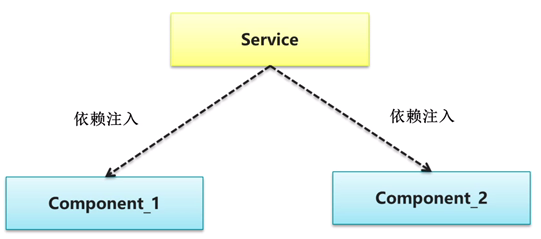
2.2.1service
做一个全局单例的service,然后多个组件共享这个实例,当然就可以共享其中的成员,来进行通讯
图片来源:大漠穷秋
具体代码如下
 import { Component, Injectable, EventEmitter } from '@angular/core';

 @Injectable()

 export class myService {

   public info:string = '';

   constructor() {}

 }
service文件
在app.module.ts文件的providers里添加这个服务
 <p>child1 work</p>

 <button (click)="showInfo()"></button>
组件1的模板文件
 import { Component, OnInit} from '@angular/core';

 import { myService } from '../../../service/myService..service';

 @Component({

   selector: 'app-child',

   templateUrl: './child1.component.html',

   styleUrls: ['./child1.component.sass']

 })

 export class Child1Component implements OnInit {

   constructor(

     public service: myService

   ) { }

   ngOnInit() {

   }

   showInfo() {

     alert(this.service.info);

   }

 }
组件1的TS文件
 <p>

   child2 works!

 </p>

 <button (click)="changeInfo()"></button>
组件2的模板文件
 import { Component, OnInit} from '@angular/core';

 import { myService } from '../../service/myService..service';

 @Component({

   selector: 'app-child2',

   templateUrl: './child2.component.html',

   styleUrls: ['./child2.component.sass']

 })

 export class Child2Component implements OnInit {

   constructor(

     public service: myService

   ) { }

   ngOnInit() {

   }

   changeInfo() {

     this.service.info = this.service.info + "";

   }

 }
组件2的TS文件
2.2.2路由传值
对于2个不同路由的组件,我们也可以通过路由传递信息
假设2个路由分别为~/home,~/about
补充下述代码路由的引用
 import { Router } from '@angular/router';

 import { ActivatedRoute, Params } from '@angular/router';

   constructor(

     private router: Router,

     private route: ActivatedRoute,

   ) { }
2.2.2.1传递一个值
假如从~/home路由向~/about路由传递一个字符串或数字
1先把~/about的路由地址改为~/about/:id, (:id 是一个路由参数的令牌(Token),比如~/home/42 这个URL中,“42”就是id参数的值)
2在/home写上路由跳转且传值的连接
 <button [routerLink]="['/about',1]">跳转</button>

 <button [routerLink]="['/about',"home"]">跳转</button>
3在跳至的页面~/about接受传入的值
   id: string = '';

   ngOnInit() {

     //获取传入的值

     this.id = this.route.snapshot.params['id'];

   }
2.2.2.2传递一个对象
类似于上述的传递一个值,但是不需要再路由末尾加上/:id
代码也有些不同
       this.router.navigate(['/about'], {

         queryParams: {

           id: '',

           status: true

         }

       });
接受传入的对象
   id: number = ;

   status: boolean = false;

   ngOnInit() {

     this.route.queryParams

       .subscribe((params: Params) => {

         this.id = params['id'];

         this.status = params['status'];

       })

   }
3通用方式实现通讯
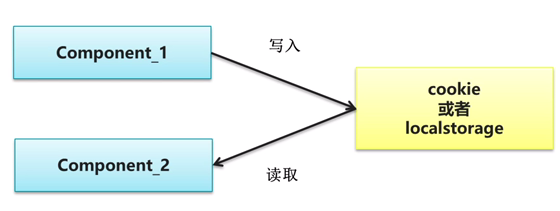
3.1localstorage处理
在angular中也可以使用本地存储这种比较通用的方式在组件间通讯,但本地存储有下列弊端:
1存储空间有限
2只能存储字符串
图片来源:大漠穷秋
具体的实现代码如下
 import { Component, OnInit } from '@angular/core';

 @Component({

   selector: 'app-child1',

   templateUrl: './child1.component.html',

   styleUrls: ['./child1.component.sass']

 })

 export class Child1Component implements OnInit {

   constructor() { }

   ngOnInit() {

   }

    setData(){

     window.localStorage.setItem("test", JSON.stringify({ key: 'test', value:  }));

   }

 }
组件1的Ts的文件
 import { Component, OnInit } from '@angular/core';

 @Component({

   selector: 'app-child2',

   templateUrl: './child2.component.html',

   styleUrls: ['./child2.component.sass']

 })

 export class Child2Component implements OnInit {

   constructor() { }

   ngOnInit() {

   }

    getData() {

     var json = window.localStorage.getItem("test");

     var obj = JSON.parse(json);

     console.log(obj.key);

     console.log(obj.value);

   }

 }
组件2的TS文件
3.2服务端处理
也可以在服务端来处理组件间的通讯问题,这是一个思路,但是已经脱离讨论的主题,就不赘述
(终)
文档信息
- 发表作者: 半路独行
- 发表出处: 博客园
- 原文地址: https://www.cnblogs.com/banluduxing/p/9290569.html
- 版权信息:
 本作品采用知识共享署名-非商业性使用-相同方式共享 4.0 国际许可协议进行许可。
感谢您的阅读,如果您觉得阅读本文对您有帮助,请点一下“推荐”按钮。本文欢迎各位转载,但是转载文章之后必须在文章页面中给出作者和原文连接。
Angular6 学习笔记——组件详解之组件通讯的更多相关文章
- Angular6 学习笔记——路由详解
angular6.x系列的学习笔记记录,仍在不断完善中,学习地址: https://www.angular.cn/guide/template-syntax http://www.ngfans.net ...
- Android学习笔记-Dialog详解
1.对话框的使用 1.1AlertDialog的显示 简单对话框以及监听的设置:重点掌握三个按钮(也就是三上单词): PositiveButton(确认按钮);NeutralButton(忽略按钮) ...
- JavaScript学习笔记-实例详解-类(二)
实例详解-类(二) //===给Object.prototype添加只读\不可枚举\不可配置的属性objectId(function(){ Object.defineProperty(Object ...
- JavaScript学习笔记-实例详解-类(一)
实例详解-类(一): //每个javascript函数(除了bind())都自动拥有一个prototype对象// 在未添加属性或重写prototype对象之前,它只包含唯一一个不可枚举属性const ...
- C++并发与多线程学习笔记--unique_lock详解
unique_lock 取代lock_quard unique_lock 的第二个参数 std::adopt_lock std::try_to_lock std::defer_lock unique_ ...
- [CSS3] 学习笔记-选择器详解(三)
1.UI元素状态伪类选择器 在CSS3的选择器中,除了结构性伪类选择器外,还有一种UI元素伪类选择器.这些选择器的共同特征是:指定的样式只有当元素处于某种状态时才起作用,在默认状态下不起作用.在CSS ...
- [CSS3] 学习笔记-选择器详解(二)
1.选择器first-child.last-child.nth-child和nth-last-child 利用first-child.last-child.nth-child和nth-last-chi ...
- Linux学习笔记之详解linux软连接和硬链接
0x00 链接文件 Linux链接分两种,一种被称为硬链接(Hard Link),另一种被称为符号链接(Symbolic Link).默认情况下,ln命令产生硬链接. [软连接] 另外一种连接称之为符 ...
- 【转载】自定义View学习笔记之详解onMeasure
网上对自定义View总结的文章都很多,但是自己还是写一篇,好记性不如多敲字! 其实自定义View就是三大流程,onMeasure.onLayout.onDraw.看名字就知道,onMeasure是用来 ...
随机推荐
- appium + python的环境配置_windows
appium是什么? 1,appium是开源的移动端自动化测试框架: 2,appium可以测试原生的.混合的.以及移动端的web项目: 3,appium可以测试ios,android应用(当然了,还有 ...
- [leetcode]416. Partition Equal Subset Sum分割数组的和相同子集
Given a non-empty array containing only positive integers, find if the array can be partitioned into ...
- 使用Ansible部署etcd 3.2高可用集群
之前写过一篇手动搭建etcd 3.1集群的文章<etcd 3.1 高可用集群搭建>,最近要初始化一套新的环境,考虑用ansible自动化部署整套环境, 先从部署etcd 3.2集群开始. ...
- 记录java版本不兼容的坑,(kafka运行报错)
启动kafka报错 错误原因是: 由较高版本的jdk编译的java class文件 试图在较低版本的jvm上运行的报错 解决办法是: 查看java版本 C:\Users\Administrator&g ...
- C语言跳表(skiplist)实现
一.简介 跳表(skiplist)是一个非常优秀的数据结构,实现简单,插入.删除.查找的复杂度均为O(logN).LevelDB的核心数据结构是用跳表实现的,redis的sorted set数据结构也 ...
- POJ 1122.FDNY to the Rescue! Dijkstra
FDNY to the Rescue! Time Limit: 1000MS Memory Limit: 10000K Total Submissions: 2808 Accepted: 86 ...
- AJAX 请求中多出了一次 OPTIONS 请求 导致 Laravel 中间件无法对 Header 传入的 Token 无法获取
背景知识: 我们会发现,在很多post,put,delete等请求之前,会有一次options请求.本文主要是来讨论一下这是什么原因引起的. 根本原因就是,W3C规范这样要求了!在跨域请求中,分为简单 ...
- [Selenium]Eclipse hangs at 57% in debug mode with TestNG tests
案例1: I am very thankful to saish and cbeust for the solution. I went through the similar issue with ...
- datagrid分页 从后端获取数据也很简单
<%@ Page Language="C#" AutoEventWireup="true" CodeBehind="Datagrid.aspx. ...
- Ckeditor上传图片返回的JS直接显示出来,未执行!!!
Ckeditor上传图片网上有很多教程. 下面是我今天下午遇到的一个坑...自己挖的坑. 在conotroller里 我开始习惯性的 response.setContentType("app ...