Spring Security 自定义认证逻辑
Spring Security 自定义认证逻辑
这篇文章的内容基于对Spring Security 认证流程的理解,如果你不了解,可以读一下这篇文章:Spring Security 认证流程 。
分析问题
以下是 Spring Security 内置的用户名/密码认证的流程图,我们可以从这里入手:
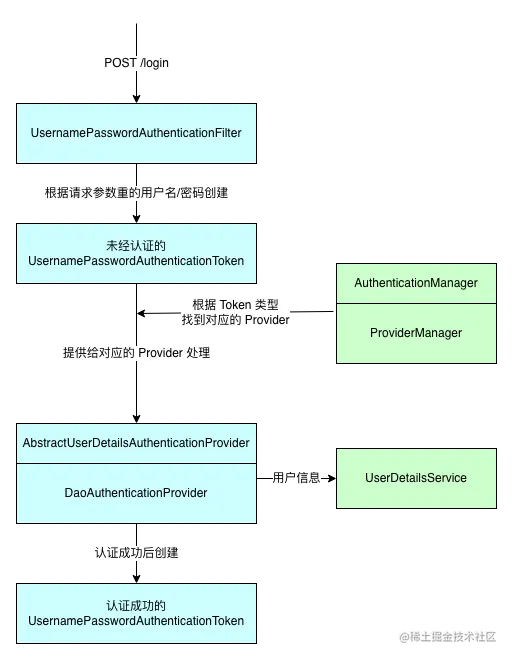
根据上图,我们可以照猫画虎,自定义一个认证流程,比如手机短信码认证。在图中,我已经把流程中涉及到的主要环节标记了不同的颜色,其中蓝色块的部分,是用户名/密码认证对应的部分,绿色块标记的部分,则是与具体认证方式无关的逻辑。
因此,我们可以按照蓝色部分的类,开发我们自定义的逻辑,主要包括以下内容:
- 一个自定义的
Authentication实现类,与UsernamePasswordAuthenticationToken类似,用来保存认证信息。 - 一个自定义的过滤器,与
UsernamePasswordAuthenticationFilter类似,针对特定的请求,封装认证信息,调用认证逻辑。 - 一个
AuthenticationProvider的实现类,提供认证逻辑,与DaoAuthenticationProvider类似。
接下来,以手机验证码认证为例,一一完成。
自定义 Authentication
先给代码,后面进行说明:
public class SmsCodeAuthenticationToken extends AbstractAuthenticationToken {

    private final Object principal;

    private Object credentials;

    public SmsCodeAuthenticationToken(Object principal, Object credentials) {

        super(null);

        this.principal = principal;

        this.credentials = credentials;

        setAuthenticated(false);

    }

    public SmsCodeAuthenticationToken(Object principal, Object credentials,

                                      Collection<? extends GrantedAuthority> authorities) {

        super(authorities);

        this.principal = principal;

        this.credentials = credentials;

        super.setAuthenticated(true);

    }

    @Override

    public Object getCredentials() {

        return this.credentials;

    }

    @Override

    public Object getPrincipal() {

        return this.principal;

    }

    @Override

    public void setAuthenticated(boolean isAuthenticated) throws IllegalArgumentException {

        Assert.isTrue(!isAuthenticated,

                "Cannot set this token to trusted - use constructor which takes a GrantedAuthority list instead");

        super.setAuthenticated(false);

    }

    @Override

    public void eraseCredentials() {

        super.eraseCredentials();

        this.credentials = null;

    }

}
和 UsernamePasswordAuthenticationToken 一样,继承 AbstractAuthenticationToken 抽象类,需要实现 getPrincipal 和 getCredentials 两个方法。在用户名/密码认证中,principal 表示用户名,credentials 表示密码,在此,我们可以让它们指代手机号和验证码,因此,我们增加这两个属性,然后实现方法。
除此之外,我们需要写两个构造方法,分别用来创建未认证的和已经成功认证的认证信息。
自定义 Filter
这一部分,可以参考 UsernamePasswordAuthenticationFilter 来写。还是线上代码:
public class SmsCodeAuthenticationProcessingFilter extends AbstractAuthenticationProcessingFilter {

    public static final String FORM_MOBILE_KEY = "mobile";

    public static final String FORM_SMS_CODE_KEY = "smsCode";

    private static final AntPathRequestMatcher DEFAULT_ANT_PATH_REQUEST_MATCHER = new AntPathRequestMatcher("/sms/login",

            "POST");

    private boolean postOnly = true;

    protected SmsCodeAuthenticationProcessingFilter() {

        super(DEFAULT_ANT_PATH_REQUEST_MATCHER);

    }

    @Override

    public Authentication attemptAuthentication(HttpServletRequest request, HttpServletResponse response) throws AuthenticationException, IOException, ServletException {

        if (this.postOnly && !request.getMethod().equals("POST")) {

            throw new AuthenticationServiceException("Authentication method not supported: " + request.getMethod());

        }

        String mobile = obtainMobile(request);

        mobile = (mobile != null) ? mobile : "";

        mobile = mobile.trim();

        String smsCode = obtainSmsCode(request);

        smsCode = (smsCode != null) ? smsCode : "";

        SmsCodeAuthenticationToken authRequest = new SmsCodeAuthenticationToken(mobile, smsCode);

        // Allow subclasses to set the "details" property

        setDetails(request, authRequest);

        return this.getAuthenticationManager().authenticate(authRequest);

    }

    private String obtainMobile(HttpServletRequest request) {

        return request.getParameter(FORM_MOBILE_KEY);

    }

    private String obtainSmsCode(HttpServletRequest request) {

        return request.getParameter(FORM_SMS_CODE_KEY);

    }

    protected void setDetails(HttpServletRequest request, SmsCodeAuthenticationToken authRequest) {

        authRequest.setDetails(this.authenticationDetailsSource.buildDetails(request));

    }

}
这部分比较简单,关键点如下:
- 首先,默认的构造方法中制定了过滤器匹配那些请求,这里匹配的是
/sms/login的 POST 请求。 - 在
attemptAuthentication方法中,首先从request中获取表单输入的手机号和验证码,创建未经认证的 Token 信息。 - 将 Token 信息交给
this.getAuthenticationManager().authenticate(authRequest)方法。
自定义 Provider
这里是完成认证的主要逻辑,这里的代码只有最基本的校验逻辑,没有写比较严谨的校验,比如校验用户是否禁用等,因为这部分比较繁琐但是简单。
public class SmsCodeAuthenticationProvider implements AuthenticationProvider {

    public static final String SESSION_MOBILE_KEY = "mobile";

    public static final String SESSION_SMS_CODE_KEY = "smsCode";

    public static final String FORM_MOBILE_KEY = "mobile";

    public static final String FORM_SMS_CODE_KEY = "smsCode";

    private UserDetailsService userDetailsService;

    @Override

    public Authentication authenticate(Authentication authentication) throws AuthenticationException {

        authenticationChecks(authentication);

        String mobile = authentication.getName();

        UserDetails userDetails = userDetailsService.loadUserByUsername(mobile);

        SmsCodeAuthenticationToken authResult = new SmsCodeAuthenticationToken(userDetails, userDetails.getAuthorities());

        return authResult;

    }

    /**

     * 认证信息校验

     * @param authentication

     */

    private void authenticationChecks(Authentication authentication) {

        HttpServletRequest request = ((ServletRequestAttributes) RequestContextHolder.getRequestAttributes()).getRequest();

        // 表单提交的手机号和验证码

        String formMobile = request.getParameter(FORM_MOBILE_KEY);

        String formSmsCode = request.getParameter(FORM_SMS_CODE_KEY);

        // 会话中保存的手机号和验证码

        String sessionMobile = (String) request.getSession().getAttribute(SESSION_MOBILE_KEY);

        String sessionSmsCode = (String) request.getSession().getAttribute(SESSION_SMS_CODE_KEY);

        if (StringUtils.isEmpty(sessionMobile) || StringUtils.isEmpty(sessionSmsCode)) {

            throw new BadCredentialsException("为发送手机验证码");

        }

        if (!formMobile.equals(sessionMobile)) {

            throw new BadCredentialsException("手机号码不一致");

        }

        if (!formSmsCode.equals(sessionSmsCode)) {

            throw new BadCredentialsException("验证码不一致");

        }

    }

    @Override

    public boolean supports(Class<?> authentication) {

        return (SmsCodeAuthenticationToken.class.isAssignableFrom(authentication));

    }

    public void setUserDetailsService(UserDetailsService userDetailsService) {

        this.userDetailsService = userDetailsService;

    }

}
这段代码的重点有以下几个:
supports方法用来判断这个 Provider 支持的 AuthenticationToken 的类型,这里对应我们之前创建的SmsCodeAuthenticationToken。- 在
authenticate方法中,我们将 Token 中的手机号和验证码与 Session 中保存的手机号和验证码进行对比。(向 Session 中保存手机号和验证码的部分在下文中实现)对比无误后,从 UserDetailsService 中获取对应的用户,并依此创建通过认证的 Token,并返回,最终到达 Filter 中。
自定义认证成功/失败后的 Handler
之前,我们通过分析源码知道,Filter 中的 doFilter 方法,其实是在它的父类
AbstractAuthenticationProcessingFilter 中的,attemptAuthentication 方法也是在 doFilter 中被调用的。
当我们进行完之前的自定义逻辑,无论是否认证成功,attemptAuthentication 方法会返回认证成功的结果或者抛出认证失败的异常。doFilter 方法中会根据认证的结果(成功/失败),调用不同的处理逻辑,这两个处理逻辑,我们也可以进行自定义。
我直接在下面贴代码:
public class SmsCodeAuthenticationSuccessHandler implements AuthenticationSuccessHandler {

    @Override

    public void onAuthenticationSuccess(HttpServletRequest request, HttpServletResponse response, Authentication authentication) throws IOException, ServletException {

        response.setContentType("text/plain;charset=UTF-8");

        response.getWriter().write(authentication.getName());

    }

}
public class SmsCodeAuthenticationFailureHandler implements AuthenticationFailureHandler {

    @Override

    public void onAuthenticationFailure(HttpServletRequest request, HttpServletResponse response, AuthenticationException exception) throws IOException, ServletException {

        response.setContentType("text/plain;charset=UTF-8");

        response.getWriter().write("认证失败");

    }

}
以上是成功和失败后的处理逻辑,需要分别实现对应的接口,并实现方法。注意,这里只是为了测试,写了最简单的逻辑,以便测试的时候能够区分两种情况。真实的项目中,要根据具体的业务执行相应的逻辑,比如保存当前登录用户的信息等。
配置自定义认证的逻辑
为了使我们的自定义认证生效,需要将 Filter 和 Provider 添加到 Spring Security 的配置当中,我们可以把这一部分配置先单独放到一个配置类中:
@Component

@RequiredArgsConstructor

public class SmsCodeAuthenticationSecurityConfig extends SecurityConfigurerAdapter<DefaultSecurityFilterChain, HttpSecurity> {

    private final UserDetailsService userDetailsService;

    @Override

    public void configure(HttpSecurity http) {

        SmsCodeAuthenticationProcessingFilter smsCodeAuthenticationFilter = new SmsCodeAuthenticationProcessingFilter();

        smsCodeAuthenticationFilter.setAuthenticationManager(http.getSharedObject(AuthenticationManager.class));

        smsCodeAuthenticationFilter.setAuthenticationSuccessHandler(new SmsCodeAuthenticationSuccessHandler());

        smsCodeAuthenticationFilter.setAuthenticationFailureHandler(new SmsCodeAuthenticationFailureHandler());

        SmsCodeAuthenticationProvider smsCodeAuthenticationProvider = new SmsCodeAuthenticationProvider();

        smsCodeAuthenticationProvider.setUserDetailsService(userDetailsService);

        http.authenticationProvider(smsCodeAuthenticationProvider)

                .addFilterAfter(smsCodeAuthenticationFilter, UsernamePasswordAuthenticationFilter.class);

    }

}
其中,有以下需要注意的地方:
- 一定记得把 AuthenticationManager 提供给 Filter,回顾之前讲到的认证逻辑,如果没有这一步,在 Filter 中完成认证信息的封装后,就没办法去找对应的 Provider。
- 要把成功/失败后的处理逻辑的两个类提供给 Filter,否则不会进入这两个逻辑,而是会进入默认的处理逻辑。
- Provider 中用到了 UserDetailsService,也要记得提供。
- 最后,将两者添加到 HttpSecurity 对象中。
接下来,需要在 Spring Security 的主配置中添加如下内容。
- 首先,注入
SmsCodeAuthenticationSecurityConfig配置。 - 然后,在
configure(HttpSecurity http)方法中,引入配置:http.apply`` ( ``smsCodeAuthenticationSecurityConfig`` ) ``;。 - 最后,由于在认证前,需要请求和校验验证码,因此,对
/sms/**路径进行放行。
测试
大功告成,我们测试一下,首先需要提供一个发送验证码的接口,由于是测试,我们直接将验证码返回。接口代码如下:
链接:https://juejin.cn/post/7054844113882972191
Spring Security 自定义认证逻辑的更多相关文章
- Spring Security自定义认证页面(动态网页解决方案+静态网页解决方案)--练气中期圆满
写在前面 上一回我们简单分析了spring security拦截器链的加载流程,我们还有一些简单的问题没有解决.如何自定义登录页面?如何通过数据库获取用户权限信息? 今天主要解决如何配置自定义认证页面 ...
- Spring Security自定义认证器
在了解过Security的认证器后,如果想自定义登陆,只要实现AuthenticationProvider还有对应的Authentication就可以了 Authentication 首先要创建一个自 ...
- Spring Security 接口认证鉴权入门实践指南
目录 前言 SpringBoot 示例 SpringBoot pom.xml SpringBoot application.yml SpringBoot IndexController SpringB ...
- spring security自定义指南
序 本文主要研究一下几种自定义spring security的方式 主要方式 自定义UserDetailsService 自定义passwordEncoder 自定义filter 自定义Authent ...
- Spring Security 自定义登录认证(二)
一.前言 本篇文章将讲述Spring Security自定义登录认证校验用户名.密码,自定义密码加密方式,以及在前后端分离的情况下认证失败或成功处理返回json格式数据 温馨小提示:Spring Se ...
- Spring Cloud实战 | 第九篇:Spring Cloud整合Spring Security OAuth2认证服务器统一认证自定义异常处理
本文完整代码下载点击 一. 前言 相信了解过我或者看过我之前的系列文章应该多少知道点我写这些文章包括创建 有来商城youlai-mall 这个项目的目的,想给那些真的想提升自己或者迷茫的人(包括自己- ...
- 最简单易懂的Spring Security 身份认证流程讲解
最简单易懂的Spring Security 身份认证流程讲解 导言 相信大伙对Spring Security这个框架又爱又恨,爱它的强大,恨它的繁琐,其实这是一个误区,Spring Security确 ...
- (二)spring Security 自定义登录页面与校验用户
文章目录 配置 security 配置下 MVC 自定义登录页面 自定义一个登陆成功欢迎页面 效果图 小结: 使用 Spring Boot 的快速创建项目功能,勾选上本篇博客需要的功能:web,sec ...
- 解决Spring Security自定义filter重复执行问题
今天做项目的时候,发现每次拦截器日志都会打两遍,很纳闷,怀疑是Filter被执行了两遍.结果debug之后发现还真是!记录一下这个神奇的BUG! 问题描述 项目中使用的是Spring-security ...
- 02 spring security 自定义用户认证流程
1. 自定义登录页面 (1)首先在static目录下面创建login.html 注意: springboot项目默认可以访问resources/resources, resources/s ...
随机推荐
- java 导入Excel数据校验判断哪行那列
记录工作 需求是导入数据的时候需要判断哪一行是空行,或者哪一行超过限制字符,然后返回给前端做展示 @PostMapping("/importExcel") @ApiOperatio ...
- 【CDH】cdh搭建遇到的坑和解决过程
本人安装CDH时,使用的是在线安装方式,就是yum install XXX XXX XXX这种.所以安装目录都是默认的目录. Linxu:centos 7 一,启动cloudera-scm-agent ...
- Supervisor进程守护监控部署
前言:Supervisor在百度百科上给的定义是超级用户,监管员.Supervisor是一个进程管理工具, 当进程中断的时候Supervisor能自动重新启动该进程.可以运行在各类Unix机器上,su ...
- 课程表及事件提醒app-界面原型设计
前端设计: 暂定为8个主要界面:程序初始界面.主界面(首页).课表界面."我的"界面.登录界面.注册界面.创建事件界面.新建课表界面 设计思路: 项目结构 三个主要界面 首页: 课 ...
- 当前我对Visual Grounding的看法
3D Visual Grounding 在看到相关论文的时候,我有一种非常严重的直觉--我的博士课题大概就是做这个了,虽然还没找老师聊. 简要解释:在这个任务中,研究者的主要目标是探索如何利用图像和自 ...
- springmvc的Interceptor拦截器和servlet的filter过滤器
springmvc的Interceptor拦截器和servlet的filter过滤器 1.springmvc的Interceptor拦截器和servlet的filter过滤器springboot实现方 ...
- 【java数据结构与算法】直接戳中"希尔排序"要点,学不会你打我~
希尔排序: 也叫增量递减排序 是插入排序的优化,分组+排序 Get到重点,那么我们开剖析一下 结合图表和代码,总结如下~public class ShellSort { public static v ...
- 调度器46—tick模式
一.tick简介 tick就是一个周期性的中断,周期通过 CONFIG_HZ 进行配置,一般常取值为100Hz.250Hz.1000Hz.Tick 每秒窃取CPU 100 到 1000 次,导致Ica ...
- MyBatis_09(逆向工程)
MyBatis的逆向工程 正向工程:先创建Java实体类,由框架负责根据实体类生成数据库表.Hibernate是支持正向工程的 逆向工程:先创建数据库表,由框架负责根据数据库表,反向生成如下资源: J ...
- C#消息泵探索(二)
引言: 上篇文章里简单的解释了C#的消息泵原理,这里我们以winform为例详细地了解一下实现代码. 底层实现 [DllImport(ExternDll.User32, ExactSpelling ...