Linux安装fastdfs集群部署
过程问题:
make: gcc:命令未找到
解决:
yum -y install gcc
一、环境和版本:
Linux环境:CentOS 7.6
libfastcommon版本:1.0.39
FastDFS版本:V5.11
fastdfs-nginx-module版本:V1.2
nginx版本:1.12.2
二、搭建步骤:
1、搭建FastDFS集群
(1)环境准备(在两台服务器上分别操作)
yum -y install pcre pcre-devel

yum install -y zlib-devel

mkdir -p /opt/fastdfs /data/fastdfs/tracker /data/fastdfs/storage /data/fastdfs/client /data/fastdfs/file
为下一步下载源码做准备
cd /opt/fastdfs
(2)安装libfastcommon(在两台服务器上分别操作)
wget https://github.com/happyfish100/libfastcommon/archive/V1.0.39.tar.gz

tar -zxvf V1.0.39.tar.gz

cd libfastcommon-1.0.39/

./make.sh

./make.sh install
(3)安装FastDFS(在两台服务器上分别操作)
cd /opt/fastdfs

wget https://github.com/happyfish100/fastdfs/archive/V5.11.tar.gz

tar -zxvf V5.11.tar.gz

\cd fastdfs-5.11/

./make.sh

./make.sh install
配置文件准备
cp /etc/fdfs/tracker.conf.sample /etc/fdfs/tracker.conf 	#tracker节点

cp /etc/fdfs/storage.conf.sample /etc/fdfs/storage.conf 	#storage节点

cp /etc/fdfs/client.conf.sample /etc/fdfs/client.conf	 #客户端文件,测试用

cp /opt/fastdfs/fastdfs-5.11/conf/http.conf /etc/fdfs/ 	#供nginx访问使用

cp /opt/fastdfs/fastdfs-5.11/conf/mime.types /etc/fdfs/ 	#供nginx访问使用
(4)tracker server配置:
vim /etc/fdfs/tracker.conf
需要修改的内容如下

port=22122 # tracker服务器端口(默认22122,一般不修改)

base_path=/data/fastdfs/tracker # 存储日志和数据的根目录
启动服务
service fdfs_trackerd start
查看服务状态, 查看服务是否启动,端口是否打开
netstat -tulnp
(5)storage server配置:
vim /etc/fdfs/storage.conf
需要修改的内容如下
port=23000 # storage服务端口(默认23000,一般不修改)

base_path=/data/fastdfs/storage # 数据和日志文件存储根目录

store_path0=/data/fastdfs/file # 第一个存储目录

tracker_server=172.18.183.5:22122 # tracker服务器IP和端口

tracker_server=172.18.183.8:22122 # tracker服务器IP和端口

http.server_port=8888 # http访问文件的端口(默认8888,看情况修改,和nginx中保持一致)
启动服务
service fdfs_storaged start
查看服务是否启动,端口是否打开
netstat -tulnp

firewall-cmd --permanent --add-port=22122/tcp

firewall-cmd --permanent --add-port=23000/tcp

firewall-cmd --reload
查看日志
journalctl -xe
查看集群状态
fdfs_monitor /etc/fdfs/storage.conf list
storage server有7个状态,如下:

FDFS_STORAGE_STATUS_INIT :初始化,尚未得到同步已有数据的源服务器

FDFS_STORAGE_STATUS_WAIT_SYNC :等待同步,已得到同步已有数据的源服务器

FDFS_STORAGE_STATUS_SYNCING :同步中

FDFS_STORAGE_STATUS_DELETED :已删除,该服务器从本组中摘除(注:本状态的功能尚未实现)

FDFS_STORAGE_STATUS_OFFLINE :离线

FDFS_STORAGE_STATUS_ONLINE :在线,尚不能提供服务

FDFS_STORAGE_STATUS_ACTIVE :在线,可以提供服务

当storage server的状态为 FDFS_STORAGE_STATUS_ONLINE 时,当该storage server向tracker server发起一次heart beat时,tracker server将其状态更改为 FDFS_STORAGE_STATUS_ACTIVE
(6)Client配置:
vim /etc/fdfs/client.conf
需要修改的内容如下
base_path=/data/fastdfs/client

tracker_server=172.18.183.5:22122 # tracker服务器IP和端口

tracker_server=172.18.183.8:22122 # tracker服务器IP和端口
保存后测试,随便上传一张图片到服务器,然后在该目录下执行以下命令返回ID表示成功
fdfs_upload_file /etc/fdfs/client.conf halo.jpg
返回值如下
group1/M00/00/00/rBK3BV58iTKABs-cABYoCsMn6JA740.jpg
(7)安装nginx和fastdfs-nginx-module(在两台服务器上分别操作)
#下载nginx module

cd /opt/fastdfs/

wget https://github.com/happyfish100/fastdfs-nginx-module/archive/V1.20.tar.gz

tar -zxvf V1.20.tar.gz

cp /opt/fastdfs/fastdfs-nginx-module-1.20/src/mod_fastdfs.conf /etc/fdfs

#编辑 fastdfs-n/ginx-module-1.20/src/config 文件

vim /opt/fastdfs/fastdfs-nginx-module-1.20/src/config
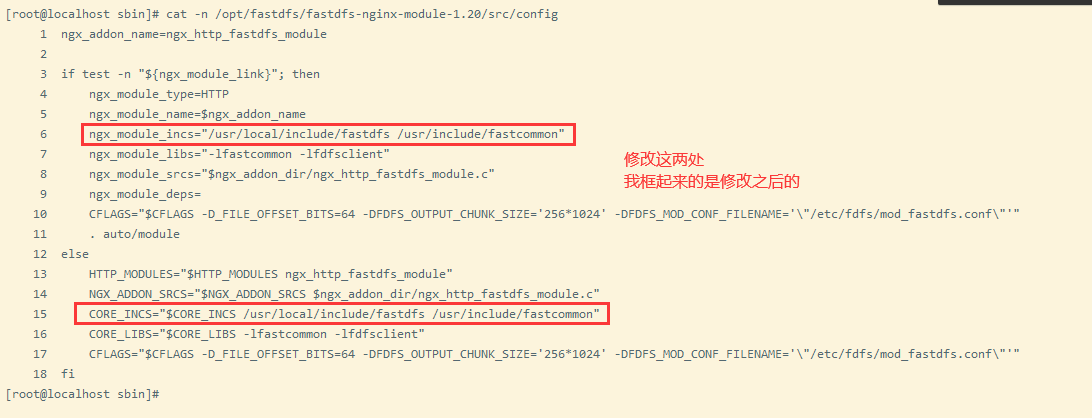
ngx_addon_name=ngx_http_fastdfs_module

if test -n "${ngx_module_link}"; then

 	ngx_module_type=HTTP

 	ngx_module_name=$ngx_addon_name

 	ngx_module_incs="/usr/local/include/fastdfs /usr/include/fastcommon"

 	ngx_module_libs="-lfastcommon -lfdfsclient"

 	ngx_module_srcs="$ngx_addon_dir/ngx_http_fastdfs_module.c"

 	ngx_module_deps=

 	CFLAGS="$CFLAGS -D_FILE_OFFSET_BITS=64 -DFDFS_OUTPUT_CHUNK_SIZE='256*1024' -			   			 DFDFS_MOD_CONF_FILENAME='\"/etc/fdfs/mod_fastdfs.conf\"'"

    . auto/module

else

    HTTP_MODULES="$HTTP_MODULES ngx_http_fastdfs_module"

    NGX_ADDON_SRCS="$NGX_ADDON_SRCS $ngx_addon_dir/ngx_http_fastdfs_module.c"

    CORE_INCS="$CORE_INCS /usr/local/include/fastdfs /usr/include/fastcommon"

    CORE_LIBS="$CORE_LIBS -lfastcommon -lfdfsclient"

    CFLAGS="$CFLAGS -D_FILE_OFFSET_BITS=64 -DFDFS_OUTPUT_CHUNK_SIZE='256*1024' -DFDFS_MOD_CONF_FILENAME='\"/etc/fdfs/mod_fastdfs.conf\"'"

fi
安装nginx,并且添加nginx module
cd /opt/fastdfs/

wget http://nginx.org/download/nginx-1.12.2.tar.gz

tar -zxvf nginx-1.12.2.tar.gz

cd nginx-1.12.2/

./configure --prefix=/usr/local/nginx --add-module=/opt/fastdfs/fastdfs-nginx-module-1.20/src

make && make install
配置nginx访问
vim /etc/fdfs/mod_fastdfs.conf
connect_timeout=10

base_path=/data/fastdfs/file

tracker_server=172.18.183.5:22122 # tracker服务器IP和端口

tracker_server=172.18.183.8:22122 #tracker服务器IP2和端口

group_name=group1         #当前服务器的group名

url_have_group_name=true #url中包含group名称

store_path0=/data/fastdfs/file #存储路径
配置nginx.config
vim /usr/local/nginx/conf/nginx.conf
增加或者修改如下内容
worker_processes  4;

worker_cpu_affinity 1000 0100 0010 0001;

error_log  logs/error.log;

events {

    worker_connections  1024;

}

http {

    include       mime.types;

    default_type  application/octet-stream;

    sendfile        on;

    keepalive_timeout  65;

    server {

        listen       8888;

        server_name  localhost;

        #charset koi8-r;

        #access_log  logs/host.access.log  main;

         location ~/group([0-9])/M00 {

            ngx_fastdfs_module;

        }

        error_page   500 502 503 504  /50x.html;

        location = /50x.html {

            root   html;

        }

    }

}
测试下载,用外部浏览器访问刚才已传过的文件。
http://172.18.183.5:8888/group1/M00/00/00/rBK3BV58iTKABs-cABYoCsMn6JA740.jpg

http://172.18.183.8:8888/group1/M00/00/00/rBK3BV58iTKABs-cABYoCsMn6JA740.jpg
Linux安装fastdfs集群部署的更多相关文章
- FastDFS集群部署
之前介绍过关于FastDFS单机部署,详见博文:FastDFS+Nginx(单点部署)事例 下面来玩下FastDFS集群部署,实现高可用(HA) 服务器规划: 跟踪服务器1[主机](Tracker S ...
- FastDFS集群部署(转载 写的比较好)
FastDFS集群部署 之前介绍过关于FastDFS单机部署,详见博文:FastDFS+Nginx(单点部署)事例 下面来玩下FastDFS集群部署,实现高可用(HA) 服务器规划: 跟踪服务器1 ...
- 初识zookeeper以及安装和集群部署
初识zookeeper以及安装和集群部署 一.Zookeeper单体版安装 在安装zookeeper之前要先安装jdk环境,具体在linux环境安装jdk1.8请参照linux笔记. ...
- (1)Consul在linux环境的集群部署
1.Consul概念 1.1什么是Consul? Consul是一种服务网格解决方案,是HashiCorp公司推出的开源组件,由Go语言开发,部署起来很容易,只需要极少的可执行程序和配置.同时Cons ...
- 关于Linux单机、集群部署FastDFS分布式文件系统的步骤。
集群部署:2台tarcker服务器,2台storage服务器. 192.168.201.86 ---------(trackerd+storage+nginx) 192.168.201.87 ...
- 分布式FastDFS集群部署
FastDFS FastDFS的作者余庆在其 GitHub 上是这样描述的:"FastDFS is an open source high performance distributed f ...
- Fastdfs集群部署以及基本操作
FastDFS引言 本地存储与分布式文件系统 本地存储的缺点: 是否有备份? 没有 成本角度? 贵 服务器 :用于计算 ---- cpu/内存 用于存储 ---- 硬盘大 存储瓶颈? 容量有限 ...
- redis CentOS6.5安装及集群部署
.下载redis source包 链接:https://pan.baidu.com/s/122ZCjNvjl9Jx6M2YsLrncw 密码:92ze 2.解压 tar -xzf redis-3.2. ...
- Spark学习笔记--Linux安装Spark集群详解
本文主要讲解如何在Linux环境下安装Spark集群,安装之前我们需要Linux已经安装了JDK和Scala,因为Spark集群依赖这些.下面就如何安装Spark进行讲解说明. 一.安装环境 操作系统 ...
随机推荐
- 3.SRE.操作手册:基础篇
SRE的根基起码应该包括:SLO.监控.告警.减少琐事和简单化. SLO(服务质量目标):用于描述服务可靠性的程度. SRE的职责并不只是将"所有工作"都自动化,并保持" ...
- GO语言学习——基本数据类型字符串
字符串 Go语言中的字符串以原生数据类型出现. Go 语言里的字符串的内部实现使用UTF-8编码. 字符串的值为双引号(")中的内容,可以在Go语言的源码中直接添加非ASCII码字符 GO语 ...
- CoAP调试工具 Mozi.IoT.CoAP
前言 CoAP是一种类HTTP协议的物联网专用协议,其数据包为人类不可阅读的字节流形式,在开发相关应用的时候往往不能准确的了解数据包的内容.故需要专用的调试工具对数据和通讯进行调试. CoAP协议介绍 ...
- pta L2-002 链表去重 +散列表知识小普及+二进制取反补码运算
题目链接:https://pintia.cn/problem-sets/994805046380707840/problems/994805072641245184: 废话:今天忙着学习新知识了,没怎 ...
- 接口测试框架实战(一) | Requests 与接口请求构造
1080×388 33.4 KB Requests 是一个优雅而简单的 Python HTTP 库,其实 Python 内置了用于访问网络的资源模块,比如urllib,但是它远不如 Requests ...
- python的一些练习题
1.目前工作上有一堆的ip地址,ip是ok的,但是需要找出来不在这里面的其他ip import os a = list() with open('ip.txt','r') as f: #print(f ...
- 【Vagrant】启动安装Homestead卡在 SSH auth method: private key
注意:通过查找资料发现,导致这个问题的原因有很多,我的这个情况只能是一个参考. 问题描述 今天在使用虚拟机的时候,由于存放虚拟机的虚拟磁盘(vmdk文件)的逻辑分区容量不足(可用容量为0了).然后在使 ...
- tuandui last
组长博客链接### 组长博客 参考邹欣老师的问题模板进行总结思考### 设想和目标(2分)#### 1.我们的软件要解决什么问题?是否定义得很清楚?是否对典型用户和典型场景有清晰的描述? 解决的问题 ...
- Microsoft Graph 的 .NET 6 之旅
这是一篇发布在dotnet 团队博客上由微软Graph首席软件工程师 Joao Paiva写的文章,原文地址: https://devblogs.microsoft.com/dotnet/micros ...
- mybatis plus 更新字段的时候设置为 null 后不生效
mybatis plus 将属性设置为 null 值会被忽略,最终生成的 sql 中不会有 set field = null(可能是某些情况) mybatis-plus 更新字段的时候设置为 null ...