Spring Boot整合OAuth2实现GitHub第三方登录
Github OAuth 第三方登录示例
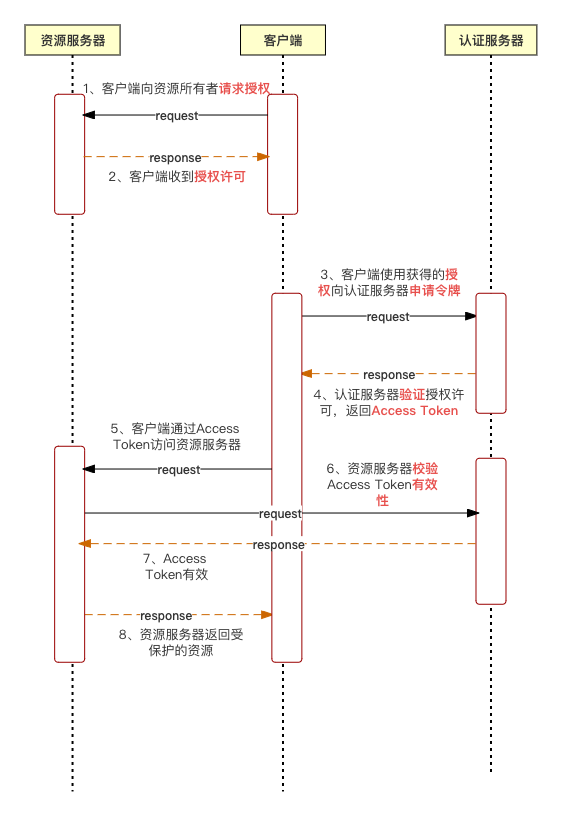
1、第三方登录原理
第三方登录的原理是借助OAuth授权来实现,首先用户先向客户端提供第三方网站的数据证明自己的身份获取授权码,然后客户端拿着授权码与授权服务器建立连接获得一个Access Token,之后客户端就可以通过Access Token来与资源服务器进行交互。
使用OAuth的好处是提供给用户一个特定的密钥,用户持有这个密钥可以访问应用中的任何信息,而不需要向网站提供用户名&密码,可以实现跨系统共享用户授权协议。
通过控制用户持有的密钥,可以很方便的控制用户可以访问的资源,以及控制密钥的过期时间。
以下是来自维基百科对于OAuth的介绍
开放授权(OAuth)是一个开放标准,允许用户让第三方应用访问该用户在某一网站上存储的私密的资源(如照片,视频,联系人列表),而无需将用户名和密码提供给第三方应用。
OAuth允许用户提供一个令牌,而不是用户名和密码来访问他们存放在特定服务提供者的数据。每一个令牌授权一个特定的网站(例如,视频编辑网站)在特定的时段(例如,接下来的2小时内)内访问特定的资源(例如仅仅是某一相册中的视频)。这样,OAuth让用户可以授权第三方网站访问他们存储在另外服务提供者的某些特定信息,而非所有内容。
OAuth是OpenID的一个补充,但是完全不同的服务。
交互流程如下:
2、GitHub实现第三方登录
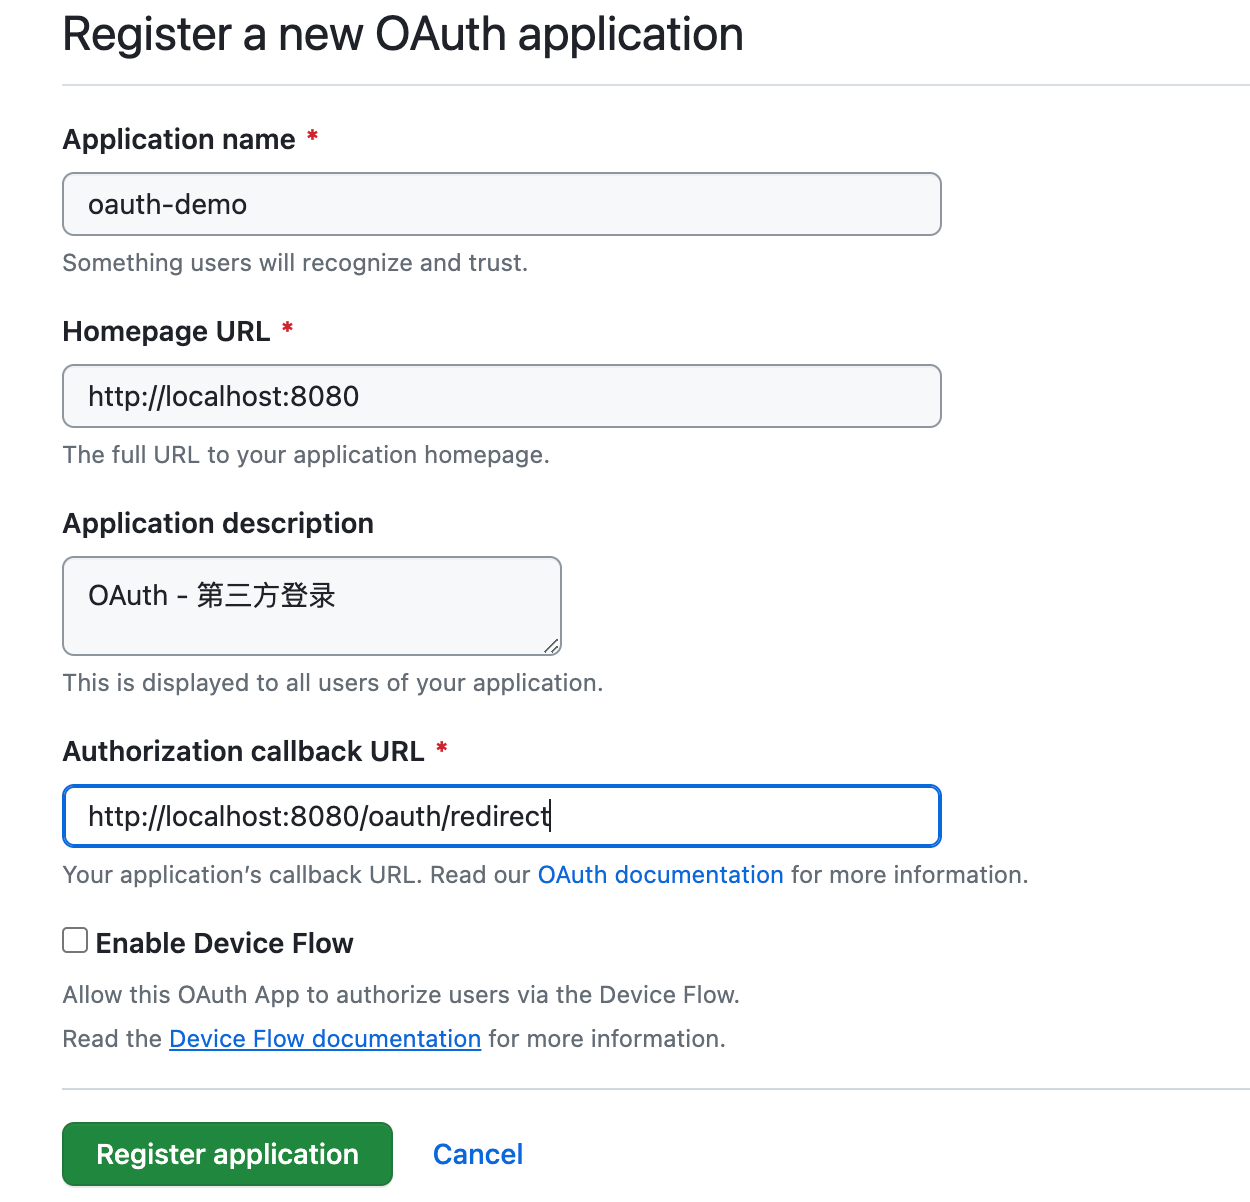
首先需要在github中对应用进行登记,让Github知道谁在发送请求。
访问这个网址,填写登记表
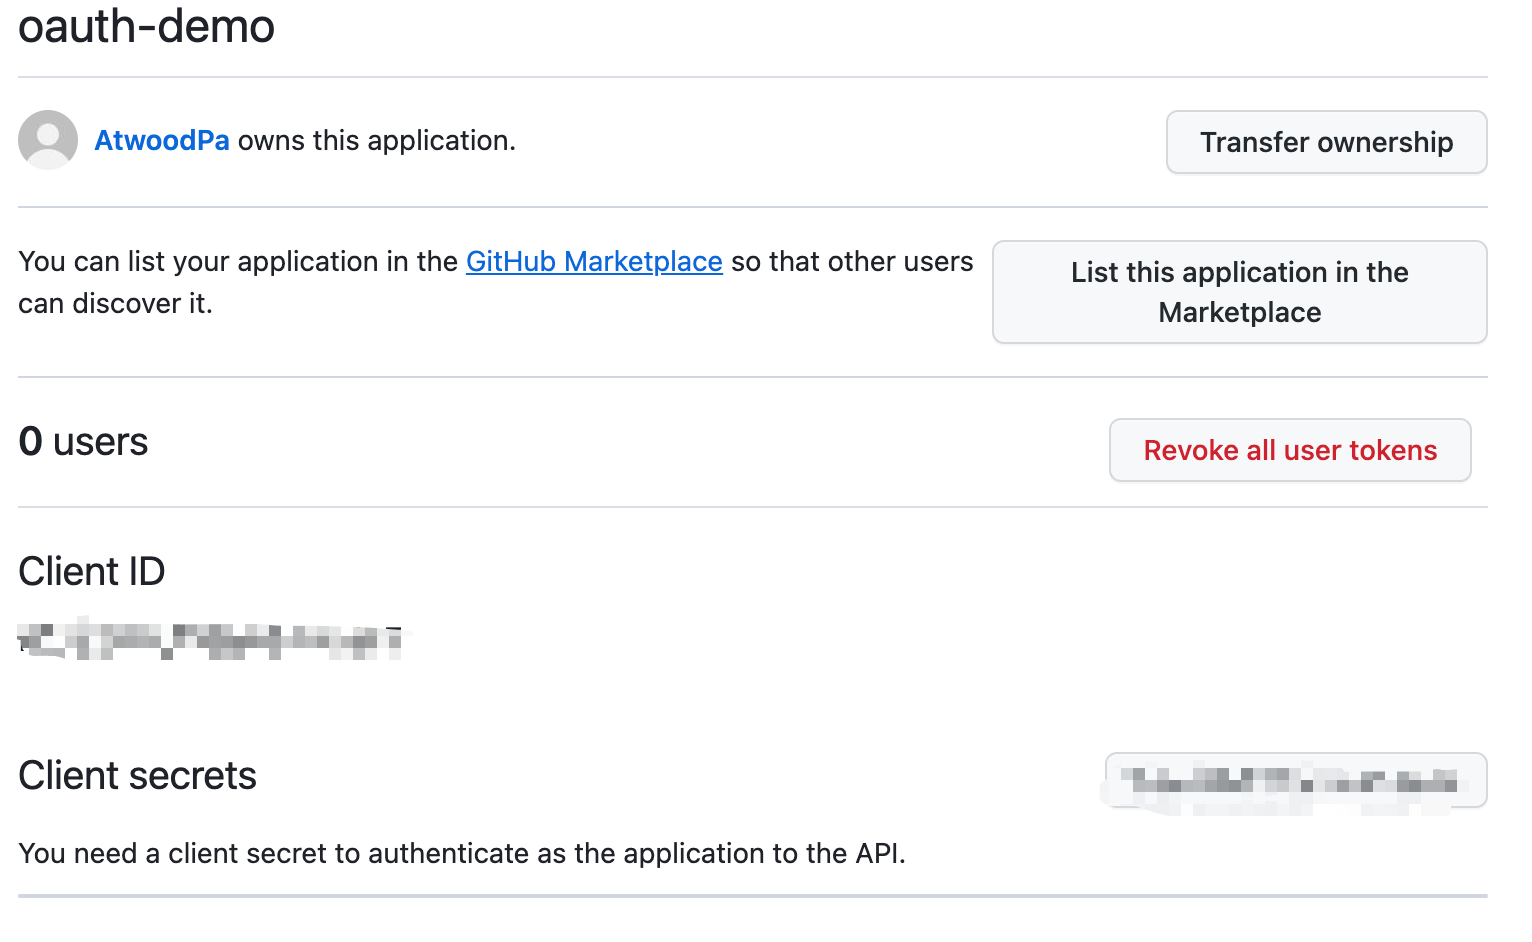
提交成功之后,GitHub会返回Client ID & Client Secrets ,这是应用的身份识别码
创建一个SpringBoot工程,pom.xml文件内容如下:
<?xml version="1.0" encoding="UTF-8"?>

<project xmlns="http://maven.apache.org/POM/4.0.0" xmlns:xsi="http://www.w3.org/2001/XMLSchema-instance"

         xsi:schemaLocation="http://maven.apache.org/POM/4.0.0 https://maven.apache.org/xsd/maven-4.0.0.xsd">

    <modelVersion>4.0.0</modelVersion>

    <parent>

        <groupId>org.springframework.boot</groupId>

        <artifactId>spring-boot-starter-parent</artifactId>

        <version>2.7.17</version>

        <relativePath/> <!-- lookup parent from repository -->

    </parent>

    <groupId>org.pp</groupId>

    <artifactId>springboot-oauth2-api</artifactId>

    <version>0.0.1-SNAPSHOT</version>

    <name>springboot-oauth2-api</name>

    <description>springboot整合oauth2,实现GitHub第三方登录</description>

    <properties>

        <java.version>1.8</java.version>

    </properties>

    <dependencies>

        <dependency>

            <groupId>org.springframework.boot</groupId>

            <artifactId>spring-boot-starter-web</artifactId>

        </dependency>

        <dependency>

            <groupId>org.springframework.boot</groupId>

            <artifactId>spring-boot-starter-thymeleaf</artifactId>

        </dependency>

    </dependencies>

    <build>

        <plugins>

            <plugin>

                <groupId>org.springframework.boot</groupId>

                <artifactId>spring-boot-maven-plugin</artifactId>

                <configuration>

                    <excludes>

                        <exclude>

                            <groupId>org.projectlombok</groupId>

                            <artifactId>lombok</artifactId>

                        </exclude>

                    </excludes>

                </configuration>

            </plugin>

        </plugins>

    </build>

</project>
将ID和密钥添加到配置文件application.yml中:
# 项目端口号

server:

  port: 8080

#  GitHub认证相关参数

github:

    client:

      id: xxx

      secret: xxx
创建一个实体类,用于映射授权成功产生的Token令牌:
import com.fasterxml.jackson.annotation.JsonProperty;

/**

 *

 * Token令牌 - 响应参数

 *

 * @author supanpan

 * @date 2023/10/25

 */

public class AccessTokenResponse {

    @JsonProperty("access_token")

    private String accessToken;

    public String getAccessToken() {

        return accessToken;

    }

    public void setAccessToken(String accessToken) {

        this.accessToken = accessToken;

    }

}
OAuthController如下:
**

 * @author supanpan

 * @date 2023/10/25

 */

@Controller

public class OAuthController {

    @Value("${github.client.id}")

    private String clientId;

    @Value("${github.client.secret}")

    private String clientSecret;

    @GetMapping("/oauth/redirect")

    public String handleRedirect(@RequestParam("code") String requestToken, Model model) {

        // 使用RestTemplate来发送HTTP请求

        RestTemplate restTemplate = new RestTemplate();

        // 获取Token的Url

        String tokenUrl = "https://github.com/login/oauth/access_token" +

                "?client_id=" + clientId +

                "&client_secret=" + clientSecret +

                "&code=" + requestToken;

        // 使用restTemplate向GitHub发送请求,获取Token

        AccessTokenResponse tokenResponse = restTemplate.postForObject(tokenUrl, null, AccessTokenResponse.class);

        // 从响应体中获取Token数据

        String accessToken = tokenResponse.getAccessToken();

        // 携带Token向GitHub发送请求

        String apiUrl = "https://api.github.com/user";

        HttpHeaders headers = new HttpHeaders();

        headers.set("Authorization", "token " + accessToken);

        HttpEntity<String> entity = new HttpEntity<>("parameters", headers);

        ResponseEntity<String> response = restTemplate.exchange(apiUrl, HttpMethod.GET, entity, String.class);

        model.addAttribute("userData", response.getBody());

        return "welcome";

    }

}
SpringBoot启动器
import org.springframework.boot.SpringApplication;

import org.springframework.boot.autoconfigure.SpringBootApplication;

@SpringBootApplication

public class SpringbootOauth2ApiApplication {

    public static void main(String[] args) {

        SpringApplication.run(SpringbootOauth2ApiApplication.class, args);

    }

}
还需要编写两个html页面,index.html和welcome.html
index.html
<!DOCTYPE html>

<html>

<head>

    <meta charset="utf-8" />

    <meta http-equiv="X-UA-Compatible" content="IE=edge">

    <title>OAuth2 Demo</title>

    <meta name="viewport" content="width=device-width, initial-scale=1">

</head>

<body>

<a id="login">Login with GitHub</a>

<script>

    const client_id = 'xxxx';

    const authorize_uri = 'https://github.com/login/oauth/authorize';

    const redirect_uri = 'http://localhost:8080/oauth/redirect';

    const link = document.getElementById('login');

    link.href = `${authorize_uri}?client_id=${client_id}&redirect_uri=${redirect_uri}`;

</script>

</body>

</html>
welcome.html
<!DOCTYPE html>

<html lang="en" xmlns:th="http://www.thymeleaf.org">

<head>

    <meta charset="UTF-8">

    <meta name="viewport" content="width=device-width, initial-scale=1.0">

    <meta http-equiv="X-UA-Compatible" content="ie=edge">

    <title>Hello</title>

</head>

<body>

    <h1>Welcome</h1>

    <div th:text="${userData}"></div>

</body>

</html>
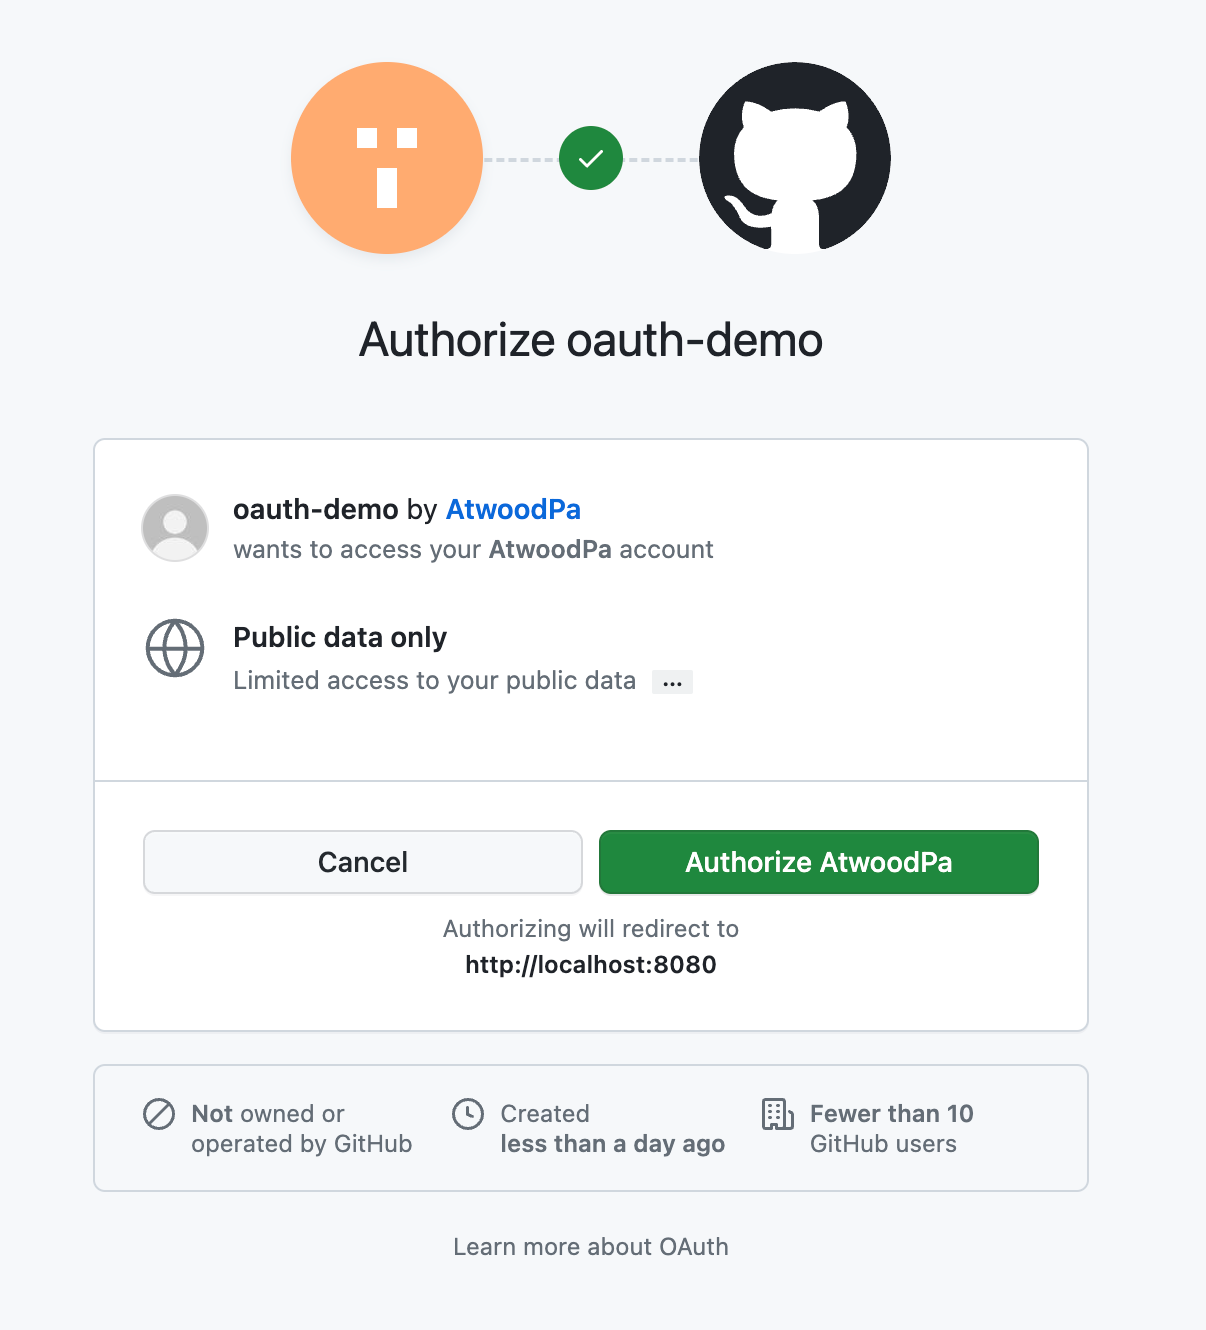
启动项目,浏览器访问localhost:8080,会跳转到index页面,点击链接会跳转到GitHub应用授权页面
点击跳转到GitHub授权之后,GitHub会询问示例代码正在请求数据,您是否同意授权。
用户同意授权, GitHub 就会跳转到redirect_uri指定的跳转网址,并且带上授权码,跳转回来的 URL 就是下面的样子
// code参数就是授权码

http://localhost:8080/oauth/redirect?code:4ea423f2ec1e04c6376a
如下是服务的响应数据:
access token: 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

{

  login: 'AtwoodPa',

  id: 110728122,

  node_id: 'U_kgDOBpmTug',

  avatar_url: 'https://avatars.githubusercontent.com/u/110728122?v=4',

  gravatar_id: '',

  url: 'https://api.github.com/users/AtwoodPa',

  html_url: 'https://github.com/AtwoodPa',

  followers_url: 'https://api.github.com/users/AtwoodPa/followers',

  following_url: 'https://api.github.com/users/AtwoodPa/following{/other_user}',

  gists_url: 'https://api.github.com/users/AtwoodPa/gists{/gist_id}',

  starred_url: 'https://api.github.com/users/AtwoodPa/starred{/owner}{/repo}',

  subscriptions_url: 'https://api.github.com/users/AtwoodPa/subscriptions',

  organizations_url: 'https://api.github.com/users/AtwoodPa/orgs',

  repos_url: 'https://api.github.com/users/AtwoodPa/repos',

  events_url: 'https://api.github.com/users/AtwoodPa/events{/privacy}',

  received_events_url: 'https://api.github.com/users/AtwoodPa/received_events',

  type: 'User',

  site_admin: false,

  name: null,

  company: null,

  blog: '',

  location: null,

  email: null,

  hireable: null,

  bio: null,

  twitter_username: null,

  public_repos: 6,

  public_gists: 0,

  followers: 0,

  following: 3,

  created_at: '2022-08-06T13:02:16Z',

  updated_at: '2023-09-03T00:15:55Z'

}

authorization code: 4ea423f2ec1e04c6376a
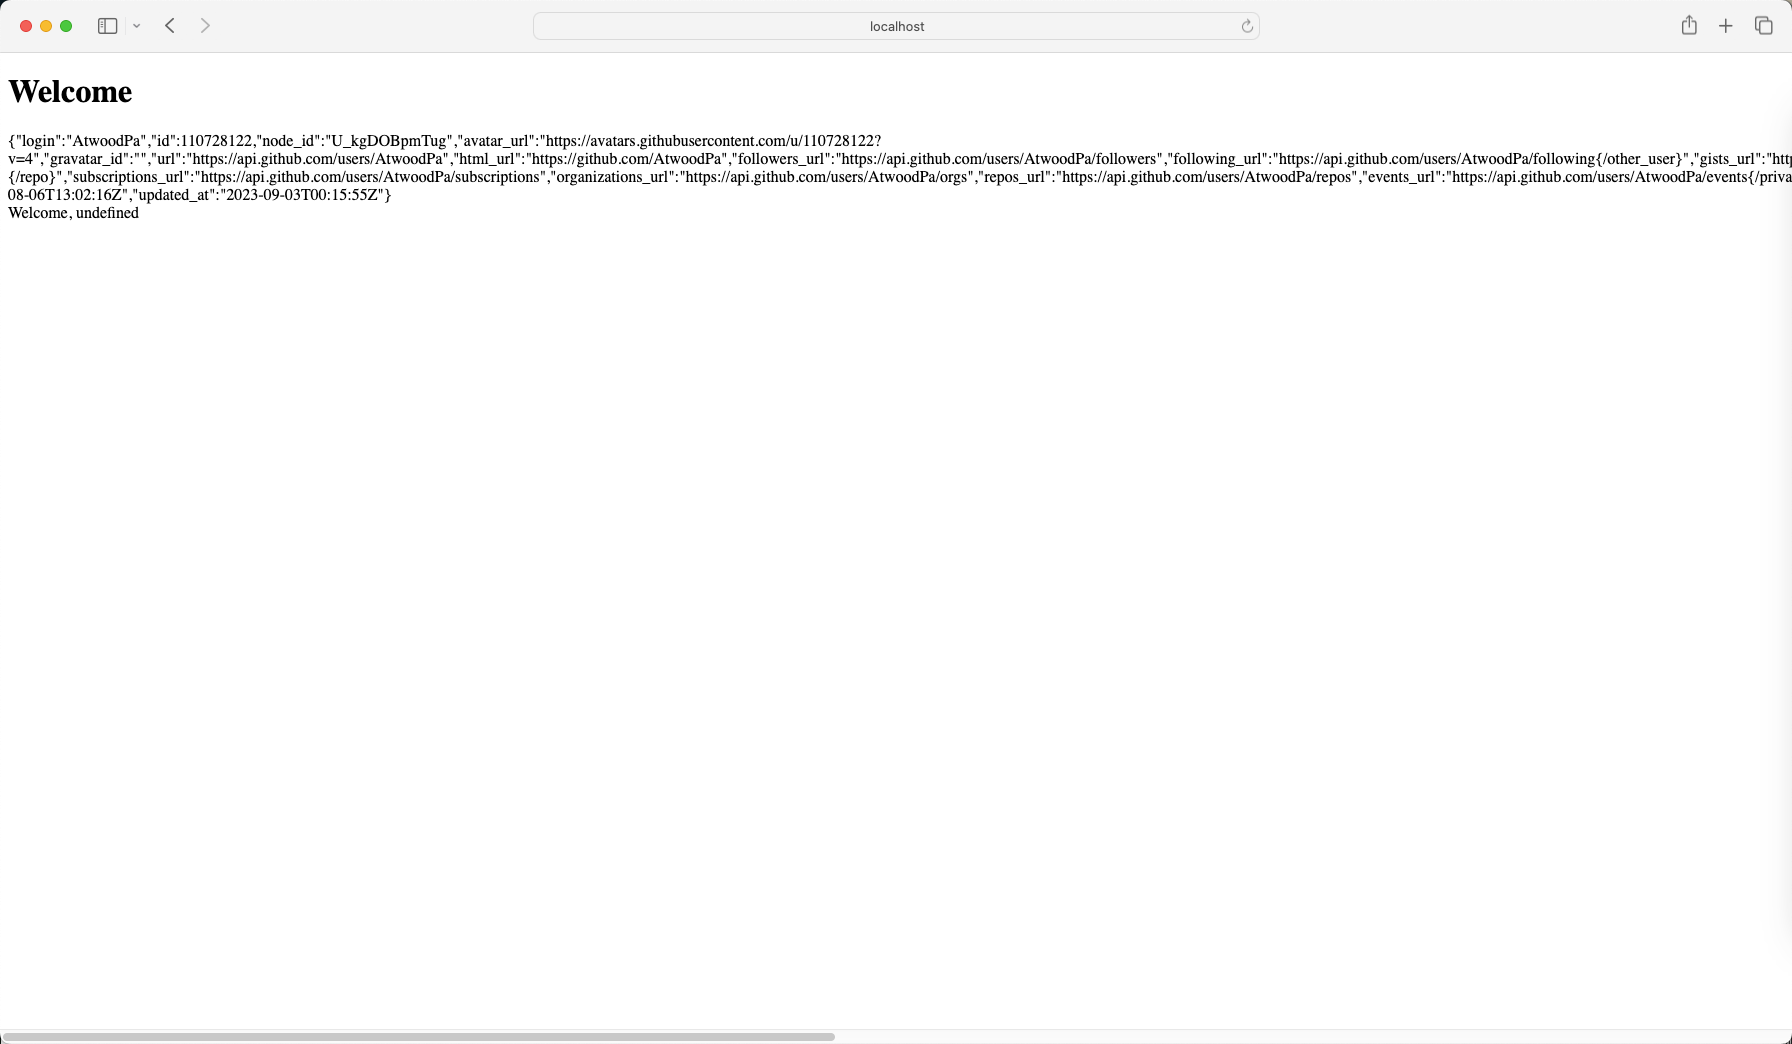
成功执行上述流程,最终展示示例的welcome页面
到这里,Spring Boot整合GitHub实现第三方登录的实现就结束了,以此类推其他厂商的第三方登录实现流程也大概是这样。
Spring Boot整合OAuth2实现GitHub第三方登录的更多相关文章
- Spring Boot(十四):spring boot整合shiro-登录认证和权限管理
Spring Boot(十四):spring boot整合shiro-登录认证和权限管理 使用Spring Boot集成Apache Shiro.安全应该是互联网公司的一道生命线,几乎任何的公司都会涉 ...
- Spring Boot 整合JDBC 实现后端项目开发
一.前言 二.新建Spring Boot 项目 三.Spring Boot 整合JDBC 与MySQL 交互 3.1 新建数据表skr_user 3.2 Jdbcproject 项目结构如下 3.3 ...
- Spring Boot整合实战Spring Security JWT权限鉴权系统
目前流行的前后端分离让Java程序员可以更加专注的做好后台业务逻辑的功能实现,提供如返回Json格式的数据接口就可以.像以前做项目的安全认证基于 session 的登录拦截,属于后端全栈式的开发的模式 ...
- Spring Boot Security Oauth2之客户端模式及密码模式实现
Spring Boot Security Oauth2之客户端模式及密码模式实现 示例主要内容 1.多认证模式(密码模式.客户端模式) 2.token存到redis支持 3.资源保护 4.密码模式用户 ...
- Spring Boot 整合 Shiro ,两种方式全总结!
在 Spring Boot 中做权限管理,一般来说,主流的方案是 Spring Security ,但是,仅仅从技术角度来说,也可以使用 Shiro. 今天松哥就来和大家聊聊 Spring Boot ...
- Spring Security整合JWT,实现单点登录,So Easy~!
前面整理过一篇 SpringBoot Security前后端分离,登录退出等返回json数据,也就是用Spring Security,基于SpringBoot2.1.4 RELEASE前后端分离的情况 ...
- Spring Boot2 系列教程(三十二)Spring Boot 整合 Shiro
在 Spring Boot 中做权限管理,一般来说,主流的方案是 Spring Security ,但是,仅仅从技术角度来说,也可以使用 Shiro. 今天松哥就来和大家聊聊 Spring Boot ...
- Spring Boot 整合 Apollo
简介 Apollo(阿波罗)是携程框架部门研发的分布式配置中心,能够集中化管理应用不同环境.不同集群的配置,配置修改后能够实时推送到应用端,并且具备规范的权限.流程治理等特性,适用于微服务配置管理场景 ...
- Spring Boot 整合 Elasticsearch,实现 function score query 权重分查询
摘要: 原创出处 www.bysocket.com 「泥瓦匠BYSocket 」欢迎转载,保留摘要,谢谢! 『 预见未来最好的方式就是亲手创造未来 – <史蒂夫·乔布斯传> 』 运行环境: ...
- Spring Boot整合Mybatis并完成CRUD操作
MyBatis 是一款优秀的持久层框架,被各大互联网公司使用,本文使用Spring Boot整合Mybatis,并完成CRUD操作. 为什么要使用Mybatis?我们需要掌握Mybatis吗? 说的官 ...
随机推荐
- Hexo博客Next主题bilibili视频Markdown插入文章
问题及需求 B站视频无广告有弹幕,非常简洁,经常看B站视频,在文章引用B站的视频 在不用插件的情况下用官方的iframe方式引入视频,默认的方式导入视频屏幕会很小 一般我们都是自己改width和hei ...
- subprocess Python执行系统命令最优选模块
简介 subprocess 是 Python 中执行操作系统级别的命令的模块,所谓系级级别的命令就是如ls /etc/user ifconfig 等和操作系统有关的命令. subprocess 创建子 ...
- 订单逆向履约系统的建模与 PaaS 化落地实践
导读 本文重点介绍了京东零售电商业务在订单逆向履约上面的最佳技术实践,京东零售快退平台承接了零售几乎所有售前逆向拦截和退款业务,并在长期的业务和技术探索中沉淀了丰富的业务场景设计方案.架构设计经验,既 ...
- React: Warning: `value` prop on `input` should not be null.
警告 解决方案 对value进行判断 修改后的效果 至此问题解决
- [oracle]使用impdp导入数据时卡在视图
前言 oracle 19c使用impdp的时候卡在导入视图的地方一点不动,也没啥提示.根据网上资料,oracle 19在导入视图的时候会有bug. 步骤 查看导入任务 sqlplus / as sys ...
- 【技术积累】Linux中的命令行【理论篇】【六】
as命令 命令介绍 在Linux中,as命令是一个汇编器,用于将汇编语言源代码转换为可执行的目标文件.它是GNU Binutils软件包的一部分,提供了一系列用于处理二进制文件的工具. 命令说明 as ...
- 【RocketMQ】消息的发送
RocketMQ是通过DefaultMQProducer进行消息发送的,它实现了MQProducer接口,MQProducer接口中定义了消息发送的方法,方法主要分为三大类: send同步进行消息发送 ...
- 将Python打包成exe
使用以下命令首先安装包 pip install pyinstaller 参数以及用法 -F生成结果是一个exe文件,所有的第三方依赖.资源和代码均被打包进该exe内 -D生成结果是一个目录,各种第三方 ...
- 《CTFshow-Web入门》01. Web 1~10
@ 目录 web1 题解 web2 题解 web3 题解 web4 题解 web5 题解 原理 web6 题解 原理 web7 题解 web8 题解 web9 题解 原理 web10 题解 ctf - ...
- 原来你是这样的JAVA[05]--String
1.从概念上讲,java字符串就是Unicode字符串. 2.字符串拼接 用指定分隔符拼接字符串数组时,使用StringJoiner或者String.join()更方便: 用StringJoiner拼 ...