Spring Security入门教程 通俗易懂 超详细 【内含案例】
Spring Security的简单使用
推荐 Java 常见面试题
简介
- SSM 整合 Security 是比较麻烦的,虽然Security的功能比 Shiro 强大,相反却没有Shiro的使用量多
- SpringBoot出现后简化了Spring系列的配置文件,因此SpringSecurity的使用逐渐增加
一、创建项目
在 SpringBoot 中直接引入 Spring Security 依赖即可
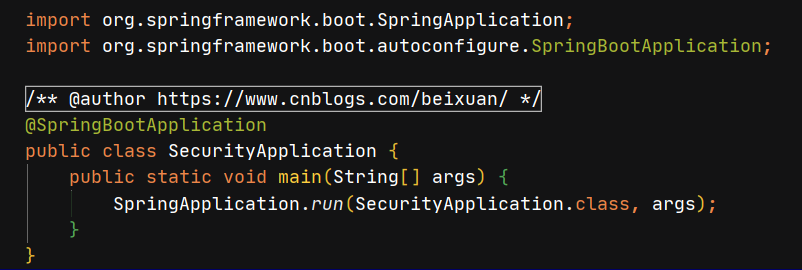
创建项目的启动类
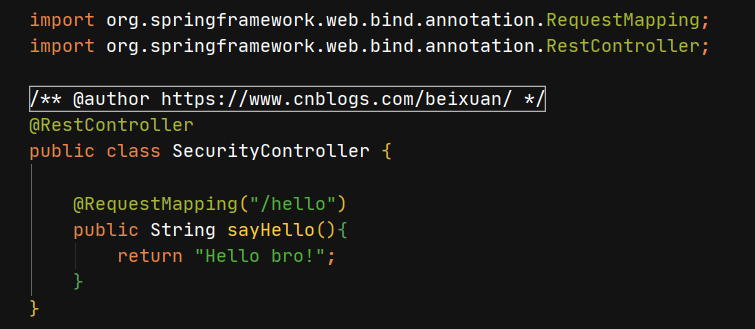
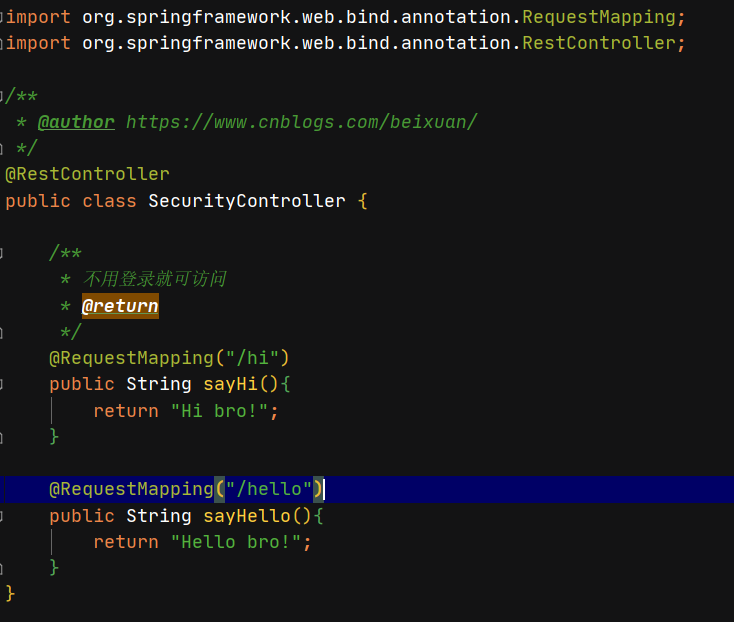
创建 SecurityController 类
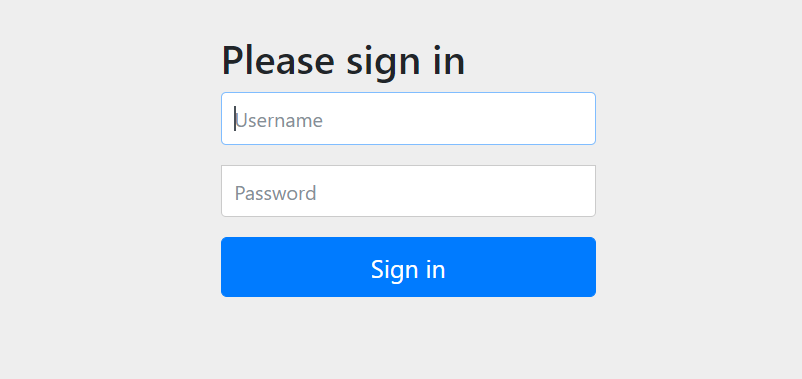
- 启动后访问
localhost:8080/hello- 会自动跳到
localhost:8080/login- 需要登录后才能访问
/hello
二、用户名配置
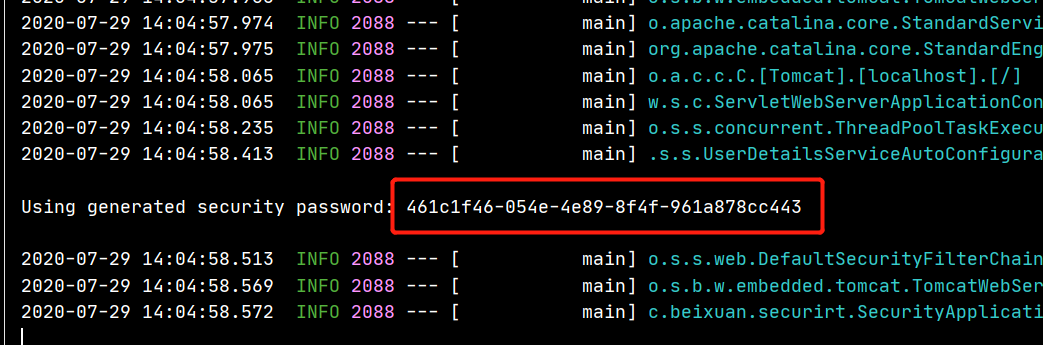
- 默认情况下用户名是
user,而密码会在项目启动时控制台打印出一串随机字符串,这就是密码.每次启动项目,密码都不一样
- 对登录的用户名/密码进行配置,有三种不同的方式
- 在
application配置文件中声明- 在
java代码配置在内存里- 通过获取
数据库
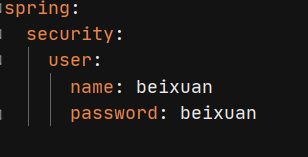
第一种方式
application.yml文件中
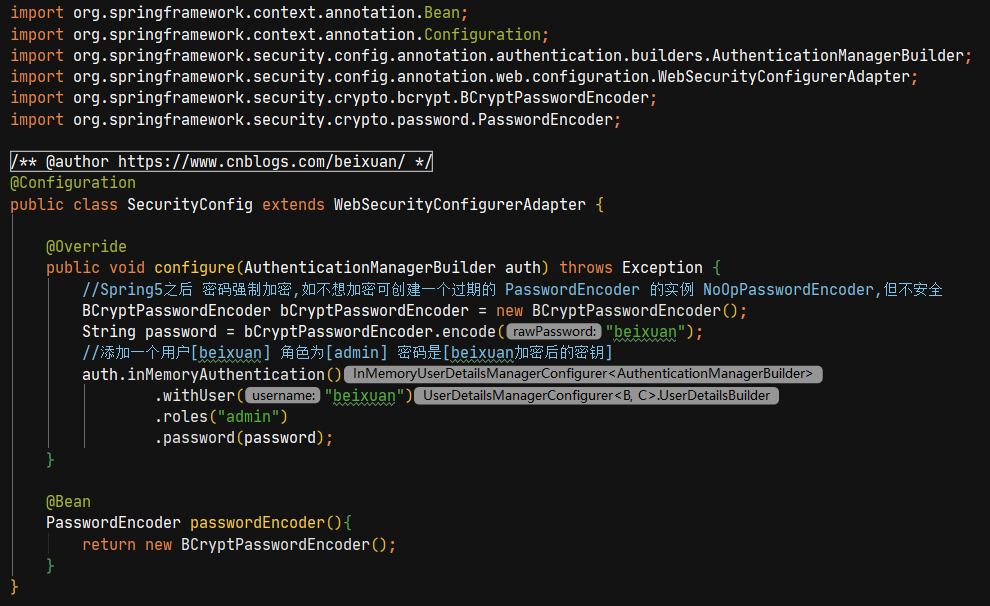
第二种方式 创建一个
SecurityConfig配置类,继承WebSecurityConfigurerAdapter
第三种方法没有进行演示,就是在数据库中取出
username和password配置到内存中
三、忽略拦截
在配置类中重写
configure(WebSecurity web)方法,然后直接访问即可

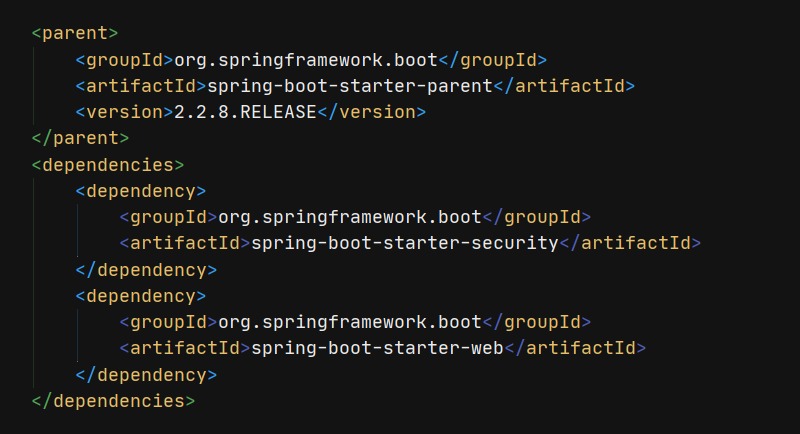
pom.xml文件
<dependency>

    <groupId>org.springframework.boot</groupId>

    <artifactId>spring-boot-starter-security</artifactId>

</dependency>

<!--Web项目 需引入web依赖-->

<dependency>

    <groupId>org.springframework.boot</groupId>

    <artifactId>spring-boot-starter-web</artifactId>

</dependency>
启动类文件
import org.springframework.boot.SpringApplication;

import org.springframework.boot.autoconfigure.SpringBootApplication;

/**

 * @author https://www.cnblogs.com/beixuan/

 */

@SpringBootApplication

public class SecurityApplication {

    public static void main(String[] args) {

        SpringApplication.run(SecurityApplication.class, args);

    }

}
SecurityController 文件
import org.springframework.web.bind.annotation.RequestMapping;

import org.springframework.web.bind.annotation.RestController;

/**

 * @author https://www.cnblogs.com/beixuan/

 */

@RestController

public class SecurityController {

    /**

     * 不用登录就可访问

     * @return

     */

    @RequestMapping("/hi")

    public String sayHi(){

        return "Hi bro!";

    }

    @RequestMapping("/hello")

    public String sayHello(){

        return "Hello bro!";

    }

}
application.yml 配置文件
spring:

  security:

    user:

      name: beixuan

      password: beixuan
SecurityConfig Java配置文件
此方法配置用户与配置
yml文件效果一致
import org.springframework.context.annotation.Bean;

import org.springframework.context.annotation.Configuration;

import org.springframework.security.config.annotation.authentication.builders.AuthenticationManagerBuilder;

import org.springframework.security.config.annotation.web.builders.WebSecurity;

import org.springframework.security.config.annotation.web.configuration.WebSecurityConfigurerAdapter;

import org.springframework.security.crypto.bcrypt.BCryptPasswordEncoder;

import org.springframework.security.crypto.password.PasswordEncoder;

/**

 * @author https://www.cnblogs.com/beixuan/

 */

@Configuration

public class SecurityConfig extends WebSecurityConfigurerAdapter {

    @Override

    public void configure(AuthenticationManagerBuilder auth) throws Exception {

        //Spring Security5之后 官方需要密码强制加密,如不想加密可创建一个过期的 PasswordEncoder 的实例 NoOpPasswordEncoder,但不安全

        BCryptPasswordEncoder bCryptPasswordEncoder = new BCryptPasswordEncoder();

        String password = bCryptPasswordEncoder.encode("beixuan");

        //添加一个用户[beixuan] 角色为[admin] 密码是[beixuan加密后的密钥]

        auth.inMemoryAuthentication()

                .withUser("beixuan")

                .roles("admin")

                .password(password);

    }

    @Bean

    PasswordEncoder passwordEncoder(){

        return new BCryptPasswordEncoder();

    }

}
- 具体的登录配置 下面代码借鉴于 江南一点雨 随笔的代码,有兴趣可以看看
VerifyCodeFilter一次性验证码,可以查看资料了解其使用方法,这里不再叙述
@Configuration

public class SecurityConfig extends WebSecurityConfigurerAdapter {

    @Autowired

    VerifyCodeFilter verifyCodeFilter;

    @Override

    protected void configure(HttpSecurity http) throws Exception {

        http.addFilterBefore(verifyCodeFilter, UsernamePasswordAuthenticationFilter.class);

        http

        .authorizeRequests()//开启登录配置

        .antMatchers("/hello").hasRole("admin")//表示访问 /hello 这个接口,需要具备 admin 这个角色

        .anyRequest().authenticated()//表示剩余的其他接口,登录之后就能访问

        .and()

        .formLogin()

        //定义登录页面,未登录时,访问一个需要登录之后才能访问的接口,会自动跳转到该页面

        .loginPage("/login_p")

        //登录处理接口

        .loginProcessingUrl("/doLogin")

        //定义登录时,用户名的 key,默认为 username

        .usernameParameter("uname")

        //定义登录时,用户密码的 key,默认为 password

        .passwordParameter("passwd")

        //登录成功的处理器

        .successHandler(new AuthenticationSuccessHandler() {

            @Override

            public void onAuthenticationSuccess(HttpServletRequest req, HttpServletResponse resp, Authentication authentication) throws IOException, ServletException {

                    resp.setContentType("application/json;charset=utf-8");

                    PrintWriter out = resp.getWriter();

                    out.write("success");

                    out.flush();

                }

            })

            .failureHandler(new AuthenticationFailureHandler() {

                @Override

                public void onAuthenticationFailure(HttpServletRequest req, HttpServletResponse resp, AuthenticationException exception) throws IOException, ServletException {

                    resp.setContentType("application/json;charset=utf-8");

                    PrintWriter out = resp.getWriter();

                    out.write("fail");

                    out.flush();

                }

            })

            .permitAll()//和表单登录相关的接口统统都直接通过

            .and()

            .logout()

            .logoutUrl("/logout")

            .logoutSuccessHandler(new LogoutSuccessHandler() {

                @Override

                public void onLogoutSuccess(HttpServletRequest req, HttpServletResponse resp, Authentication authentication) throws IOException, ServletException {

                    resp.setContentType("application/json;charset=utf-8");

                    PrintWriter out = resp.getWriter();

                    out.write("logout success");

                    out.flush();

                }

            })

            .permitAll()

            .and()

            .httpBasic()

            .and()

            .csrf().disable();

    }
忽略拦截分两步
增加访问路径
/hi
/**

 * 不用登录就可访问

 * @return

 */

@RequestMapping("/hi")

public String sayHi(){

    return "Hi bro!";

}
增加配置代码
@Override

public void configure(WebSecurity web) throws Exception {

    web.ignoring().antMatchers("/hi");

}
即可不用登录访问
/hi路径
END
本文就先说到这里,有问题欢迎留言讨论
Spring Security入门教程 通俗易懂 超详细 【内含案例】的更多相关文章
- SVN入门图解教程(超详细)
SVN入门图解教程(超详细) 一.总结 一句话总结: 二.SVN入门教程 1. 什么是SVN SVN全名Subversion,即版本控制系统.SVN与CVS一样,是一个跨平台的软件,支持大多数常见的操 ...
- Spring Cloud 入门教程(十):和RabbitMQ的整合 -- 消息总线Spring Cloud Netflix Bus
在本教程第三讲Spring Cloud 入门教程(三): 配置自动刷新中,通过POST方式向客户端发送/refresh请求, 可以让客户端获取到配置的最新变化.但试想一下, 在分布式系统中,如果存在很 ...
- Spring Cloud 入门教程(四): 分布式环境下自动发现配置服务
前一章, 我们的Hello world应用服务,通过配置服务器Config Server获取到了我们配置的hello信息“hello world”. 但自己的配置文件中必须配置config serve ...
- Spring Cloud入门教程(二):客户端负载均衡(Ribbon)
对于大型应用系统负载均衡(LB:Load Balancing)是首要被解决一个问题.在微服务之前LB方案主要是集中式负载均衡方案,在服务消费者和服务提供者之间又一个独立的LB,LB通常是专门的硬件,如 ...
- Spring MVC 入门教程示例 (一)
今天和大家分享下 Spring MVC 入门教程 首先还是从 HelloWorld web 工程开始 -------------------------- 1.首先创建一个Maven Web工程 ...
- Spring Boot入门教程1、使用Spring Boot构建第一个Web应用程序
一.前言 什么是Spring Boot?Spring Boot就是一个让你使用Spring构建应用时减少配置的一个框架.约定优于配置,一定程度上提高了开发效率.https://zhuanlan.zhi ...
- Spring Boot入门教程2-1、使用Spring Boot+MyBatis访问数据库(CURD)注解版
一.前言 什么是MyBatis?MyBatis是目前Java平台最为流行的ORM框架https://baike.baidu.com/item/MyBatis/2824918 本篇开发环境1.操作系统: ...
- Spring Boot 入门教程
Spring Boot 入门教程,包含且不仅限于使用Spring Boot构建API.使用Thymeleaf模板引擎以及Freemarker模板引擎渲染视图.使用MyBatis操作数据库等等.本教程示 ...
- Spring Cloud 入门教程 - 搭建配置中心服务
简介 Spring Cloud 提供了一个部署微服务的平台,包括了微服务中常见的组件:配置中心服务, API网关,断路器,服务注册与发现,分布式追溯,OAuth2,消费者驱动合约等.我们不必先知道每个 ...
- Spring Cloud 入门教程(七): 熔断机制 -- 断路器
对断路器模式不太清楚的话,可以参看另一篇博文:断路器(Curcuit Breaker)模式,下面直接介绍Spring Cloud的断路器如何使用. SpringCloud Netflix实现了断路器库 ...
随机推荐
- 关于java-Class类的简单分析
java有个Class的基类,高级编程的时候,务必要理解这个. 粗略看下,可以明白了解Class这个类对于了解和掌握java非常重要. Class这个类的包路径是:java.lang.Class< ...
- python利用公私钥加解密
小贴士 这里不再赘述公私钥的生成过程.可以利用OpenSSL进行生成. 加密代码 #!/usr/bin/python #加密 #conda install pycrypto #提前安装模块 impor ...
- CLR via C# 笔记 -- 枚举(15)
1. 枚举继承System.Enum,后者继承 System.ValueType,所以枚举是值类型. 2. 枚举不能定义任何方法.属性和事件,不过可以定义扩展方法 3. ToString()方法 Co ...
- 使用iperf3调试网络
介绍 Iperf是一款基于TCP/IP和UDP/IP的网络性能测试工具,它可以用来测量网络带宽和网络质量,还可以提供网络延迟抖动.数据包丢失率.最大传输单元等统计信息.网络管理员可以根据这些信息了解并 ...
- EC热键问题
EC热键问题 ec 问题描述 ACPI事件监控 按键监控 UDEV事件监控 kprobe探测 初步总结热键功能流程 调试记录 PS2 问题描述 系统无触摸板打开和关闭的提示 已知热键功能 快捷键 功能 ...
- 都是全志T113处理器,“-i”和“-S3”有什么区别?
自9个月前,创龙科技"1片含税就79元"的全志T113-i双核ARM Cortex-A7@1.2GHz的工业核心板(SOM-TLT113)推出之后,不少嵌入式软硬件工程师.用户都咨 ...
- [UG 二次开发 python ] 截图,并用 opencv 显示出来
需要 numpy,cv2 截图,去除背景,只显示主要部分 # nx: threaded from typing import Dict import NXOpen import numpy as np ...
- Qt--共享内存监听工具
共享内存概述 共享内存的特点: 1)共享内存是进程共享数据的一种最快的方法. 一个进程向共享内存区域写入了数据,共享这个内存区域的所有进程就可以立刻看到其中的内容. 2)使用共享内存要注意的是多个进程 ...
- 【规范】Git分支管理,看看我司是咋整的
前言 缘由 Git分支管理好,走到哪里都是宝 事情起因: 最近翻看博客中小伙伴评论时,发现文章[规范]看看人家Git提交描述,那叫一个规矩一条回复: 本狗亲测在我司中使用规范的好处,遂把我司的Git分 ...
- useHeadSafe:安全生成HTML头部元素
title: useHeadSafe:安全生成HTML头部元素 date: 2024/7/17 updated: 2024/7/17 author: cmdragon excerpt: 摘要:&quo ...