
又双叒叕种草了新家装风格?AI帮你家居换装
摘要:又双叒叕种草了家装新风格?想要尝试却又怕踩雷?如果能够轻松Get量身定制的家装风格图,那该多好啊。现在,这一切都成为了可能!
本文分享自华为云社区《又双叒叕种草了新家装风格?AI帮你家居换装!》,作者:Emma_Liu。
Control Stable Diffusion with M-LSD 修改建筑及家居装修风格
你是否曾经想过,如果能够轻松地看到自己家居的不同风格,该有多好呢?现在,这一切都变得可能了!
让你的眼睛仔细观察这些图片,你会发现它们展现了不同的风格和氛围,从现代简约到古典优雅,从温馨舒适到时尚前卫,应有尽有。但是,你知道吗?这些图片都是由AI生成的!
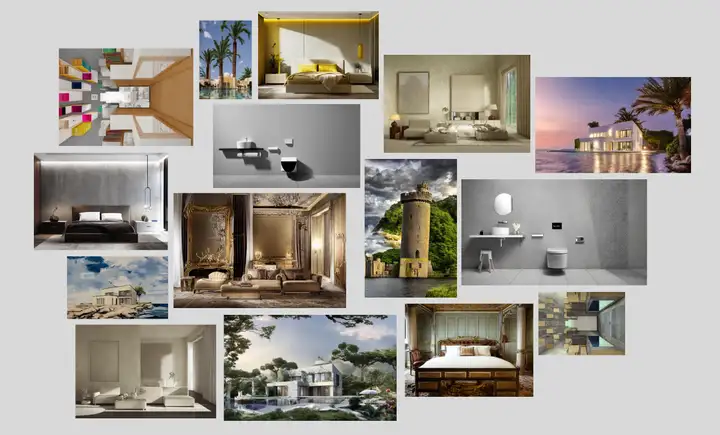
它们看起来非常逼真,仿佛是真实的照片一样。这就是人工智能的奇妙之处,让我们可以轻松地预览不同的家居风格,不必实际进行装修。让我们一起来感受AI技术的魅力吧!
装修风格参考

现代极简风卧室
图一是原图,我要基于图一的装修布局重新装修一下,图二是M-LSD线段检测器的输出图像,图三是加入prompt为:现代极简风卧室生成图像,图四再补充一些prompt:现代极简风卧室,床是黄色的,墙是浅咖色。不得不说效果真不错!

卫生间
图一这种简单布局的卫生间我很是喜欢,康康其他风格的侘寂风卫生间 - 图二、三

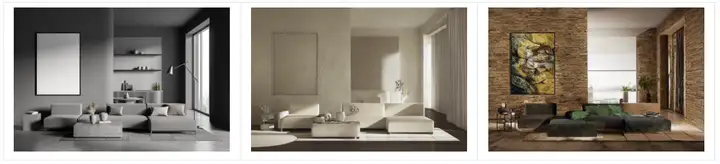
客厅
换装ing——奶油风客厅——无名(不填prompt也可以生成不错的图片,很多惊喜诶)
别墅
我已经在幻想住上大别墅了看看别墅的效果怎么样
浪漫的海边别墅、新中式别墅
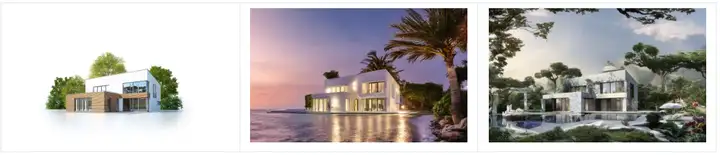
我想尝试用建筑设计图来看看能不能生成…哇,绝绝子——简约风,现代风

其他建筑
建模图变——欧式建筑
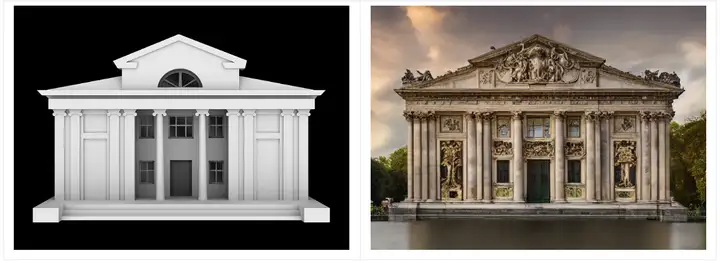
厂房变办公楼、大型超市、别墅(这样式的别墅)

好神奇,它是怎么做到的呢,来看看模型的介绍。
0.模型介绍
建筑的稳定扩散 | ControlNet模型-MLSD,随意创建建筑物、房间内部或外部以及独特的场景
ControlNet 最早是在L.Zhang等人的论文《Adding Conditional Control to Text-to-Image Diffusion Model》中提出的,目的是提高预训练的扩散模型的性能。它引入了一个框架,支持在扩散模型 (如 Stable Diffusion ) 上附加额外的多种空间语义条件来控制生成过程。为稳定扩散带来了前所未有的控制水平。
Mobile LSD (M-LSD): 《Towards Light-weight and Real-time Line Segment Detection》是用于资源受限环境的实时和轻量级线段检测器,M-LSD利用了极其高效的LSD体系结构和新的训练方案,包括SoL增强和几何学习方案。模型可以在GPU、CPU甚至移动设备上实时运行。
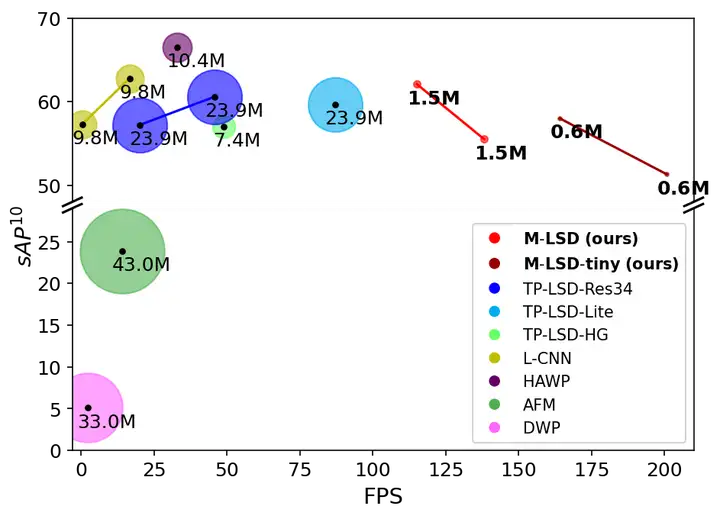
图1 GPU上M-LSD和现有LSD方法的比较
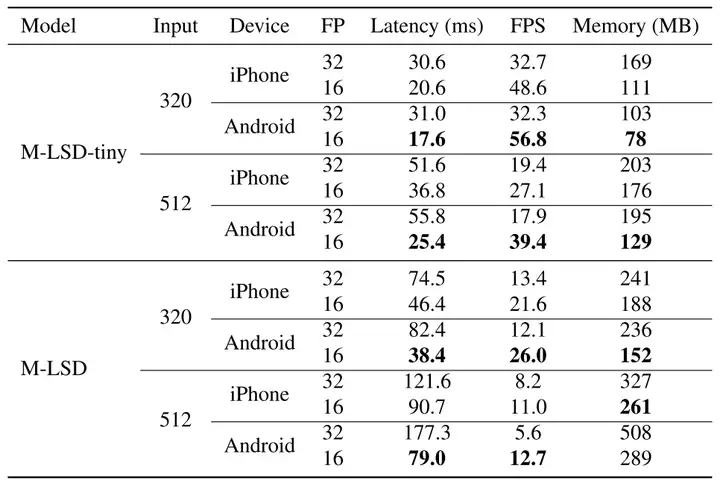
图2 移动设备上的推理速度和内存使用情况.
案例以分享至AI Gallery - AI建筑风格修改: ControlNet-MLSD,一起来运行代码,实现你的新装吧。
1.装包
!pip install transformers==4.29.0

!pip install diffusers==0.16.1

!pip install accelerate==0.17.1

!pip install gradio==3.32.0

!pip install translate==3.6.1
2.下载模型
使用mlsd, sd-controlnet-mlsd, stable-diffusion-v1-5预训练模型,为方便大家使用,已转存到华为云OBS中。
import os

import moxing as mox

pretrained_models = ['mlsd', 'sd-controlnet-mlsd', 'stable-diffusion-v1-5']

for pretrained_model in pretrained_models:

 model_dir = os.path.join(os.getcwd(), pretrained_model)

 if not os.path.exists(model_dir):

 mox.file.copy_parallel(f'obs://modelarts-labs-bj4-v2/case_zoo/ControlNet/ControlNet_models/{pretrained_model}', model_dir)

 if os.path.exists(model_dir):

 print(f'{pretrained_model} download success')

 else:

 raise Exception(f'{pretrained_model} download Failed')

 else:

 print(f"{pretrained_model} already exists!")
3.加载模型
import torch

from PIL import Image

from mlsd import MLSDdetector

from translate import Translator

from diffusers.utils import load_image

from diffusers import StableDiffusionControlNetPipeline, ControlNetModel, UniPCMultistepScheduler

mlsd = MLSDdetector()

controlnet = ControlNetModel.from_pretrained("sd-controlnet-mlsd", torch_dtype=torch.float16)

pipe = StableDiffusionControlNetPipeline.from_pretrained("stable-diffusion-v1-5", controlnet=controlnet, safety_checker=None, torch_dtype=torch.float16)

pipe.scheduler = UniPCMultistepScheduler.from_config(pipe.scheduler.config)

pipe.enable_model_cpu_offload()
4.生成图像
首先,传入的图片会通过mlsd detector输出黑白线条图,然后基于此mlsd图像,通过controlnet和stable diffusion生成图像。
from PIL import Image

import matplotlib.pyplot as plt

import numpy as np

ori = Image.open("1920245540.jpg")

mlsd = MLSDdetector()

mlsd_img = mlsd(ori, thr_v=0.1, thr_d=0.1, detect_resolution=512, image_resolution=512, return_pil=True)

trans = Translator(from_lang="ZH",to_lang="EN-US")

prompt = "现代极简风卧室,床是黄色的,墙是浅咖色"

en_prompt = trans.translate(prompt)

gen_img = pipe(en_prompt, mlsd_img, num_inference_steps=20).images[0]

fig = plt.figure(figsize=(25, 10))

ax1 = fig.add_subplot(1, 3, 1)

plt.title('Orignial image', fontsize=16)

ax1.axis('off')

ax1.imshow(ori)

ax2 = fig.add_subplot(1, 3, 2)

plt.title('ML Detector image', fontsize=16)

ax2.axis('off')

ax2.imshow(mlsd_img)

ax3 = fig.add_subplot(1, 3, 3)

plt.title('Generate image', fontsize=16)

ax3.axis('off')

ax3.imshow(gen_img)

plt.show()
5.Gradio可视化部署
Gradio应用启动后可在下方页面上传图片根据提示生成图像,您也可以分享public url在手机端,PC端进行访问生成图像。
参数说明
img_path:输入图像路径
prompt:提示词(建议填写)
n_prompt: 负面提示(可选)
num_inference_steps: 采样步数,一般15-30,值越大越精细,耗时越长
image_resolution: 对输入的图片进行最长边等比resize
detect_resolution:Hough Resolution,检测分辨率,值越小-线条越粗糙
value_threshold: Hough value threshold (MLSD),值越大-检测线条越多,越详细
distance_threshold: Hough distance threshold (MLSD),值越大-距离越远,检测到的线条越少
对比一下参数value_threshold,distance_threshold,当value_threshold值变大时,如图二所示,检测到的线段越少,获取到的信息也就越少,对控制生成后的图像来说,会缺失掉很多的细节;当distance_threshold值变大时,如图三所示,越远处的物体,提取到的线段越少,图像会更专注于前面的部分。这对于来调整生成的图像是一个很好的参考。

thr_v=0.1, thr_d=0.1
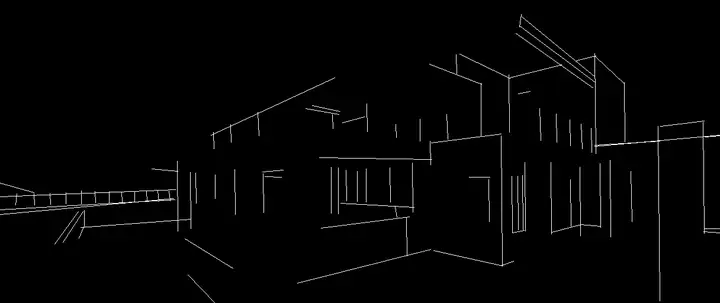
thr_v=0.5, thr_d=0.1
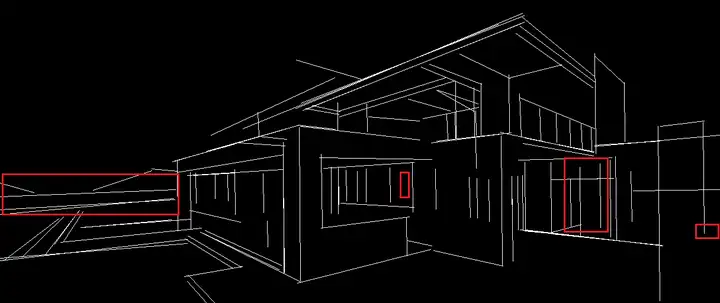
thr_v=0.1, thr_d=20
import gradio as gr

def mlsd(img, prompt, num_inference_steps, thr_v, thr_d, n_prompt, detect_resolution, image_resolution):

    trans = Translator(from_lang="ZH",to_lang="EN-US")

    prompt = trans.translate(prompt)

 n_prompt = trans.translate(n_prompt)

 mlsd = MLSDdetector()

 mlsd_img = mlsd(img, thr_v=0.1, thr_d=0.1, detect_resolution=512, image_resolution=512, return_pil=True)

 gen_img = pipe(prompt, mlsd_img, num_inference_steps=20, negative_prompt=n_prompt).images[0]

    result = [mlsd_img, gen_img]

 return result

block = gr.Blocks().queue()

with block:

 with gr.Row():

 gr.Markdown("##  Control Stable Diffusion with MLSD")

 with gr.Row():

 with gr.Column():

 input_image = gr.Image(source='upload', type="numpy")

            prompt = gr.Textbox(label="描述")

 run_button = gr.Button(label="Run")

 with gr.Accordion("高级选项", open=False):

 num_inference_steps = gr.Slider(label="图像生成步数", minimum=1, maximum=100, value=20, step=1)

 value_threshold = gr.Slider(label="Hough value threshold (MLSD)", minimum=0.01, maximum=2.0, value=0.1, step=0.01)

 distance_threshold = gr.Slider(label="Hough distance threshold (MLSD)", minimum=0.01, maximum=20.0, value=0.1, step=0.01)

 n_prompt = gr.Textbox(label="否定提示",

                                      value='lowres, extra digit, fewer digits, cropped, worst quality, low quality')

 detect_resolution = gr.Slider(label="Hough Resolution", minimum=128, maximum=1024, value=512, step=1)

 image_resolution = gr.Slider(label="Image Resolution", minimum=256, maximum=768, value=512, step=64)

 with gr.Column():

 result_gallery = gr.Gallery(label='Output', show_label=False, elem_id="gallery").style(columns=2, height='auto')

 ips = [input_image, prompt, num_inference_steps, value_threshold, distance_threshold, n_prompt, detect_resolution, image_resolution]

 run_button.click(fn=mlsd, inputs=ips, outputs=[result_gallery])

block.launch(share=True)
参考文献
- Paper: 《Adding Conditional Control to Text-to-Image Diffusion Model》
- Paper: 《Towards Light-weight and Real-time Line Segment Detection》
- Model:sd-controlnet-mlsd, stable-diffusion-v1-5
- 案例代码地址:AI Gallery - AI建筑风格修改: ControlNet-MLSD 免费体验
又双叒叕种草了新家装风格?AI帮你家居换装的更多相关文章
- 【AS3 Coder】任务六:人物换装(纸娃娃)系统的制作
使用框架:AS3(Flash Professional CS5.0及更高版本 + Flash Buider)任务描述:了解人物换装系统的制作原理难度系数:2 本章源码下载:http://www.iam ...
- DragonBones龙骨换装(局部换装+全局换装)
参考: Egret官方换装动画 Egret换装三种方式 CSDN(全局换装) egret使用DragonBones实现简单的换装 换装,主要是替换任意插槽的图片,来达到局部换装的目的. 游戏中可以只制 ...
- 3D游戏中人物换装解决方案
换装基本上是每个网游都必须有的一个功能,每种网游的做法都各有不同,有些是换掉整个模型,有些则是通过可以换掉模型的一个部分完成.前者属于整体换,相对简单些:后者则是通过部分替换实现,目前用的比较多,本文 ...
- bzoj3631 松鼠的新家
Description 松鼠的新家是一棵树,前几天刚刚装修了新家,新家有n个房间,并且有n-1根树枝连接,每个房间都可以相互到达,且俩个房间之间的路线都是唯一的.天哪,他居然真的住在“树”上.松鼠想邀 ...
- 此博客主人已搬家访问新家地址:http://write.blog.csdn.net/postlist
此博客主人已搬家访问新家地址:http://write.blog.csdn.net/postlist
- BZOJ 3631 【JLOI2014】 松鼠的新家
Description 松鼠的新家是一棵树,前几天刚刚装修了新家,新家有n个房间,并且有n-1根树枝连接,每个房间都可以相互到达,且俩个房间之间的路线都是唯一的.天哪,他居然真的住在"树&q ...
- 【BZOJ-3631】松鼠的新家 树形DP?+ 倍增LCA + 打标记
3631: [JLOI2014]松鼠的新家 Time Limit: 10 Sec Memory Limit: 128 MBSubmit: 1231 Solved: 620[Submit][Stat ...
- 【bzoj3631】[JLOI2014]松鼠的新家
题目描述 松鼠的新家是一棵树,前几天刚刚装修了新家,新家有n个房间,并且有n-1根树枝连接,每个房间都可以相互到达,且俩个房间之间的路线都是唯一的.天哪,他居然真的住在"树"上.松 ...
- 【BZOJ3631】松树的新家 树链剖分
BZOJ3631 松树的新家 Description 松鼠的新家是一棵树,前几天刚刚装修了新家,新家有n个房间,并且有n-1根树枝连接,每个房间都可以相互到达,且俩个房间之间的路线都是唯一的.天哪,他 ...
- BZOJ 3631: [JLOI2014]松鼠的新家( 树链剖分 )
裸树链剖分... ------------------------------------------------------------------- #include<bits/stdc++ ...
随机推荐
- 由mysql转为oracle注意事项
1. text类型->nclob 2. 表名是关键字 引号 3. 字段名是关键字 引号 4. 日期型和mysql不同,hh24:mi:ss 就是HH:mm:ss,库里存日期型也可以(查询时 ...
- Windows下VC++编译器32位memcpy、memmove函数汇编代码详解
整理者:赤勇玄心行天道 QQ号:280604597 微信号:qq280604597 QQ群:511046632 博客:www.cnblogs.com/gaoyaguo blog.csdn.net/c ...
- Speex详解(2019年09月25日更新)
Speex详解 整理者:赤勇玄心行天道 QQ号:280604597 微信号:qq280604597 QQ群:511046632 博客:www.cnblogs.com/gaoyaguo 大家有什么不明白 ...
- Node.js中常用的设计模式有哪些?
本文由葡萄城技术团队首发.转载请注明出处:葡萄城官网,葡萄城为开发者提供专业的开发工具.解决方案和服务,赋能开发者. 设计模式简介 设计模式是由经验丰富的程序员在日积月累中抽象出的用以解决通用问题的可 ...
- 研发日常踩坑-Mysql分页数据重复
踩坑描述: 写分页查询接口,order by和limit混用的时候,出现了排序的混乱情况 在进行第N页查询时,出现与第一前面页码的数据一样的记录. 问题 在MySQL中分页查询,我们经常会用limit ...
- 毕业三年,月薪30K,我想跟你聊聊!
大家好,我是冰河~~ 很多读者私信问我,自己工作三年多了,随着工作年限的不断增长,感觉自己的技术水平与自己的工作年限严重不符.想跳槽出去换个新环境吧,又感觉自己的能力达不到心仪公司的标准,即使投了简历 ...
- 虹科分享|被困云端?虹科Redis企业版数据库来解救!
数字化时代已然到来,各行企业奋起直追数字化进程.为应对数据爆炸式增长导致的数据负载,并保证降低成本,增加效益的前提下,提升企业运行程序的灵活性.在云上进行应用程序部署的新趋势,风头正劲! 但这种方式为 ...
- QT线程问题
QT线程问题 (一)QThread (二)QMutex和QMutexLocker (end)后面会更新 (一)QThread 文章 (二)QMutex和QMutexLocker 通俗理解 QMutex ...
- 神经网络入门篇:详解多样本向量化(Vectorizing across multiple examples)
多样本向量化 与上篇博客相联系的来理解 逻辑回归是将各个训练样本组合成矩阵,对矩阵的各列进行计算.神经网络是通过对逻辑回归中的等式简单的变形,让神经网络计算出输出值.这种计算是所有的训练样本同时进行的 ...
- 暴力+DP:买卖股票的最佳时机
给定一个数组,它的第 i 个元素是一支给定股票第 i 天的价格. 如果你最多只允许完成一笔交易(即买入和卖出一支股票一次),设计一个算法来计算你所能获取的最大利润. 注意:你不能在买入股票前卖出股票. ...