Android Debug Bridge
Android Debug Bridge
Introduction
- A client, which sends commands. The client runs on your development machine. You can invoke a client from a shell by issuing an adb command. Other Android tools such as DDMS also create adb clients.
- A daemon, which runs commands on a device. The daemon runs as a background process on each emulator or device instance.
- A server, which manages communication between the client and the daemon. The server runs as a background process on your development machine.
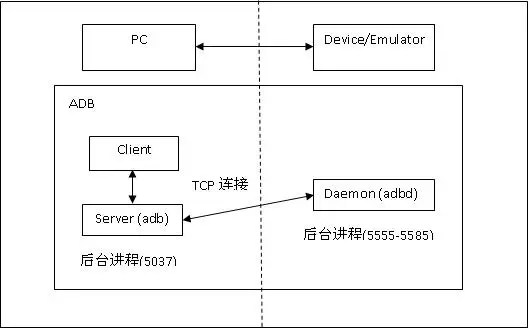
How adb Works
Emulator 1, console: 5554
Emulator 1, adb: 5555
Emulator 2, console: 5556
Emulator 2, adb: 5557
and so on...
Enabling adb Debugging
Note: When you connect a device running Android 4.2.2 or higher to your computer, the system shows a dialog asking whether to accept an RSA key that allows debugging through this computer. This security mechanism protects user devices because it ensures that USB debugging and other adb commands cannot be executed unless you're able to unlock the device and acknowledge the dialog. This requires that you have adb version 1.0.31 (available with SDK Platform-tools r16.0.1 and higher) in order to debug on a device running Android 4.2.2 or higher.
Syntax
adb [-d|-e|-s <serialNumber>] <command>
Commands
| Category | Command | Description | Comments |
|
Target
Device
|
-d | Direct an adb command to the only attached USB device. | Returns an error if more than one USB device is attached. |
| -e | Direct an adb command to the only running emulator instance. | Returns an error if more than one emulator instance is running. | |
| -s <serialNumber> | Direct an adb command a specific emulator/device instance, referred to by its adb-assigned serial number (such as "emulator-5556"). | See Directing Commands to a Specific Emulator/Device Instance. | |
| General | devices | Prints a list of all attached emulator/device instances. | See Querying for Emulator/Device Instances for more information. |
| help | Prints a list of supported adb commands. | ||
| version | Prints the adb version number. | ||
| Debug | logcat [option] [filter-specs] | Prints log data to the screen. | |
| bugreport | Prints dumpsys, dumpstate, and logcat data to the screen, for the purposes of bug reporting. | ||
| jdwp | Prints a list of available JDWP processes on a given device. | You can use the forward jdwp:<pid> port-forwarding specification to connect to a specific JDWP process. For example: adb forward tcp:8000 jdwp:472 |
|
| Data | install <path-to-apk> | Pushes an Android application (specified as a full path to an .apk file) to an emulator/device. | |
| pull <remote> <local> | Copies a specified file from an emulator/device instance to your development computer. | ||
| push <local> <remote> | Copies a specified file from your development computer to an emulator/device instance. | ||
| Ports and Networking |
forward <local> <remote> | Forwards socket connections from a specified local port to a specified remote port on the emulator/device instance. | Port specifications can use these schemes:
|
| ppp <tty> [parm]... | Run PPP over USB.
Note that you should not automatically start a PPP connection. |
||
| Scripting | get-serialno | Prints the adb instance serial number string. | See Querying for Emulator/Device Instances for more information. |
| get-state | Prints the adb state of an emulator/device instance. | ||
| wait-for-device | Blocks execution until the device is online — that is, until the instance state is device. | You can prepend this command to other adb commands, in which case adb will wait until the emulator/device instance is connected before issuing the other commands. Here's an example:adb wait-for-device shell getprop Note that this command does not cause adb to wait until the entire system is fully booted. For that reason, you should not prepend it to other commands that require a fully booted system. As an example, the install requires the Android package manager, which is available only after the system is fully booted. A command such as adb wait-for-device install <app>.apk would issue the install command as soon as the emulator or device instance connected to the adb server, but before the Android system was fully booted, so it would result in an error. |
|
| Server | start-server | Checks whether the adb server process is running and starts it, if not. | |
| kill-server | Terminates the adb server process. | ||
| Shell | shell | Starts a remote shell in the target emulator/device instance. | See ADB Shell Commands for more information. |
| shell [shellCommand] | Issues a shell command in the target emulator/device instance and then exits the remote shell. |
Querying for Emulator/Device Instances
adb devices
- Serial number — A string created by adb to uniquely identify an emulator/device instance by its console port number. The format of the serial number is <type>-<consolePort>. Here's an example serial number: emulator-5554
- State — The connection state of the instance may be one of the following:
- offline — the instance is not connected to adb or is not responding.
- device — the instance is now connected to the adb server. Note that this state does not imply that the Android system is fully booted and operational, since the instance connects to adb while the system is still booting. However, after boot-up, this is the normal operational state of an emulator/device instance.
- no device — there is no emulator/device connected.
[serialNumber] [state]
adb devices
List of devices attached
emulator-5554 device
emulator-5556 device
emulator-5558 device
Directing Commands to a Specific Emulator/Device Instance
adb -s <serialNumber> <command>
adb -s emulator-5556 install helloWorld.apk
Installing an Application
adb install <path_to_apk>
Forwarding Ports
adb forward tcp:6100 tcp:7100
adb forward tcp:6100 local:logd
Copying Files to or from an Emulator/Device Instance
adb pull <remote> <local>
adb push <local> <remote>
adb push foo.txt /sdcard/foo.txt
Stopping the adb Server
参考
Android Debug Bridge的更多相关文章
- [ADB]ADB(Android Debug Bridge)简介及基础(不包含命令)
"Android Debug Bridge (adb) is a versatile command line tool that lets you communicate with an ...
- 用ADB(Android Debug Bridge)实时监测Android程序的运行
监控Android设备上程序的运行,需要ADB的配合,具体ADB工具的介绍以及命令选项可见博客: http://blog.csdn.net/mliubing2532/article/details ...
- adb ( Android Debug Bridge)
adb ( Android Debug Bridge) 是一个通用命令行工具,其允许您与模拟器实例或连接的 Android 设备进行通信.它可为各种设备操作提供便利,如安装和调试应用. adb工具的工 ...
- Android Debug Bridge命令介绍[转]
Android Debug Bridge命令介绍 Android Debug Bridge的一些基本命令.这个工具直译过来就是Android调试桥的意思.它提供了强大的特性,例如复制文件到设备或从设备 ...
- adb(android debug bridge)命令
adb(android debug bridge) adb devices --查看当前连接的模拟器/设备 adb remount --模拟器/设备重新启动,保证能用 adb push src des ...
- adb(Android Debug Bridge)(一)
上一篇介绍的am,pm命令都是基于adb shell下的命令.这节来详细介绍下adb命令. Android Debug Bridge(adb)是一个让你跟模拟器或者android设备通信的多功能命令. ...
- [ADB Shell]Android Debug Bridge常用命令
ADB用法 *:first-child { margin-top: 0 !important; } body>*:last-child { margin-bottom: 0 !important ...
- adb(Android Debug Bridge)安装使用教程
一.说明 adb的db是debug bridge而不是和gdb一样指debug,这意思是说adb不能像gdb那样能一步步调试代码,但可以启到一些类似调试的功能. 下面就针对这些功能进行介绍,本文根据官 ...
- Android 官方命令深入分析之Android Debug Bridge(adb)
作者:宋志辉 Android Debug Brideg(adb)是一个多用途的命令行工具.可以与Android虚拟机进行通信或连接真机.它同样提供了访问设备shell的高级命令行操作的权限.它是一个包 ...
随机推荐
- 比较两个文件不同以及生成SQL插入语句
Tips 做一个终身学习的人! 日拱一卒,功不唐捐. 今天有个小小的需求,具体需求是这样的: 有两个文本文件,每个文件都有一些字符串文本: 比较第一个文件中,在第二个文件中,不存在的字符串文本: 把这 ...
- cocos2dx - android环境配置及编译
接上一节内容:cocos2dx - 伤害实现 本节主要讲Android环境配置及编译 在第一节中setup.py的配置里,我们没有配置对应的ndk,sdk,ant的路径,在这里需要先配置好环境变量. ...
- win10 uwp clone
clone 可以用MemberwiseClone来复制一个类 但这个复制是浅复制,创建一个新的object然后复制值字段,对于引用就直接复制引用,不复制引用的本身,指向同样引用 如果要复制引用,可以使 ...
- win10 uwp 修改CalendarDatePicker图标颜色
CalendarDatePicker 是一个好用的东西,但是我发现想要修改他右边的那个图标,显示日历的图标颜色,没有这个选项. 如果不知道我说的是哪个,请看下面的图. 左边颜色变化的就是我们要修改的图 ...
- jemalloc 快速上手攻略
引言 - 赠送个 Cygwin (加精) Cygwin 有它存在的合理性. 至少比 wine 好太多了. 它主要功能是在winds上面简易的模拟出linux环境, 比虚拟机 轻量一点点. 坑也不少, ...
- Linux下PHP连接MS SQLServer的办法
Linux下PHP连接MS SQLServer的办法分析问题 本来PHP脚本读写SQLServer是没有什么问题的,在Apache for windows和Windows IIS下可以工作的很好,一般 ...
- Android实现购物车功能
如图: 主要代码如下: actvity中的代码: publicclassShoppingCartActivity extendsBaseActivity { private List< ...
- C#中的协变(Covariance)和逆变(Contravariance)
摘要 ● 协变和逆变的定义是什么?给我们带来了什么便利?如何应用? ● 对于可变的泛型接口,为什么要区分成协变的和逆变的两种?只要一种不是更方便吗? ● 为什么还有不可变的泛型接口,为什么有的泛型接口 ...
- (MariaDB)MySQL内置函数大全
html { font-family: sans-serif } body { margin: 0 } article,aside,details,figcaption,figure,footer,h ...
- python生成式
本篇将介绍Python的列表生成式,更多内容请参考:Python列表生成式 列表生成式即List Comprehensions,是Python内置的非常简单却强大的可以用来创建list的生成式. 举个 ...