vue-cli——vue-resource登录注册实例
前言
使用vue-resource请求接口非常方便,在使用前需安装vue-resource依赖并在入口文件main.js中声明。
实例功能简述
本实例只有简单的两个模块:登录和注册,主要演示如何用vue-resource请求接口以及后期逻辑书写。各个功能如下所示:
登录模块
登录-用户不存在
登录-密码错误
登录-成功
注销登录
注册模块
项目功能梳理
在创建项目之前,我们先理一下整个项目的功能模块。
登录模块
1.用户输入用户名及密码,调用接口
1.1用户名未找到,提示用户“用户名不存在”
1.2用户名找到,但密码不匹配,提示用户“密码输入错误”
1.3用户名和密码都匹配,登录成功并跳转到主页,同时将用户名存为cookie
2.加载主页获取cookie
2.1cookie不存在,跳转到登录页
2.2cookie存在,显示用户名
2.3点击注销,删除cookie并跳转到登录页
3.管理员登录
3.1输入管理员用户名及密码,跳转到管理页
注册模块
1.用户输入用户名及密码,调用接口
1.1注册成功直接跳转到登录页
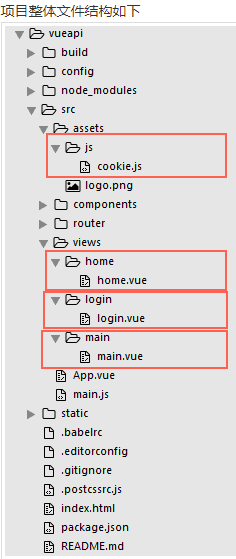
项目整体文件结构如下
cookie.js为公共方法,用于cookie的存储、获取及删除
home.vue为用户登录成功之后的主页
login.vue为登录注册页
main.vue为后台管理页
开发项目
用vue-cli创建一个新项目,创建好后,因为我们要用到接口请求,所以第一步先安装vue-resource,打开cmd进入文件所在目录,输入npm install vue-resource,安装完成后在入口文件main.js中引入
import VueResource from 'vue-resource'

Vue.use(VueResource)
1.登录页
1.1 新建login.vue页面
在src中新建views/login/login.vue
<template>

    <div>

        <div class="login-wrap" v-show="showLogin">

            <h3>登录</h3>

            <p v-show="showTishi">{{tishi}}</p>

            <input type="text" placeholder="请输入用户名" v-model="username">

            <input type="password" placeholder="请输入密码" v-model="password">

            <button v-on:click="login">登录</button>

            <span v-on:click="ToRegister">没有账号?马上注册</span>

        </div>

        <div class="register-wrap" v-show="showRegister">

            <h3>注册</h3>

            <p v-show="showTishi">{{tishi}}</p>

            <input type="text" placeholder="请输入用户名" v-model="newUsername">

            <input type="password" placeholder="请输入密码" v-model="newPassword">

            <button v-on:click="register">注册</button>

            <span v-on:click="ToLogin">已有账号?马上登录</span>

        </div>

    </div>

</template>

<style>

    .login-wrap{text-align:center;}

    input{display:block; width:250px; height:40px; line-height:40px; margin:0 auto; margin-bottom: 10px; outline:none; border:1px solid #888; padding:10px; box-sizing:border-box;}

    p{color:red;}

    button{display:block; width:250px; height:40px; line-height: 40px; margin:0 auto; border:none; background-color:#41b883; color:#fff; font-size:16px; margin-bottom:5px;}

    span{cursor:pointer;}

    span:hover{color:#41b883;}

</style>

<script>

    export default{

        data(){

            return{

                showLogin: true,

                showRegister: false,

                showTishi: false,

                tishi: '',

                username: '',

                password: '',

                newUsername: '',

                newPassword: ''

            }

        }

    }

</script>
1.2 配置路由
编辑/src/router/router.js
import Vue from 'vue'

import Router from 'vue-router'

/*引入页面*/

import Login from '@/views/login/login.vue'

import Main from '@/views/main/main.vue'

import Home from '@/views/home/home.vue'

Vue.use(Router)

/*配置路由*/

export default new Router({

  routes: [

    {

      path: '/',

      name: 'Login',

      component: Login

    },

    {

      path: '/main',

      name: 'Main',

      component: Main

    },

    {

      path: '/home',

      name: 'Home',

      component: Home

    }

  ]

})
在cmd输入npm run dev启动项目,在浏览器看效果

1.3 登录功能
点击登录按钮,触发login事件,登录成功会保存cookie,所以我们先把公共方法写好。新建src/assets/js/cookie.js
/*用export把方法暴露出来*/

/*设置cookie*/

export function setCookie(c_name,value,expire) {

    var date=new Date()

    date.setSeconds(date.getSeconds()+expire)

    document.cookie=c_name+ "="+escape(value)+"; expires="+date.toGMTString()

    console.log(document.cookie)

}

/*获取cookie*/

export function getCookie(c_name){

    if (document.cookie.length>0){

        let c_start=document.cookie.indexOf(c_name + "=")

        if (c_start!=-1){

            c_start=c_start + c_name.length+1

            let c_end=document.cookie.indexOf(";",c_start)

            if (c_end==-1) c_end=document.cookie.length

                return unescape(document.cookie.substring(c_start,c_end))

            }

        }

    return ""

}

/*删除cookie*/

export function delCookie(c_name){

    setCookie(c_name, "", -1)

}
login.vue页面先引用该公共方法
<script>

import {setCookie,getCookie} from '../../assets/js/cookie.js'

export default{

  mounted(){

  /*页面挂载获取cookie,如果存在username的cookie,则跳转到主页,不需登录*/

    if(getCookie('username')){

        this.$router.push('/home')

    }

  },

  methods:{

    login(){

        if(this.username == "" || this.password == ""){

            alert("请输入用户名或密码")

        }else{

            let data = {'username':this.username,'password':this.password}

            /*接口请求*/

            this.$http.post('http://localhost/vueapi/index.php/Home/user/login',data).then((res)=>{

                console.log(res)

             /*接口的传值是(-1,该用户不存在),(0,密码错误),同时还会检测管理员账号的值*/

              if(res.data == -1){

                  this.tishi = "该用户不存在"

                  this.showTishi = true

              }else if(res.data == 0){

                  this.tishi = "密码输入错误"

                  this.showTishi = true

              }else if(res.data == 'admin'){

              /*路由跳转this.$router.push*/

                  this.$router.push('/main')

              }else{

                  this.tishi = "登录成功"

                  this.showTishi = true

                  setCookie('username',this.username,1000*60)

                  setTimeout(function(){

                      this.$router.push('/home')

                  }.bind(this),1000)

              }

          })

      }

    }

  }

}

</script>
同时新建登录成功跳转到的主页 src/views/home/home.vue
<template>

    <div>

        <h3>欢迎 {{name}}</h3>

        <a href="#" @click="quit">注销登录</a>

    </div>

</template>

<script>

/*引入公共方法*/

import { setCookie,getCookie,delCookie } from '../../assets/js/cookie.js'

    export default{

        data(){

            return{

                name: ''

            }

        },

        mounted(){

            /*页面挂载获取保存的cookie值,渲染到页面上*/

            let uname = getCookie('username')

            this.name = uname

            /*如果cookie不存在,则跳转到登录页*/

            if(uname == ""){

                this.$router.push('/')

            }

        },

        methods:{

            quit(){

                /*删除cookie*/

                delCookie('username')

            }

        }

    }

</script>
1.4 测试
现在我们来检测一下,接口是我用php写在本地上的,服务器环境用的xampp,我们先打开xampp的phpMyadmin数据库管理页看一下我们的user表

用户名不存在测试
然后我们来试试刚刚写的登录功能
输入用户名“张三”,密码“123”,可以看到提示区域显示“该用户不存在”,接口返回的值是-1
密码错误测试
输入用户名“刘德华”,密码“123456”,可以看到提示区域显示“密码错误”,接口返回的值是0
登录成功测试
输入用户名“刘德华”,密码“123”,可以看到提示区域显示“登录成功”,间隔1秒自动跳转到了主页,url地址栏可以看到路由的变化,接口返回值为1,打印cookie可以看到已经存在username的cookie
cookie测试
刚刚我们已经登录成功了,并且已经保存了username的cookie,现在我们在该浏览器中新建一个标签页,输入路由localhost:8080/#/可以看到路由自动跳转到了home。这个意思就是用户登录成功之后,在cookie有效期内是可以免登录直接跳转主页的。
注销登录测试
注销登录其实就是删除cookie,可以看到打印出的cookie里面已经没有了username
此时我们已经删除了cookie,再新建一个标签页,输入主页的路由,可以看到又自动跳回登录页了
1.5 管理页
前面我们登录功能主要用到的是vue-resource的post请求,接下来我们写一个get请求,其实两者都差不多,格式都为this.$http.post/get(url,data).then((res)=>{成功返回},(res)=>{失败返回})
我们新建一个管理页src/views/main/main.vue,用get请求返回所有注册的用户
<template>

    <div>

        <h3>所有注册用户</h3>

        <ul>

            <li v-for="item in list">

                {{item.username}}

            </li>

        </ul>

    </div>

</template>

<style>

    ul{padding: 0;}

    ul li{list-style: none;}

</style>

<script>

    export default{

        data(){

            return{

                list: ''

            }

        },

        mounted(){

            this.$http.get('http://localhost/vueapi/index.php/Home/user/index').then((res)=>{

                this.list = res.data

                console.log(res)

            })

        }

    }

</script>
前面创建登录页login.vue时,我们做的判断是当用户名和密码都为admin时,认为它是管理员账号,跳转到管理页main.vue
打开登录页,输入用户名“admin”,密码“admin”,可以看到路由直接跳转到main,打印出的是接口的返回值
2.注册页
2.1 在login.vue页面控制登录注册切换
前面我们在login.vue里已经写好了登录和注册两个区域,并且我们默认的是显示登录页(即showRegister 为false,showLogin 为true),现在我们要增加切换显示的方法ToRegister和ToLogin,方法很简单,写在login.vue下script标签的methods内部即可
ToRegister(){

    this.showRegister = true

    this.showLogin = false

},

ToLogin(){

    this.showRegister = false

    this.showLogin = true

}
查看切换效果
2.2 注册功能
点击“注册”按钮,触发register事件,在该事件中将用户输入的用户名和密码传至接口
register(){

    if(this.newUsername == "" || this.newPassword == ""){

        alert("请输入用户名或密码")

    }else{

        let data = {'username':this.newUsername,'password':this.newPassword}

        this.$http.post('http://localhost/vueapi/index.php/Home/user/register',data).then((res)=>{

            console.log(res)

            if(res.data == "ok"){

                this.tishi = "注册成功"

                this.showTishi = true

                this.username = ''

                this.password = ''

                 /*注册成功之后再跳回登录页*/

                setTimeout(function(){

                    this.showRegister = false

                    this.showLogin = true

                    this.showTishi = false

                }.bind(this),1000)

            }

        })

    }

}
好了,到这里我们已经基本实现了一个有cookie功能的简单的登录注册小实例,主要是了解一下vue-resource接口请求的用法
vue-cli——vue-resource登录注册实例的更多相关文章
- Vue学习之路之登录注册实例代码
Vue学习之路之登录注册实例代码:https://www.jb51.net/article/118003.htm vue项目中路由验证和相应拦截的使用:https://blog.csdn.net/wa ...
- Node.js_express_中间件 middleware_登录/注册实例源代码
静态资源: 都写死了的资源,如 css,html 解析规则: 所有路由和中间件都在一个数组中,js 引擎会按照代码先后顺序添加路由和中间件 当请求发送到服务器时,服务器获取当前的请求信息(请求方式.请 ...
- vue cli & vue 3.x
vue cli & vue 3.x https://cli.vuejs.org/dev-guide/ui-api.html#ui-api https://cli.vuejs.org/zh/gu ...
- vue新手入门之使用vue框架搭建用户登录注册案例,手动搭建webpack+Vue项目(附源码,图文详解,亲测有效)
前言 本篇随笔主要写了手动搭建一个webpack+Vue项目,掌握相关loader的安装与使用,包括css-loader.style-loader.vue-loader.url-loader.sass ...
- ASP.NET简单登录注册实例
<%@ Page Language="C#" AutoEventWireup="true" CodeBehind="WebForm1.aspx. ...
- vue cli 3
介绍 Vue CLI 是一个基于 Vue.js 进行快速开发的完整系统 通过 @vue/cli 搭建交互式的项目脚手架. 通过 @vue/cli + @vue/cli-service-global 快 ...
- 如何使用@vue/cli 3.0在npm上创建,发布和使用你自己的Vue.js组件库
译者按: 你可能npm人家的包过成千上万次,但你是否有创建,发布和使用过自己的npm包? 原文: How to create, publish and use your own VueJS Compo ...
- 使用Vue CLI 3将基于element-ui二次封装的组件发布到npm
前言:之前在网上找的好多都是基于vue-cli 2.x的,而使用vue-cli 3的文章比较少,Vue CLI 3 中文文档,所以我在自己尝试的时候把几篇文章结合了一下,调出来了我想要的模式,也就是V ...
- Vue CLI 是如何实现的 -- 终端命令行工具篇
Vue CLI 是一个基于 Vue.js 进行快速开发的完整系统,提供了终端命令行工具.零配置脚手架.插件体系.图形化管理界面等.本文暂且只分析项目初始化部分,也就是终端命令行工具的实现. 0. 用法 ...
随机推荐
- (转)TabIndex 属性
html中的tabIndex属性可以设置键盘中的TAB键在控件中的移动顺序,即焦点的顺序. 把控件的tabIndex属性设成1到32767的一个值,就可以把这个控件加入到TAB键的序列中. 这 ...
- Slf4j+Log4j日志框架入门
(一).日志系统介绍 slf4j,即简单日志门面(Simple Logging Facade for Java),不是具体的日志解决方案,它只服务于各种各样的日志系统.简答的讲就是slf4j是一系列的 ...
- 推荐系统架构-(附ppt&代码)
Part1.乐视网视频推荐系统 推荐系统:和传统的推荐系统架构无异(基础建模+规则) 数据模块特点:用户反馈服务数据->kv 缓存->log存储 行为日志->解析/聚合->se ...
- MyBatis 原始Dao开发方式
原始Dao开发方法需要程序员编写Dao接口和Dao实现类. 映射文件 <?xml version="1.0" encoding="UTF-8" ?> ...
- JAVA基础知识总结:六
一.不定长参数 1.语法:数据类型... 变量名称 使用注意事项:a.不定长参数就相当于是一个数组 b.不定长参数只能出现在参数列表的最后面 c.一个函数的参数列表中只能出现一次不定长参数 d.对于不 ...
- 树莓派.系统.修改声音输出通道(auto,hdmi,耳机接口)
树莓派平时通过耳机接口一直在正常使用 有一天外接了一个HDMI的屏幕, 结果耳机接口连着的音箱突然就没声音了,在网上查了资料,发现原来树莓派声音输出有3种模式 记录如下: 在命令行终端上输入下面命令将 ...
- javascript倒计时调转页面
<html><head><meta http-equiv="Content-Type" content="text/html; charse ...
- LeetCode 560. Subarray Sum Equals K (子数组之和等于K)
Given an array of integers and an integer k, you need to find the total number of continuous subarra ...
- EF框架搭建小总结--CodeFirst模型优先
前言:之前在下总结编写了一篇 EF框架搭建小总结--ModelFirst模型优先 博文,看到一段时间内该博文的访问量蹭.蹭蹭.蹭蹭蹭...往上涨(实际也不是很多,嘿嘿),但是还是按捺不住内心的喜悦(蛮 ...
- Asp.net MVC4高级编程学习笔记-模型学习第五课MVC表单和HTML辅助方法20171101
MVC表单和HTML辅助方法 一.表单的使用. 表单中的action与method特性.Action表示表单要提交往那里,因此这里就有一个URL.这个URL可以是相对或绝对地址.表单默认的method ...