
HTML5本地图片裁剪并上传
最近做了一个项目,这个项目中需要实现的一个功能是:用户自定义头像(用户在本地选择一张图片,在本地将图片裁剪成满足系统要求尺寸的大小)。这个功能的需求是:头像最初剪切为一个正方形。如果选择的图片小于规定的头像要求尺寸,那么这整张图片都会作为头像。如果大于规定的尺寸,那么用户可以选择要裁剪的区域。用户点击确定按钮,就将裁剪得到的图片数据发送到服务器,在后端将图片数据保存成一个文件。
要完成上述功能,涉及到的知识有:ajax,canvas和html5中的files接口。我将实现这个功能的代码封装到了4个模块中,分别是ajax.js,preview.js,shear.js和customerImg.js。
ajax.js:用于发送ajax请求。
preview.js:用于图片预览
shear.js:用于裁剪图片
customer.js:自定义头像。在这个模块中药引入ajax.js,preview.js和shear.js
我使用webpack进行打包。我还使用了jquery和jquery-ui。
我从这个项目中抽离出了这个功能。下面是这个功能的详细代码。
1.HTML代码
<div class="m-warp" id="warp">

        <div class="item">

            <input type="file" name="img" id="img" hidden>

            <label for="img">选择图片</label>

        </div>

        <div class="item clearfix">

            <div class="col col-1">

                <div class="preview" id="preview">

                    <div class="mask"></div>

                    <canvas class="cvsMove" id="cvsMove"></canvas>

                </div>

            </div>

            <div class="thum col-2 col">

                <p>预览</p>

                <img src="" id="thum">

                <p class="f-text-l f-marTop-20">

                    <button class="shear" id="submit">确定</button>

                </p>

            </div>

        </div>

    </div>
2.CSS代码
.clearfix:after{

    content: "";

    display: block;

    clear: both;

    height:;

    overflow: hidden;

    visibility: hidden;

}

img{
  vertical-align: middle;
  max-width:100%
}

.m-warp{

    width: 800px;

}

.item{

    margin-top: 20px;

}

.col{

    float: left;

}

.col-1{

    position: relative;

    width: 450px;

    height: 450px;

    outline: 1px solid #333;

}

.preview{

    display: inline-block;

}

.col-2{

    width: 300px;

    margin-left: 50px;

}

label{

    display: block;

    text-align: center;

    width: 100px;

    font-size: 16px;

    color: #fff;

    background-color: #888888;

    height: 30px;

    line-height: 30px;

}

.mask{

    position: absolute;

    z-index:;

    top:;

    left:;

    bottom:;

    right:;

    background-color: rgba(0,0,0,.4);

}

.cvsMove{

    position: absolute;

    z-index:;

    outline: 2px dotted #333;

    cursor: move;

    display: none;

}
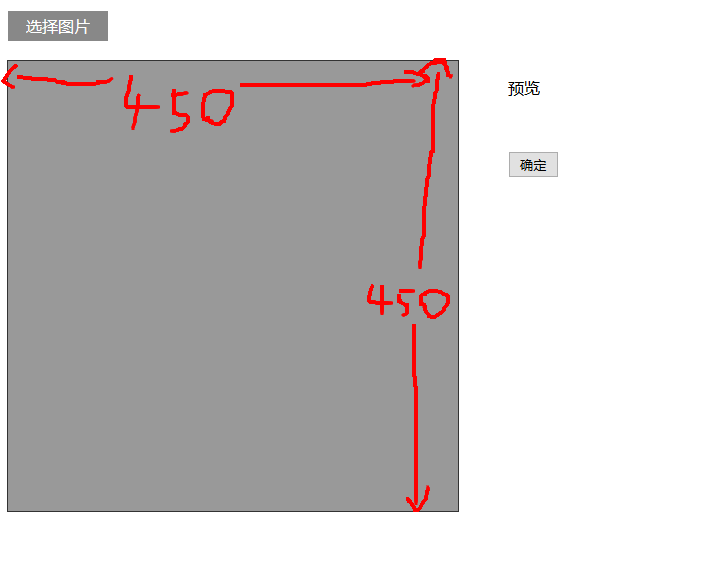
有了css和html的运行结果如下:
3.js代码
customerImg.js
var $ = require('jquery');

var ajax = require('./ajax.js');

var preview = require('./preview.js');

var shear = require('./shear.js');

/**

 * 自定义头像

 * @constructor

 */

function CustomerImg() {

    this.isSupport = null;

    this.previewBox = null;

    this.warp = null;

}

/**

 * 入口

 * @param warp 操作区域 jquery节点

 */

CustomerImg.prototype.start = function (warp) {

    var info,me,warpBox;

    me = this;

    this.isSupport = this.__isSupport();

    if(!this.isSupport) {

        info = $('<p>你的浏览器不支持自定义头像,可更换高版本的浏览器自定义头像</p>');

        $('body').html(info);

        return this;

    }

    //判断操作区域示范存在

    if(warp && warp.length > 0){

        this.warp = warp;

    }else{

        return this;

    }

    //预览

    preview.start(warp,shear.start.bind(shear,warp));

    this.previewBox = warp.find('#preview');

    //确定

    warp

        .find('#submit')

        .unbind('click')

        .on('click',me.__submit.bind(me));

};

/**

 * 提交

 * @private

 */

CustomerImg.prototype.__submit = function () {

    var cvsMove,data,fd;

    cvsMove = this.previewBox.find('#cvsMove');

    data = cvsMove[0].toDataURL('image/jpg',1);

    fd = {

        'customerImg':data

    };

    ajax.upload(fd);

};

/**

 * 判断是否支持自定义头像

 * @returns {boolean}

 * @private

 */

CustomerImg.prototype.__isSupport = function () {

    var canvas,context;

    canvas= document.createElement('canvas');

    if(typeof FileReader === 'function'&& canvas.getContext && canvas.toDataURL){

        return true;

    }else{

        return false;

    }

};

var customerImg = new CustomerImg();

module.exports = customerImg;
preview.js
/**

 * Created by star on 2017/3/7.

 */

var $ = require('jquery');

/**

 * 预览类

 * @constructor

 */

function Preview() {

    this.boxElem = null;

    this.callback = null;

    this.type = null;

}

/**

 * 入口

 * @param boxElem 操作区域

 * @param callback 预览结束的回调函数

 */

Preview.prototype.start = function (boxElem,callback) {

    var chooseFile,me;

    me = this;

    if(! boxElem || boxElem.length <= 0) return this;

    this.boxElem = boxElem;

    if(typeof callback === 'function'){

        this.callback = callback;

    }

    if(this.__isSupport()){

        chooseFile = boxElem.find('input[type="file"]');

        chooseFile

            .on('change',me.fileChange.bind(me))

    }

};

/**

 * 选择图片的事件处理程序

 * @param event

 */

Preview.prototype.fileChange = function (event) {

    var target,reader,file,me,type;

    target =  event.target;

    me = this;

    file = target.files[0];

    type = file.type;

    this.type = type;

    if(type !== 'image/png' && type !== 'image/jpg' && type !== 'image/jpeg'){

        alert('文件格式不正确');

        return this;

    }

    reader = new FileReader();

    if(file){

        reader.readAsDataURL(file);

    }

    reader.onload = function () {

        me.show(reader);

    }

};

/**

 * 显示从本地选择的图片

 * @param reader fileReader对象

 */

Preview.prototype.show = function (reader) {

    var preView,img,me;

    preView = this.boxElem.find('#preview');

    img = preView.find('#preImg');

    me = this;

    if(img.length <= 0){

        preView.append($('<img id="preImg">'));

    }

    img = preView.find('#preImg');

    //确保图片加载完成后再执行回调

    img.on('load',function () {

        if(me.callback){

            me.callback(me.type);

        }

    });

    img.attr('src',reader.result);

};

/**

 * 是否支持预览

 * @returns {boolean}

 * @private

 */

Preview.prototype.__isSupport = function () {

    return typeof FileReader === 'function';

};

var preview = new Preview();

module.exports = preview;
shear.js
var $ = require('jquery');

//由于要使用jquery-ui,所以将$暴露到window上。

window.$ = $;

require('./jquery-ui.min.js');

/**

 * 切割

 * @constructor

 */

function Shear() {

    this.previewBox = null;

    this.cvsMove = null;

    this.maxW = 200;

    this.maxH = 200;

    this.thum = null;

    this.fileType = 'image/jpeg';

}

/**

 * 入口

 * @param previewBox 预览元素的父元素

 * @param fileType 裁剪的图片的类型 如:'image/jpg'

 * @returns {Shear}

 */

Shear.prototype.start = function (previewBox,fileType) {

    if(!arguments.length) return this;

    var me = this;

    this.previewBox = previewBox;

    if(fileType){

        this.fileType = fileType;

    }

    this.thum = this.previewBox.find('#thum');

    this.cvsMove = this.previewBox.find('#cvsMove');

    this.showCanvas();

    return this;

};

/**

 * 显示出canvas

 */

Shear.prototype.showCanvas = function () {

    var preImg,h,w,me,cvsH,cvsW,rateH,rateW,naturalH,naturalW,preview;

    me = this;

    preImg = this.previewBox.find('#preImg');

    preview = this.previewBox.find('#preview');

    naturalH = preImg[0].naturalHeight;

    naturalW = preImg[0].naturalWidth;

    //将canvas显示出来

    this.cvsMove.show();

    //将canvas置于(0,0)

    this.cvsMove

        .css({

            "left":'0',

            'top':'0'

        });

    h = preImg.height();

    w = preImg.width();

    //规定裁剪出的图片尺寸为200px*200px

    //要保证裁剪的图片不变形

    if(h < this.maxH || w < this.maxW){

        this.cvsMove[0].width = cvsW = Math.min(h,w);

        this.cvsMove[0].height = cvsH = Math.min(h,w);

    }else{

        this.cvsMove[0].width= cvsW = this.maxW;

        this.cvsMove[0].height= cvsH = this.maxH;

    }

    rateH = h/naturalH;

    rateW = w/naturalW;

    this.__drawImg(preImg,0,0,cvsW/rateW,cvsH/rateH,0,0,cvsW,cvsH);

    //使用jquery-ui中的功能使canvas可以移动

    this.cvsMove.draggable(

        {

            containment: "parent",

            drag:function (event,ui) {

                var left,top;

                left = ui.position.left;

                top = ui.position.top;

                //canvas每次移动都有从新绘制图案

                me.__drawImg(preImg,left/rateW,top/rateH,cvsW/rateW,cvsH/rateH,0,0,cvsW,cvsH);

            }

        }

    )

};

/**

 * 在canvas上显示图片

 * @param myImg 要显示的图片节点

 * @param sx 图片的起点在原图片上的x坐标

 * @param sy 图片的起点在原图上的y坐标

 * @param sW 在原图上的宽度

 * @param sH 在原图上的高度

 * @param dx 起点在canvas上的x坐标

 * @param dy 起点在canvas上的y坐标

 * @param dW 在canvas上的宽度

 * @param dH 在canvas上的高度

 * @private

 */

Shear.prototype.__drawImg = function (myImg,sx,sy,sW,sH,dx,dy,dW,dH) {

    var cxt,thum,me;

    me = this;

    cxt = this.cvsMove[0].getContext('2d');

    cxt.drawImage(myImg[0],sx,sy,sW,sH,dx,dy,dW,dH);

    thum = this.thum;

    //将canvas上的图案显示到右侧

    thum

        .attr('src',this.cvsMove[0].toDataURL(me.fileType,1))

        .width(this.maxW)

        .height(this.maxH)

};

var shear = new Shear();

module.exports = shear;
ajax.js
var $ = require('jquery');

function Ajax() {

}

/**

 * 上传图片数据

 */

Ajax.prototype.upload = function (data) {

    $.ajax({

        type:'POST',

        data:data,

        dataType:'json',

        url:'/test/PHP/upload.php',

        success:function (result) {

            if(result.status){

                location.reload();

            }else{

                alert(result.msg);

            }

        }

    });

};

var ajax = new Ajax();

module.exports = ajax;
最后在另一个文件中,调用customerImg对象的start方法
var $ = require('jquery');

var customerImg =require('./customerImg.js');

customerImg.start($('#warp'));
webpack的配置文件如下:
var webpack = require('webpack');

module.exports = {

    entry:{

        'customerImg':'./js/test.js',

        'jQuery':['jquery']

    },

    output:{

        filename:'[name].js',

        library:'jQuery',

        libraryTarget:'umd'

    },

    plugins:[

        new webpack.optimize.CommonsChunkPlugin({

            name:'jQuery',

            filename:'jquery.js'

        })

    ]

};
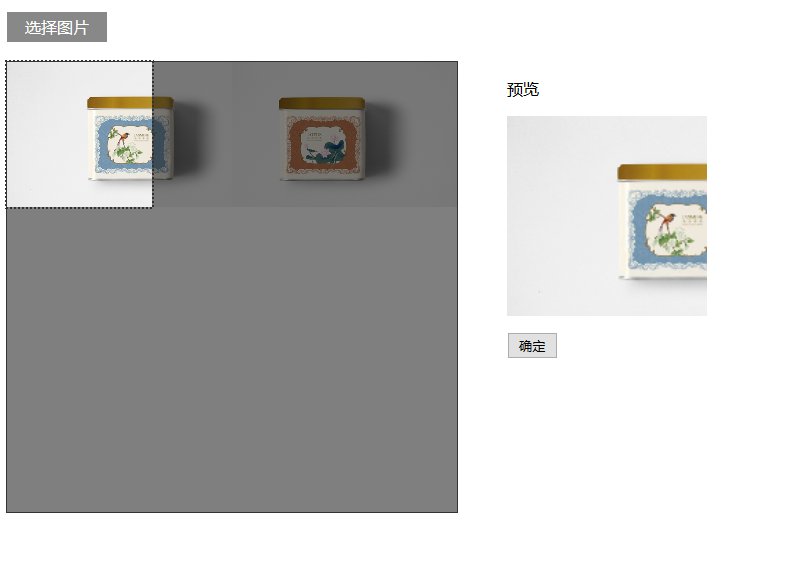
效果:
4.php代码
if(!empty($_POST) && isset($_POST['customerImg'])){

    $img = $_POST['customerImg'];

    $imgdata = explode(',', $img);

    $uniName = md5 ( uniqid ( microtime ( true ), true ) );

    $a = file_put_contents('./../uploads/'.$uniName.'.jpg',  base64_decode($imgdata[1]));

}
HTML5本地图片裁剪并上传的更多相关文章
- HTML5实现图片文件异步上传
原文:HTML5实现图片文件异步上传 利用HTML5的新特点做文件异步上传非常简单方便,本文主要展示JS部分,html结构.下面的代码并未使用第三发库,如果有参照,请注意一些未展现出来的代码片段.我这 ...
- HTML5多图片拖拽上传带进度条
前言 昨天利用css2的clip属性实现了网页进度条觉得还不错,但是很多情况下,我们在那些时候用进度条呢,一般网页加载的时候如果有需要可以用,那么问题就来了,怎么才算整个加载完毕呢,是页面主要模块加载 ...
- struts2+jsp+jquery+Jcrop实现图片裁剪并上传
<1> 使用html标签上传需要裁剪的大图. <2> 在页面呈现大图,使用Jcrop(Jquery)对大图进行裁剪,并且可以进行预览. <3> 选择好截取部分之后发 ...
- 使用cropper插件进行图片裁剪 并上传
cropper插件的使用和 github地址: github 官方实例 我参考的中文文档: https://www.cnblogs.com/baka-sky/p/8001577.html 因为我是.n ...
- HTML5——将图片拖拽上传
如下图所示: 代码如下: <!DOCTYPE html> <html> <head> <meta charset="utf-8"> ...
- 【Web】前端裁剪图片,并上传到服务器(Jcrop+canvas)
web网站中常常有的功能:上传头像.上传封面等:一般图片都有一定的比例限制,所以需要前端在上传图片时,进行裁剪,并把裁剪后的图片进行上传. 本例采用Jcrop插件实现裁剪效果,canvas裁剪图片,并 ...
- html5+php实现文件拖动上传功能
界面样式我是参考了一个国外的相册网站,改动不大,只是把鸟语转换成中文,以及上传时的样式也进行了改动,之所以选这个的原因就是,我很容易做扩展,它支持3种方式添加图片,一种拖拽上传,一种常规的选择文件上传 ...
- Resumable.js – 基于 HTML5 File API 的文件上传
Resumable.js 是一个 JavaScript 库,通过 HTML5 文件 API 提供,稳定和可恢复的批量上传功能.在上传大文件的时候通过每个文件分割成小块,每块在上传失败的时候,上传会不断 ...
- 基于h5的图片无刷新上传(uploadifive)
基于h5的图片无刷新上传(uploadifive) uploadifive简介 了解uploadify之前,首先了解来一下什么是uploadify,uploadfy官网,uploadify和uploa ...
随机推荐
- 微端游戏启动器LAUNCHER的制作之MFC版一(序和进程通信)
额...刚开始信誓旦旦说要写launcher制作的博客,还没写完就被抛到脑后了真是没毅力.最近把之前写的wpf的launcher改成了mfc版,遇到很多问题,写了三个星期才写完,好好记录一下吧.我也想 ...
- java 继承的学习(转)
转自:http://www.cnblogs.com/happyframework/p/3332243.html,非常感谢啊 public class test { /** * @param args ...
- 警惕Dictionary和SortedDictionary的顺序陷阱
/*我们查询资料得知Dictionary的遍历顺序和添加Add时的顺序是一致的,不像 HashTable 顺序不可知;于是我要依赖Dictionary的这种顺序一致特性做一个,固定大小400长度的队列 ...
- php in_array语法
bool in_array ( mixed $needle , array $haystack [, bool $strict ] ) 返回值为直或假 var_dump(in_array( ...
- LAMP学习小记
记录今天学习到的解决LAMP环境搭建的两个小问题: 问题1.xshell无法连接到虚拟机上的linux主机 解决方法: (1)进入网络配置文件: vi /etc/sysconfig/network-s ...
- TCP协议详解
TCP协议详解 一.TCP协议 1.TCP 通过以下方式提供可靠性: · ◆ 应用程序分割为TCP认为最合适发送的数据块.由TCP传递给IP的信息单位叫做报文段. · ◆ 当TCP发出一个报文段后 ...
- ASP.NET Core MVC之Serilog日志处理,你了解多少?
前言 本节我们来看看ASP.NET Core MVC中比较常用的功能,对于导入和导出目前仍在探索中,项目需要自定义列合并,所以事先探索了如何在ASP.NET Core MVC进行导入.导出,更高级的内 ...
- 转:KVC与KVO机制
由于Objective-C是基于Smalltalk进行设计的,所以它具有动态加载.动态绑定等特性.Key-value coding (KVC) 和 key-value observing (KVO) ...
- linux 下apache2 安装
Apache安装要求 安装APR.APR-Util.PCRE,gcc-c++等包 Apache HTTP Server http://httpd.apache.org/download.cgi#ap ...
- python 写的几道题
''' #乘法口诀''' for i in range(1,10): for j in range(1,i+1): print("%d*%d=%2d" % (i,j,i*j),en ...