
Grafana最新版本4.3.1安装(后端使用mysql)
环境
CentOS release 6.5 (Final) 64bit
zabbix_server (Zabbix) 3.0.3
grafana-4.3.1
mysql-5.6.21
一、安装grafana
安装方法有很多,官网有介绍:http://docs.grafana.org/installation/rpm/。我这里采用二进制安装方法。
1、下载二进制包,安装
[root@localhost src]# rpm -Uvh grafana-4.3.1-1.x86_64.rpm
warning: grafana-4.3.1-1.x86_64.rpm: Header V4 RSA/SHA1 Signature, key ID 24098cb6: NOKEY
Preparing... ########################################### [100%]
1:grafana ########################################### [100%]
### NOT starting grafana-server by default on bootup, please execute
sudo /sbin/chkconfig --add grafana-server
### In order to start grafana-server, execute
sudo service grafana-server start
POSTTRANS: Running script
2、修改grafana.ini文件
参考连接http://docs.grafana.org/installation/configuration/
因为默认使用sqlite3,我这里把他替换成mysql,因为我对mysql熟悉些,而且考虑到以后备份、异常恢复啥的。
修改配置:database和session都替换成mysql数据库。
############################### Database ####################################
[database]
# You can configure the database connection by specifying type, host, name, user and password
# as seperate properties or as on string using the url propertie.
# Either "mysql", "postgres" or "sqlite3", it's your choice
type = mysql
host = 127.0.0.1:3306
name = grafana
user = grafana
password = grafana
################################# Session #################################
[session]
provider = mysql
provider_config = grafana:grafana@tcp(127.0.0.1:3306)/grafana
cookie_name = grafana_session
cookie_secure = false
session_life_time = 86400
3、建库
CREATE DATABASE grafana DEFAULT CHARACTER SET utf8;
GRANT ALL ON grafana.* TO grafana@'localhost' IDENTIFIED BY 'grafana' WITH GRANT OPTION;
FLUSH PRIVILEGES;
4、启动服务grafana-server
启动服务时,出了个小插曲。启动服务的时候,失败了。
[root@localhost ~]# /etc/init.d/grafana-server restart
Stopping Grafana Server: ...[FAILED]
Starting Grafana Server: ... [ OK ]
FAILED
解决过程:查log。
[root@localhost grafana]# tail -f /var/log/grafana/grafana.log
t=2017-06-22T11:26:03+0800 lvl=info msg="Executing migration" logger=migrator id="create index UQE_user_email - v2"
t=2017-06-22T11:26:03+0800 lvl=info msg="Executing migration" logger=migrator id="copy data_source v1 to v2"
t=2017-06-22T11:26:03+0800 lvl=info msg="Executing migration" logger=migrator id="Drop old table user_v1"
t=2017-06-22T11:26:03+0800 lvl=info msg="Executing migration" logger=migrator id="Add column help_flags1 to user table"
t=2017-06-22T11:26:03+0800 lvl=info msg="Executing migration" logger=migrator id="Update user table charset"
t=2017-06-22T11:26:03+0800 lvl=info msg="Executing migration" logger=migrator id="create temp user table v1-7"
t=2017-06-22T11:26:03+0800 lvl=info msg="Executing migration" logger=migrator id="create index IDX_temp_user_email - v1-7"
t=2017-06-22T11:26:03+0800 lvl=eror msg="Executing migration failed" logger=migrator id="create index IDX_temp_user_email - v1-7" error="Error 1071: Specified key was too long; max key length is 767 bytes"
t=2017-06-22T11:26:03+0800 lvl=eror msg="Exec failed" logger=migrator error="Error 1071: Specified key was too long; max key length is 767 bytes" sql="CREATE INDEX `IDX_temp_user_email` ON `temp_user` (`email`);"
t=2017-06-22T11:26:03+0800 lvl=eror msg="Fail to initialize orm engine" logger=sqlstore error="Sqlstore::Migration failed err: Error 1071: Specified key was too long; max key length is 767 bytes\n"
根据提示,是在创建索引的时候,长度超过了767bytes导致。在mysql官网查看也可以看到:By default, the index key prefix length limit is 767 bytes.
参考连接https://dev.mysql.com/doc/refman/5.6/en/innodb-restrictions.html
解决办法:
1、修改my.cnf文件,增加如下变量
my.cnf
innodb_large_prefix=ON
innodb_file_format=Barracuda
innodb_file_format_max=Barracuda
进入数据库,查看这几个变量的原始值:
mysql> show variables like 'innodb_file%';
+--------------------------+----------+
| Variable_name | Value |
+--------------------------+----------+
| innodb_file_format | Antelope |
| innodb_file_format_check | ON |
| innodb_file_format_max | Antelope |
| innodb_file_per_table | ON |
+--------------------------+----------+
4 rows in set (0.01 sec)
mysql> show variables like 'innodb_large%';
+---------------------+-------+
| Variable_name | Value |
+---------------------+-------+
| innodb_large_prefix | OFF |
+---------------------+-------+
1 row in set (0.00 sec)
修改my.cnf文件后,重启数据库。
2、修改grafana表的行格式。
temp_user ALTER TABLE temp_user ROW_FORMAT=DYNAMIC;
dashboard ALTER TABLE dashboard ROW_FORMAT=DYNAMIC;
alert ALTER TABLE alert ROW_FORMAT=DYNAMIC;
修改前:
mysql> SHOW TABLE STATUS like 'dashboard'\G
*************************** 1. row ***************************
Name: dashboard
Engine: InnoDB
Version: 10
Row_format: Compact
Rows: 21
Avg_row_length: 60074
Data_length: 1261568
Max_data_length: 0
Index_length: 65536
Data_free: 4194304
Auto_increment: 44
Create_time: 2016-07-13 11:07:01
Update_time: NULL
Check_time: NULL
Collation: utf8_general_ci
Checksum: NULL
Create_options:
Comment:
1 row in set (0.00 sec)
mysql> ALTER TABLE dashboard ROW_FORMAT=DYNAMIC;
Query OK, 0 rows affected (0.17 sec)
Records: 0 Duplicates: 0 Warnings: 0
mysql> ALTER TABLE dashboard ROW_FORMAT=DYNAMIC;
Query OK, 0 rows affected (0.17 sec)
Records: 0 Duplicates: 0 Warnings: 0
修改后:
mysql> SHOW TABLE STATUS like 'dashboard'\G
*************************** 1. row ***************************
Name: dashboard
Engine: InnoDB
Version: 10
Row_format: Dynamic
Rows: 22
Avg_row_length: 72238
Data_length: 1589248
Max_data_length: 0
Index_length: 65536
Data_free: 0
Auto_increment: 44
Create_time: 2017-05-24 12:01:03
Update_time: NULL
Check_time: NULL
Collation: utf8_general_ci
Checksum: NULL
Create_options: row_format=DYNAMIC
Comment:
3、重启grafana服务,一切OK。
t=2017-06-22T11:39:21+0800 lvl=info msg="Starting Grafana" logger=main version=4.3.1 commit=befc15c compiled=2017-05-23T21:50:22+0800
t=2017-06-22T11:39:21+0800 lvl=info msg="Config loaded from" logger=settings file=/usr/share/grafana/conf/defaults.ini
t=2017-06-22T11:39:21+0800 lvl=info msg="Config loaded from" logger=settings file=/etc/grafana/grafana.ini
t=2017-06-22T11:39:21+0800 lvl=info msg="Config overriden from command line" logger=settings arg="default.paths.data=/var/lib/grafana"
t=2017-06-22T11:39:21+0800 lvl=info msg="Config overriden from command line" logger=settings arg="default.paths.logs=/var/log/grafana"
t=2017-06-22T11:39:21+0800 lvl=info msg="Config overriden from command line" logger=settings arg="default.paths.plugins=/var/lib/grafana/plugins"
t=2017-06-22T11:39:21+0800 lvl=info msg="Path Home" logger=settings path=/usr/share/grafana
t=2017-06-22T11:39:21+0800 lvl=info msg="Path Data" logger=settings path=/var/lib/grafana
t=2017-06-22T11:39:21+0800 lvl=info msg="Path Logs" logger=settings path=/var/log/grafana
t=2017-06-22T11:39:21+0800 lvl=info msg="Path Plugins" logger=settings path=/var/lib/grafana/plugins
t=2017-06-22T11:39:21+0800 lvl=info msg="Initializing DB" logger=sqlstore dbtype=mysql
t=2017-06-22T11:39:21+0800 lvl=info msg="Starting DB migration" logger=migrator
t=2017-06-22T11:39:21+0800 lvl=info msg="Executing migration" logger=migrator id="copy data account to org"
t=2017-06-22T11:39:21+0800 lvl=info msg="Skipping migration condition not fulfilled" logger=migrator id="copy data account to org"
t=2017-06-22T11:39:21+0800 lvl=info msg="Executing migration" logger=migrator id="copy data account_user to org_user"
t=2017-06-22T11:39:21+0800 lvl=info msg="Skipping migration condition not fulfilled" logger=migrator id="copy data account_user to org_user"
t=2017-06-22T11:39:21+0800 lvl=info msg="Executing migration" logger=migrator id="add index alert state"
t=2017-06-22T11:39:21+0800 lvl=info msg="Executing migration" logger=migrator id="add index alert dashboard_id"
t=2017-06-22T11:39:21+0800 lvl=info msg="Executing migration" logger=migrator id="create alert_notification table v1"
t=2017-06-22T11:39:21+0800 lvl=info msg="Executing migration" logger=migrator id="Add column is_default"
t=2017-06-22T11:39:22+0800 lvl=info msg="Executing migration" logger=migrator id="add index alert_notification org_id & name"
t=2017-06-22T11:39:22+0800 lvl=info msg="Executing migration" logger=migrator id="Update alert table charset"
t=2017-06-22T11:39:22+0800 lvl=info msg="Executing migration" logger=migrator id="Update alert_notification table charset"
t=2017-06-22T11:39:22+0800 lvl=info msg="Executing migration" logger=migrator id="Drop old annotation table v4"
t=2017-06-22T11:39:22+0800 lvl=info msg="Executing migration" logger=migrator id="create annotation table v5"
t=2017-06-22T11:39:23+0800 lvl=info msg="Executing migration" logger=migrator id="add index annotation 0 v3"
t=2017-06-22T11:39:23+0800 lvl=info msg="Executing migration" logger=migrator id="add index annotation 1 v3"
t=2017-06-22T11:39:23+0800 lvl=info msg="Executing migration" logger=migrator id="add index annotation 2 v3"
t=2017-06-22T11:39:23+0800 lvl=info msg="Executing migration" logger=migrator id="add index annotation 3 v3"
t=2017-06-22T11:39:23+0800 lvl=info msg="Executing migration" logger=migrator id="add index annotation 4 v3"
t=2017-06-22T11:39:23+0800 lvl=info msg="Executing migration" logger=migrator id="Update annotation table charset"
t=2017-06-22T11:39:24+0800 lvl=info msg="Executing migration" logger=migrator id="Add column region_id to annotation table"
t=2017-06-22T11:39:24+0800 lvl=info msg="Executing migration" logger=migrator id="create test_data table"
t=2017-06-22T11:39:25+0800 lvl=info msg="Created default admin user: admin"
t=2017-06-22T11:39:25+0800 lvl=info msg="Starting plugin search" logger=plugins
t=2017-06-22T11:39:25+0800 lvl=warn msg="Plugin dir does not exist" logger=plugins dir=/var/lib/grafana/plugins
t=2017-06-22T11:39:25+0800 lvl=info msg="Plugin dir created" logger=plugins dir=/var/lib/grafana/plugins
t=2017-06-22T11:39:25+0800 lvl=info msg="Initializing Alerting" logger=alerting.engine
t=2017-06-22T11:39:25+0800 lvl=info msg="Initializing CleanUpService" logger=cleanup
t=2017-06-22T11:39:25+0800 lvl=info msg="Initializing Stream Manager"
t=2017-06-22T11:39:25+0800 lvl=info msg="Initializing HTTP Server" logger=http.server address=0.0.0.0:3000 protocol=http subUrl= socket=
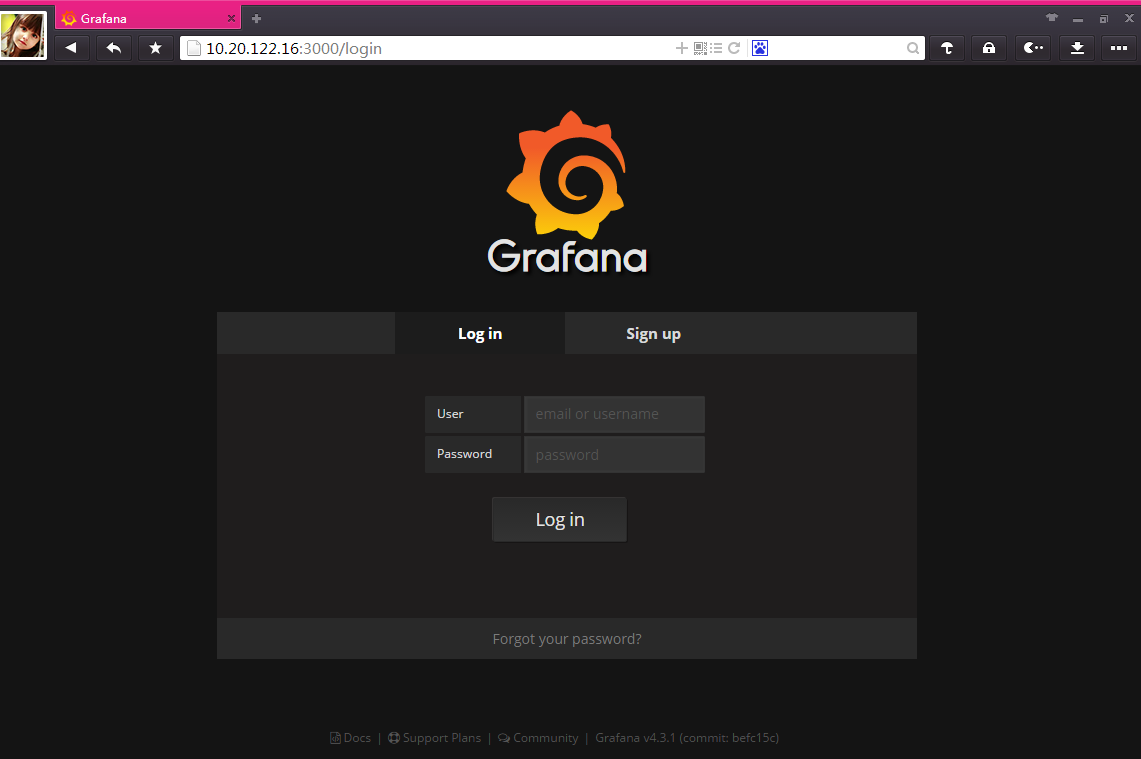
5、打开主页
PS:本文纯属记录个人实践经历,如有问题,可随时联系我。QQ505711559
Grafana最新版本4.3.1安装(后端使用mysql)的更多相关文章
- 安装最新版本的kubernets(+安装插件dashboard)
一.安装docker // 安装系统工具: sudo yum install -y yum-utils device-mapper-persistent-data lvm2 // 添加docker y ...
- Git 最新版本2.20.1 安装及配置
我们先去官网下载地址,去下载. https://git-scm.com/downloads 1. 2. 3. 双击 Git-2.20.1-64-bit.exe 安装 4. 5. 6. 7. 8. 9. ...
- 最新版本2018.1.1webstorm安装、汉化、破解教程
一.安装(下载与激活) 1.官网下载安装包https://www.jetbrains.com/webstorm/ 2.开始安装 3.选择安装目录,点击下一步 4.勾选64位,点击下一步 5.继续下一步 ...
- Ruby windows7安装配置(最新版本)
1.下载最新版本的rubyinstaller并安装http://rubyinstaller.org/downloads/ 如下图所示设置路径,我安装时将所有选项都打够了,免除了后面需要什么配置麻烦. ...
- Kubernetes 1.13.3 部署 Prometheus+Grafana-7.5.2(最新版本踩坑)
本教程直接在 Kubernetes 1.13.3 版本上安装 Prometheus 和 Grafana-7.5.2,至于它们的原理和概念就不再赘述,这里就直接开始操作. Git 下载相关 YAML 文 ...
- 最新版本elasticsearch本地搭建入门篇
最新版本elasticsearch本地搭建入门篇 项目介绍 最近工作用到elasticsearch,主要是用于网站搜索,和应用搜索. 工欲善其事,必先利其器. 自己开始关注elasticsearch, ...
- Linux CentOS6系统安装最新版本Node.js环境及相关文件配置
Node.js,当前应用非常广泛的Javascript运行环境,采用C++编写的,目前应用较多的用于WEB应用中,执行效率还是非常高的,虽然老左不从业程序的开发,但是有些时候在玩VPS的时候还是会遇到 ...
- ABP开发框架前后端开发系列---(16)ABP框架升级最新版本的经验总结
有一小段时间没有持续升级ABP框架了,最近就因应客户的需要,把ABP框架进行全面的更新,由于我们应用的ABP框架,基础部分还是会使用官方的内容,因此升级的时候需要把官方基础ABP的DLL进行全面的更新 ...
- ubuntu14.04下配置Java环境以及安装最新版本的eclipse
首先是配置JDK 步骤一:下载最新版本的JDK,链接:http://www.oracle.com/technetwork/java/javase/downloads/index.html 步骤二:首先 ...
随机推荐
- Spring Boot-------JPA基础及查询规则
JPA基础及查询规则 JPA JPA是Java Persistence API的简称,中文名Java持久层API,是JDK 5.0注解或XML描述对象-关系表的映射关系,并将运行期的实体对象持久化到数 ...
- activeMq 使用方法
一:activeMq介绍 ActiveMQ是一种开源的,实现了JMS1.1规范的,面向消息(MOM)的中间件,为应用程序提供高效的.可扩展的.稳定的和安全的企业级消息通信,下载地址是:http://a ...
- iOS UICollectionView(转三)
上篇博客的实例是自带的UICollectionViewDelegateFlowLayout布局基础上来做的Demo, 详情请看<iOS开发之窥探UICollectionViewControlle ...
- iOS MJRefresh上拉加载更多
1.导入MJRefresh包 2.在类中引入:#import "MJRefresh.h" 3.添加footerView 添加加载更多的UI样式: MJRefreshAutoNorm ...
- C#中&与&&的区别
c#&是什么意思? 看过一些文章,关于这个的简单而容易被忽略的语法,说的总有点瑕疵. 贴代码15秒之内应该能知道c#中一个&和两个&&的区别,开始计数了........ ...
- UNIX域协议(命名套接字)
这里主要介绍命名UNIX域套接字 1.什么是UNIX域套接字Unix域协议并不是一个实际的协议族,而是在单个主机上执行客户/服务通信的一种方式.是进程间通信(IPC)的一种方式.它提供了两类套接字:字 ...
- Appsacn 定期自动化扫描
appscan提供了计划扫描的选项,配合windows的计划任务,可以按需设定. 操作流程如下: 1.打开Appsacn--工具---扫描调度程序---新建 2.新建后显示如下窗口 3.填写好相应的设 ...
- 在表格中,th scope="row"和th scope="col"中的scope属性的用法及意义
把表头和数据联系起来:scope,id,headers属性就我用到现在,很多表格要比上面提供的例子复杂的多.让例子复杂一点,我会移去"Company"表头,并且把第一列的数据移到表 ...
- oracle里的优化器
1.1 oracle里的优化器 RBO(Rule-Based-Optinizer):基于规则的优化器 CBO(Cost-Based-Optinizer): 基于成本的优化器 SQL语句执行过程 待执行 ...
- [编织消息框架][JAVA核心技术]cglib动态代理
先在mavne项目里添加cglib库 maven仓库搜索cglib版本 maven地址:http://mvnrepository.com/ 点击最新的版本 3.2.5 复制到pom.xml depe ...