python3 爬淘女郎
刚学到python 组合数据类型这里,机缘巧合之下得到了一个公开课的视频,也看了前辈写的,取其精华,去其糟粕的爬了一下:
import urllib
from urllib import request
from json import loads
import re
import os
import pymssql
# sql server 数据库
class DB:

    def __init__(self,host,user,password,database,charset):
        self.conn = pymssql.connect(host=host, user=user, password=password, database=database, charset=charset)
        self.cur = self.conn.cursor()

    # 操作
    def operateDB(self,sql):
        if not self.cur:
            print('连接失败')
        else:
            self.cur.execute(sql)
            self.conn.commit()

    # 关闭
    def close(self):
        self.cur.close()
        self.conn.close()
# 发起请求
def getRequestBody(url):
    return urllib.request.urlopen(url).read().decode('gbk')
# 删除字符串中不要的字符
def setStrLegal(body,son):
    start_index = body.find(son)
    end_index = body.find(son) + len(son)
    return body[:start_index] + body[end_index:]
# 获得page页的所有模特信息,封装在字典中
def getShowInfoList(page):
# 页码请求的url
url = 'https://mm.taobao.com/tstar/search/tstar_model.do?_input_charset=utf-8¤tPage={}'.format(page)
body = getRequestBody(url)
dicts = loads(body)
print(dicts['data']['searchDOList'])
return dicts
# 获取模特的信息
def getInfo(userId):
# 每个模特的模特卡的url
url = 'https://mm.taobao.com/self/info/model_info_show.htm?user_id={}'.format(userId)
body = getRequestBody(url).strip()
reg = r'<span>(.*?)</span>'
list_re = re.findall(reg, body)
list_re[1] = setStrLegal(list_re[1],' ').strip()
# 处理错误信息
if len(list_re)-1 >= 8:
list_re.pop()
if len(list_re)-1 < 7:
list_re.append('')
if list_re[4] == '':
list_re[4] = list_re[4].replace('','未知').strip()
if list_re[6] == '':
list_re[6] = list_re[6].replace('', '未知').strip()
if list_re[7] == '':
list_re[7] = list_re[7].replace('', '未知').strip()
list_re[5] = list_re[5].split(' ') reg1 = r'<p>(.*?)</p>'
list_re1 = re.findall(reg1, body)
list_re1[0] = list_re1[0][:list_re1[0].find('CM')]
list_re1[1] = list_re1[1][:list_re1[1].find('KG')]
try:
list_re1[4] = int(list_re1[4][:list_re1[4].find('码')])
except ValueError:
list_re1[4] = 0
return list_re + list_re1
# 一个人所有的相册
def getAlbumList(userId):
    # 单击相册时的请求url,请求返回所有相册
    url = 'https://mm.taobao.com/self/album/open_album_list.htm?_charset=utf-8&user_id%20={}'.format(userId)
    # 获取每一个相册的正侧表达式
    body = getRequestBody(url)
    reg = r'<a href="(.*?)" target="_blank">'
    return re.findall(reg,body)
def getPhotoList(userId,albumId):#url
    # 访问相册每个相片
    # url = 'https:%s' %url
    # print(url)
    url = 'https://mm.taobao.com/album/json/get_album_photo_list.htm?user_id={}&album_id={}&top_pic_id=0' \
          '&cover=%2F%2Fimg.alicdn.com%2Fimgextra%2Fi1%2F176817195%2FTB1jFcMKFXXXXblXFXXXXXXXXXX_!!0-tstar.jpg' \
          '&page=1&_ksTS=1516189198030_166&callback=jsonp167'.format(userId,albumId)
    # 获取每一个相册的内容,具体到个体
    body = getRequestBody(url)# jsonp数据
    data = getData(body,'jsonp167(',')')
    dicts = loads(data)
    return dicts['picList']
# 取strat_son至end_son之间的字符串
def getData(body,strat_son,end_son):
    # strat_son在不在body里面,在返回其位置,否则-1
    temp_index = body.find(strat_son)
    start_index = temp_index + len(strat_son)
    end_index = body.find(end_son, start_index)
    return body[start_index:end_index]

def savePhoto(photoUrl,path,picId):
    file_path = 'f:/mm/' + path
    if not os.path.exists(file_path):
        os.makedirs(file_path)
        auto_down(photoUrl, file_path + '/' + picId + '.jpg')

# 递归调用,防止因为文件下载不完全导致的错误
def auto_down(url,file_path):
    try:
        urllib.request.urlretrieve(url,file_path)
    except urllib.request.ContentTooShortError:
        print('Network conditions is not good.Reloading.')
        auto_down(url,file_path)
# 实施
page = 1
while True:
    showInfo_dicts = getShowInfoList(page)
    if showInfo_dicts['status'] == 1:
        for key in showInfo_dicts['data']['searchDOList']:# getUrlList():30
            userId = key['userId']
            showInfo_list = getInfo(userId)
            print(showInfo_list)
            print('正在保存{}的信息'.format(key['realName']))
            db = DB('localhost','sa','123456c','Models','utf8')
            try:
                sql = '''begin tran insert_data
                insert into user_basic values('{0}','{1}','{2}','{3}','{4}');
                insert into user_extend values('{5}','{6}','{7}','{8}','{9}','{10}');
                insert into user_standard values('{11}',{12},{13},'{14}','{15}',{16});
                commit tran insert_data'''.format(userId,showInfo_list[0],showInfo_list[2],showInfo_list[1],showInfo_list[4],
                                                    userId,showInfo_list[3],showInfo_list[5][0],showInfo_list[5][1],showInfo_list[6],
                                                    showInfo_list[7],
                                                    userId,float(showInfo_list[8]),float(showInfo_list[9]),showInfo_list[10],
                                                    showInfo_list[11],int(showInfo_list[12]))
            except ValueError:
                continue
            try:
                db.operateDB(sql)
            except pymssql.OperationalError:
                continue
            print('保存信息完成')
            # 获取每个相册url,封在list中
            urlList = getAlbumList(userId)
            print(urlList)
            # 去重复值,相册的url
            for album_url in urlList[::7]:
                albumId = getData(album_url, 'album_id=', '&')
                photoList = getPhotoList(userId, albumId)  # 获取封装相片的jsonp数据
                print(photoList)
                for photo_url in photoList:
                    photoUrl = ''
                    if photo_url['picUrl'].find('.jpg_290x10000') != -1:
                        photoUrl = 'https:' + photo_url['picUrl'].strip('.jpg_290x10000') + '.jpg'  # 删除指定字符
                    else:
                        photoUrl = 'https:' + photo_url['picUrl']
                    path = photo_url['userId'] + '/' + photo_url['albumId']
                    savePhoto(photoUrl, path, photo_url['picId'])
    else:
        print('该网页已没有想要的数据了,该换了!')
        break
    page += 1

每个相册只能爬16张。
数据会插入数据中,以下代码,针对得到的数据,做了简单的处理:
import pymssql
from pychartdir import *
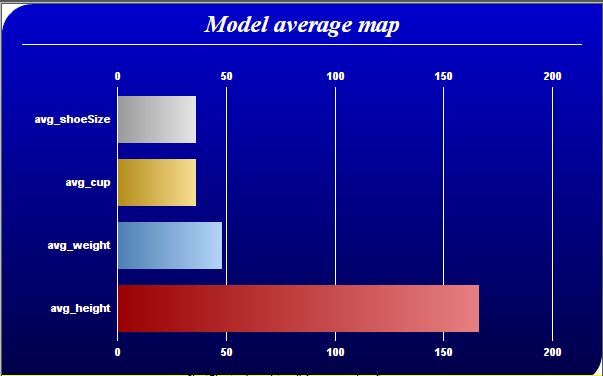
def avgMap(data):
    # The labels for the bar chart
    labels = ["avg_height", "avg_weight", "avg_cup", "avg_shoeSize"]

    # The colors for the bars
    colors = [0xcc0000, 0x66aaee, 0xeebb22, 0xcccccc, 0xcc88ff]

    # Create a PieChart object of size 600 x 380 pixels.
    c = XYChart(600, 380)

    # Use the white on black palette, which means the default text and line colors are white
    c.setColors(whiteOnBlackPalette)

    # Use a vertical gradient color from blue (0000cc) to deep blue (000044) as background. Use rounded
    # corners of 30 pixels radius for the top-left and bottom-right corners.
    c.setBackground(c.linearGradientColor(0, 0, 0, c.getHeight(), 0x0000cc, 0x000044))
    c.setRoundedFrame(0xffffff, 30, 0, 30, 0)

    # Add a title using 18pt Times New Roman Bold Italic font. Add 6 pixels top and bottom margins to
    # the title.
    title = c.addTitle("Model average map", "timesbi.ttf", 18)
    title.setMargin2(0, 0, 6, 6)

    # Add a separator line in white color just under the title
    c.addLine(20, title.getHeight(), c.getWidth() - 21, title.getHeight(), 0xffffff)

    # Tentatively set the plotarea at (70, 80) and of 480 x 240 pixels in size. Use transparent border
    # and white grid lines
    c.setPlotArea(70, 80, 480, 240, -1, -1, Transparent, 0xffffff)

    # Swap the axis so that the bars are drawn horizontally
    c.swapXY()

    # Add a multi-color bar chart layer using the supplied data. Use bar gradient lighting with the
    # light intensity from 0.75 to 2.0
    c.addBarLayer3(data, colors).setBorderColor(Transparent, barLighting(0.75, 2.0))

    # Set the labels on the x axis.
    c.xAxis().setLabels(labels)

    # Show the same scale on the left and right y-axes
    c.syncYAxis()

    # Set the bottom y-axis title using 10pt Arial Bold font
    # c.yAxis().setTitle("USD (millions)", "arialbd.ttf", 10)

    # Set y-axes to transparent
    c.yAxis().setColors(Transparent)
    c.yAxis2().setColors(Transparent)

    # Disable ticks on the x-axis by setting the tick color to transparent
    c.xAxis().setTickColor(Transparent)

    # Set the label styles of all axes to 8pt Arial Bold font
    c.xAxis().setLabelStyle("arialbd.ttf", 8)
    c.yAxis().setLabelStyle("arialbd.ttf", 8)
    c.yAxis2().setLabelStyle("arialbd.ttf", 8)

    # Adjust the plot area size, such that the bounding box (inclusive of axes) is 30 pixels from the
    # left edge, 25 pixels below the title, 50 pixels from the right edge, and 25 pixels from the bottom
    # edge.
    c.packPlotArea(30, title.getHeight() + 25, c.getWidth() - 50, c.getHeight() - 25)

    # Output the chart
    c.makeChart("avg.png")
conn = pymssql.connect(host='localhost', user='sa', password='123456c', database='Models', charset="utf8")
cur = conn.cursor()

cur.execute("""select avg(height),avg(weight),avg(cast(left(cup,2) as int)),avg(shoeSize) from  user_standard
where cup not in ('0A' ,'B','M','3X','请选择','不接拍','C','**','QWE'); """)
row = cur.fetchone()
data_avg = []
while row:
    data_avg = list(row)
    print(data_avg)
    row = cur.fetchone()
avgMap(data_avg)
# 关闭
cur.close()
conn.close()

结果图:
python3 爬淘女郎的更多相关文章
- python3爬取网页
爬虫 python3爬取网页资源方式(1.最简单: import'http://www.baidu.com/'print2.通过request import'http://www.baidu.com' ...
- python3爬取女神图片,破解盗链问题
title: python3爬取女神图片,破解盗链问题 date: 2018-04-22 08:26:00 tags: [python3,美女,图片抓取,爬虫, 盗链] comments: true ...
- Python3 爬取微信好友基本信息,并进行数据清洗
Python3 爬取微信好友基本信息,并进行数据清洗 1,登录获取好友基础信息: 好友的获取方法为get_friends,将会返回完整的好友列表. 其中每个好友为一个字典 列表的第一项为本人的账号信息 ...
- Python3爬取人人网(校内网)个人照片及朋友照片,并一键下载到本地~~~附源代码
题记: 11月14日早晨8点,人人网发布公告,宣布人人公司将人人网社交平台业务相关资产以2000万美元的现金加4000万美元的股票对价出售予北京多牛传媒,自此,人人公司将专注于境内的二手车业务和在美国 ...
- python3爬取微博评论并存为xlsx
python3爬取微博评论并存为xlsx**由于微博电脑端的网页版页面比较复杂,我们可以访问手机端的微博网站,网址为:https://m.weibo.cn/一.访问微博网站,找到热门推荐链接我们打开微 ...
- python3爬取全民K歌
Python3爬取全民k歌 环境 python3.5 + requests 1.通过歌曲主页链接爬取 首先打开歌曲主页,打开开发者工具(F12). 选择Network,点击播放,会发现有一个请求返回的 ...
- Python3爬取猫眼电影信息
Python3爬取猫眼电影信息 import json import requests from requests.exceptions import RequestException import ...
- python3爬取1024图片
这两年python特别火,火到博客园现在也是隔三差五的出现一些python的文章.各种开源软件.各种爬虫算法纷纷开路,作为互联网行业的IT狗自然看的我也是心痒痒,于是趁着这个雾霾横行的周末瞅了两眼,作 ...
- Python3爬取中文网址
本以为Python3的中文兼容性无比友好,结果还是会有一点问题的. 解决方案如下,就以爬取我自己的一个网页极简翻译为例 #coding:utf8 import urllib.request impor ...
随机推荐
- 谈谈CommonsChunkPlugin抽取公共模块
引言 webpack插件CommonsChunkPlugin的主要作用是抽取webpack项目入口chunk的公共部分,具体的用法就不做过多介绍,不太了解可以参考webpack官网介绍: 该插件是we ...
- Docker容器中开始.NETCore之路
一.引言 开始写这篇博客前,已经尝试练习过好多次Docker环境安装,.Net Core环境安装了,在这里替腾讯云做一个推广,假如我们想学习.练手.net core 或是Docker却苦于没有开发环境 ...
- Xamarin android spinner的使用方法
<?xml version="1.0" encoding="utf-8"?> <LinearLayout xmlns:android=&quo ...
- Hello TensorFlow 二 (GPU)
官方说明:https://www.tensorflow.org/install/ 环境: 操作系统 :Windows 10 家庭中文版 处理器 : Intel(R) Core(TM) i7-7700 ...
- maven jar包冲三种解决方式
初次启动应用,一直包如下错误,起初怀疑引入pandora 版本冲突. Exception in thread "main" java.lang.NoSuchMethodError: ...
- [编织消息框架][JAVA核心技术]动态代理应用6-设计生成类
上篇介绍到rpc可以使用接口与实现类来约束书写 根据接口用javassist生成两个代理类 1.sendProxy 发送处理,调用方式可以是远程/本地 2.receiveProxy 接收处理,内部调用 ...
- redis centos启动
转到redis目录 ./redis-server /usr/java/redis/redis.conf
- java inputstream to string
https://stackoverflow.com/questions/309424/read-convert-an-inputstream-to-a-string 过千赞的答案
- VS2010 Extension实践(3)——实现自定义配置
在之前的两篇曾提到通过VSSDK(MSDN也叫VSX)来拓宽思路,实现一些MEF Extension所不能做到的功能,比如获取IVsUIShell服务来执行Command等等,这里我给各位看官展示如何 ...
- springMVC(6)---处理模型数据
springMVC(6)---处理模型数据 之前一篇博客,写个怎么获取前段数据:springMVC(2)---获取前段数据,这篇文章写怎么从后端往前端传入数据. 模型数据类型 ...