
flask的post,get请求及获取不同格式的参数
flask的post,get请求及获取不同格式的参数
1 获取不同格式参数

1.0 获取json参数
- Demo
from flask import Flask, request, jsonify

app = Flask(__name__)

@app.route('/jsonargs/<string:args_1>', methods=['POST'])

def json_args(args_1):

    args_2 = request.json.get("args_2")

    args_3 = request.json['args_3']

    return jsonify({"args_1":args_1, "args_2":args_2, "args_3":args_3})

if __name__ == "__main__":

    app.run(host='0.0.0.0', port=8080, debug=True)
- request

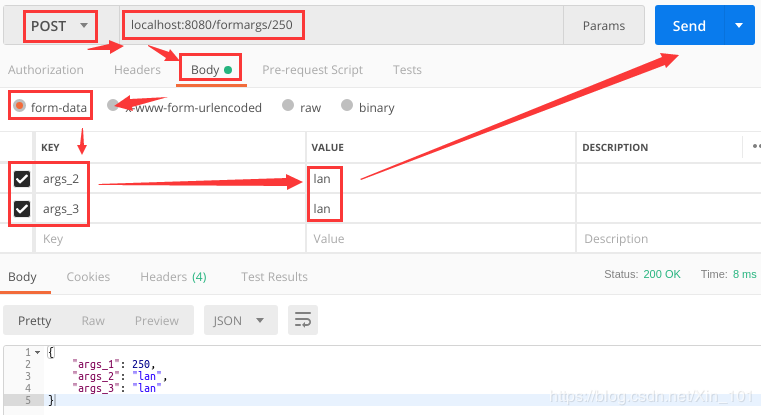
1.2 获取form参数
- Demo
from flask import Flask, request, jsonify

app = Flask(__name__)

@app.route('/formargs/<int:args_1>', methods=['POST'])

def form_args(args_1):

    args_2 = request.form.get('args_2')

    args_3 = request.form['args_3']

    return jsonify({"args_1":args_1, "args_2":args_2, "args_3":args_3})

if __name__ == "__main__":

    app.run(host='0.0.0.0', port=8080, debug=True)
- request
1.3 get获取地址栏参数
from flask import Flask, request, jsonify

app = Flask(__name__)

@app.route('/getargs', methods=['GET', 'POST'])

def get_args():

    args_1 = request.args.get("args_1")

    args_2 = request.args.get("args_2")

    args_3 = request.args.get("args_3")

    return jsonify({"args_1":args_1, "args_2":args_2, "args_3":args_3})

if __name__ == "__main__":

    app.run(host='0.0.0.0', port=8080, debug=True)
Request

1.4 获取file文件
from flask import Flask, request, jsonify

import os

basedir = os.path.abspath(os.path.dirname(__name__))

app = Flask(__name__)

@app.route('/imageprocess', methods=['GET', 'POST'])

def image_preprocess():

    # get upload image and save

    image = request.files['image']

    path = basedir + "/source_images/"

    file_path = path + image.filename

    image.save(file_path)

if __name__ == "__main__":

    app.run(host='0.0.0.0', port=8080, debug=True)
1.5 获取任何格式
from flask import Flask, request

app = Flask(__name__)

def upload_data():

    data = request.values.get("input")

    return jsonify({"data type":"successfully upload!"})

if __name__ == "__main__":

    app.run(host="0.0.0.0", port=8090, debug=True)
2 文件格式解析
from flask import Flask, jsonify, request,abort

import os

app = Flask(__name__)

def path_get():

    path = os.path.abspath(os.path.dirname(__name__))

    return path

@app.route('/connect', methods=["GET"])

def connect():

    return jsonify({"connect state":"successfully connect!"})

@app.route('/upload_data', methods=["GET", "POST"])

def upload_data():

    # 判断form文件是否为空及是否是form文件

    if request.form and 'input' in request.form:

        upload_data = request.form['input']

        form_type = request.form

        print("form type: {}".format(form_type))

        # return jsonify({"input data":upload_data})

        return jsonify({"form data type":form_type})

    # 判断json文件是否为空及是否是json文件

    elif request.json and 'input' in request.json:

        upload_data = request.json['input']

        # return jsonify({"input data":upload_data})

        # return jsonify({"input test":"success"})

        json_type = request.json

        print("json type: {}".format(json_type))

        return jsonify({"form data type":json_type})

    # 判断files文件是否为空及是否是files文件

    elif 'input' in request.files:

        file = request.files["input"]

        path = path_get() + "/images/test.png"

        # file.save(path)

        files_type = request.files

        print("files type: {}".format(files_type))

        return jsonify({"path":path})

        # return jsonify({"form data type":files_type})

    else:

        abort(400)

if __name__ == "__main__":

    app.run(host='0.0.0.0', port=8098, debug=True)
Result
# form数据

form type: ImmutableMultiDict([('input', 'dancer')])

{

    "form data type": {

        "input": "dancer"

    }

}

=======================

# json数据

json type: {'input': 'jumper'}

{

    "form data type": {

        "input": "jumper"

    }

}

=======================

# files文件

files type: ImmutableMultiDict([('input', <FileStorage: '1.jpeg' ('image/jpeg')>)])
Analysis
(1) form数据是可遍历的字典,可使用字典属性;
(2) json数据为字典,可使用字典属性;
(3) files数据为可遍历的字典,可使用字典属性,通过key判断是否存在该key,如input这个键;
(4) 当使用数据中的一种格式时,其他的数据为None,不可遍历,因此直接使用if判断是否为该类型的数据,会抛出错误TypeError: argument of type 'NoneType' is not iterable,所以通过先判断数据是否为空,然后判断是否为指定格式,解除错误;
3 获取checkbox数据
3.1 获取一个checkbox数据
- html
<p><input type="checkbox" name="checkbox_name" value="选择框">选择框</p>
- flask
data = request.values.get("checkbox_name")
3.2 获取多个checkbox数据
- html
<p><input type="checkbox" name="checkbox_names" value="选择1">选择1</p>

<p><input type="checkbox" name="checkbox_names" value="选择1">选择2</p>

<p><input type="checkbox" name="checkbox_names" value="选择1">选择3</p>
- flask
datas = request.values.getlist("checkbox_names")
3.3 分级选择
参考:https://www.cnblogs.com/kaituorensheng/p/4529113.html
<html>

<head>

<meta http-equiv="Content-Type" content="text/html; charset=utf-8" />

<script>

function allSelect(check_v, checkname)

{

    var v_item = document.getElementsByName(check_v);

    var items = document.getElementsByName(checkname);

    for (var i = 0; i < items.length; ++i)

    {

        if (v_item[0].checked)

        {

            items[i].checked = true;

        }

        else

        {

            items[i].checked = false;

        }

    }

}

function singleSelect2parent(check_v, checkname)

{

    var v_item = document.getElementsByName(check_v);

    var items = document.getElementsByName(checkname);

    var childStatus = true;

    for (var i = 0; i < items.length; ++i)

    {

        childStatus = (childStatus && items[i].checked);

    }

    if (childStatus)

    {

        v_item[0].checked = true;

    }

    else

    {

        v_item[0].checked = false;

    }

}

</script>

</head>

<body>

<p> <input type="checkbox" checked name="checkbox_v1" value="version1" onclick="allSelect('checkbox_v1', 'checkbox1')">默认全选</p>

<ul>

    <p> <input type="checkbox" checked name="checkbox1" value="layer1" onclick="singleSelect2parent('checkbox_v1', 'checkbox1')">tiger_roads</p>

    <p> <input type="checkbox" checked name="checkbox1" value="layer2" onclick="singleSelect2parent('checkbox_v1', 'checkbox1')">poly_landmarks</p>

    <p> <input type="checkbox" checked name="checkbox1" value="layer3" onclick="singleSelect2parent('checkbox_v1', 'checkbox1')">poi</p>

</ul>

<p> <input type="checkbox" name="checkbox_v2" value="version2" onclick="allSelect('checkbox_v2', 'checkbox2')">默认全不选</p>

<ul>

    <p> <input type="checkbox" name="checkbox2" value="layer1" onclick="singleSelect2parent('checkbox_v2', 'checkbox2')" >tiger_roads</p>

    <p> <input type="checkbox" name="checkbox2" value="layer2" onclick="singleSelect2parent('checkbox_v2', 'checkbox2')">poly_landmarks</p>

    <p> <input type="checkbox" name="checkbox2" value="layer3" onclick="singleSelect2parent('checkbox_v2', 'checkbox2')">poi</p>

</ul>

</body>

</html>
4 总结
(1) 数据获取使用request请求,常用数据格式有json,form,file及地址栏的get请求数据;
(2) form及json数据请求方式均有两种,如request.json.get(),request.json[];
(3) 获取文件数据,可通过filename属性获取文件名,save属性进行保存;
(4) 地址栏可直接写入数据,需在route的方法内使用格式为:<type:args>如<int:id>,<string:name>等;
(5) 通过判断输入数据的格式,提供不同类型的输入;
[参考文献]
[1]https://www.jianshu.com/p/ecd97b1c21c1
[2]https://blog.csdn.net/p571912102/article/details/80526634
[3]https://www.cnblogs.com/kaituorensheng/p/4529113.html
[4]https://blog.csdn.net/kuangshp128/article/details/68926902
flask的post,get请求及获取不同格式的参数的更多相关文章
- flask get和post请求使用
直接看代码 #-*-coding:utf-8-*- from flask import Flask,url_for,redirect,render_template,request app = Fla ...
- flask源码剖析--请求流程
想了解这篇里面的内容,请先去了解我另外一篇博客Flask上下文 在了解flask之前,我们需要了解两个小知识点 偏函数 import functools def func(a1,a2): print( ...
- 浅谈flask源码之请求过程
更新时间:2018年07月26日 09:51:36 作者:Dear. 我要评论 这篇文章主要介绍了浅谈flask源码之请求过程,小编觉得挺不错的,现在分享给大家,也给大家做个参考.一起跟随 ...
- Java发送Http请求并获取状态码
通过Java发送url请求,查看该url是否有效,这时我们可以通过获取状态码来判断. try { URL u = new URL("http://10.1.2.8:8080/fqz/page ...
- 速战速决 (6) - PHP: 获取 http 请求数据, 获取 get 数据 和 post 数据, json 字符串与对象之间的相互转换
[源码下载] 速战速决 (6) - PHP: 获取 http 请求数据, 获取 get 数据 和 post 数据, json 字符串与对象之间的相互转换 作者:webabcd 介绍速战速决 之 PHP ...
- PHP模拟POST请求,获取response内容
/* * 模拟POST请求,获取response内容 */ protected function curl($url, $type, $header, $data) { $CURL_OPTS = ar ...
- Java爬虫(一)利用GET和POST发送请求,获取服务器返回信息
本人所使用软件 eclipse fiddle UC浏览器 分析请求信息 以知乎(https://www.zhihu.com)为例,模拟登陆请求,获取登陆后首页,首先就是分析请求信息. 用UC浏览器F1 ...
- php curl请求和获取接口数据
curl请求和获取接口数据 class ToolModel{ /** * [http 调用接口函数] * @Author GeorgeHao * @param string $url [接口地址] * ...
- Python Socket请求网站获取数据
Python Socket请求网站获取数据 ---阻塞 I/O ->收快递,快递如果不到,就干不了其他的活 ---非阻塞I/0 ->收快递,不断的去问,有没有送到,有没有送到,. ...
随机推荐
- InnoDB引擎中的索引与算法9
5.1 InnoDB支持以下几种常见的索引: B+树索引 全文索引 哈希索引(自适应哈希索引) 关于哈希索引的说明: -- 1.InnoDB的哈希索引是自适应的,其根据表的使用情况自动生成哈希索引,不 ...
- 【Leetcode】【中等】【36. 有效的数独】【JavaScript】
题目描述 36. 有效的数独 判断一个 9x9 的数独是否有效.只需要根据以下规则,验证已经填入的数字是否有效即可. 数字 1-9 在每一行只能出现一次.数字 1-9 在每一列只能出现一次.数字 1- ...
- ZZNUOJ-2154:单身狗线下聚会【求N个数的最小公倍数,会超longlong,大数乘法,Java】
2154: 单身狗线下聚会 题目描述 马上就到七夕节了,单身狗们决定聚一聚.但是它们沉迷B站上的lo娘,他们每沉迷 ai 单身狗时间(这是它们专业计时)后就会休息 单身狗时间.它们想找到一个时间正好他 ...
- 0006SpringBoot中@Configuration与@Bean联合使用
需求:将某个普通类做为组件注册到容器中,可通过如下办法 1.定义HelloService类 package springboot_test.springboot_test.service; publi ...
- Python 字节码bytecode
字节码bytecode python把源码文件编译成字节码文件,存放在__pycahe子目录内,用.pyc结尾.之后如果不再修改源码文件,运行时则使用*.pyc文件编译成机器码,这样不但运行速度快,而 ...
- JVM之Java运行时数据区(线程共享区)
JVM运行时区域各线程共享的区域包括堆区和方法区. 堆区 堆区最最主要的功能是存储对象实例[上篇也提到过],因此Java垃圾回收的主要战场就是在堆区,因此也有称为GC堆区.如果堆区的内存不够会出现Ou ...
- python_tkinter弹出对话框1
tkinter提供了三个模块,可以创建弹出对话窗口:(使用必须单独导入模块) 1.messagebox 消息对话框 示例:askokcancel import tkinter # 导入消息对话框子模块 ...
- 6、组件注册-@Lazy-bean懒加载
6.组件注册-@Lazy-bean懒加载 懒加载:单实例bean,默认是在容器启动的时候创建对象:懒加载就是启动的是不创建,在第一次使用的时候再创建对象. @Lazy // 单实例下懒加载bean
- 使用docker配置gitlab服务器
下载gitlab镜像,导入 [root@gitlab ~]# docker load < gitlab_zh.tar 容器需要22端口,所以修改ssh的默认端口 [root@gitlab ~]# ...
- 五十三.Docker概述、部署Docker、Docker镜像、Docker基本命令
1.安装Docker 准备两台虚拟机,IP为192.168.1.10和192.168.1.20 安装docker-engine 和 docker-engine-selinux 关闭防火墙 **** ...