
Android_(控件)使用ListView显示Android系统中联系人信息
使用ListView显示手机中联系人的姓名和电话号码
父类布局activity_main.xml,子类布局line.xml(一个文件的单独存放)
运行截图:
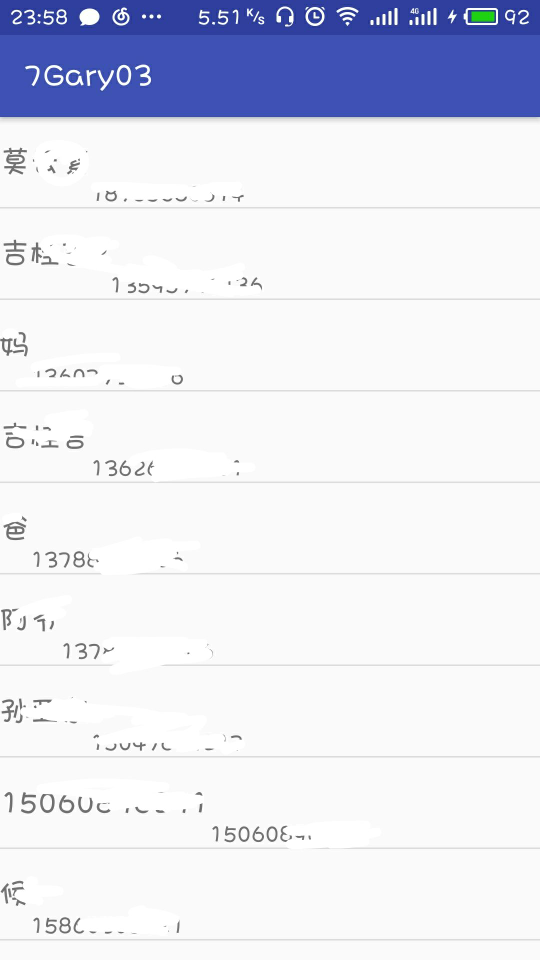
(避免泄露信息对部分地方进行了涂鸦O(∩_∩)O!)
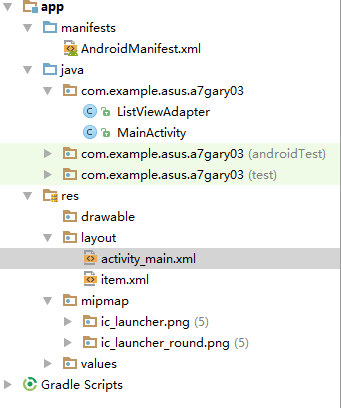
程序结构
<?xml version="1.0" encoding="utf-8"?>

<manifest xmlns:android="http://schemas.android.com/apk/res/android"

    package="com.example.asus.a7gary03">

    <!-- 读取通讯录权限 -->

    <uses-permission android:name="android.permission.READ_CONTACTS" />

    <application

        android:allowBackup="true"

        android:icon="@mipmap/ic_launcher"

        android:label="@string/app_name"

        android:roundIcon="@mipmap/ic_launcher_round"

        android:supportsRtl="true"

        android:theme="@style/AppTheme">

        <activity android:name=".MainActivity">

            <intent-filter>

                <action android:name="android.intent.action.MAIN" />

                <category android:name="android.intent.category.LAUNCHER" />

            </intent-filter>

        </activity>

    </application>

</manifest>
AndroidManifest.xml
package com.example.asus.a7gary03;

import android.support.v7.app.AppCompatActivity;

import android.database.Cursor;

import android.os.Bundle;

import android.provider.ContactsContract;

import android.widget.ListView;

import java.util.ArrayList;

import java.util.List;

public class MainActivity extends AppCompatActivity {

    ListView lv;

    List<String> list_phone, list_name;

    @Override

    protected void onCreate(Bundle savedInstanceState) {

        super.onCreate(savedInstanceState);

        setContentView(R.layout.activity_main);

        lv = (ListView) findViewById(R.id.lv);

        list_name = new ArrayList<String>();

        list_phone = new ArrayList<String>();

        Cursor c = getContentResolver().query(

                ContactsContract.CommonDataKinds.Phone.CONTENT_URI, null, null,

                null, null);

        //获取通讯录的信息

        startManagingCursor(c);

        int phoneIndex = 0, nameIndex = 0;

        if (c.getCount() > 0) {

            phoneIndex = c

                    .getColumnIndex(ContactsContract.CommonDataKinds.Phone.NUMBER);

            // 获取手机号码的列名

            nameIndex = c

                    .getColumnIndex(ContactsContract.CommonDataKinds.Phone.DISPLAY_NAME);

            // 获取用户名的列名

        }

        while (c.moveToNext()) {

            String phone = c.getString(phoneIndex);

            // 获取手机号码

            list_phone.add(phone);

            String name = c.getString(nameIndex);

            // 获取用户名

            list_name.add(name);

        }

        ListViewAdapter adapter = new ListViewAdapter(this, list_name,

                list_phone);

        lv.setAdapter(adapter);

    }

}
MainActivity
package com.example.asus.a7gary03;

/**

 * Created by ASUS on 2018/5/24.

 */

import java.util.List;

import android.annotation.SuppressLint;

import android.content.Context;

import android.view.LayoutInflater;

import android.view.View;

import android.view.ViewGroup;

import android.widget.BaseAdapter;

import android.widget.TextView;

@SuppressLint("InflateParams")

public class ListViewAdapter extends BaseAdapter {

    List<String> names, phones;

    LayoutInflater inflater;

    @SuppressWarnings("static-access")

    public ListViewAdapter(Context context, List<String> names,

                           List<String> phones) {

        inflater = inflater.from(context);

        this.names = names;

        this.phones = phones;

    }

    @Override

    public int getCount() {

        return names.size();

    }

    @Override

    public Object getItem(int position) {

        return position;

    }

    @Override

    public long getItemId(int position) {

        return position;

    }

    @Override

    public View getView(int position, View convertView, ViewGroup parent) {

        View view;

        if (convertView == null) {

            view = inflater.inflate(R.layout.item, null);

            TextView tv_name = (TextView) view.findViewById(R.id.tv_name);

            TextView tv_phone = (TextView) view.findViewById(R.id.tv_number);

            tv_name.setText(names.get(position));

            tv_phone.setText(phones.get(position));

        } else {

            view = convertView;

        }

        return view;

    }

}
ListViewAdapter
<?xml version="1.0" encoding="utf-8"?>

<RelativeLayout xmlns:android="http://schemas.android.com/apk/res/android"

    xmlns:app="http://schemas.android.com/apk/res-auto"

    xmlns:tools="http://schemas.android.com/tools"

    android:layout_width="match_parent"

    android:layout_height="match_parent"

    tools:context="com.example.asus.a7gary03.MainActivity">

    <ListView

        android:id="@+id/lv"

        android:layout_width="match_parent"

        android:layout_height="match_parent" >

    </ListView>

</RelativeLayout>
activity_main.xml
<?xml version="1.0" encoding="utf-8"?>

<LinearLayout xmlns:android="http://schemas.android.com/apk/res/android"

    android:layout_width="match_parent"

    android:layout_height="match_parent"

    android:orientation="vertical" >

    <LinearLayout

        android:layout_width="match_parent"

        android:layout_height="60sp"

        android:orientation="horizontal" >

        <TextView

            android:id="@+id/tv_name"

            android:layout_width="wrap_content"

            android:layout_height="wrap_content"

            android:layout_gravity="center_vertical"

            android:text="1111"

            android:textSize="20sp" />

        <TextView

            android:id="@+id/tv_number"

            android:layout_width="wrap_content"

            android:layout_height="wrap_content"

            android:layout_gravity="bottom"

            android:text="2222"

            android:textSize="15sp" />

    </LinearLayout>

</LinearLayout>
item.xml
一、获取手机存储卡权限
    读取通讯录权限
<uses-permission android:name="android.permission.READ_CONTACTS" />
二、界面布局
activity_main.xml布局中
TextView中显示手机联系人的的文本框,ListView列出手机中的联系人
item.xml布局中
两个TextView,一个显示联系人的姓名,一个显示联系人的电话号码
三、实现程序功能
1、获取手机电话号码和联系人信息
        Cursor c = getContentResolver().query(

                ContactsContract.CommonDataKinds.Phone.CONTENT_URI, null, null,

                null, null);

        //获取通讯录的信息

        startManagingCursor(c);

        int phoneIndex = 0, nameIndex = 0;

        if (c.getCount() > 0) {

            phoneIndex = c

                    .getColumnIndex(ContactsContract.CommonDataKinds.Phone.NUMBER);

            // 获取手机号码的列名

            nameIndex = c

                    .getColumnIndex(ContactsContract.CommonDataKinds.Phone.DISPLAY_NAME);

            // 获取用户名的列名

        }

        while (c.moveToNext()) {

            String phone = c.getString(phoneIndex);

            // 获取手机号码

            list_phone.add(phone);

            String name = c.getString(nameIndex);

            // 获取用户名

            list_name.add(name);

        }
Cursor:Android使用的数据库是SQLite数据库,对于数据库记录的操作,可以使用Cursor来进行 (传送门)
getColumnIndex(String columnName) -------->返回指定列的名称 ,如果不存在返回-1
Cursor c = getContentResolver.query(uri , String[ ] , where , String[ ] , sort);
这条语句相信大家一定经常看到用到,查看sdk帮助文档也很容易找到其中五个参数的意思
第一个参数:是一个URI,指向需要查询的表;
第二个参数:需要查询的列名,是一个数组,可以返回多个列;
第三个参数:需要查询的行,where表示需要满足的查询条件,where语句里面可以有?号;
第四个参数:是一个数组,用来替代上面where语句里面的问号;
第五个参数:表示排序方式;
public View getView(int position, View convertView, ViewGroup parent) {

        View view;

        if (convertView == null) {

            view = inflater.inflate(R.layout.item, null);

            TextView tv_name = (TextView) view.findViewById(R.id.tv_name);

            TextView tv_phone = (TextView) view.findViewById(R.id.tv_number);

            tv_name.setText(names.get(position));

            tv_phone.setText(phones.get(position));

        } else {

            view = convertView;

        }

        return view;

    }
LayoutInflater类的作用类似于findViewById()
不同点是LayoutInflater是用来找res/layout/下的xml布局文件,并且实例化
而findViewById()是找xml布局文件下的具体widget控件(如Button、TextView等)。
Android_(控件)使用ListView显示Android系统中联系人信息的更多相关文章
- Android_(控件)使用ListView显示Android系统中SD卡的文件列表
使用ListView显示Android SD卡中的文件列表 父类布局activity_main.xml,子类布局line.xml(一个文件的单独存放) 运行截图: 程序结构: <?xml ver ...
- Android_(控件)使用ListView显示Android系统SD卡的文件列表_02
使用ListView显示Android SD卡中的文件列表 父类布局activity_main.xml,子类布局item_filelayout(一个文件的单独存放) 运行截图: 程序结构 <?x ...
- 【实用篇】获取Android通讯录中联系人信息
第一步,在Main.xml布局文件中声明一个Button控件,布局文件代码如下: <LinearLayout xmlns:android="http://schemas.android ...
- 查看Android系统中硬件信息的文件
文件目录: 使用Linux命令,进入到/proc目录 进入/proc目录,可以查看内存信息(memoinfo)或CPU信息(cpuinfo),使用cat命令
- Android的WebView控件载入网页显示速度慢的究极解决方案
Android的WebView控件载入网页显示速度慢的究极解决方案 [转载来源自http://hi.baidu.com/goldchocobo/] 秒(甚至更多)时间才会显示出来.研究了很久,搜遍了国 ...
- XE6 FMX之控件绘制与显示
中午,有个货随手买的2块钱的彩票,尼玛中了540块,这是啥子狗屎气运.稍微吐槽一下,现在开始正规的笔记录入.经常有朋友说为毛我的博客不更新了或者说更新的少了,为啥呢!一来自己懒了,没学习什么新的东西, ...
- 与众不同 windows phone (52) - 8.1 新增控件: AutoSuggestBox, ListView, GridView, SemanticZoom
[源码下载] 与众不同 windows phone (52) - 8.1 新增控件: AutoSuggestBox, ListView, GridView, SemanticZoom 作者:webab ...
- 使用shape来定义控件的一些显示属性
Android中常常使用shape来定义控件的一些显示属性,今天看了一些shape的使用,对shape有了大体的了解,稍作总结 先看下面的代码: <shape> <!-- 实心 -- ...
- winform利用ImageList控件和ListView控件组合制作图片文件浏览器
winform利用ImageList控件和ListView控件组合制作图片文件浏览器,见图,比较简单,实现LISTVIEW显示文件夹图片功能. 1.选择文件夹功能代码: folderBrowserDi ...
随机推荐
- dgv数据绑定后,添加行遇到过的问题并解决
1. 当控件被数据绑定时,无法以编程方式向 DataGridView 的行集合中添加行 解决方法:((DataTable)Dgv.DataSource).Rows.Add("", ...
- shell、bash、terminal和kernel之间的关系
shell.bash.terminal和kernel之间的关系 本文是<鸟哥的Linux私房菜>的学习笔记 什么是kernel kernel的中文是"操作系统核心",主 ...
- O040、Migrate Instance 操作详解
参考https://www.cnblogs.com/CloudMan6/p/5538599.html Migrate 操作的作用是将instance 从当前的计算节点迁移到其他的计算节点上. ...
- visual studio2015 搭建pro*c开发编译环境
关于pro*c是什么,这里不做介绍,主要说明如何在vs2015里面开发pro*c程序,并编译exe执行文件 一.vs2015环境配置 1.新建一个空的vc++项目,如下图 2.右击项目属性,添加相关的 ...
- 斐波那契数列(js)
//斐波那契数列:后一个数等于前面两个数的和 //0,1,1,2,3,5,8,13,21.... let readline = require("readline-sync"); ...
- 1 asp.net 中如何把用户控件应用于母版页
1 创建用户控件 2 在母版页中注册用户控件 3 使用 <%@ Master Language="C#" AutoEventWireup="true" C ...
- Python自制小时钟,并转换为exe可执行程序详解
一,简介Python写完程序,要靠命令来执行太LOW,太低调了,还不华丽了. 再说别人的电脑,都没有Python库,怎么执行,还能不能愉快的一起玩耍了. 所以哪怕只会写一个HelloWorld,也要弄 ...
- docker 安装php
nginx :docker pull nginx docker run -p 80:80 --name nginx -v /usr/local/nginx/www:/www -v /usr/local ...
- mysql的锁机制,以及乐观锁,悲观锁,以及热点账户余额问题
mysql的简单锁机制. myisam 1.只支持表级锁,所以经常更新的表结构不适宜用. 2.select也会产生锁表 innodb 1.支持事务,行级锁,表级锁,执行行级锁的前提是sql语句的索引有 ...
- loadrunner执行场景时报Error -27040: Data Format Extension: Init: Internal error问题解决
[问题描述] 在loadrunner控制台执行场景时,所有用户均Failed,查看errors,错误原因如下: Error -27040: Data Format Extension: Init: I ...