python AI换脸 用普氏分析法(Procrustes Analysis)实现人脸对齐
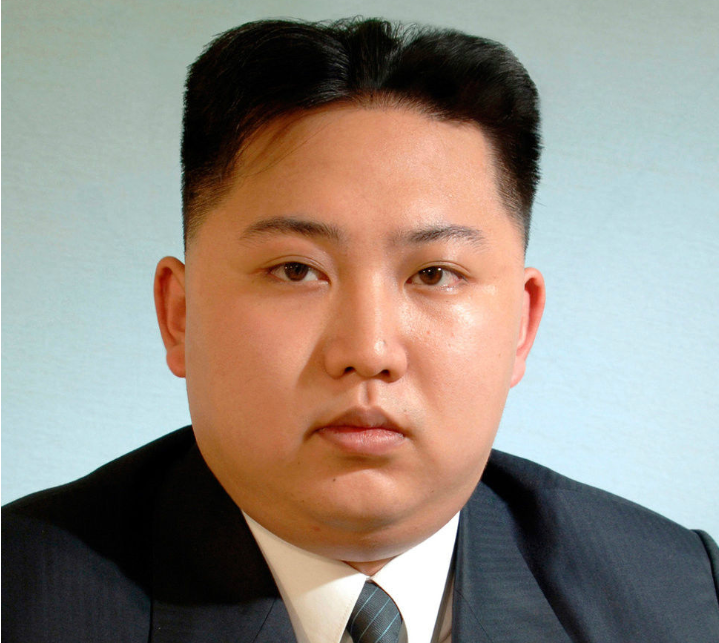
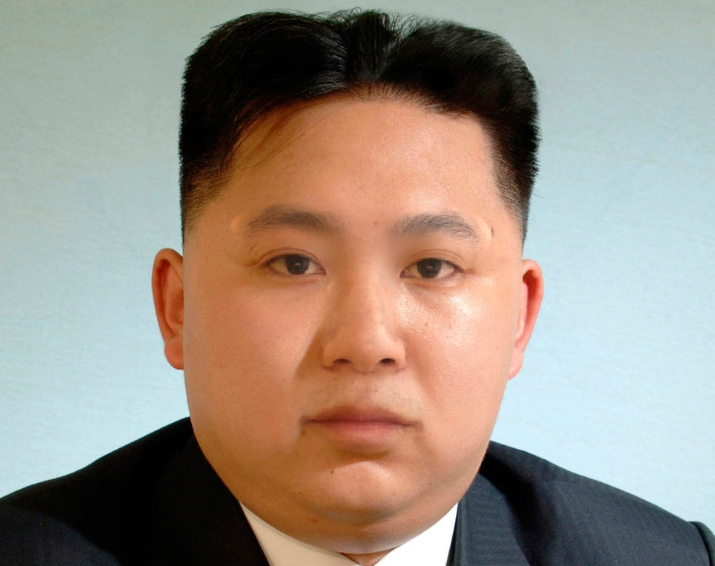
1、图片效果
2、原代码
# !/usr/bin/python

# -*- coding: utf-8 -*-

# Copyright (c) 2015 Matthew Earl

#

# Permission is hereby granted, free of charge, to any person obtaining a copy

# of this software and associated documentation files (the "Software"), to deal

# in the Software without restriction, including without limitation the rights

# to use, copy, modify, merge, publish, distribute, sublicense, and/or sell

# copies of the Software, and to permit persons to whom the Software is

# furnished to do so, subject to the following conditions:

#

#     The above copyright notice and this permission notice shall be included

#     in all copies or substantial portions of the Software.

#

#     THE SOFTWARE IS PROVIDED "AS IS", WITHOUT WARRANTY OF ANY KIND, EXPRESS

#     OR IMPLIED, INCLUDING BUT NOT LIMITED TO THE WARRANTIES OF

#     MERCHANTABILITY, FITNESS FOR A PARTICULAR PURPOSE AND NONINFRINGEMENT. IN

#     NO EVENT SHALL THE AUTHORS OR COPYRIGHT HOLDERS BE LIABLE FOR ANY CLAIM,

#     DAMAGES OR OTHER LIABILITY, WHETHER IN AN ACTION OF CONTRACT, TORT OR

#     OTHERWISE, ARISING FROM, OUT OF OR IN CONNECTION WITH THE SOFTWARE OR THE

#     USE OR OTHER DEALINGS IN THE SOFTWARE.

"""

This is the code behind the Switching Eds blog post:

    http://matthewearl.github.io/2015/07/28/switching-eds-with-python/

See the above for an explanation of the code below.

To run the script you'll need to install dlib (http://dlib.net) including its

Python bindings, and OpenCV. You'll also need to obtain the trained model from

sourceforge:

    http://sourceforge.net/projects/dclib/files/dlib/v18.10/shape_predictor_68_face_landmarks.dat.bz2

Unzip with `bunzip2` and change `PREDICTOR_PATH` to refer to this file. The

script is run like so:

    ./faceswap.py <head image> <face image>

If successful, a file `output.jpg` will be produced with the facial features

from `<head image>` replaced with the facial features from `<face image>`.

"""

import cv2

import dlib

import numpy

import sys

output = 'out3' # 输出图像名称

sys.argv = ["isWap_faces.py", "./facesImage/head1.jpg", "./facesImage/head.jpg"]

# PREDICTOR_PATH = "/home/matt/dlib-18.16/shape_predictor_68_face_landmarks.dat"

PREDICTOR_PATH = "./model/shape_predictor_68_face_landmarks.dat"

SCALE_FACTOR = 1

FEATHER_AMOUNT = 11

FACE_POINTS = list(range(17, 68))

MOUTH_POINTS = list(range(48, 61))

RIGHT_BROW_POINTS = list(range(17, 22))

LEFT_BROW_POINTS = list(range(22, 27))

RIGHT_EYE_POINTS = list(range(36, 42))

LEFT_EYE_POINTS = list(range(42, 48))

NOSE_POINTS = list(range(27, 35))

JAW_POINTS = list(range(0, 17))

# Points used to line up the images.

ALIGN_POINTS = (LEFT_BROW_POINTS + RIGHT_EYE_POINTS + LEFT_EYE_POINTS +

                RIGHT_BROW_POINTS + NOSE_POINTS + MOUTH_POINTS)

# Points from the second image to overlay on the first. The convex hull of each

# element will be overlaid.

OVERLAY_POINTS = [

    LEFT_EYE_POINTS + RIGHT_EYE_POINTS + LEFT_BROW_POINTS + RIGHT_BROW_POINTS,

    NOSE_POINTS + MOUTH_POINTS,

]

# Amount of blur to use during colour correction, as a fraction of the

# pupillary distance.

COLOUR_CORRECT_BLUR_FRAC = 0.4

detector = dlib.get_frontal_face_detector()

predictor = dlib.shape_predictor(PREDICTOR_PATH)

class TooManyFaces(Exception):

    pass

class NoFaces(Exception):

    pass

def get_landmarks(im):

    rects = detector(im, 1)

    if len(rects) > 1:

        raise TooManyFaces

    if len(rects) == 0:

        raise NoFaces

    return numpy.matrix([[p.x, p.y] for p in predictor(im, rects[0]).parts()])

def annotate_landmarks(im, landmarks):

    im = im.copy()

    for idx, point in enumerate(landmarks):

        pos = (point[0, 0], point[0, 1])

        cv2.putText(im, str(idx), pos,

                    fontFace=cv2.FONT_HERSHEY_SCRIPT_SIMPLEX,

                    fontScale=0.4,

                    color=(0, 0, 255))

        cv2.circle(im, pos, 3, color=(0, 255, 255))

    return im

def draw_convex_hull(im, points, color):

    points = cv2.convexHull(points)

    cv2.fillConvexPoly(im, points, color=color)

def get_face_mask(im, landmarks):

    im = numpy.zeros(im.shape[:2], dtype=numpy.float64)

    for group in OVERLAY_POINTS:

        draw_convex_hull(im,

                         landmarks[group],

                         color=1)

    im = numpy.array([im, im, im]).transpose((1, 2, 0))

    im = (cv2.GaussianBlur(im, (FEATHER_AMOUNT, FEATHER_AMOUNT), 0) > 0) * 1.0

    im = cv2.GaussianBlur(im, (FEATHER_AMOUNT, FEATHER_AMOUNT), 0)

    return im

def transformation_from_points(points1, points2):

    """

    Return an affine transformation [s * R | T] such that:

        sum ||s*R*p1,i + T - p2,i||^2

    is minimized.

    """

    # Solve the procrustes problem by subtracting centroids, scaling by the

    # standard deviation, and then using the SVD to calculate the rotation. See

    # the following for more details:

    #   https://en.wikipedia.org/wiki/Orthogonal_Procrustes_problem

    points1 = points1.astype(numpy.float64)

    points2 = points2.astype(numpy.float64)

    c1 = numpy.mean(points1, axis=0)

    c2 = numpy.mean(points2, axis=0)

    points1 -= c1

    points2 -= c2

    s1 = numpy.std(points1)

    s2 = numpy.std(points2)

    points1 /= s1

    points2 /= s2

    U, S, Vt = numpy.linalg.svd(points1.T * points2)

    # The R we seek is in fact the transpose of the one given by U * Vt. This

    # is because the above formulation assumes the matrix goes on the right

    # (with row vectors) where as our solution requires the matrix to be on the

    # left (with column vectors).

    R = (U * Vt).T

    return numpy.vstack([numpy.hstack(((s2 / s1) * R,

                                       c2.T - (s2 / s1) * R * c1.T)),

                         numpy.matrix([0., 0., 1.])])

def read_im_and_landmarks(fname):

    im = cv2.imread(fname, cv2.IMREAD_COLOR)

    im = cv2.resize(im, (im.shape[1] * SCALE_FACTOR,

                         im.shape[0] * SCALE_FACTOR))

    s = get_landmarks(im)

    return im, s

def warp_im(im, M, dshape):

    output_im = numpy.zeros(dshape, dtype=im.dtype)

    cv2.warpAffine(im,

                   M[:2],

                   (dshape[1], dshape[0]),

                   dst=output_im,

                   borderMode=cv2.BORDER_TRANSPARENT,

                   flags=cv2.WARP_INVERSE_MAP)

    return output_im

def correct_colours(im1, im2, landmarks1):

    blur_amount = COLOUR_CORRECT_BLUR_FRAC * numpy.linalg.norm(

        numpy.mean(landmarks1[LEFT_EYE_POINTS], axis=0) -

        numpy.mean(landmarks1[RIGHT_EYE_POINTS], axis=0))

    blur_amount = int(blur_amount)

    if blur_amount % 2 == 0:

        blur_amount += 1

    im1_blur = cv2.GaussianBlur(im1, (blur_amount, blur_amount), 0)

    im2_blur = cv2.GaussianBlur(im2, (blur_amount, blur_amount), 0)

    # Avoid divide-by-zero errors.

    im2_blur += (128 * (im2_blur <= 1.0)).astype(im2_blur.dtype)

    return (im2.astype(numpy.float64) * im1_blur.astype(numpy.float64) /

            im2_blur.astype(numpy.float64))

im1, landmarks1 = read_im_and_landmarks(sys.argv[1])

im2, landmarks2 = read_im_and_landmarks(sys.argv[2])

M = transformation_from_points(landmarks1[ALIGN_POINTS],

                               landmarks2[ALIGN_POINTS])

mask = get_face_mask(im2, landmarks2)

warped_mask = warp_im(mask, M, im1.shape)

combined_mask = numpy.max([get_face_mask(im1, landmarks1), warped_mask],

                          axis=0)

warped_im2 = warp_im(im2, M, im1.shape)

warped_corrected_im2 = correct_colours(im1, warped_im2, landmarks1)

output_im = im1 * (1.0 - combined_mask) + warped_corrected_im2 * combined_mask

cv2.imwrite('./outImage/{}.jpg'.format(output), output_im)
3、目录结构

python AI换脸 用普氏分析法(Procrustes Analysis)实现人脸对齐的更多相关文章
- Procrustes Analysis普氏分析法
选取N幅同类目标物体的二维图像,并用上一篇博文的方法标注轮廓点,这样就得到训练样本集: 由于图像中目标物体的形状和位置存在较大偏差,因此所得到的数据并不具有仿射不变性,需要对其进行归一化处理.这里采用 ...
- 帕累托分析法(Pareto Analysis)(柏拉图分析)
帕累托分析法(Pareto Analysis)(柏拉图分析) ABC分类法是由意大利经济学家帕雷托首创的.1879年,帕累托研究个人收入的分布状态图是地,发现少数人收入占全部人口收入的大部分,而多数人 ...
- 用200行Python代码“换脸”
介绍 本文将介绍如何编写一个只有200行的Python脚本,为两张肖像照上人物的“换脸”. 这个过程可分为四步: 检测面部标记. 旋转.缩放和转换第二张图像,使之与第一张图像相适应. 调整第二张图像的 ...
- 程序员体验AI换脸就不要用ZAO了,详解Github周冠军项目Faceswap的变脸攻略
本文链接:https://blog.csdn.net/BEYONDMA/article/details/100594136 上个月笔者曾在<银行家杂志>发文传统银行如何引领开放 ...
- python笔记之常用模块用法分析
python笔记之常用模块用法分析 内置模块(不用import就可以直接使用) 常用内置函数 help(obj) 在线帮助, obj可是任何类型 callable(obj) 查看一个obj是不是可以像 ...
- 2017人生总结(MECE分析法)
试着用MECE分析法对人生的整个规划做一下总结.作为技术人员,其实除了编码架构能力之外,分析问题的能力的重要程度也会随着职业发展越来越重要.<美团点评技术博客>说这几天要在黄金时段头版头条 ...
- 基于Python的信用评分卡模型分析(二)
上一篇文章基于Python的信用评分卡模型分析(一)已经介绍了信用评分卡模型的数据预处理.探索性数据分析.变量分箱和变量选择等.接下来我们将继续讨论信用评分卡的模型实现和分析,信用评分的方法和自动评分 ...
- 从Vehicle-ReId到AI换脸,应有尽有,解你所惑
最近在做视频搜索的技术调研,已经初步有了一些成果输出,算法准确性还可以接受,基本达到了调研的预期.现将该技术调研过程中涉及到的内容总结一篇文章分享出来,内容比较多,初看起来可能关系不大,但是如果接触面 ...
- TINY语言采用递归下降分析法编写语法分析程序
目录 自顶向下分析方法 TINY文法 消左提左.构造first follow 基本思想 python构造源码 运行结果 参考来源:聊聊编译原理(二) - 语法分析 自顶向下分析方法 自顶向下分析方法: ...
随机推荐
- 【Maven】-maven打包跳过javadoc
有时候由于代码中注释错误(比如方法参数)或者maven javadoc插件版本有问题,导致打包报错,而我们着急打包验证问题,没有时间一一修改错误,这时候可以先跳过生成javadoc,继续下一步工作. ...
- mysql简单用法
来源:http://hi.baidu.com/demon119/item/e4917f30b6482949023edc33 mysql 用法 #mysql -uroot -proot //可直接登录m ...
- BZOJ 4034 [HAOI2015]树上操作 线段树+树剖或dfs
题意 直接照搬原题面 有一棵点数为 N 的树,以点 1 为根,且树点有边权.然后有 M 个 操作,分为三种: 操作 1 :把某个节点 x 的点权增加 a . 操作 2 :把某个节点 x 为根的子树中所 ...
- 9030PCI CAN驱动开发点滴
1.配置EEPROM. 使用PlxMon打开9030,基本修改Spacex(0,1,2,3), Chip selectx(0,1,2,3), 中断状态INTCSR(0x74), 其他(0x78),详细 ...
- jeecg中自定义dialog,实现窗体的弹出
自定一个dialog,在子窗体中写一个方法,然后通过iframe进行调取function createwindowoktext(title, addurl,width,height,oktext,ca ...
- jmeter源代码开发环境构建
1.下载jmeter源码:http://jmeter.apache.org/download_jmeter.cgi 2.新建-->java Project-->Next-->src- ...
- koa 项目实战(一)创建项目
1.安装模块 npm install koa koa-router --save npm install -g nodemon 2.入口文件 app.js const Koa = require('k ...
- intellij系列编辑器个性化注释说明(定义个人风格的todo)
有时候我们需要用于自己个性化的注释,不为装逼,只为能够快速找到自己的注释,自己的代码,不迷路... 废话少说,孩儿们看过来: 1.打开你的编辑器,打开setting,搜索TODO: 设置完点击保存去试 ...
- js闭包1
闭包是函数和声明该函数的词法环境的组合. function init() { var name = "Mozilla"; // name 是一个被 init 创建的局部变量 fun ...
- Ceph RBD 的实现原理与常规操作
目录 文章目录 目录 前文列表 RBD RBD Pool 的创建与删除 块设备的创建与删除 块设备的挂载与卸载 新建客户端 块设备的扩缩容 RBD 块设备的 Format 1 VS Format 2 ...